


|
|
EGS002 |
x 1 | |

|
HY1-5VPANASONIC ELECTRIC WORKS
|
x 1 | |
|
|
BC547(RANGE:420-800) |
x 1 | |
|
|
ERJ2RKF2200X220R『 』PANASONIC
|
x 1 | |
|
|
1N4007Diotec Semi
|
x 1 |

|
arduino IDEArduino
|
Make a 16-Channel Home IoT project using NodeMCU ESP32 WROOM Module
If you're looking to build a versatile IoT device capable of controlling up to 16 appliances or devices via your smartphone, then you're in the right place. In this tutorial, we’ll create a 16-channel relay module controlled using an ESP32 WROOM module and the RemoteXY platform. This setup is perfect for home automation projects. Let’s dive in!
What You’ll Need
Here is the list of components required for this project:
Hardware Components
- ESP32 WROOM Module (NodeMCU ESP32 development board)
- 5V 16-Channel Relay Module (16 relays)
- 16 x 1N4007 Diodes (for flyback protection)
- 16 x 330Ω Resistors (current-limiting resistors)
- 16 x BC547 Transistors (to drive the relays)
- 16 x AC Terminal Blocks (for load connections)
- Power Socket (5V DC power supply for the relays and ESP32)
- Jumper wires and connecting cables
- Breadboard or PCB (optional for prototyping)
Software Tools
- RemoteXY (for GUI design and app integration)
- Arduino IDE (for ESP32 programming)
- USB Cable (for uploading the code to the ESP32)
Step 1: Understanding the Circuit Design
In this setup:
- The ESP32 WROOM will control the relays through the BC547 transistors.
- Each relay will have its own protection circuit comprising a 1N4007 diode and 330Ω resistor.
- The ESP32 will connect to your smartphone via RemoteXY, allowing you to toggle the relays on or off.
- A 5V power supply will power both the relay board and ESP32.
Step 2: Design the Control Interface with RemoteXY
- Create an Account: Go to RemoteXY and sign up for free.
- Design the Interface:
- Choose the number of buttons (16, for each relay).
- Label each button (e.g., "Relay 1", "Relay 2").
- Arrange the buttons in a grid or list format for easy access.
- Save and download the generated code file for Arduino IDE.
Step 3: Build the Circuit
Circuit Connections
Relay Module:
- Connect the VCC of the relay module to the 5V power supply.
- Connect the GND of the relay module to the GND of the ESP32.
Transistor Circuit:
- Connect the collector of each BC547 transistor to the input pin of the corresponding relay.
- Connect the emitter to GND.
- Use a 330Ω resistor between the base of the BC547 and the GPIO pin of the ESP32.
Diodes:
- Place a 1N4007 diode parallel to each relay coil with the cathode connected to VCC and the anode to the collector of the transistor.
ESP32 Pins:
- Assign each GPIO pin of the ESP32 to control one relay (e.g., GPIO16, GPIO17, etc.).
Power Supply
Ensure the ESP32 and the relay board share a common GND for smooth operation.
Use a 5V DC power supply with enough current capacity to drive all relays simultaneously (around 2A is sufficient).
Step 4: Upload the Code
Install ESP32 Board Support:
Open the Arduino IDE.
Go to File > Preferences and add the following URL to the Additional Board Manager:
arduino
Copy code
https://dl.espressif.com/dl/package_esp32_index.json
Install the ESP32 board package from the Board Manager.
Include RemoteXY Library:
Add the library generated by the RemoteXY platform to the Arduino IDE.
Code Upload:
- Open the code file downloaded from RemoteXY.
- Modify it to match your GPIO pin assignments for the relays.
- Connect the ESP32 to your computer via USB and upload the code.
Step 5: Test and Control Your IoT Device
Install the RemoteXY App:
Download the RemoteXY app from the Google Play Store or Apple App Store.
Pair the app with your ESP32 (via WiFi or Bluetooth, depending on your setup).
Control Your Relays:
Open the app, and you should see the 16 buttons you designed.
Tapping a button will toggle the corresponding relay on or off, controlling the connected appliance.
Step 6: Integrate with Home Appliances
- Connect your home appliances to the AC terminal blocks of the relay module.
- Ensure proper insulation and safety precautions when dealing with AC mains.
Video Reference:
Conclusion
By following this tutorial, you’ve built a robust 16-channel IoT device using the ESP32 WROOM module and RemoteXY. This setup offers a flexible and scalable solution for home automation or industrial control systems. Feel free to customize the design to add more functionality, such as timers or sensors.

Make a 16-Channel Home IoT project using NodeMCU ESP32 WROOM Module
*PCBWay community is a sharing platform. We are not responsible for any design issues and parameter issues (board thickness, surface finish, etc.) you choose.


Raspberry Pi 5 7 Inch Touch Screen IPS 1024x600 HD LCD HDMI-compatible Display for RPI 4B 3B+ OPI 5 AIDA64 PC Secondary Screen(Without Speaker)
BUY NOW


- Comments(1)
- Likes(3)
 More by Estiak Khan
-
 ⚡ How to Make a DIY Spot Welding Machine at Home for 18650 Batteries | Full Circuit & Working
If you’re working on battery pack projects using 18650 lithium-ion cells, then you know how importan...
⚡ How to Make a DIY Spot Welding Machine at Home for 18650 Batteries | Full Circuit & Working
If you’re working on battery pack projects using 18650 lithium-ion cells, then you know how importan...
-
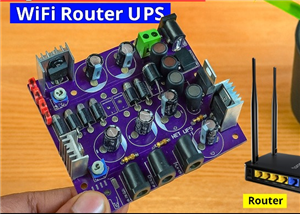
 🔋 How to Make a Simple DIY Wi-Fi Router UPS at Home | Step-by-Step Guide with Circuit & PCB
Do you lose internet connection every time the power goes out?If yes, then this simple DIY Wi-Fi Rou...
🔋 How to Make a Simple DIY Wi-Fi Router UPS at Home | Step-by-Step Guide with Circuit & PCB
Do you lose internet connection every time the power goes out?If yes, then this simple DIY Wi-Fi Rou...
-
 Automatic AC Changeover for Inverter
 – DIY Circuit GuideAre you tired of manually switching between ...
Automatic AC Changeover for Inverter
Automatic AC Changeover for Inverter – DIY Circuit GuideAre you tired of manually switching between ...
-
 How to Make a 12V AC/DC Fan Controller Module
If you're looking for an efficient way to control a 12V fan using either AC or DC input, this DIY pr...
How to Make a 12V AC/DC Fan Controller Module
If you're looking for an efficient way to control a 12V fan using either AC or DC input, this DIY pr...
-
 Autocut DC Mini IPS for DC 12V Load
If you are looking for a reliable Autocut DC Mini IPS for DC 12V ...
Autocut DC Mini IPS for DC 12V Load
Autocut DC Mini IPS for DC 12V LoadIf you are looking for a reliable Autocut DC Mini IPS for DC 12V ...
-
 Build a 12V Battery Autocut System with LCD Display
Are you looking for an efficient and affordable way to protect and monitor your 12V battery system? ...
Build a 12V Battery Autocut System with LCD Display
Are you looking for an efficient and affordable way to protect and monitor your 12V battery system? ...
-
 DIY Transistor Tester | Build Your Own LCR Meter at Home with Arduino Nano
Are you fascinated by electronics and want to create your own tools for testing components? Building...
DIY Transistor Tester | Build Your Own LCR Meter at Home with Arduino Nano
Are you fascinated by electronics and want to create your own tools for testing components? Building...
-
 How to Make a Pure Sine Wave Inverter Using EG8010 + IR2110S | Step-by-Step Guide
If you are looking ...
How to Make a Pure Sine Wave Inverter Using EG8010 + IR2110S | Step-by-Step Guide
How to Make a Pure Sine Wave Inverter Using EG8010 + IR2110S | Step-by-Step GuideIf you are looking ...
-
 🔋 How to Make DC Changeover for Automatic Inverter System | DIY Inverter Changeover Switch
Are you tired of manually switching between DC power supply and battery backup during load shedding?...
🔋 How to Make DC Changeover for Automatic Inverter System | DIY Inverter Changeover Switch
Are you tired of manually switching between DC power supply and battery backup during load shedding?...
-
 No Need Adapter 🤔 WiFi Router UPS Making with Transformer
No Need Adapter WiFi Router UPS Making with Transformer | Complete Circuit DiagramAre you tired of ...
No Need Adapter 🤔 WiFi Router UPS Making with Transformer
No Need Adapter WiFi Router UPS Making with Transformer | Complete Circuit DiagramAre you tired of ...
-
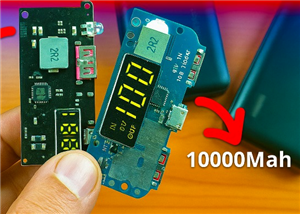 🔋 How to Make a Power Bank Module at Home
Are you looking to build your own DIY power bank at home? In this blog post, we’ll show you how to c...
🔋 How to Make a Power Bank Module at Home
Are you looking to build your own DIY power bank at home? In this blog post, we’ll show you how to c...
-
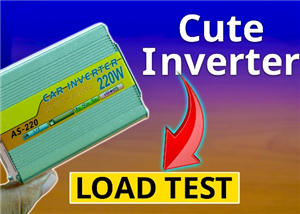 Cute LIT 220W Inverter Load Test ⚡ Auto Changeover IPS System Explained! 🔋 Real Load Backup Test
Are you looking for a reliable backup power solution for your WiFi router, CCTV, or small appliances...
Cute LIT 220W Inverter Load Test ⚡ Auto Changeover IPS System Explained! 🔋 Real Load Backup Test
Are you looking for a reliable backup power solution for your WiFi router, CCTV, or small appliances...
-
 ⚡ Hybrid WiFi Router UPS for Solar System
IntroductionPower cuts in off-grid areas can disrupt internet connectivity. With the rise of solar s...
⚡ Hybrid WiFi Router UPS for Solar System
IntroductionPower cuts in off-grid areas can disrupt internet connectivity. With the rise of solar s...
-
 🔋 DIY Solar-Based Mini IPS at Home | Auto Load Changeover Circuit for 12V DC Fan/Light
If you're looking for an easy and affordable solution to keep your 12V DC fan or light running even ...
🔋 DIY Solar-Based Mini IPS at Home | Auto Load Changeover Circuit for 12V DC Fan/Light
If you're looking for an easy and affordable solution to keep your 12V DC fan or light running even ...
-
 🔋 DIY Automatic Cut Off 12V Trickle Charger | Lead Acid Battery AutoCut Charger
Do you often charge your 12V lead-acid battery manually and worry about overcharging? With this DIY ...
🔋 DIY Automatic Cut Off 12V Trickle Charger | Lead Acid Battery AutoCut Charger
Do you often charge your 12V lead-acid battery manually and worry about overcharging? With this DIY ...
-
 🔥 DIY Smart 12V Battery at Home | Using 18650 Cells + Smart BMS
Looking for a way to build a powerful and smart 12V battery at home? In this guide, I'll show you h...
🔥 DIY Smart 12V Battery at Home | Using 18650 Cells + Smart BMS
Looking for a way to build a powerful and smart 12V battery at home? In this guide, I'll show you h...
-
 🎮 DIY Arduino Nano Snake Game Console with OLED Display
DIY Arduino Nano Snake Game Console with OLED Display and ButtonsDo you love retro games? Want to bu...
🎮 DIY Arduino Nano Snake Game Console with OLED Display
DIY Arduino Nano Snake Game Console with OLED Display and ButtonsDo you love retro games? Want to bu...
-
 DIY 150W IPS Making At Home with Auto Changeover System | Mini IPS 2025
How to Make an Automatic 150W IPS Using Two Circuit ModulesAre you looking for a reliable and effici...
DIY 150W IPS Making At Home with Auto Changeover System | Mini IPS 2025
How to Make an Automatic 150W IPS Using Two Circuit ModulesAre you looking for a reliable and effici...
-
-
-
-
ARPS-2 – Arduino-Compatible Robot Project Shield for Arduino UNO
2633 0 5 -
A Compact Charging Breakout Board For Waveshare ESP32-C3
3113 3 8 -
AI-driven LoRa & LLM-enabled Kiosk & Food Delivery System
3347 2 1 -
-
-


