


 Bottom
 Top
Top


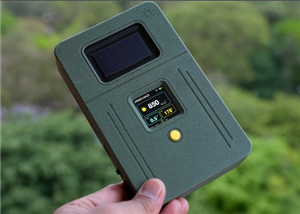
Solar Powered WiFi Weather Station V2.0
This project is a continuation of my earlier weather station project. It was quite popular on the web, people around the globe made their own by following it and give valuable feedback for improvement. By taking consideration of the comments and Q&A section of my earlier project, I decided to make this new version Weather Station. I also made a custom PCB for this project, so anyone with little knowledge on electronics circuit can be made this project. My V-2.0 PCB can also be used for many application in Arduino platform. Following are the salient features of the new weather station.
Features:
1. Connect to Wi-Fi, and upload the data to the web ( Blynk App and Thingspeak)
2. Monitoring Weather parameters like Temperature, Pressure, Humidity, altitude and UV level etc.
3. Extra ports to add more sensors
4. Remote Battery Status Monitoring
5. Uses a powerful Li-Ion Battery ( 3400 mAh ) and Solar Panel (1W)
6. Independence from the external power source
7.Can be installed in remote sites or geographically challenging environments
8. Being Solar powered, it is an environment-friendly device.
Buy PCB :
You can buy the PCB and all the components in a single Kit from PCBWay
Note:Battery and 3D printed enclosure is not included in the kit
Components Used :
1. Wemos D1 Mini Pro (Banggood / Amazon )
2. TP 4056 Charging Board ( Amazon )
3. BME 280 sensor ( Amazon / Bangood )
4. BMP280 ( Banggood / Amazon )
5. DS18B20 Sensor ( Amazon )
6. Switch (Amazon)
7. Screw Terminals ( Banggood)
8. PCB standoffs ( Amazon )
9. 18650 Battery ( Amazon)
10.18650 Battery Holder ( Banggood / Amazon)
11. Solar Panel ( Banggood )
12. Straight Headers Pin ( Amazon )
13. 22 AWG wire ( Amazon )
14. Super Glue ( Amazon )
15. 3D printing filament -PLA ( GearBest )
Power Supply

My plan is to deploy the Weather station at a remote place ( my farmhouse).To run the Weather Station continuously, there must be a continuous power supply otherwise the system will not work. The best way to provide continuous power to the circuit is by using a battery. But after some days the battery juice will run out, and it is a really difficult job to go there and charge it. So a solar charging circuit was proposed to user free energy from the sun to charge the batteries and to power the Wemos board. I have used a 18650 Li-Ion battery.
The battery is charged from a Solar panel through a TP4056 charging module. The TP4056 module comes with battery protection chip or without the protection chip. I will recommend buying a module which has a battery protection chip included.
Monitoring Temperature and Humidity by BMP/E280

In the earlier days, weather parameters like ambient temperature, humidity, and barometric pressure were measured with separate analog instruments: thermometer, hygrometer, and barometer. But today the market is flooded with cheap and efficient digital sensors that can be used to measure a variety of environmental parameters. The best examples are sensors like DHT11, DHT 22, BMP180, BMP/E280, etc.
In this project, we will use BMP280 / BME280 sensor.
BMP 280 :
BMP280 is a sophisticated sensor that very accurately measures barometric pressure and temperature with reasonable accuracy. The BME280 is the next-generation of sensors from Bosch and is the upgrade to the BMP085/BMP180/BMP183 - with a low altitude noise of 0.25m and the same fast conversion time. The advantage of this sensor is that it can use either I2C or SPI for communication with the microcontroller. For simple easy wiring, I will suggest buying the I2C version board.
BME280 :
The new BME280 sensor, an environmental sensor with temperature, barometric pressure, and humidity. The BME280 is the next-generation of sensors from Bosch and is the upgrade to the BMP280. This precision sensor from Bosch is the best low-cost sensing solution for measuring humidity with ±3% accuracy, barometric pressure with ±1 hPa absolute accuracy, and temperature with ±1.0°C accuracy. It can be used in both I2C and SPI.
Note: BME280 can measure humidity but BMP280 can't. In the market, BMP280 is also available by the name of BME280. So be sure whether it is a BMP280 or BME280.
Additional Ports for More Sensors


The Weather Station V2.0 board have 5 additional ports to hook up more weather sensors. The following additional sensors can easily be hooked up :
1. GY-1145 Sensor: for measuring UV Index
The SI1145 is a sensor with a calibrated UV sensing element that can calculate the UV Index. It can communicate via I2C communication (address 0x60). You can hook up this sensor with I2C port in the board which is located just side to the power switch.
You can read this article to know more about this sensor.
2. HDC1080: for measuring temperature and humidity
The HDC1080 is a digital humidity sensor with an integrated temperature sensor that provides excellent measurement accuracy at very low power. It can also communicate via I2C communication.
You can read this article to know more about this sensor.
3. DS18B20: for measuring temperature
It can measure temperature with a minimal amount of hardware and wiring. These sensors use a digital protocol to send accurate temperature readings directly to your development board without the need of an analog to digital converter or other extra hardware. It uses a one-wire protocol to communicate with the microcontroller. It can be hooked up in port-P2 in the board which is located on the right side of the Wemos board.
You can read this article to know more about this sensor.
Using an External Antenna ( 3dBi )


The Wemos D1 mini Pro board have an inbuilt ceramic antenna along with provision for connecting an external antenna to improve the range. Before using the external antenna, you have to reroute the antenna signal from the built-in ceramic antenna, to the external socket. This can be done by rotating the small surface mount (0603) Zero Ohm resistor (sometimes called a link).
You can see the above picture, how I have done this.
You can also watch this video made by Alex Eamesto to rotate the zero ohm resistor. Then snap the antenna SMA connector into the Wemos Pro mini antenna slot.
Monitoring Battery Voltage
The weather station is run by a 18650 Li-Ion battery, so it is very important to monitor its status. The max voltage input to the Wemos board is around 3.2~3.3V but a fully charged 18650 battery voltage is 4.2V. So to measure this voltage we have to step down the voltage by using a voltage divider network.
The Wemos D1 mini already has an internal voltage divider that connects the A0 pin to the ADC of the ESP8266 chip. The voltage divider is made up of 220k (R1) and 100k (R2). So, we have to add an external resistance with the inbuilt 220k resistor to read the battery voltage. By using a 100k resistance we can measure the max voltage of the battery, but taking some margin, a 220k resistor is selected. It is named R1 on the PCB board and located just above the battery holder.
To select the voltage divider resistance values, you can use this online calculator.
You can also read this article on battery voltage monitoring.
Implimenting Deep Sleep Mode

The heart of the Wemos Board used in our Weather Station is an ESP8266 SOC which is a power hungry chip. Our objective is to run the device by using a 18650 battery but the demand for power usually makes battery operation impractical.
Another problem is that as the device will run continuously, it is quite obvious that the device will experience warming, and therefore the measured temperature will be higher than the ambient temperature.
From the above, it is clear that we have to lower the power consumption of the ESP8266 WiFi chip. To do that, we’ll use the Deep Sleep mode which is the most power efficient option for ESP chip. It allows to put the ESP8266 into hibernation and saves the battery. You can wake up it at regular intervals to make measurements and publish them.
Component Operation mode ----- Sleep mode
1. ESP8266 170 mA -------- 10 uA
2. CH340 12 mA --------- 50 uA
3. Built-in LED 3 mA ----------- 0 uA
4. Voltage monitor 0.006 mA ----- 6 uA
-----------------------------------
Total185 mA ---- 66 uA
If the sleep-wake cycle is 10 minutes, with a 30 second wake time, the energy consumption budget looks like this:
Wake time 185 mA for 0.5 minutes = 92.5 mA-minutes
Sleep time 0.066 mA for 9.5 minutes = 0.627 mA-minutes
Total in 10 minutes = 93.13 mA-minutes
Thus the average current consumption is 9.3 mA.
Selecting the Solar Panel


From the previous step, it is concluded that the average current consumption is 9.3 mA
Charge required for running the device for the whole day = 9.3 mA x 24 Hours = 223.2 mAh
There is no current gain in the linear regulator used in the WeMos, so any current used at 3.3V results in the same current at 3.7V or whatever voltage the battery is at.
The amount of solar insolation varies according to which part of the globe you are located at. To find out the amount of solar insolation in your area, you can use the Global Solar Atlas. By taking consideration into minimum 1 hour of full sunlight, we are going to select the solar panel.
So, our target is to generate 223.2 mAh in 1 hour.
To charge a 3.7V Li-Ion battery, a solar panel of voltage 5 to 6V is adequate.
Required Solar Panel rating = 223.2 mA at a voltage of around 5 to 6 volts.
Solar panel rating = 223.2mA x 5V = 1.1W
Solar Panel Selected : 1W / 5V to 6V
In this project, I have used a 5V,200mA Solar Panel ( 99 x 69 mm)
So a 1W panel should be enough to run the project even in winter in places with a high latitude.
Note: If your location receiving ample amount of sunlight, then a 0.66W solar panel which I have used in my earlier version also work.
PCB Design


I have drawn the schematic by using EasyEDA online software after that switched to PCB layout.
All of the components you added in the schematic should be there, stacked on top of each other, ready to be placed and routed. Drag the components by grabbing on its pads. Then place it inside the rectangular border line.
Arrange all the components in such a way that the board occupies minimum space. Smaller the board size, cheaper will be the PCB manufacturing cost. It will be useful if this board has some mounting holes on it so that it can be mounted in an enclosure.
Now you have to route. Routing is the most fun part of this entire process. It’s like solving a puzzle! Using the tracking tool we need to connect all the components. You can use both the top and the bottom layer for avoiding overlap between two different tracks and making the tracks shorter.
You can use the Silk layer to add text to the board. Also, we are able to insert an image file, so I add an image on of my website logo to be printed on the board. At the end using the copper area tool, we need to create the ground area of the PCB.
Now the PCB is ready for manufacturing.
PCB Fabrication

Once we are completed the PCB design we just need to click the “Gerber output” button, save the project and we will be able to download the Gerber files which are used to manufacturing the PCB.
Assembling the PCB


After receiving the board from the PCB fab house, you have to solder the components.
For Soldering, you will need a decent Soldering Iron, Solder, Nipper.
First I cut the straight male and female headers pin for Wemos Board, TP4056, BMP/E 280 and for all the ports.
Following are the details about the headers :
1. Wemos Board - 2 x 8pins Female
2. BMP280 - 1 x 6pins Female
3. I2C Port - 1 x 4pins
4. Port P1 - 1 x 4pins
5. Port P2- 1 x 3pins
6. Port P3- 1 x 4pins
7. Port P4- 1 x 3 pins
It is good practice to solder the components according to their height. Solder the lesser height components first.
I have started by soldering the resistors, switch and then moved towards the bigger components like headers pin, screw terminal and battery holder.
Adding the Modules and Battery

After assembling the header pins, switch and screw terminal, it is time to insert the boards into their respective headers. The headers are clearly labeled on the PCB, so there is no chance of confusion.
First I place the TP4056 board and solder all the pads.
Then I added the Wemos Board and BME280 Sensor.
Finally, I inserted the 18650 battery into the battery holder.
Mounting the Standoffs


After adding all the parts, mount the standoffs at 4 corners. I used M3 Brass Hex Standoffs.
Use of standoffs will provide sufficient clearance to the soldering joints and wires from the ground.
3D Printed Enclosure


To give a nice commercial product look, I designed an enclosure for this project. I used Autodesk Fusion 360 to design the enclosure.
The enclosure has two parts:
1. Main Body
2. Cover Lid
The Main Body is basically designed to fit the Weather station V2.0 PCB (85mm* 83mm).
The Cover lid is to cover up the main body opening.
I used my Creality CR-10 printer and 1.75 mm green PLA filament to print the parts. It took me about 11 hours to print the main body and around 3 hours to print the top lid.
My settings are:
Print Speed : 60 mm/s
Layer Height: 0.2mm ( 0.3 also works well)
Fill Density: 25%
Extruder Temperature: 200 deg C
Bed Temp: 60 deg C
Download the STL files from Thingiverse
You can also have a look into the enclosure designed by 3KU_Delta.
Download the STL file of his design from Thingiverse
Put the PCB Inside the Enclosure


First, insert the M-F hex standoffs into the four mounting slots in the enclosure.
Then fix the PCB board over the standoffs by aligning its four screw holes at the corner.
After inserting the four standoffs, I have faced difficulty to fix the PCB due to small misalignment. So I am thinking to modify the mounting stand to fix the 3M screw directly instead of hex standoffs.
Installing the Components


After mounting the PCB, you have to install the BME280 module and Wemos board.
Then insert the jumper JP2.
Insert the SMA connector into the holes provided in the enclosure. Then tighten the nut along with the washers. Now install the antenna by properly aligning with the SMA connector.
At last, put the 18650 battery inside the battery holder. Make sure you have to insert with the right polarity. The polarity is marked in the battery holder, PCB as well as on the battery.
3D Printed Stevenson Screen


My enclosure design was a decent looking enclosure but it was not ideal for the weather station. The ideal enclosure for keeping the weather sensors is the Stevenson Screen. A Stevenson screen is an enclosure for weather sensors against rain and direct heat radiation from outside sources, while still allowing air to circulate freely around them.
The Stevenson Screen for Solar Weather Station V2 is designed by my friend Glen. This has a simple wall mount and a 2 part cover to isolate the heat transfer from the solar panel. I really appreciate his work.
You can download the .STL files from Thingiverse
You can watch the above video for 3D printed Stevenson Screen assembling.
Video Credit:digiblurDIY
TIP: Spray the fully assembled PCB with Lacquer Spray to protect the board and components, but you do need to put a little tape over the BME280 temp sensor hole to not block it.
Interfacing With Blynk App


Step-1: Download the Blynk app
1. For Android
2. For iPhone
Step-2: Get the Auth Token
In order to connect the Blynk App and your hardware, you need an Auth Token.
1. Create a new account in the Blynk App.
2. Press the QR icon on the top menu bar. Create a clone of this Project by scanning the QR code shown above. Once it detected successfully, the whole project will be on your phone immediately.
I've made Sol Weather Station app. You are welcome to try it out!
To start using it: 1. Download Blynk App: http://j.mp/blynk_Android or http://j.mp/blynk_iOS 2. Touch the QR-code icon and point the camera to the code below 3. Enjoy my app!
3. After the project was created, we will send you Auth Token over email.
4. Check your email inbox and find the Auth Token.
Step-3: Preparing Arduino IDE for Wemos Board
To upload the Arduino code to Wemos board, you have to follow this Instructables
Step-4: Arduino Sketch
After installing the above libraries, paste the Arduino code given below.
Enter the auth code from step-1,ssid, and password of your router.
Then upload the code.
Uploading Sensor Data to ThingSpeak


First, create an account on ThingSpeak.
Then create a new Channel on your ThingSpeak account.
Find How to Create a New Channel Fill Field 1 as Pressure, Field 2 as Temperature, Field 3 humidity, Field 4 as altitude and Field 5 as Bat Voltage.
In your ThingSpeak account select “Channel” and then “My Channel”.
Click on your channel name.
Click on “API Keys” tab and copy the “Write API Key”
Open the Solar_Weather_Station_ThingSpeak code.
Replace the “WRITE API ”with the copied “Write API Key”.
You can see my live feed.
Software and Libraries

To use Wemos D1 with the Arduino library, you'll have to use the Arduino IDE with ESP8266 board support. If you haven't already done that yet, you can easily install ESP8266 Board support to your Arduino IDE by following this tutorial by Sparkfun.
Following settings are preferable :
PU Frequency: 80MHz 160MHz
Flash Size: 4M (3M SPIFFS) – 3M File system size 4M (1M SPIFFS) – 1M File system size
Upload Speed: 921600 bps
Library
Before uploading the code install the following libraries :
1. ESP8266
2. BMP280
3. Blynk
You can read this tutorial by Sparkfun to install the Arduino libraries.
In my earlier version, there are two separate codes for Blynk and Thinspeak but in this version, we have written a single piece of code. The user has to only comment out a single line of code for Blynk or Thingspeak. For example, if you are using it for Blynk App, the code should be as below:
   const String App = "BLYNK";         //  alternative is line below
// const String App = "Thingspeak";    //  alternative is line above
Credit: I want to give a lot of credit to Keith Hungerford, who has guided me to make this project more powerful. The software library for BMP280 is also written by him. You can read his Instructable on BMP280 power saving mode.
Note: Before using the deep sleep feature, Wemos D0 pin must be connected to the RST pin. This can be done by shorting the jumper JP2.
Update : 15.05.2019
You can also see excellent work done by 3KUdelta on his GitHub Page. In his V2.3 code, he included the famous Zambretti forecaster. I really appreciate his hard work for the improvement of the project.
The software provides short term forecast in words (4-6 hours) using the famous Zambretti forecast model :
- 4-6 hour forecast in words
- Trend in words
- Temperature
- Dewpoint
- Heat Index
- Humidity
- Absolute Pressure
- Relative Pressure
- Battery Voltage (V)
Adding Wind Sensors


Update on 05.04.2020
For a weather station, it is very essential to monitor wind speed and direction. The wind speed is measured by anemometer and wind direction is by the wind vane. You can buy the sensors from Sparkfun or Amazon.
My friend honzek from the Czech republic hooked up the wind sensor in Weather Station PCB V2.0 to monitor the wind speed and direction. He also used the 3D printed Stevenson screen to keep the PCB and other sensors. The outcome of his project is extremely good, you can see the above picture.
I am sharing his work because it will be an inspiration for many more. I would like to give special thanks to honzek for sharing the pictures and Arduino Code.
You can also see the Arduino Code for his project, attached below.
More Information:
- Instructables : https://www.instructables.com/id/Solar-Powered-WiFi-Weather-Station-V20/
- My Website: Solar Powered WiFi Weather Station V2.0
3D Printed Enclosure :
- https://www.thingiverse.com/thing:3395393
- https://www.thingiverse.com/thing:3615016
- https://www.thingiverse.com/thing:3551386
Arduino Code:
https://learn.adafruit.com/adafruit-hdc1008-temperature-and-humidity-sensor-breakout/wiring-and-test
Solar Powered WiFi Weather Station V2.0
*PCBWay community is a sharing platform. We are not responsible for any design issues and parameter issues (board thickness, surface finish, etc.) you choose.


Raspberry Pi 5 7 Inch Touch Screen IPS 1024x600 HD LCD HDMI-compatible Display for RPI 4B 3B+ OPI 5 AIDA64 PC Secondary Screen(Without Speaker)
BUY NOW

- Comments(9)
- Likes(120)
- 72 USER VOTES
- YOUR VOTE 0.00 0.00

-
10design
-
9usability
-
10creativity
-
9content
-
3design
-
6usability
-
2creativity
-
4content
-
9design
-
10usability
-
7creativity
-
9content
-
10design
-
10usability
-
10creativity
-
10content
-
1design
-
2usability
-
3creativity
-
6content
-
10design
-
10usability
-
10creativity
-
10content
-
5design
-
1usability
-
4creativity
-
4content
-
1design
-
6usability
-
7creativity
-
9content
-
10design
-
10usability
-
9creativity
-
10content
-
9design
-
10usability
-
10creativity
-
9content
-
10design
-
9usability
-
9creativity
-
10content
-
10design
-
10usability
-
10creativity
-
10content

-
7design
-
7usability
-
6creativity
-
8content

-
9design
-
9usability
-
9creativity
-
10content
-
10design
-
10usability
-
10creativity
-
10content

-
9design
-
9usability
-
9creativity
-
9content

-
10design
-
10usability
-
10creativity
-
10content

-
6design
-
9usability
-
7creativity
-
5content
-
10design
-
10usability
-
10creativity
-
10content
-
10design
-
10usability
-
10creativity
-
9content
-
10design
-
10usability
-
10creativity
-
10content
-
10design
-
10usability
-
10creativity
-
10content
-
8design
-
8usability
-
7creativity
-
9content
-
10design
-
10usability
-
10creativity
-
10content
-
7design
-
8usability
-
8creativity
-
8content
-
10design
-
10usability
-
10creativity
-
10content
-
10design
-
10usability
-
10creativity
-
10content
-
9design
-
10usability
-
10creativity
-
9content

-
10design
-
10usability
-
7creativity
-
9content
-
10design
-
10usability
-
10creativity
-
10content
-
10design
-
10usability
-
10creativity
-
10content
-
10design
-
10usability
-
10creativity
-
10content
-
9design
-
9usability
-
10creativity
-
10content
-
10design
-
10usability
-
10creativity
-
10content
-
9design
-
9usability
-
9creativity
-
9content
-
10design
-
10usability
-
10creativity
-
10content
-
10design
-
8usability
-
10creativity
-
7content
-
10design
-
10usability
-
10creativity
-
10content

-
10design
-
10usability
-
10creativity
-
10content

-
4design
-
5usability
-
3creativity
-
6content

-
9design
-
9usability
-
8creativity
-
8content

-
7design
-
7usability
-
7creativity
-
7content
-
7design
-
7usability
-
7creativity
-
6content

-
4design
-
7usability
-
4creativity
-
7content

-
5design
-
5usability
-
5creativity
-
5content

-
9design
-
10usability
-
8creativity
-
8content

-
7design
-
8usability
-
8creativity
-
8content

-
9design
-
9usability
-
9creativity
-
10content
-
10design
-
10usability
-
10creativity
-
10content

-
10design
-
9usability
-
10creativity
-
10content

-
8design
-
9usability
-
9creativity
-
9content
-
1design
-
2usability
-
3creativity
-
4content

-
10design
-
10usability
-
10creativity
-
10content
-
10design
-
10usability
-
10creativity
-
10content
-
10design
-
10usability
-
10creativity
-
1content
-
10design
-
10usability
-
10creativity
-
10content
-
10design
-
10usability
-
10creativity
-
10content
-
2design
-
3usability
-
4creativity
-
6content
-
1design
-
2usability
-
1creativity
-
2content
-
10design
-
10usability
-
10creativity
-
10content
-
10design
-
10usability
-
10creativity
-
10content
-
10design
-
10usability
-
10creativity
-
10content
-
10design
-
10usability
-
10creativity
-
10content
-
10design
-
10usability
-
10creativity
-
10content
-
10design
-
10usability
-
10creativity
-
10content
-
9design
-
10usability
-
8creativity
-
9content
-
10design
-
10usability
-
9creativity
-
10content
-
9design
-
10usability
-
10creativity
-
10content
-
10design
-
10usability
-
10creativity
-
10content
-
10design
-
6usability
-
10creativity
-
10content
-
10design
-
10usability
-
10creativity
-
10content

-
10design
-
9usability
-
9creativity
-
10content
More by Open Green Energy
-
 DIY Smart Multipurpose Battery Tester
In recent years, the market has been flooded with low-cost batteries, many of which originate from u...
DIY Smart Multipurpose Battery Tester
In recent years, the market has been flooded with low-cost batteries, many of which originate from u...
-
 Solar Powered WiFi Weather Station V4.0
This is an affordable weather station for various applications like smart agriculture, smart city, s...
Solar Powered WiFi Weather Station V4.0
This is an affordable weather station for various applications like smart agriculture, smart city, s...
-
 DIY Solar Bottle Lamp V1.0
Solar Bottle Lamp is a solar-powered light that is constructed from waste plastic bottles. The desig...
DIY Solar Bottle Lamp V1.0
Solar Bottle Lamp is a solar-powered light that is constructed from waste plastic bottles. The desig...
-
 https://www.instructables.com/DIY-Solar-Power-Meter/
Accurate measurement of solar irradiance is one of the most critical steps in solar photovoltaic sys...
https://www.instructables.com/DIY-Solar-Power-Meter/
Accurate measurement of solar irradiance is one of the most critical steps in solar photovoltaic sys...
-
 DIY Solar Mason Jar Lamp
Making a solar mason Jar Lamp is not just a fun project; it’s also a fantastic way to learn about re...
DIY Solar Mason Jar Lamp
Making a solar mason Jar Lamp is not just a fun project; it’s also a fantastic way to learn about re...
-
 LED PCB for DIY Solar Bottle Lamp V2.0
DIY Solar Bottle Lamp V2.0 contains two PCBs, one is the Main PCB and the other is the LED PCB.This ...
LED PCB for DIY Solar Bottle Lamp V2.0
DIY Solar Bottle Lamp V2.0 contains two PCBs, one is the Main PCB and the other is the LED PCB.This ...
-
 DIY Portable Solar Generator V2
A DIY portable solar generator is an excellent project for individuals who want to harness the power...
DIY Portable Solar Generator V2
A DIY portable solar generator is an excellent project for individuals who want to harness the power...
-
 DIY 18650 Power Bank With Flashlight
BOM :Powerbank Module: https://s.click.aliexpress.com/e/_DBELYV918650 Battery: https://s.click.aliex...
DIY 18650 Power Bank With Flashlight
BOM :Powerbank Module: https://s.click.aliexpress.com/e/_DBELYV918650 Battery: https://s.click.aliex...
-
 Solar WiFi Weather Station V4 Receiver ( Rx )
Note:One more important thing, both the transmitter and receiver board must be in the same frequency...
Solar WiFi Weather Station V4 Receiver ( Rx )
Note:One more important thing, both the transmitter and receiver board must be in the same frequency...
-
 DIY Solar Panel Monitoring System – V2.0
As solar photovoltaic (PV) systems become increasingly popular as a clean and renewable source of en...
DIY Solar Panel Monitoring System – V2.0
As solar photovoltaic (PV) systems become increasingly popular as a clean and renewable source of en...
-
 Main PCB for DIY Solar Bottle Lamp V2.0
PCBWay Note: DIY Solar Bottle Lamp V2.0 contains two PCBs, one is the Main PCB and the other is the ...
Main PCB for DIY Solar Bottle Lamp V2.0
PCBWay Note: DIY Solar Bottle Lamp V2.0 contains two PCBs, one is the Main PCB and the other is the ...
-
 How to Make a 12V Lead Acid Battery Charger with CC & CV
I made a simple battery charger for charging my 12V/7Ah SLA battery commonly used inside the UPS for...
How to Make a 12V Lead Acid Battery Charger with CC & CV
I made a simple battery charger for charging my 12V/7Ah SLA battery commonly used inside the UPS for...
-
 TP4056 Based Solar Bottle Lamp
Solar Bottle Lamp is a solar-powered light that is constructed from waste plastic bottles. The desig...
TP4056 Based Solar Bottle Lamp
Solar Bottle Lamp is a solar-powered light that is constructed from waste plastic bottles. The desig...
-
 DIY Mini UPS for WiFi Router V5.0
The pandemic COVID-19 outbreak forced companies to continue with work-from-home policy to maintain s...
DIY Mini UPS for WiFi Router V5.0
The pandemic COVID-19 outbreak forced companies to continue with work-from-home policy to maintain s...
-
 ESP8266 Weather Widget V2.0
Welcome to my new Weather Widget Project. Earlier I have posted an article on the weather widget, th...
ESP8266 Weather Widget V2.0
Welcome to my new Weather Widget Project. Earlier I have posted an article on the weather widget, th...
-
 DIY Non Contact IR Thermometer V1.0
Currently, we are chasing an invisible monster named Corona Virus ( COVID-19 ) and we are going thro...
DIY Non Contact IR Thermometer V1.0
Currently, we are chasing an invisible monster named Corona Virus ( COVID-19 ) and we are going thro...
-
 Solar Powered WiFi Weather Station V3.0
Note: now the version is 3.2 This Weather Station is such compact weather station that consists of s...
Solar Powered WiFi Weather Station V3.0
Note: now the version is 3.2 This Weather Station is such compact weather station that consists of s...
-
 DIY Emergency Light
Features:● Long Battery Backup ( 6V / 4.5Ah )● Light can bе соnnесtеd tо the power source аll t?mе.●...
DIY Emergency Light
Features:● Long Battery Backup ( 6V / 4.5Ah )● Light can bе соnnесtеd tо the power source аll t?mе.●...
-
Programmable Mist Maker - XIAO / QT PY Extension
829 1 0 -
RadioHAT - Raspberry Pi radio development platform
667 0 2 -
-
-
-
-
ARPS-2 – Arduino-Compatible Robot Project Shield for Arduino UNO
3129 0 6 -
A Compact Charging Breakout Board For Waveshare ESP32-C3
3756 3 8 -
AI-driven LoRa & LLM-enabled Kiosk & Food Delivery System
4082 2 2


