


|
KiCad 9.0 |
|

|
PlatformIOPlatformIO Labs
|
|

|
Autodesk Fusion 360Autodesk
|
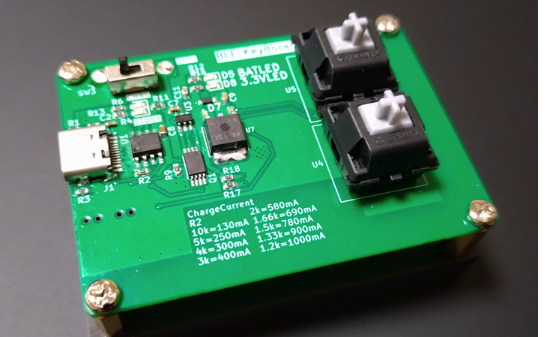
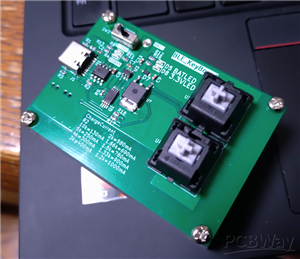
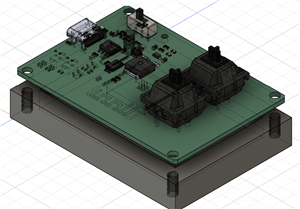
ESP32-C3 BLE Keyboard - Battery Powered with USB-C Charging
## Project Motivation
While working, I often needed a simple Bluetooth keyboard with customizable shortcut keys.
Instead of buying an expensive commercial product, I decided to create my own compact
2-key BLE keyboard using ESP32-C3.
## Key Features
This project successfully achieves the following:
✅ **2-Key Bluetooth HID Keyboard** - Works as a standard Bluetooth keyboard with any PC/Mac
✅ **Battery Powered** - Fully portable with integrated Li-ion battery support
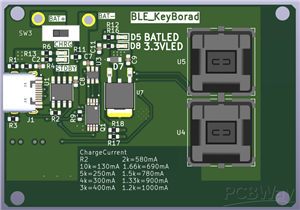
✅ **USB Type-C Charging** - Convenient charging with built-in charging circuit
✅ **Safe Operation** - Protection IC prevents overcurrent and overvoltage
✅ **Auto Programming** - No need to press BOOT/EN buttons during firmware upload
✅ **Compact Design** - Small PCB footprint, easy to carry
## Technical Details
### Power Management
- **Charging IC**: TP4056 with protection IC
- **Battery**: Single-cell Li-ion battery (3.7V)
- **Voltage Regulation**: Stable 3.3V output for ESP32-C3
- **USB Type-C**: Charging and power supply with proper CC pin configuration
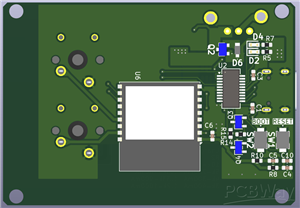
### Programming Interface
- **USB-UART Bridge**: FT231XS (or CH340/CP2102) for serial communication
- **Auto-Reset Circuit**: DTR/RTS controlled BOOT/EN pins for automatic programming
- **Manual Override**: Physical BOOT and EN buttons included for troubleshooting
### Bluetooth Operation
- **BLE HID Profile**: Standard Bluetooth Low Energy keyboard implementation
- **Key Assignment**: 2 programmable keys (fully customizable via firmware)
- **Low Power**: BLE enables extended battery life
- **Wide Compatibility**: Works with Windows, macOS, Linux, Android, iOS
## How It Works
1. **Connect via Bluetooth**: Pair with any device supporting BLE keyboards
2. **Assign Keys**: Program your preferred shortcuts (Enter, Space, Ctrl+C, etc.)
3. **Use Wirelessly**: Press keys to send commands to your computer
4. **Recharge Easily**: Plug in USB-C cable when battery runs low
## Use Cases
- Quick access to frequently used shortcuts during work
- Custom macro pad for video editing, CAD, or programming
- Minimalist desk setup with wireless control
- Educational project for learning ESP32 BLE programming
#include <Arduino.h>

/*
 * ESP32-C3 2キーBluetoothキーボード(セキュリティ設定修正版)
 * GPIO1: ENTERキー
 * GPIO3: スペースキー
 *
 * 必要なライブラリ:
 * - ESP32-BLE-Keyboard by T-vK
 *   Arduino IDEのライブラリマネージャーからインストール可能
 *
 * 配線:
 * - タクトスイッチ1の片側: GPIO1
 * - タクトスイッチ1のもう片側: GND
 * - タクトスイッチ2の片側: GPIO3
 * - タクトスイッチ2のもう片側: GND
 * - ESP32-C3の3V3とGNDに電源を供給
 */

#include <BleKeyboard.h>
#include <NimBLEDevice.h>

// ピン設定
const int BUTTON_ENTER_PIN = 1;  // ENTERキー用タクトスイッチ
const int BUTTON_SPACE_PIN = 3;  // スペースキー用タクトスイッチ

// チャタリング防止用の設定
const unsigned long DEBOUNCE_DELAY = 50;  // 50ミリ秒

// ENTER用のチャタリング管理
unsigned long lastDebounceTimeEnter = 0;
int lastButtonStateEnter = HIGH;
int buttonStateEnter = HIGH;

// スペース用のチャタリング管理
unsigned long lastDebounceTimeSpace = 0;
int lastButtonStateSpace = HIGH;
int buttonStateSpace = HIGH;

// BLEキーボードの初期化
BleKeyboard bleKeyboard("ESP32 Keyboard", "Espressif", 100);

void setup() {
  // シリアル通信の初期化(デバッグ用)
  Serial.begin(115200);
  delay(1000);
  Serial.println("ESP32-C3 2-Key BLE Keyboard Starting...");

  // ボタンピンの設定(内部プルアップ抵抗を有効化)
  pinMode(BUTTON_ENTER_PIN, INPUT_PULLUP);
  pinMode(BUTTON_SPACE_PIN, INPUT_PULLUP);

  // BLEセキュリティ設定を変更(ペアリング簡易化)
  Serial.println("Configuring BLE Security (No PIN required)...");

  // NimBLEのセキュリティ設定を変更
  NimBLEDevice::setSecurityAuth(false, false, true);  // bonding=false, mitm=false, sc=true
  NimBLEDevice::setSecurityIOCap(BLE_HS_IO_NO_INPUT_OUTPUT);  // PIN入力なし

  // BLEキーボードの開始
  Serial.println("Initializing BLE Keyboard...");
  bleKeyboard.begin();

  Serial.println("Ready! Waiting for Bluetooth connection...");
  Serial.println("Please pair from your device's Bluetooth settings.");
  Serial.println("No PIN required!");
}

void loop() {
  // BLE接続状態の確認
  if(bleKeyboard.isConnected()) {

    // ========== ENTERキーの処理 ==========
    int readingEnter = digitalRead(BUTTON_ENTER_PIN);

    if (readingEnter != lastButtonStateEnter) {
      lastDebounceTimeEnter = millis();
    }

    if ((millis() - lastDebounceTimeEnter) > DEBOUNCE_DELAY) {
      if (readingEnter != buttonStateEnter) {
        buttonStateEnter = readingEnter;

        if (buttonStateEnter == LOW) {
          Serial.println("ENTER key pressed!");
          bleKeyboard.write(KEY_RETURN);
          delay(100);
        }
      }
    }

    lastButtonStateEnter = readingEnter;

    // ========== スペースキーの処理 ==========
    int readingSpace = digitalRead(BUTTON_SPACE_PIN);

    if (readingSpace != lastButtonStateSpace) {
      lastDebounceTimeSpace = millis();
    }

    if ((millis() - lastDebounceTimeSpace) > DEBOUNCE_DELAY) {
      if (readingSpace != buttonStateSpace) {
        buttonStateSpace = readingSpace;

        if (buttonStateSpace == LOW) {
          Serial.println("SPACE key pressed!");
          bleKeyboard.write(' ');  // スペースキー
          delay(100);
        }
      }
    }

    lastButtonStateSpace = readingSpace;

  } else {
    // 接続待ち状態
    static unsigned long lastPrintTime = 0;
    if (millis() - lastPrintTime > 5000) {
      Serial.println("Waiting for Bluetooth connection...");
      lastPrintTime = millis();
    }
  }

  // CPU負荷を下げるための短い待機時間
  delay(10);
}
ESP32-C3 BLE Keyboard - Battery Powered with USB-C Charging
*PCBWay community is a sharing platform. We are not responsible for any design issues and parameter issues (board thickness, surface finish, etc.) you choose.


Raspberry Pi 5 7 Inch Touch Screen IPS 1024x600 HD LCD HDMI-compatible Display for RPI 4B 3B+ OPI 5 AIDA64 PC Secondary Screen(Without Speaker)
BUY NOW


- Comments(0)
- Likes(2)
More by KAZUMA KURATA
-
Programmable Mist Maker - XIAO / QT PY Extension
554 1 0 -
RadioHAT - Raspberry Pi radio development platform
438 0 1 -
-
-
-
-
ARPS-2 – Arduino-Compatible Robot Project Shield for Arduino UNO
2950 0 6 -
A Compact Charging Breakout Board For Waveshare ESP32-C3
3463 3 8 -
AI-driven LoRa & LLM-enabled Kiosk & Food Delivery System
3807 2 2


