


|
|
Android smartphone |
x 1 | |
|
|
Xinfrared P2 pro thermal camera |
x 1 |
|
|
P2 Pro Android app. |
InfiRay Xinfrared P2 pro thermal camera detailed Review
A thermal imager, also known as a thermal camera or infrared camera, is a device that captures and visualizes thermal or infrared radiation emitted by objects and surfaces. Today I received the package containing the thermal imager that I ordered some time ago. The model is InfiRay Xinfrared P2Pro + Macro Thermal Camera for Android Smartphones. The package is well packed and protected from damage and arrived here to Macedonia in less than a two weeks.

let's see what this sturdy and quality made box contains.
- a small IR imager module designed to connect to a smartphone, in my case an Android with a C-type connection, but there is also an iPhone option.
- magnetic macro lens for microscopic detail
- protective bag
- USB cable,
- and English instruction manual
First a few words in general about this kind of devices and their use:
In previous years, I have some experience with making thermal imagers using Arduino and an AMG8833 sensor with a resolution of 8x8 dots, as well as an MLEX90640 sensor with a resolution of 32x24 dots.

These resolutions are too small for any serious use, and may serve as demonstration devices for educational purposes. I think a usable resolution for practical work should be minimum 120 x 90 dots.
And now let's move on to the description and testing of this camera. At first glance, the device is solidly made and is incredibly compact, strong, and light, and it have Fully Metal Body. Its dimensions are 27mm×18mm×9.8mm, and weighs only 9g.

P2ProThermal Camera Imager is a high-tech product that supports android 9.0, IOS 13.0/iPhone11 and above.
Infrared sensor resolution of this camera is 256x192 /49,152 pixels, and fast frame rate of 25Hz. Just to mention that many manufacturers use a cheap marketing trick, showing in the characteristics the resolution of the Display on which the IR image is displayed, instead of the resolution of the IR camera sensor itself. The temperature range that can be measured is from -20 degrees Celsius to 600 degrees Celsius, and the accuracy is +/- 2%. This device is easy to use with mobile and no need extra battery. It is perfect for home inspections, missing insulation, floor heating, water pipe, facility maintenance, HVAC troubleshootingm, etc...
Now let's follow the operation of this camera in real conditions. First of all, in order to put it into operation, we need to download the appropriate software on the smartphone, in this case the P2Pro Application, which you can download for free from Google Play.

Next, we need to connect the camera to the USB port of the smartphone and with that the camera is ready to work.
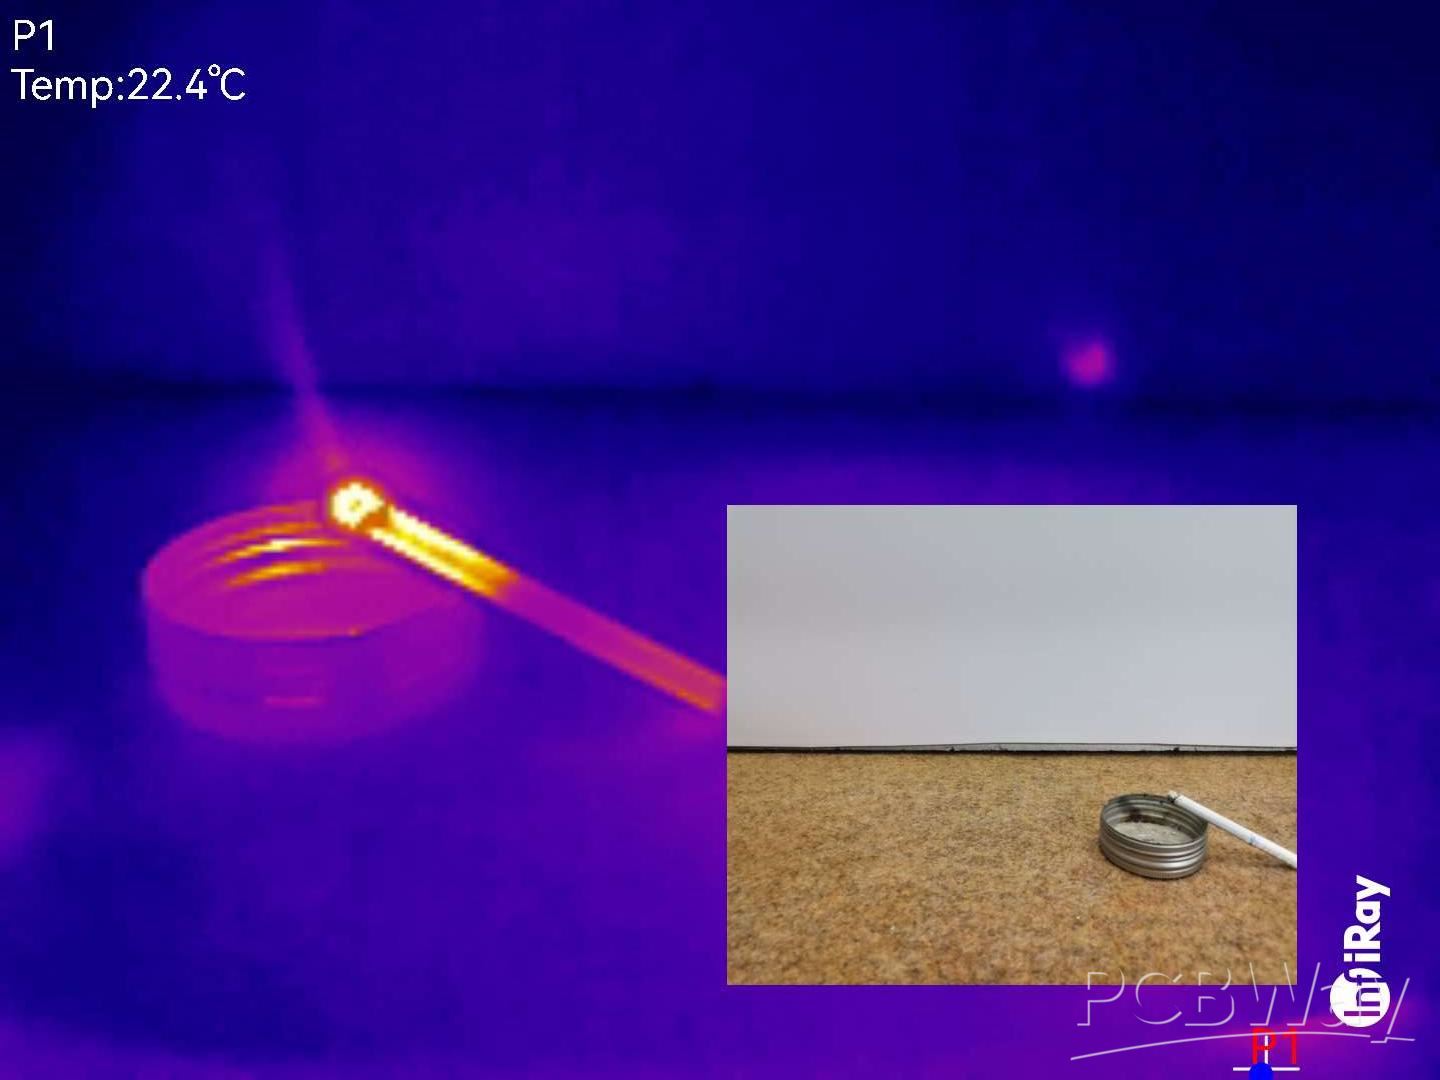
Now we start the P2Pro application and get the first thermal image, for example this is how cup of hot water and cigarrete looks like.

In the following, we will look at several interesting examples of objects and objects analyzed through thermal imaging. Some interesting options of this application are:
multiple color palettes, recording of thermal image and thermal video, image in image (thermal + real image), minimum and maximum temperature in a certain pre-defined area and other options.
In this way, we can perform a thermal analysis of residential buildings, where the areas where the most heat is lost during the winter can be clearly seen.

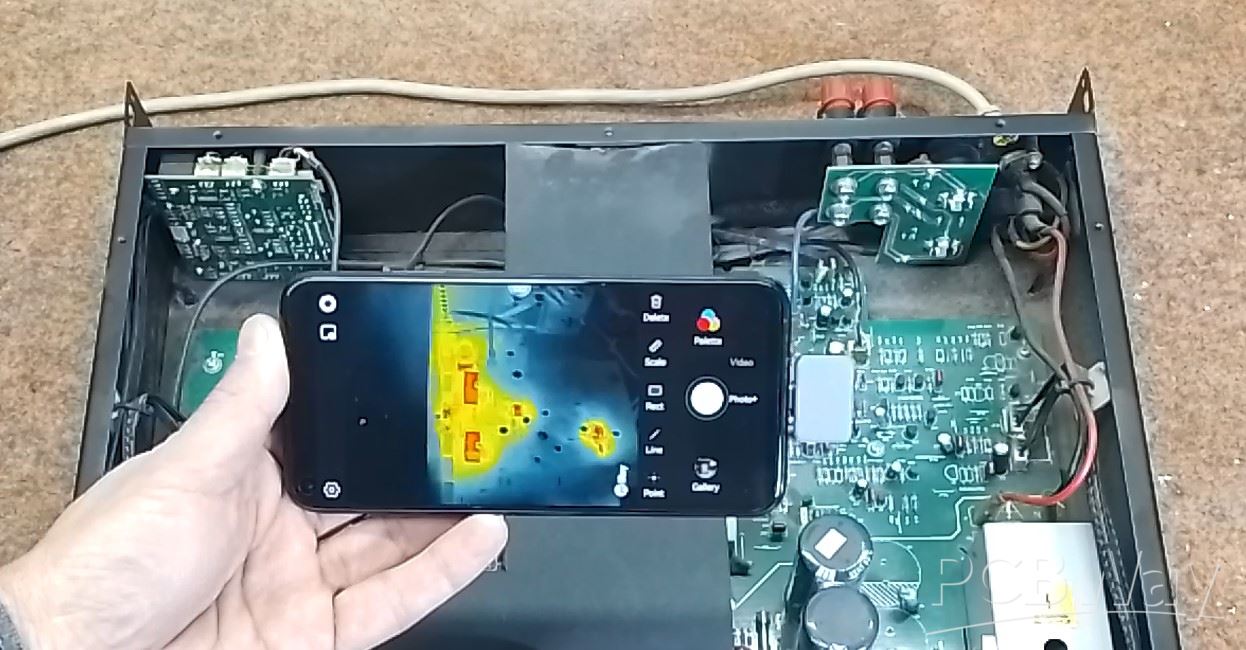
This camera is extremely useful in case of servicing electronic devices. These high-resolution images provide a comprehensive view of the thermal patterns within electronic components, making it easier to identify anomalies, hotspots, and potential failure points. Namely, most often the defective component in an electronic device has еxtremely high temperatures. Poor component vith PCB contacts can also be easily detected, as a higher temperature is generated here. Accurate temperature measurements are crucial for diagnosing overheating issues, optimizing device efficiency, and preventing premature failures. In the video I do a thermal analysis of the Audio Power Amplifier, development board, and ESP32 microcontroller.

Inclusion of a magnetic macro lens unlocks the ability to examine even the tiniest of details, down to 0.25mm electronic components.
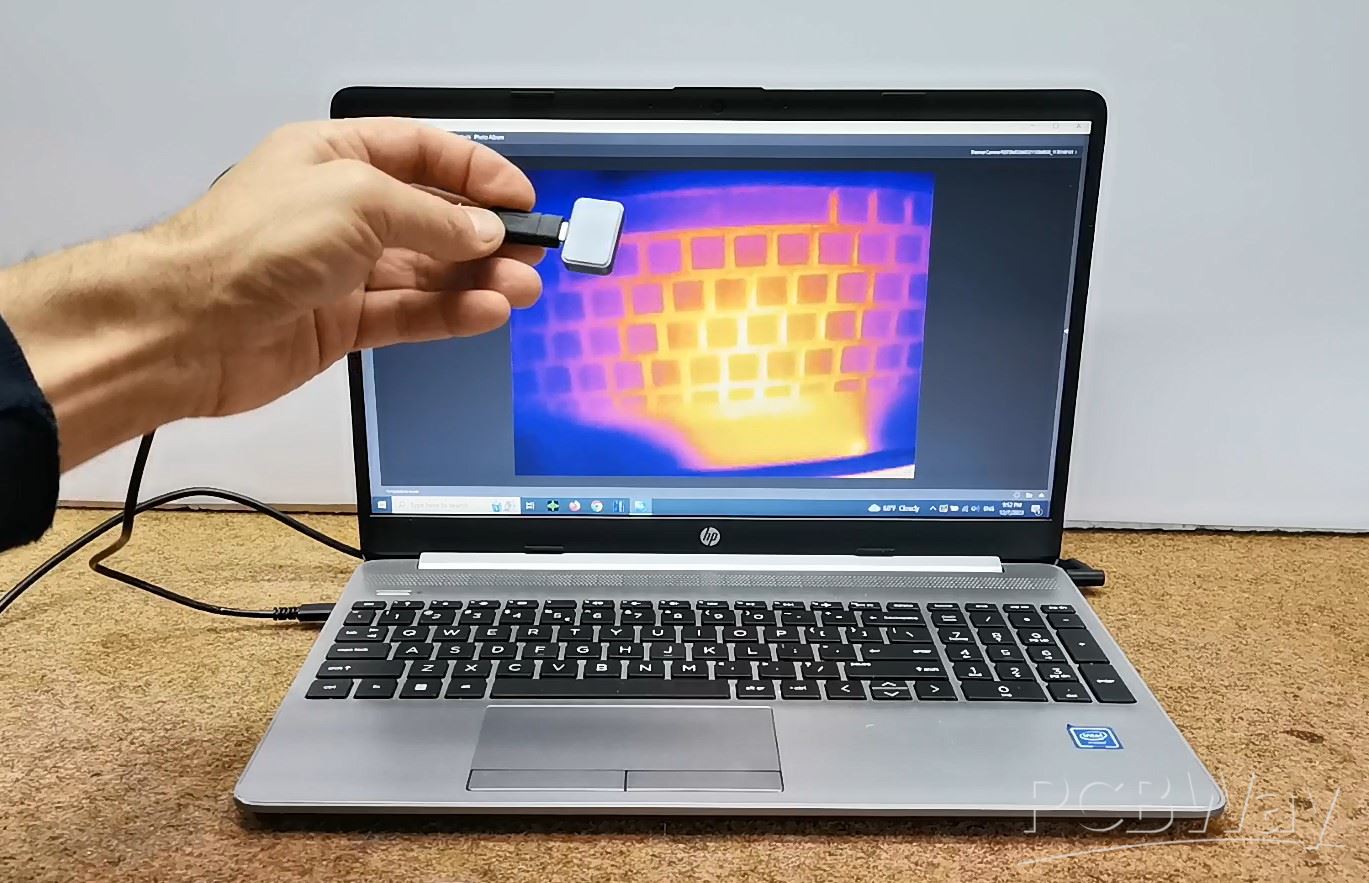
In addition to a smartphone, this camera can also be connected to a tablet with a large screen, which gives even greater visibility. This camera uses Tiny 1 Core so it can be connected even on the Windows PC with certain software that support this core
Now a short conclusion. First of all, let me mention again that all thermal images and video materials in this project were made with the Xinfrared P2Pro camera. This is an incredibly useful, lightweight, solid, and miniature cell phone accessory that I think should it own anyone who does any kind of appliance service, construction, heating and cooling, automotive, electronics, design and construction, science... I previously had a handheld standalone thermal camera with a resolution of 120 x 90 pixels, and I have no words to describe you how much more practical this new camera for me. Also a big advantage is the huge screen of the smartphone, compared to the small display of the handheld device. Of course, the quality of the thermal image is incomparable, but for a detailed description of all the advantages and disadvantages of these devices in one of the following videos.
And finally, let me tell you that if you are interested in purchasing the Xinfrared P2Pro Thermal Camera, you can buy it from the official seller with a 10% discount on the links provided below this text.
Xinfraredx: Get 10% off discount
https://xinfraredx.com?sca_ref=4943060.81tRyBUcw1
Amazon: Get 10% off discount
Code :103YWHR6
https://amzn.to/49YcOPE
Xinfraredx: Get 10% off discount
Code: P2 Pro
https://bit.ly/XinfraredP2Pro
InfiRay Xinfrared P2 pro thermal camera detailed Review


Raspberry Pi 5 7 Inch Touch Screen IPS 1024x600 HD LCD HDMI-compatible Display for RPI 4B 3B+ OPI 5 AIDA64 PC Secondary Screen(Without Speaker)
BUY NOW


- Comments(0)
- Likes(2)
More by Mirko Pavleski
-
 Arduino 3D Printed self Balancing Cube
Self-balancing devices are electronic devices that use sensors and motors to keep themselves balanc...
Arduino 3D Printed self Balancing Cube
Self-balancing devices are electronic devices that use sensors and motors to keep themselves balanc...
-
 DIY Green Laser Night Sky Object Finder - Find Stars & Galaxies Instantly with great accuracy
As an amateur astronomer, especially at the beginning, the most difficult part of observing the nig...
DIY Green Laser Night Sky Object Finder - Find Stars & Galaxies Instantly with great accuracy
As an amateur astronomer, especially at the beginning, the most difficult part of observing the nig...
-
 DIY Avionics Simulator with ESP32 - Artificial Horizon, Compass & Altimeter
The inspiration for this project comes from classical aircraft cockpit instruments used for navigat...
DIY Avionics Simulator with ESP32 - Artificial Horizon, Compass & Altimeter
The inspiration for this project comes from classical aircraft cockpit instruments used for navigat...
-
 DIY Miniature X-Ray Machine using a TV Vacuum Tube DY86
An X-ray machine (or radiograph) is a quick, painless medical test that produces images of the struc...
DIY Miniature X-Ray Machine using a TV Vacuum Tube DY86
An X-ray machine (or radiograph) is a quick, painless medical test that produces images of the struc...
-
 Simple SDR Receiver Using 2x NE612 - Dual Conversion, Superheterodyne (0.1–30 MHz)
SDR (Software Defined Radio) is a radio system in which most of the functions of a classic radio (f...
Simple SDR Receiver Using 2x NE612 - Dual Conversion, Superheterodyne (0.1–30 MHz)
SDR (Software Defined Radio) is a radio system in which most of the functions of a classic radio (f...
-
 DIY Vintage TV VU Meter with peak indicators
Some time ago in one of my projects I presented you a way to turn a black and white old mini TV int...
DIY Vintage TV VU Meter with peak indicators
Some time ago in one of my projects I presented you a way to turn a black and white old mini TV int...
-
 DIY Tesla Coil based Plasma Rife Machine
In several of my previous videos, I presented you with different ways to make a Rife Machine, from ...
DIY Tesla Coil based Plasma Rife Machine
In several of my previous videos, I presented you with different ways to make a Rife Machine, from ...
-
 ESP32 Analog VU Meter – Smooth Needle, Real Audio Response (DIY Build)
In several of my previous videos I have shown you how to make analog VU meters emulated on differen...
ESP32 Analog VU Meter – Smooth Needle, Real Audio Response (DIY Build)
In several of my previous videos I have shown you how to make analog VU meters emulated on differen...
-
 The Ultimate Smartphone VFO ESP32 & Si5351 Wireless Control
Variable frequency oscillators (VFOs) are commonly used in radio transmitters and receivers, especi...
The Ultimate Smartphone VFO ESP32 & Si5351 Wireless Control
Variable frequency oscillators (VFOs) are commonly used in radio transmitters and receivers, especi...
-
 DIY Shortwave Propagation Monitor - Measure Ionosphere Conditions
Shortwave Propagation is the way radio waves in the 3 to 30 MHz range travel from point A to point ...
DIY Shortwave Propagation Monitor - Measure Ionosphere Conditions
Shortwave Propagation is the way radio waves in the 3 to 30 MHz range travel from point A to point ...
-
 Professional grade Smart Lock with ESP32, BLE and Android App Control
An electronic codelock is a security device that grants access using a numerical sequence—a PIN cod...
Professional grade Smart Lock with ESP32, BLE and Android App Control
An electronic codelock is a security device that grants access using a numerical sequence—a PIN cod...
-
 Building a 3-Input Stereo ECC83 (12AX7) Tube Preamp
Some time ago I presented you a project for a 3W stereo tube amplifier with a GU32 output vacuum t...
Building a 3-Input Stereo ECC83 (12AX7) Tube Preamp
Some time ago I presented you a project for a 3W stereo tube amplifier with a GU32 output vacuum t...
-
 ESP32 Weather Dashboard with Satellite Maps and 16-day Weather Forecast
As you can see from my previous videos, besides Electronics, my fields of experimentation and proje...
ESP32 Weather Dashboard with Satellite Maps and 16-day Weather Forecast
As you can see from my previous videos, besides Electronics, my fields of experimentation and proje...
-
 Retro Analog VU Meter on Round dispalys (ESP32 and GC9A01)
Recently, in one of my previous videos I presented you a Retro VU Meter project on round displays ...
Retro Analog VU Meter on Round dispalys (ESP32 and GC9A01)
Recently, in one of my previous videos I presented you a Retro VU Meter project on round displays ...
-
 Ultimate 2-Player Reaction Timer with WS2812B LED Strips & Arduino
Arcade reaction game is a genre of play designed to test a player's physical response time and hand...
Ultimate 2-Player Reaction Timer with WS2812B LED Strips & Arduino
Arcade reaction game is a genre of play designed to test a player's physical response time and hand...
-
 Building a Vintage Tube-Style Internet Radio with Raspberry Pi & Rotary Encoder
Internet radio (also known as web radio or net radio) is a digital audio service transmitted via th...
Building a Vintage Tube-Style Internet Radio with Raspberry Pi & Rotary Encoder
Internet radio (also known as web radio or net radio) is a digital audio service transmitted via th...
-
 DIY Smart Code Lock with CrowPanel 1.28 ESP32 Rotary Display
A code lock is a keyless security device—either mechanical or electronic—that restricts access to d...
DIY Smart Code Lock with CrowPanel 1.28 ESP32 Rotary Display
A code lock is a keyless security device—either mechanical or electronic—that restricts access to d...
-
 SDR Panadapter for Vintage Tube Radios – Step-by-Step Tutorial
A radio panadapter (or panoramic adapter) is a device or software tool used in amateur radio and ot...
SDR Panadapter for Vintage Tube Radios – Step-by-Step Tutorial
A radio panadapter (or panoramic adapter) is a device or software tool used in amateur radio and ot...
-
Programmable Mist Maker - XIAO / QT PY Extension
474 1 0 -
RadioHAT - Raspberry Pi radio development platform
377 0 1 -
-
-
-
-
ARPS-2 – Arduino-Compatible Robot Project Shield for Arduino UNO
2910 0 6 -
A Compact Charging Breakout Board For Waveshare ESP32-C3
3416 3 8 -
AI-driven LoRa & LLM-enabled Kiosk & Food Delivery System
3754 2 2


