


|
Screw thread maker |
|

|
arduino IDEArduino
|
|

|
Python |
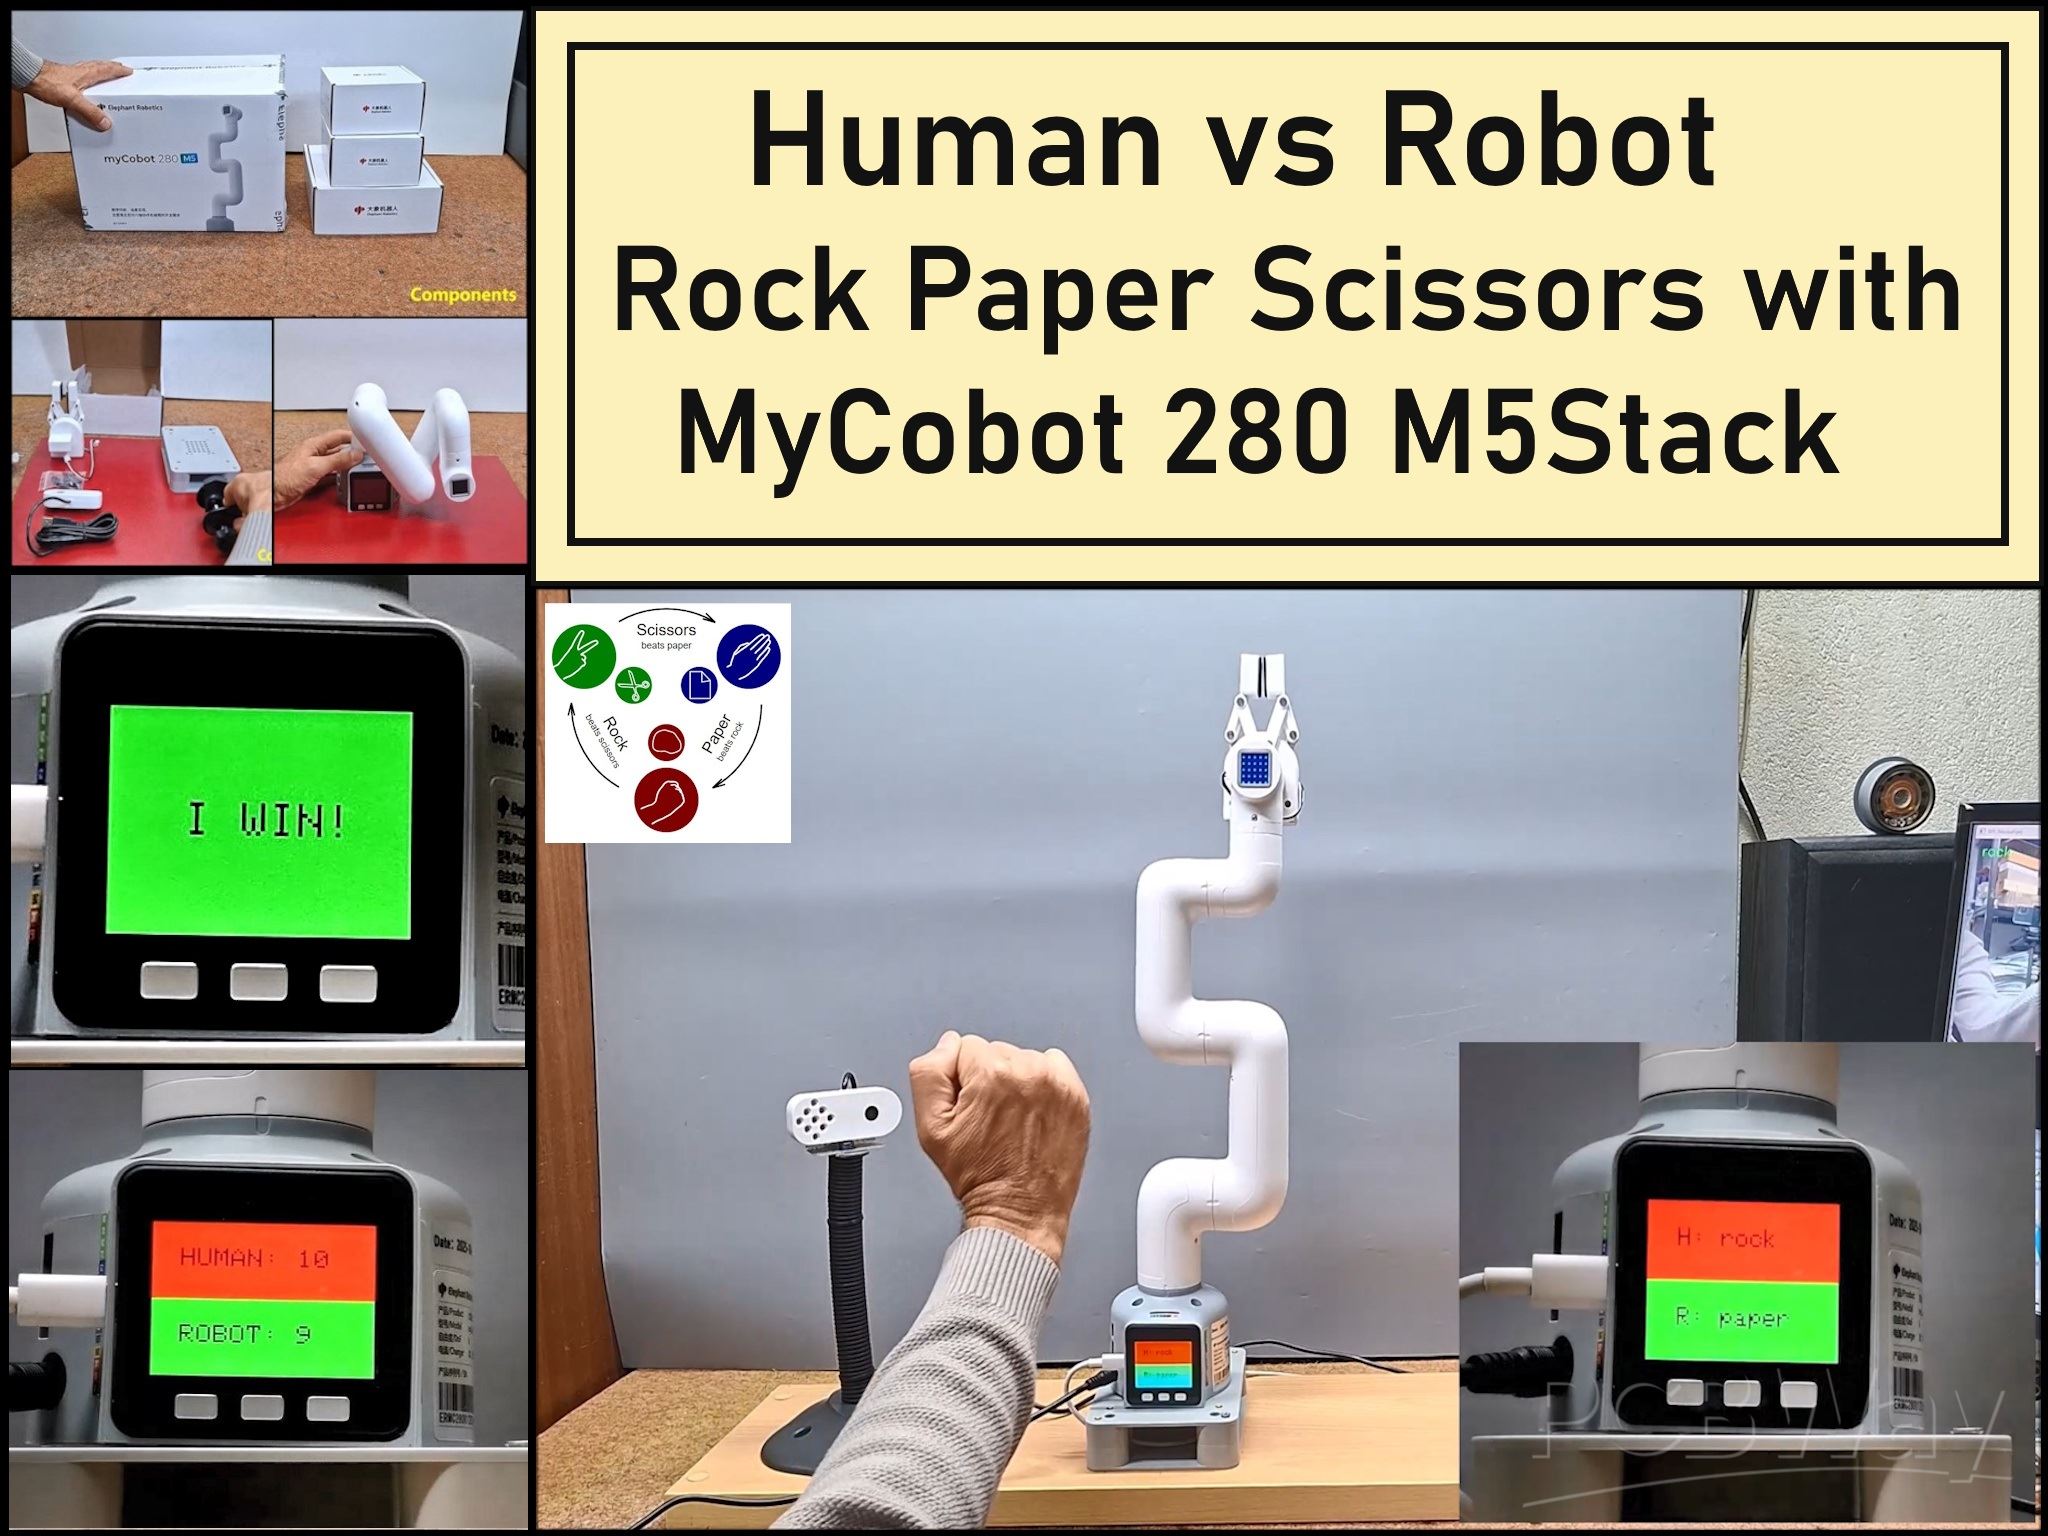
Human vs Robot – Rock Paper Scissors with MyCobot 280 M5Stack
Today I received a package containing the few Elephant Robotics products. The shipment is well packaged and fully protected from mechanical impacts during transport. The package contains the myCobot 280 M5 robot arm, myCobot Camera Flange 2.0 and myCobot Adaptive Gripper. There is also a G-shape Base 2.0 which serves to attach the robot arm to the base.
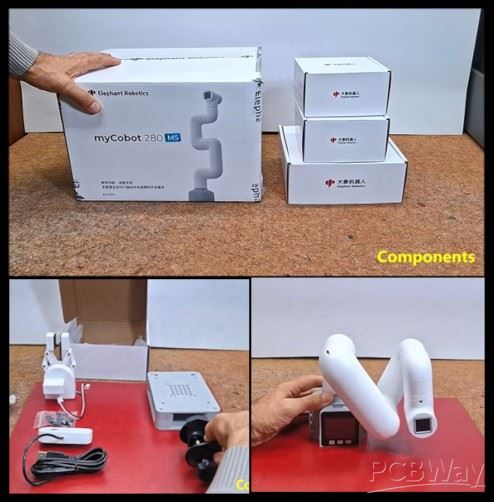
The main component in this kit is the Robotic Arm. Тhe box contains the Robotic Arm, power supply, a USB cable and wires for connecting external modules. There is also the basic instructions, certificate and links. From the very first glance, it is clear that it is solidly made and of high quality, and I will examine its functionality later.
MyCobot 280 is 6-DOF collaborative robot (Cobot) wich weighs 850g, has a payload of 250g, and an effective working radius of 280mm. It is small in size but powerful in function. It can be adapted to various application scenarios such as scientific research, education, smart home, and commercial research. As the name suggests, this model features an m5 stack, with three buttons as well as a large number of input/output ports and pins for controlling additional external devices. It supports multiple programming languages like Python, C++, Arduino, C# etc., and also the platforms Windows, Android, Mac OSX and Linux. The overall structure of the mechanical arm is simple and stylish and contains 6 high-performance servo motors with fast response, small inertia, and smooth rotation.

And before I start describing my custom project, I want to describe a simple way to "drag teaching". Drag Teaching is an intuitive method for programming the movements of a robotic arm, especially common in cobots and specialized industrial robots. Instead of using complex code, the operator can literally grab the robot arm and physically guide it through the desired path. The robot can then reproduce the recorded path with high precision at normal operating speed. In this way, we can most easily capture the performance of this Robotic Arm, such as accuracy, speed and smoothness of motion.
The following is a description of the main project that will demonstrate the functionality of all three components: the Robotic Arm, the camera, and the gripper. So I decided to develop a version of the well-known game Rock-Paper-Scissors in which each player simultaneously forms one of three shapes with an outstretched hand - Rock, Paper, And Scissors.

At a specific moment, which will be indicated on the display and with an audio signal, the human and the robot will show one of the three shapes and then, according to the rules of the game, the winner will be declared. Let me emphasize that the robot generates a shape completely randomly and at the same moment when it receives information that the human has displayed a shape.
Let's start with the Python part. Here we use myCobot Camera Flange 2.0 which is connected to the PC via a USB cable. On Win10 and Win11 OS the camera is installed automatically. First of all, a Python environment with appropriate support (libraries) should be installed on the PC. Python version 3.11 is installed from the given link and during installation the "Add Python to PATH" option should be checked.

The Python program can use multiple tools to perform the given task. First I created a code with the OpenCV library but the ability to determine the shape of the hand was relatively weak. Then I created a code with the TensorFlow platform which worked well but the whole installation procedure was very complex. In the end I found the simplest but functional solution using the MediaPipe framework ) from Google.

It is necessary to install several components by running these two lines in the CMD (command prompt) one by one:
python -m pip install --upgrade pip
python -m pip install "mediapipe==0.10.20" opencv-python pyserial
At the end of this text, the Python code named "MediaPIPE_Code" is given. We just need to start this Python script and in the cmd window we need to select the serial port on which the M5Stack microcontroller is installed. In my case, it is COM17 (meaning option 1). Now a window with the video camera appears, and now we need to show the appropriate shape in front of the camera. As you can see, the program detects the three shapes with great accuracy. In the command window, you can see the result that is sent to the serial port.
Next comes the Arduino part, which is significantly more complicated, so I will try to explain the installation method in detail. First, let's install support in Arduino IDE specifically for this M5Stack microcontroller.
- Open the Arduino IDE and select File --> Preferences --> Settings to add the url address (https://dl.espressif.com/dl/package_esp32_index.json) below to the additional board manager
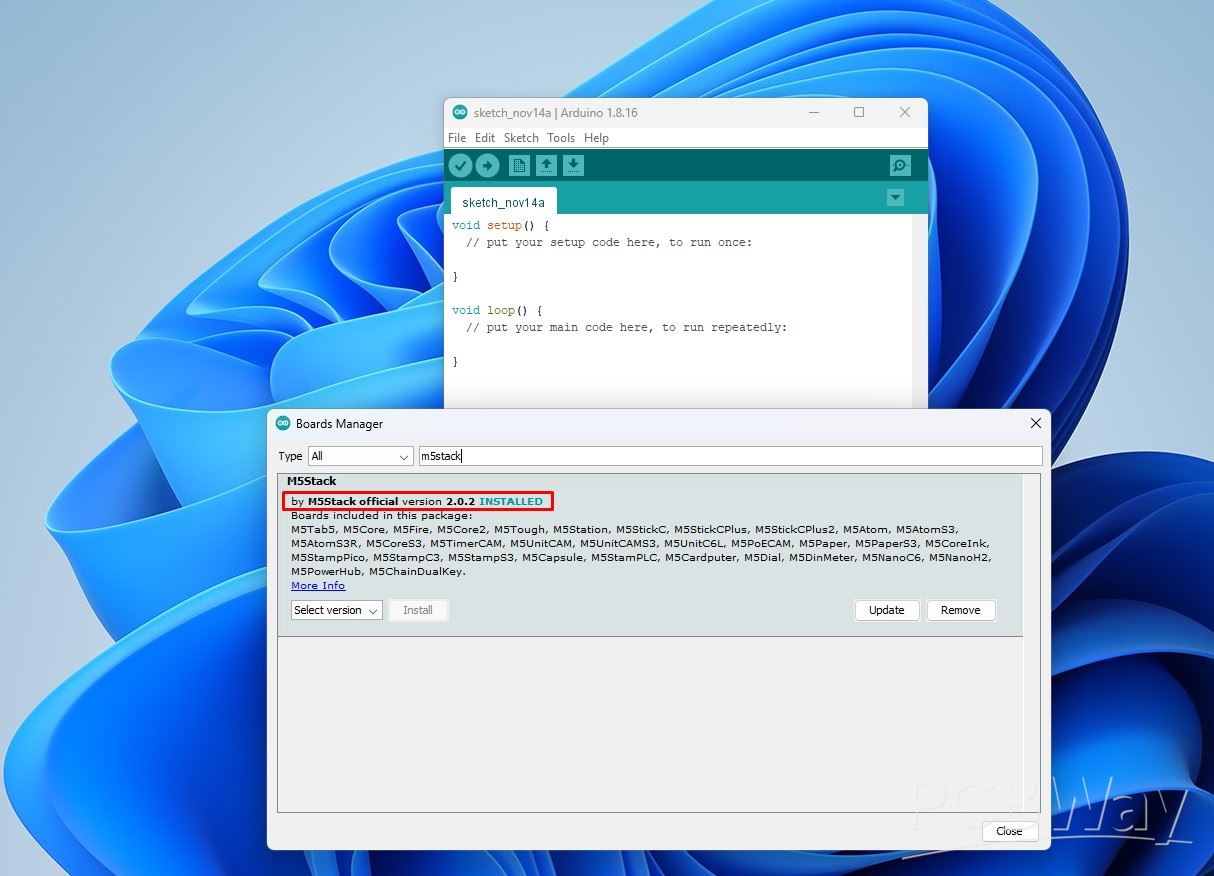
- After adding, select the Tools --> Board --> Boards Manager, in the new pop-up dialog, input and search M5Stack , click Install (Important note: Here you should select M5Stack core VER 2.0.2, not the latest version)
- Next Tools --> Board --> M5Stack Arduino select M5Stack-Core-ESP32

Next, we need to install the support libraries.
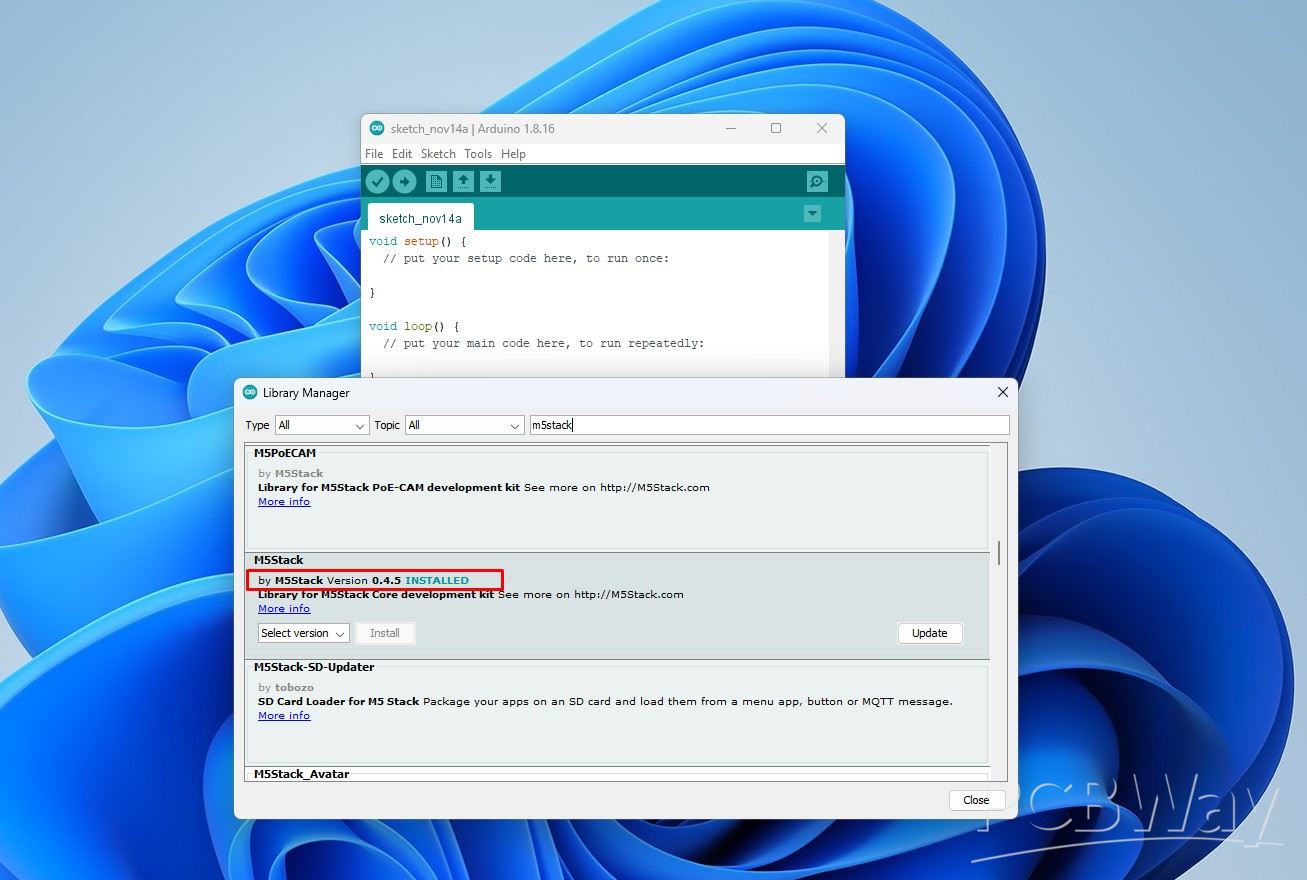
Go to Sketch --> Include Library --> Manage Library, and In the search box, enter M5Stack. I will install the M5Stack library version 0.4.5
In the same way we install the "MyCobotBasic" library.
Now we will do some simple tests to check the communication between the Robotic Arm and the PC, as well as the functionality of the libraries. In Arduino, we select the appropriate port (in my case COM17) and upload the code named "First communication TEST".

Now we will do some simple tests to check the communication between the Robotic Arm and the PC, as well as the functionality of the libraries. In Arduino, we select the appropriate port (in my case COM17) and upload the code named "First communication TEST".
If this part also works, then we are done with testing and we need to move on to the implementation of the specific task which is the Rock, Paper, Scissors interactive game Human vs Robot.
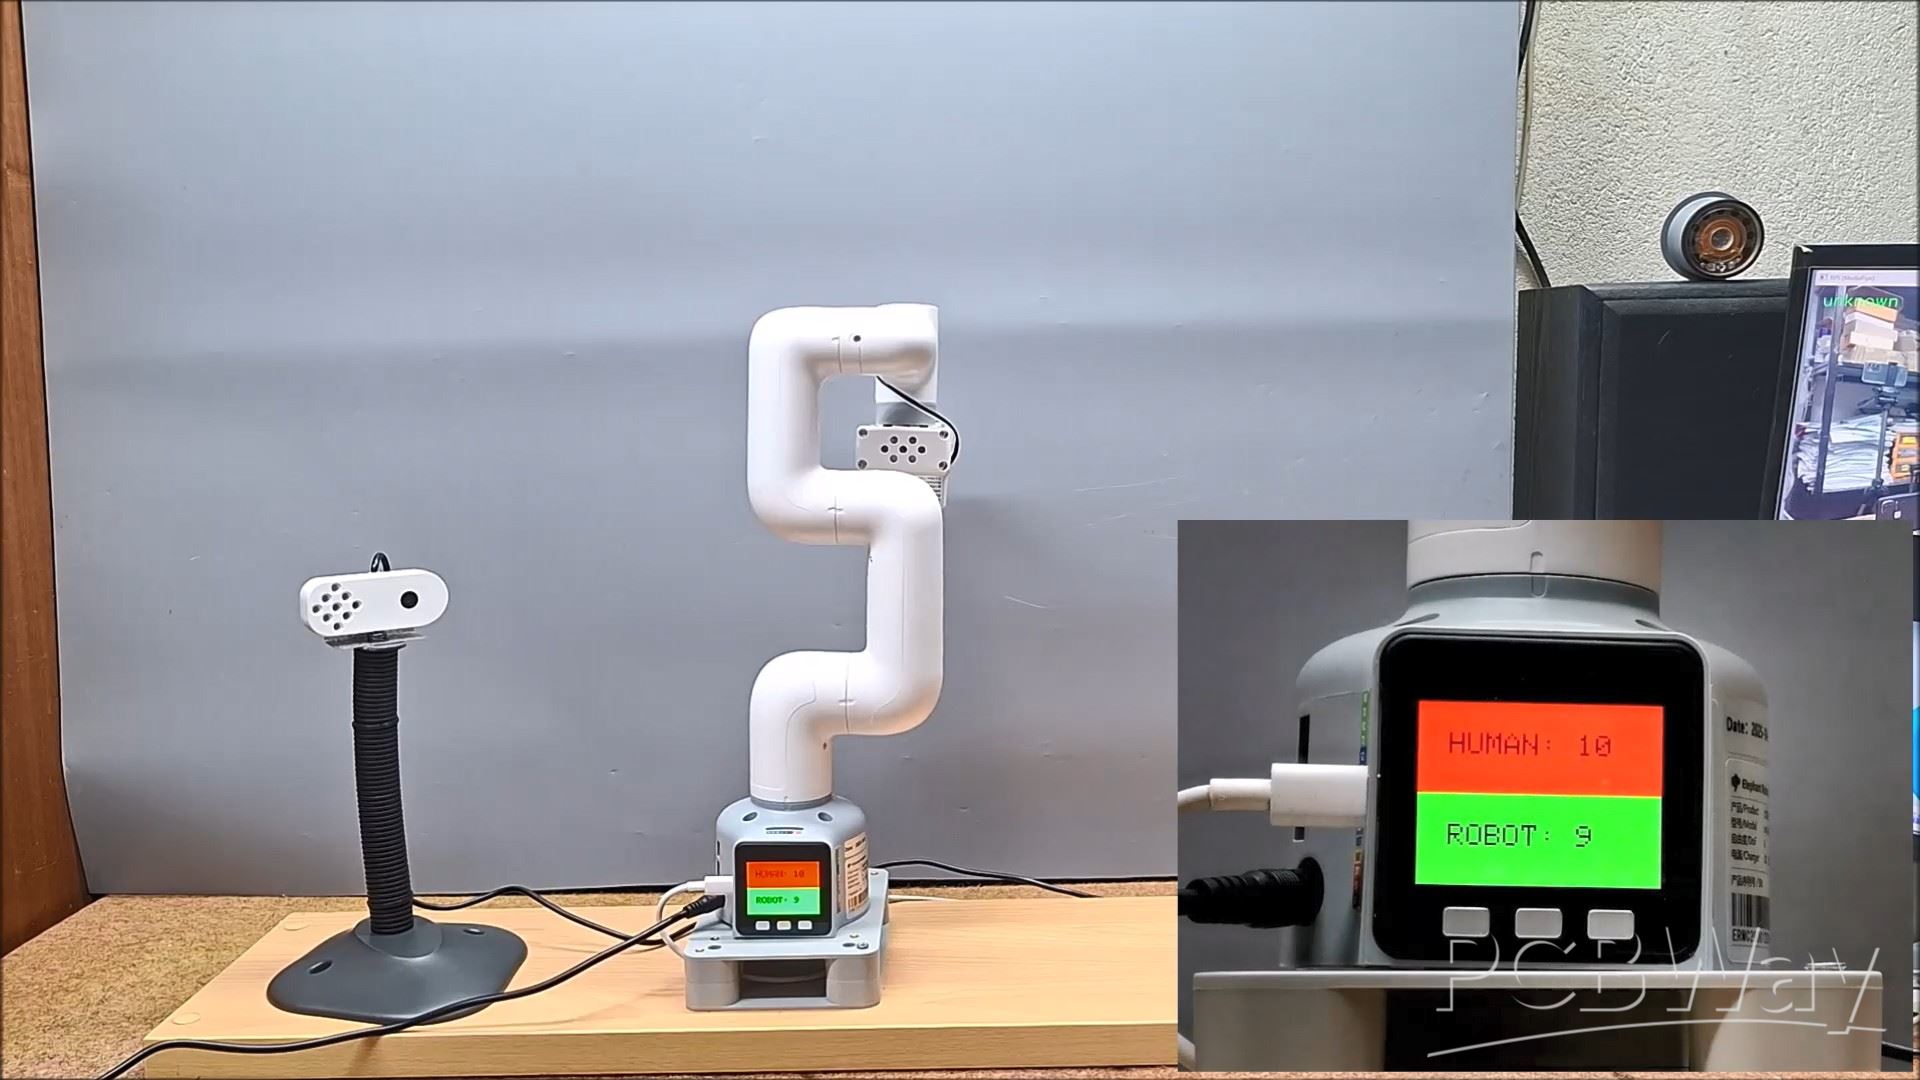
For this purpose, I attached the robotic arm to a solid base for stability, and placed the camera on a special stand, although I could have mounted it directly on the robotic arm in a certain way (for example, it could have been mounted directly above the gripper, but for this particular project, this is impossible because the camera and the matrix display would always be in the opposite direction.). I did this for practical reasons, to protect the camera from unwanted arm movements during testing, and also with this type of mounting the device is universal and ready for other projects.

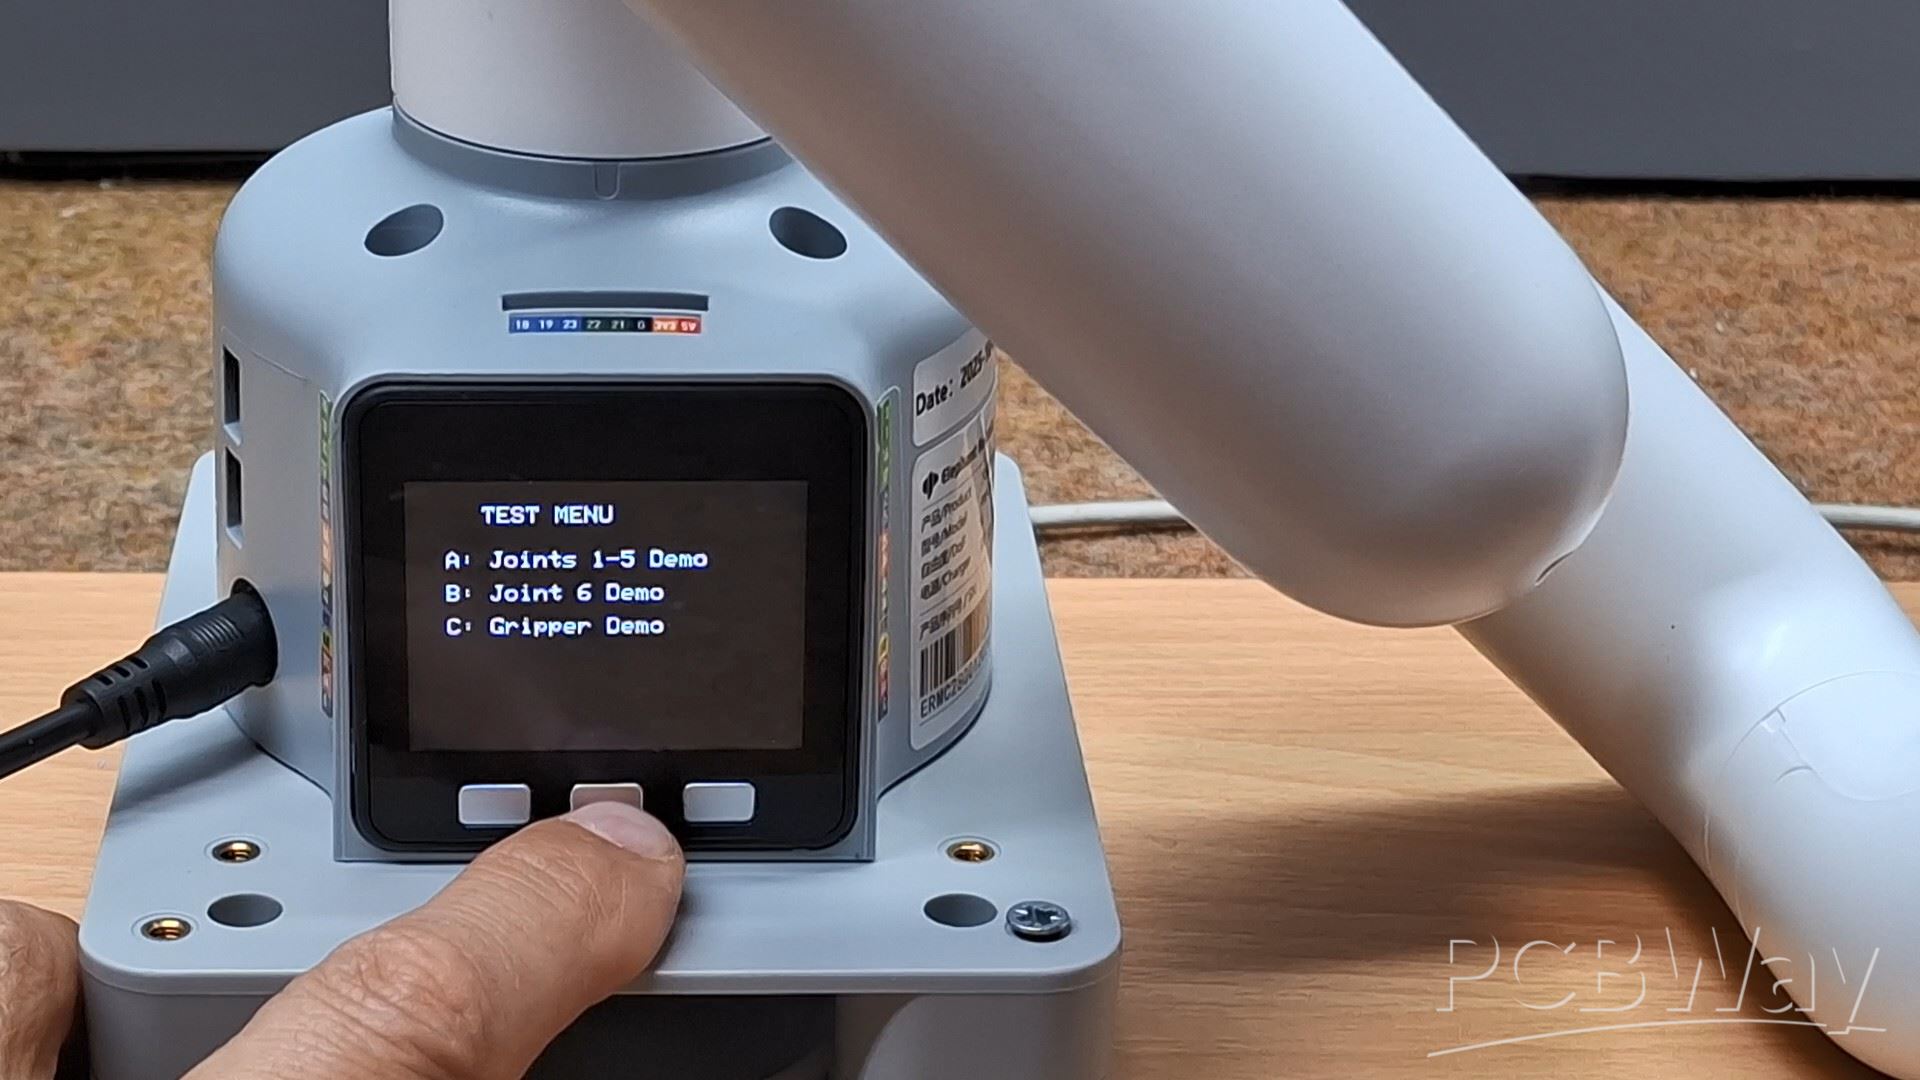
So we need to connect the myCobot Camera Flange 2.0 camera to the PC USB port and activate the Python script. On the M5Stack microcontroller, we first need to upload the code named "Rock_Paper_Scissors_Game".
Three options are displayed on the screen. At the beginning, the arm is in some arbitrary position. Now we press the B button, which gradually takes the arm into a position ready for the game. When it stabilizes, to start the game, we press the A button. Now the robot straightens up, and the matrix display lights up in blue, which indicates that the game has started. At the same moment, a countdown of 3,2,1 begins, after which we have to show a certain shape with our hand in front of the camera.
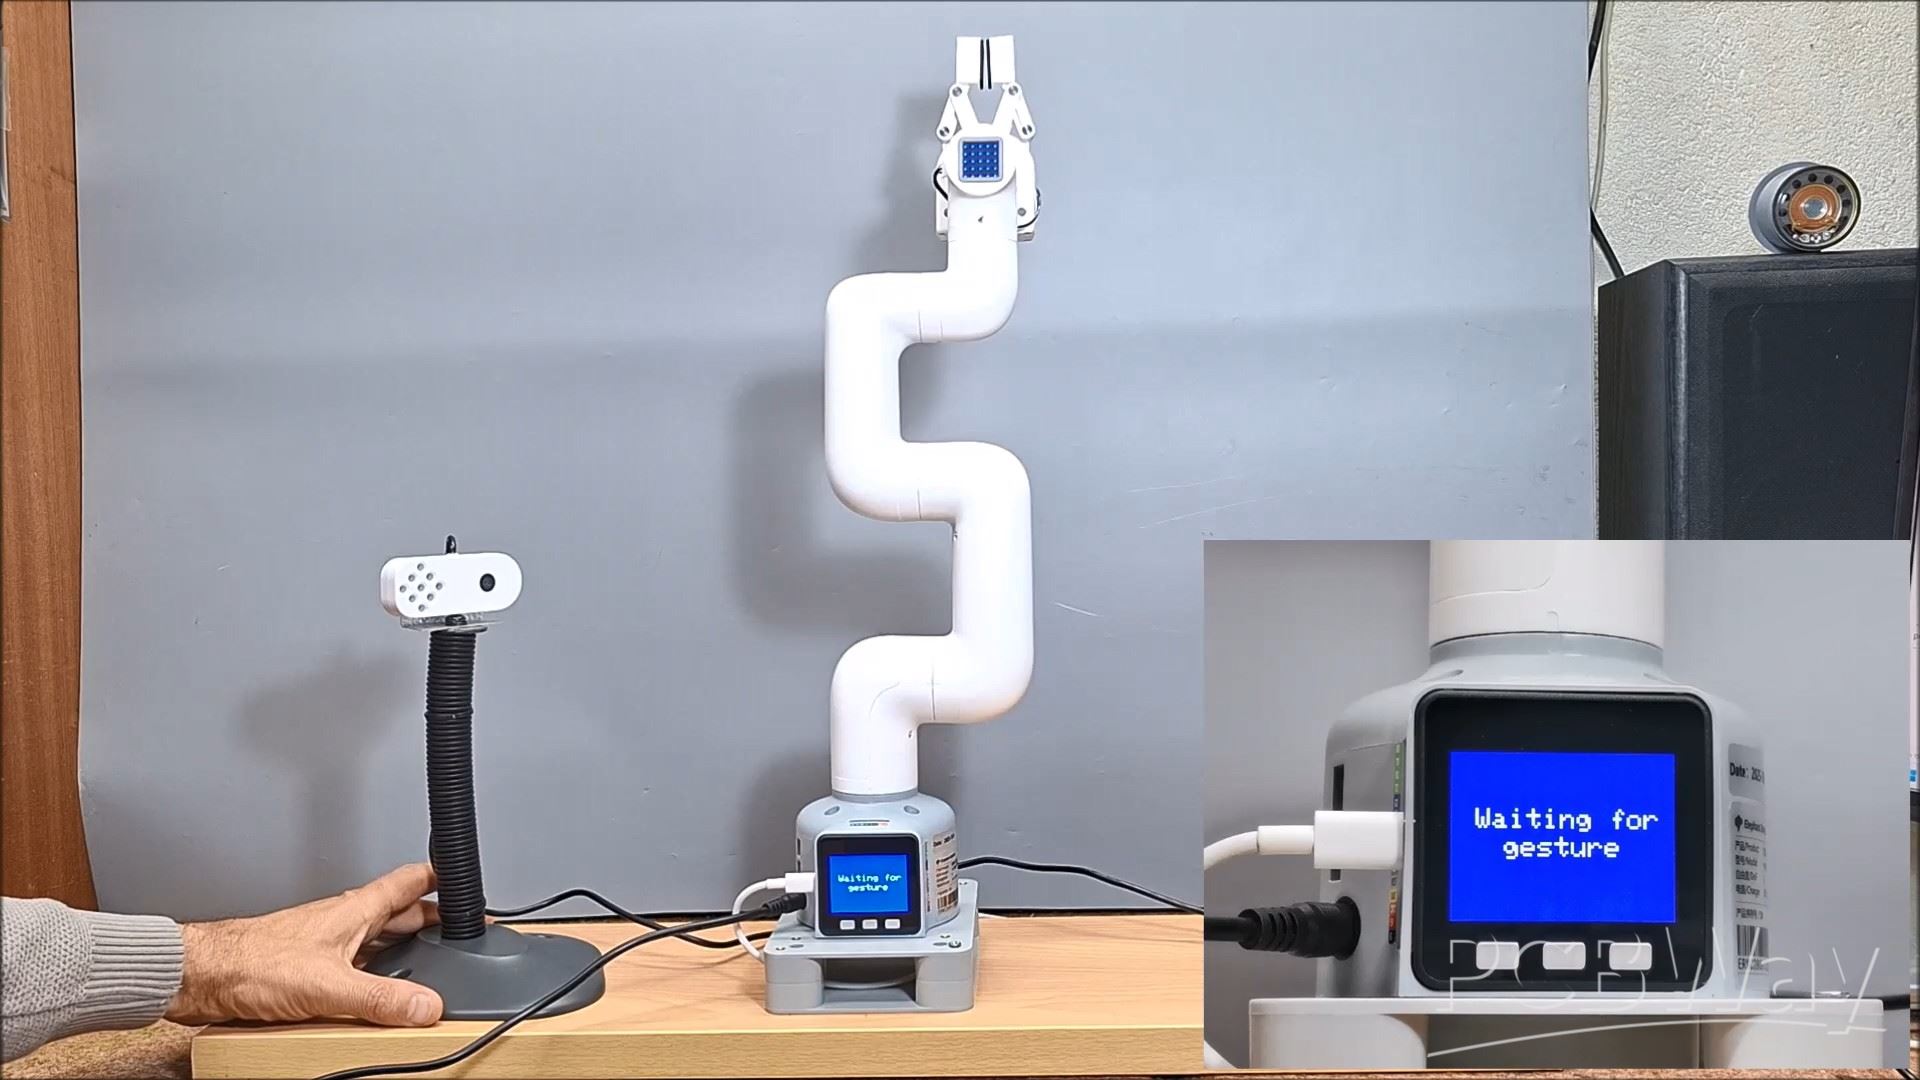
Until the human shows a shape, the robot stands still and waits for data from the human.
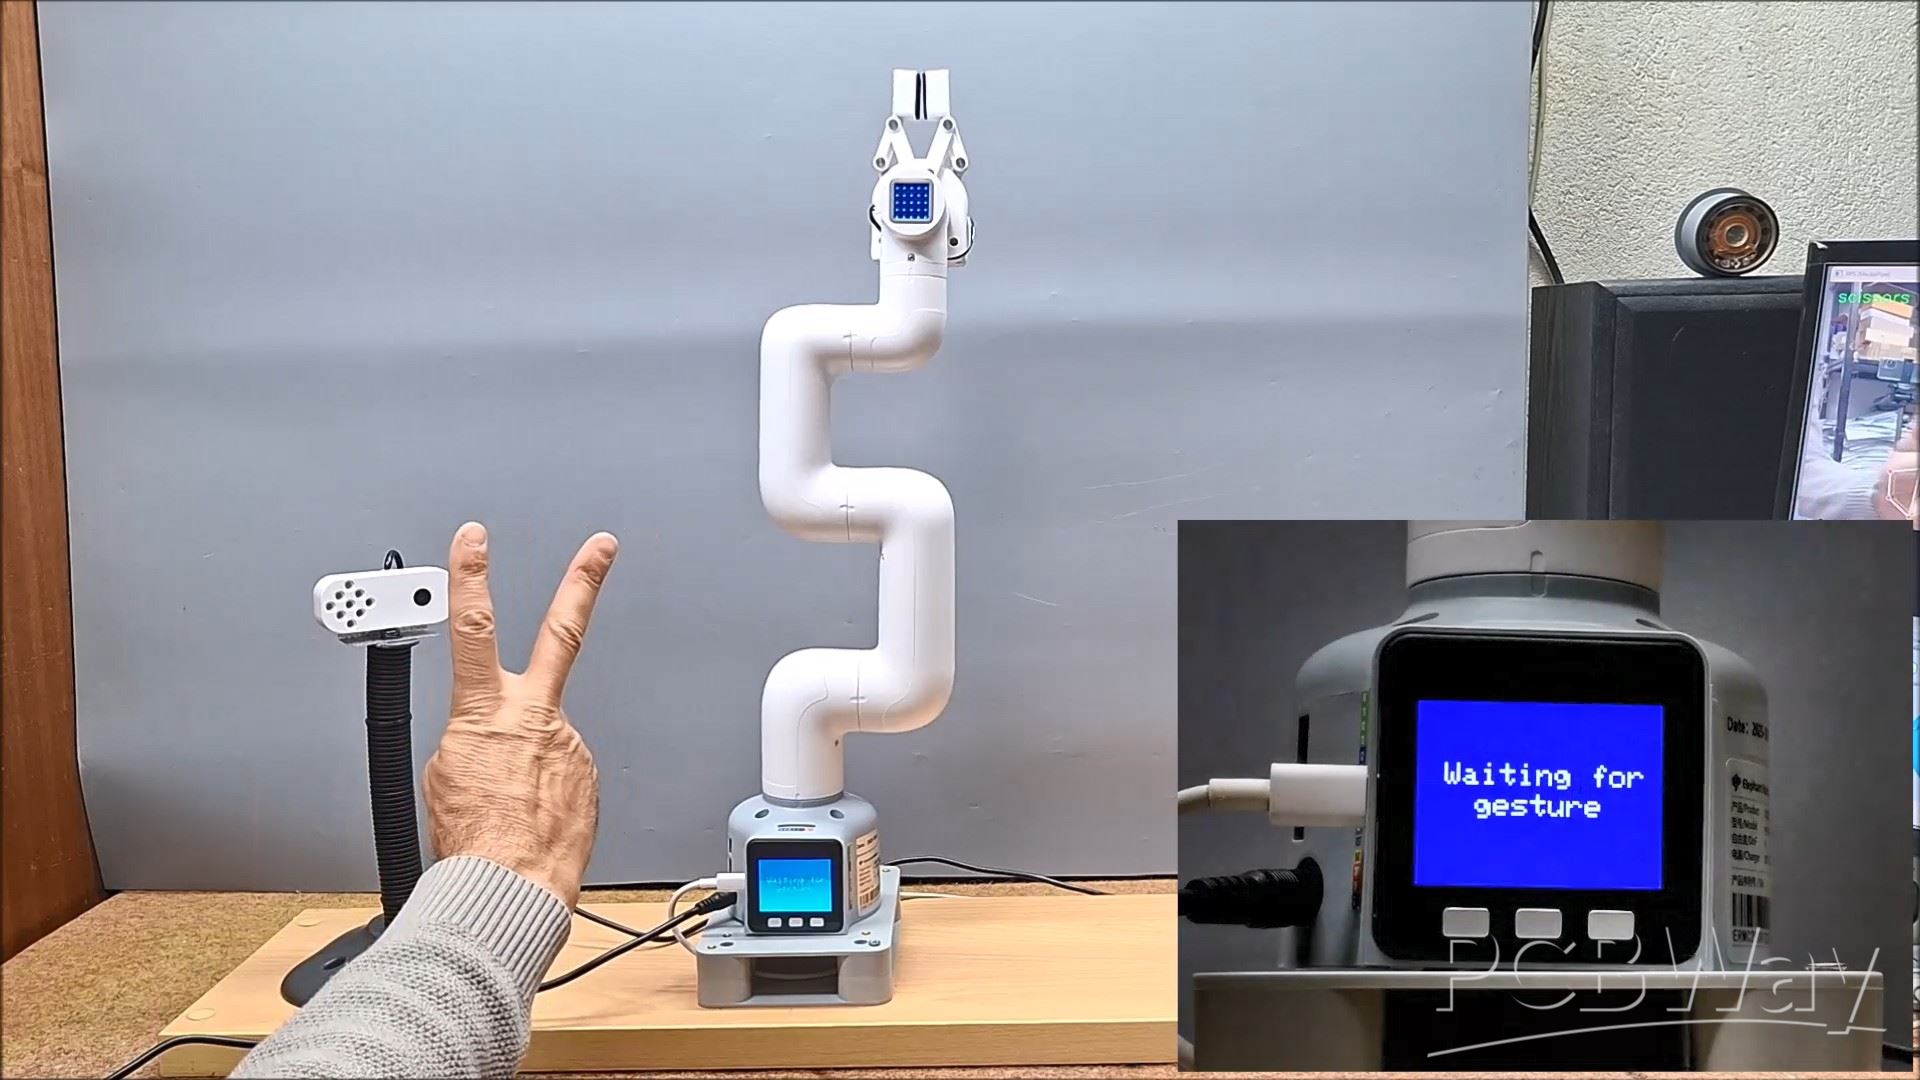
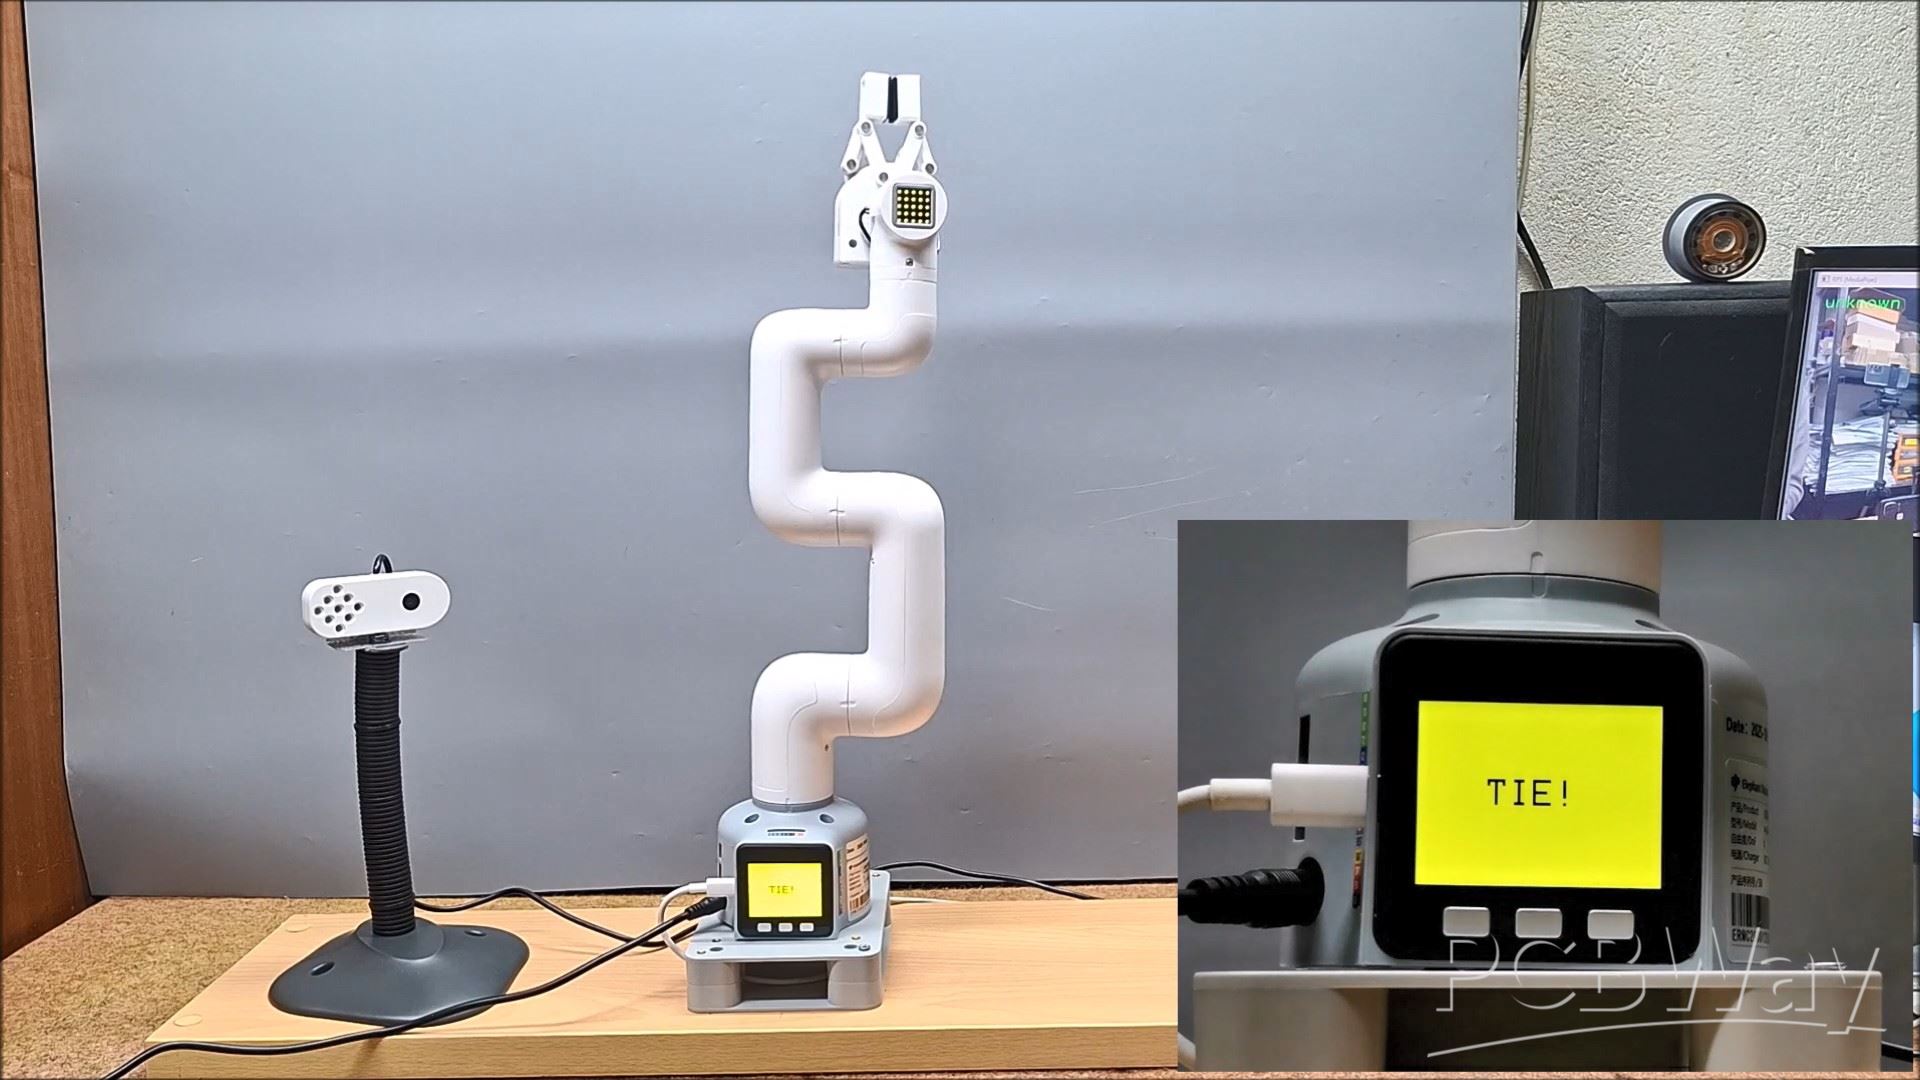
Upon receiving such data, the robot immediately randomly generates one of the three characters Rock, Paper or Scissors. To repeat, Rock is a closed Gripper, Paper is an open Gripper, and Scissors is an open-closed gripper animation. When both players show their shape, it is displayed on the display, on the upper half - human, and on the lower - robot. Now the winner is determined, if the Robot wins, the message "I WIN" appears on the TFT display on a green surface, the upper matrix display also lights up green and the robot tilts back. If the man wins, the message "YOU WIN" appears on a red background on the TFT display, the upper matrix display lights up red and the robot leans forward, that is, bows. If the result is a draw, the message "TIE" is displayed on a yellow background on the TFT display, the upper matrix display lights up yellow and the robot moves left and right.
The game is accompanied by appropriate audio effects throughout. After this, the game ends and the robot returns to the "ready to play position". The "C" button has the function of displaying the total score at any moment of the game. By pressing it, the score is displayed and automatically disappears after two seconds.
And Finally short conclusion. This project demonstrates a complete interactive game between human and robot — the classic Rock-Paper-Scissors — using the MyCobot 280 M5 robotic arm. The robot recognizes human hand gestures via a Python + MediaPipe vision system and responds with real-time motion, LED feedback, sounds, and on-screen results displayed on the M5Stack TFT display. It’s a perfect blend of hardware control, AI gesture detection, and embedded programming.
- https://shop.elephantrobotics.com/?ref=glecnphf
- Elephant Robotics’ official website: https://www.elephantrobotics.com/en/
- Elephant Robotics' official online store: https://shop.elephantrobotics.com/
- Elephant Robotics' official Amazon: https://linktr.ee/Elephant_Robotics_Robotics_Arm
Human vs Robot – Rock Paper Scissors with MyCobot 280 M5Stack


Raspberry Pi 5 7 Inch Touch Screen IPS 1024x600 HD LCD HDMI-compatible Display for RPI 4B 3B+ OPI 5 AIDA64 PC Secondary Screen(Without Speaker)
BUY NOW


- Comments(0)
- Likes(1)
More by Mirko Pavleski
-
 Arduino 3D Printed self Balancing Cube
Self-balancing devices are electronic devices that use sensors and motors to keep themselves balanc...
Arduino 3D Printed self Balancing Cube
Self-balancing devices are electronic devices that use sensors and motors to keep themselves balanc...
-
 Elecrow All-in-One Arduino Starter Kit Review - 20 Projects & 16 Modules
This time I will describe a simple and practical way to enter the world of microcontrollers, specif...
Elecrow All-in-One Arduino Starter Kit Review - 20 Projects & 16 Modules
This time I will describe a simple and practical way to enter the world of microcontrollers, specif...
-
 ESP32-C3 Color Detector with TCS34725, Real-Time RGB Detection & Web Interface
Color detection is a fundamental task in many embedded systems – from industrial sorting machines t...
ESP32-C3 Color Detector with TCS34725, Real-Time RGB Detection & Web Interface
Color detection is a fundamental task in many embedded systems – from industrial sorting machines t...
-
 DIY ESP32 Telegram Flood Protection System - Smart Home Automation
Recently I had an unpleasant experience in my home, specifically my ground floor was flooded as a r...
DIY ESP32 Telegram Flood Protection System - Smart Home Automation
Recently I had an unpleasant experience in my home, specifically my ground floor was flooded as a r...
-
 Real-Time Air Traffic Radar using ESP32 + ADS-B Data
ADS-B, which stands for Automatic Dependent Surveillance-Broadcast, is the modern standard for trac...
Real-Time Air Traffic Radar using ESP32 + ADS-B Data
ADS-B, which stands for Automatic Dependent Surveillance-Broadcast, is the modern standard for trac...
-
 DIY Green Laser Night Sky Object Finder - Find Stars & Galaxies Instantly with great accuracy
As an amateur astronomer, especially at the beginning, the most difficult part of observing the nig...
DIY Green Laser Night Sky Object Finder - Find Stars & Galaxies Instantly with great accuracy
As an amateur astronomer, especially at the beginning, the most difficult part of observing the nig...
-
 DIY Avionics Simulator with ESP32 - Artificial Horizon, Compass & Altimeter
The inspiration for this project comes from classical aircraft cockpit instruments used for navigat...
DIY Avionics Simulator with ESP32 - Artificial Horizon, Compass & Altimeter
The inspiration for this project comes from classical aircraft cockpit instruments used for navigat...
-
 DIY Miniature X-Ray Machine using a TV Vacuum Tube DY86
An X-ray machine (or radiograph) is a quick, painless medical test that produces images of the struc...
DIY Miniature X-Ray Machine using a TV Vacuum Tube DY86
An X-ray machine (or radiograph) is a quick, painless medical test that produces images of the struc...
-
 Simple SDR Receiver Using 2x NE612 - Dual Conversion, Superheterodyne (0.1–30 MHz)
SDR (Software Defined Radio) is a radio system in which most of the functions of a classic radio (f...
Simple SDR Receiver Using 2x NE612 - Dual Conversion, Superheterodyne (0.1–30 MHz)
SDR (Software Defined Radio) is a radio system in which most of the functions of a classic radio (f...
-
 DIY Vintage TV VU Meter with peak indicators
Some time ago in one of my projects I presented you a way to turn a black and white old mini TV int...
DIY Vintage TV VU Meter with peak indicators
Some time ago in one of my projects I presented you a way to turn a black and white old mini TV int...
-
 DIY Tesla Coil based Plasma Rife Machine
In several of my previous videos, I presented you with different ways to make a Rife Machine, from ...
DIY Tesla Coil based Plasma Rife Machine
In several of my previous videos, I presented you with different ways to make a Rife Machine, from ...
-
 ESP32 Analog VU Meter – Smooth Needle, Real Audio Response (DIY Build)
In several of my previous videos I have shown you how to make analog VU meters emulated on differen...
ESP32 Analog VU Meter – Smooth Needle, Real Audio Response (DIY Build)
In several of my previous videos I have shown you how to make analog VU meters emulated on differen...
-
 The Ultimate Smartphone VFO ESP32 & Si5351 Wireless Control
Variable frequency oscillators (VFOs) are commonly used in radio transmitters and receivers, especi...
The Ultimate Smartphone VFO ESP32 & Si5351 Wireless Control
Variable frequency oscillators (VFOs) are commonly used in radio transmitters and receivers, especi...
-
 DIY Shortwave Propagation Monitor - Measure Ionosphere Conditions
Shortwave Propagation is the way radio waves in the 3 to 30 MHz range travel from point A to point ...
DIY Shortwave Propagation Monitor - Measure Ionosphere Conditions
Shortwave Propagation is the way radio waves in the 3 to 30 MHz range travel from point A to point ...
-
 Professional grade Smart Lock with ESP32, BLE and Android App Control
An electronic codelock is a security device that grants access using a numerical sequence—a PIN cod...
Professional grade Smart Lock with ESP32, BLE and Android App Control
An electronic codelock is a security device that grants access using a numerical sequence—a PIN cod...
-
 Building a 3-Input Stereo ECC83 (12AX7) Tube Preamp
Some time ago I presented you a project for a 3W stereo tube amplifier with a GU32 output vacuum t...
Building a 3-Input Stereo ECC83 (12AX7) Tube Preamp
Some time ago I presented you a project for a 3W stereo tube amplifier with a GU32 output vacuum t...
-
 ESP32 Weather Dashboard with Satellite Maps and 16-day Weather Forecast
As you can see from my previous videos, besides Electronics, my fields of experimentation and proje...
ESP32 Weather Dashboard with Satellite Maps and 16-day Weather Forecast
As you can see from my previous videos, besides Electronics, my fields of experimentation and proje...
-
 Retro Analog VU Meter on Round dispalys (ESP32 and GC9A01)
Recently, in one of my previous videos I presented you a Retro VU Meter project on round displays ...
Retro Analog VU Meter on Round dispalys (ESP32 and GC9A01)
Recently, in one of my previous videos I presented you a Retro VU Meter project on round displays ...
-
Programmable Mist Maker - XIAO / QT PY Extension
1052 2 1 -
RadioHAT - Raspberry Pi radio development platform
849 0 2 -
-
-
-
-
ARPS-2 – Arduino-Compatible Robot Project Shield for Arduino UNO
3315 0 6 -
A Compact Charging Breakout Board For Waveshare ESP32-C3
3918 3 8 -
AI-driven LoRa & LLM-enabled Kiosk & Food Delivery System
4305 2 2


