


|
IRF3205PBFInfineon Technologies
|
x 3 | |
|
|
2N2222ADiotec
|
x 1 | |
|
|
Rotary potentiometer |
x 1 | |
|
|
1N4007 |
x 1 | |
|
|
Resistor 100 ohm |
x 3 | |
|
|
Resistor 2.21k ohm |
x 1 | |
|
|
Resistor 1k ohm |
x 1 |

|
Soldering Iron Wire |
|

|
Soldering iron |
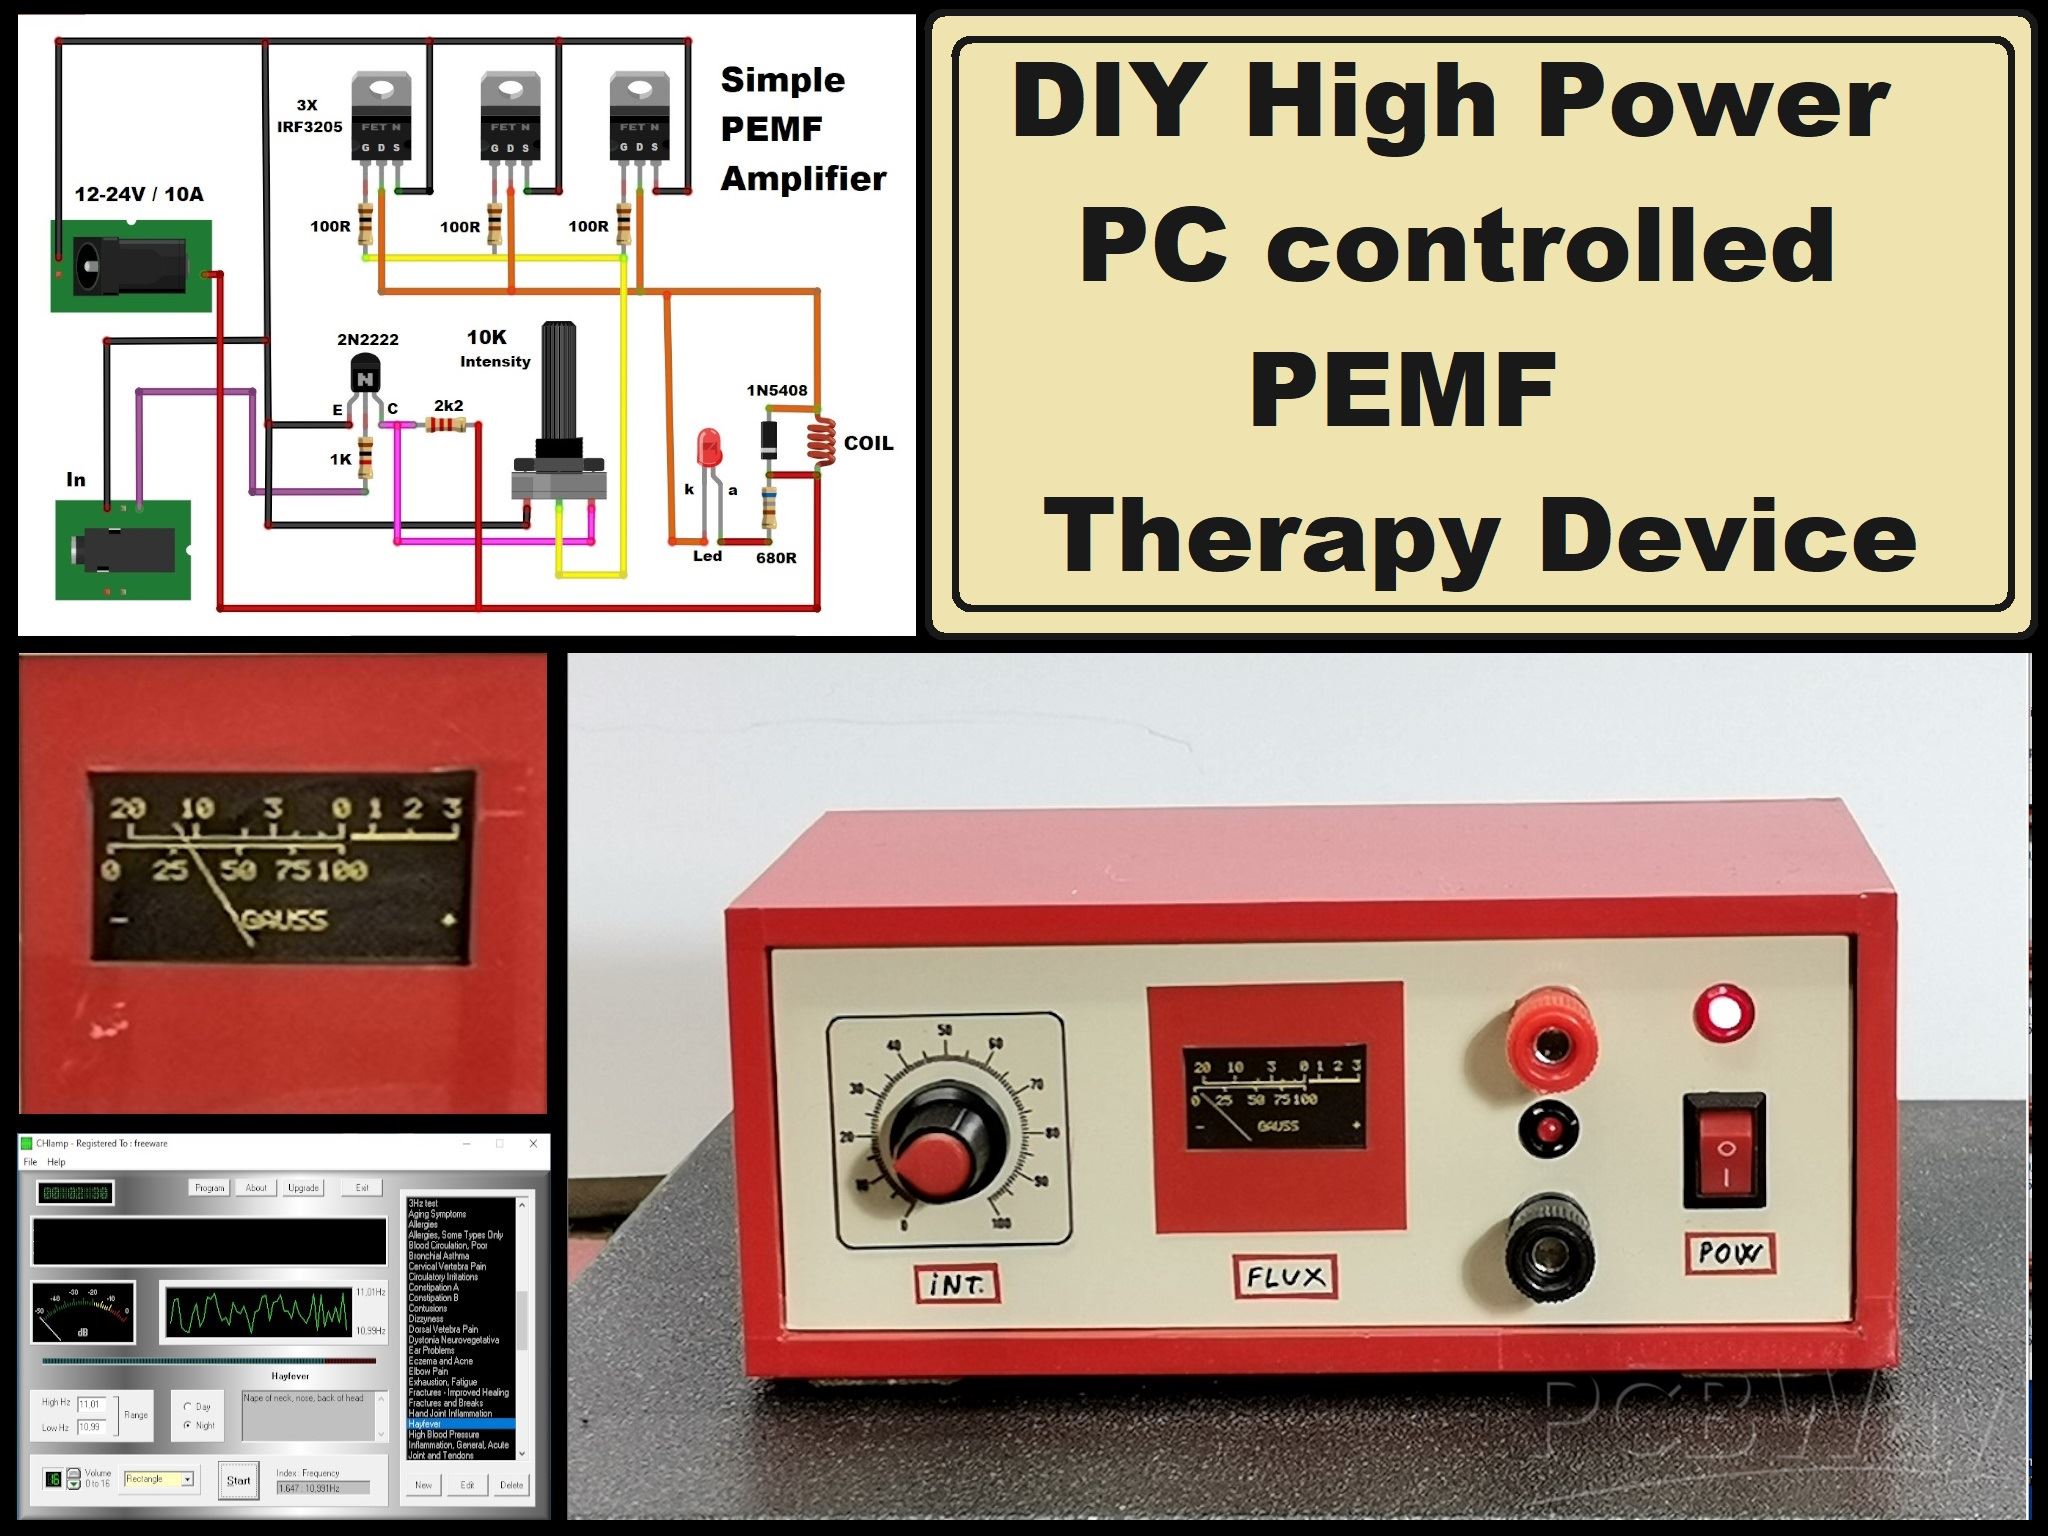
DIY PC controlled high power PEMF Therapy Device
PEMF or Pulsed Electromagnetic Field therapy is a type of therapy that uses electromagnetic fields to improve health and well-being. The basic idea behind PEMF is that it can influence the body at the cellular level, promoting healing and regeneration. The electromagnetic fields generated by PEMF devices can penetrate the body and interact with the cells, tissues, and organs.

PEMF therapy is used in various medical and wellness applications. It is commonly employed for pain management, wound healing, and bone-related disorders.
In several of my previous videos , I described simple ways to cheaply make such a device yourself. This time I will describe a way to make a PEMF device that will receive the frequency signal from an external device such as a PC with appropriate software, a mobile phone, or a commercial PEMF device that has a voltage output, whereby this device would amplify that signal.
The magnetic field that can be radiated by this device reaches a value of up to 150 Gauss, and with the parallel addition of Mosfets and a powerful power supply, stronger fields can easily be achieved.

Of course, the radiation coil plays an important role here, which you can see more about in the videos mentioned above. However, I should also mention that according to NASA research, fields of 1 to 4 Gauss are sufficient for effective therapy.
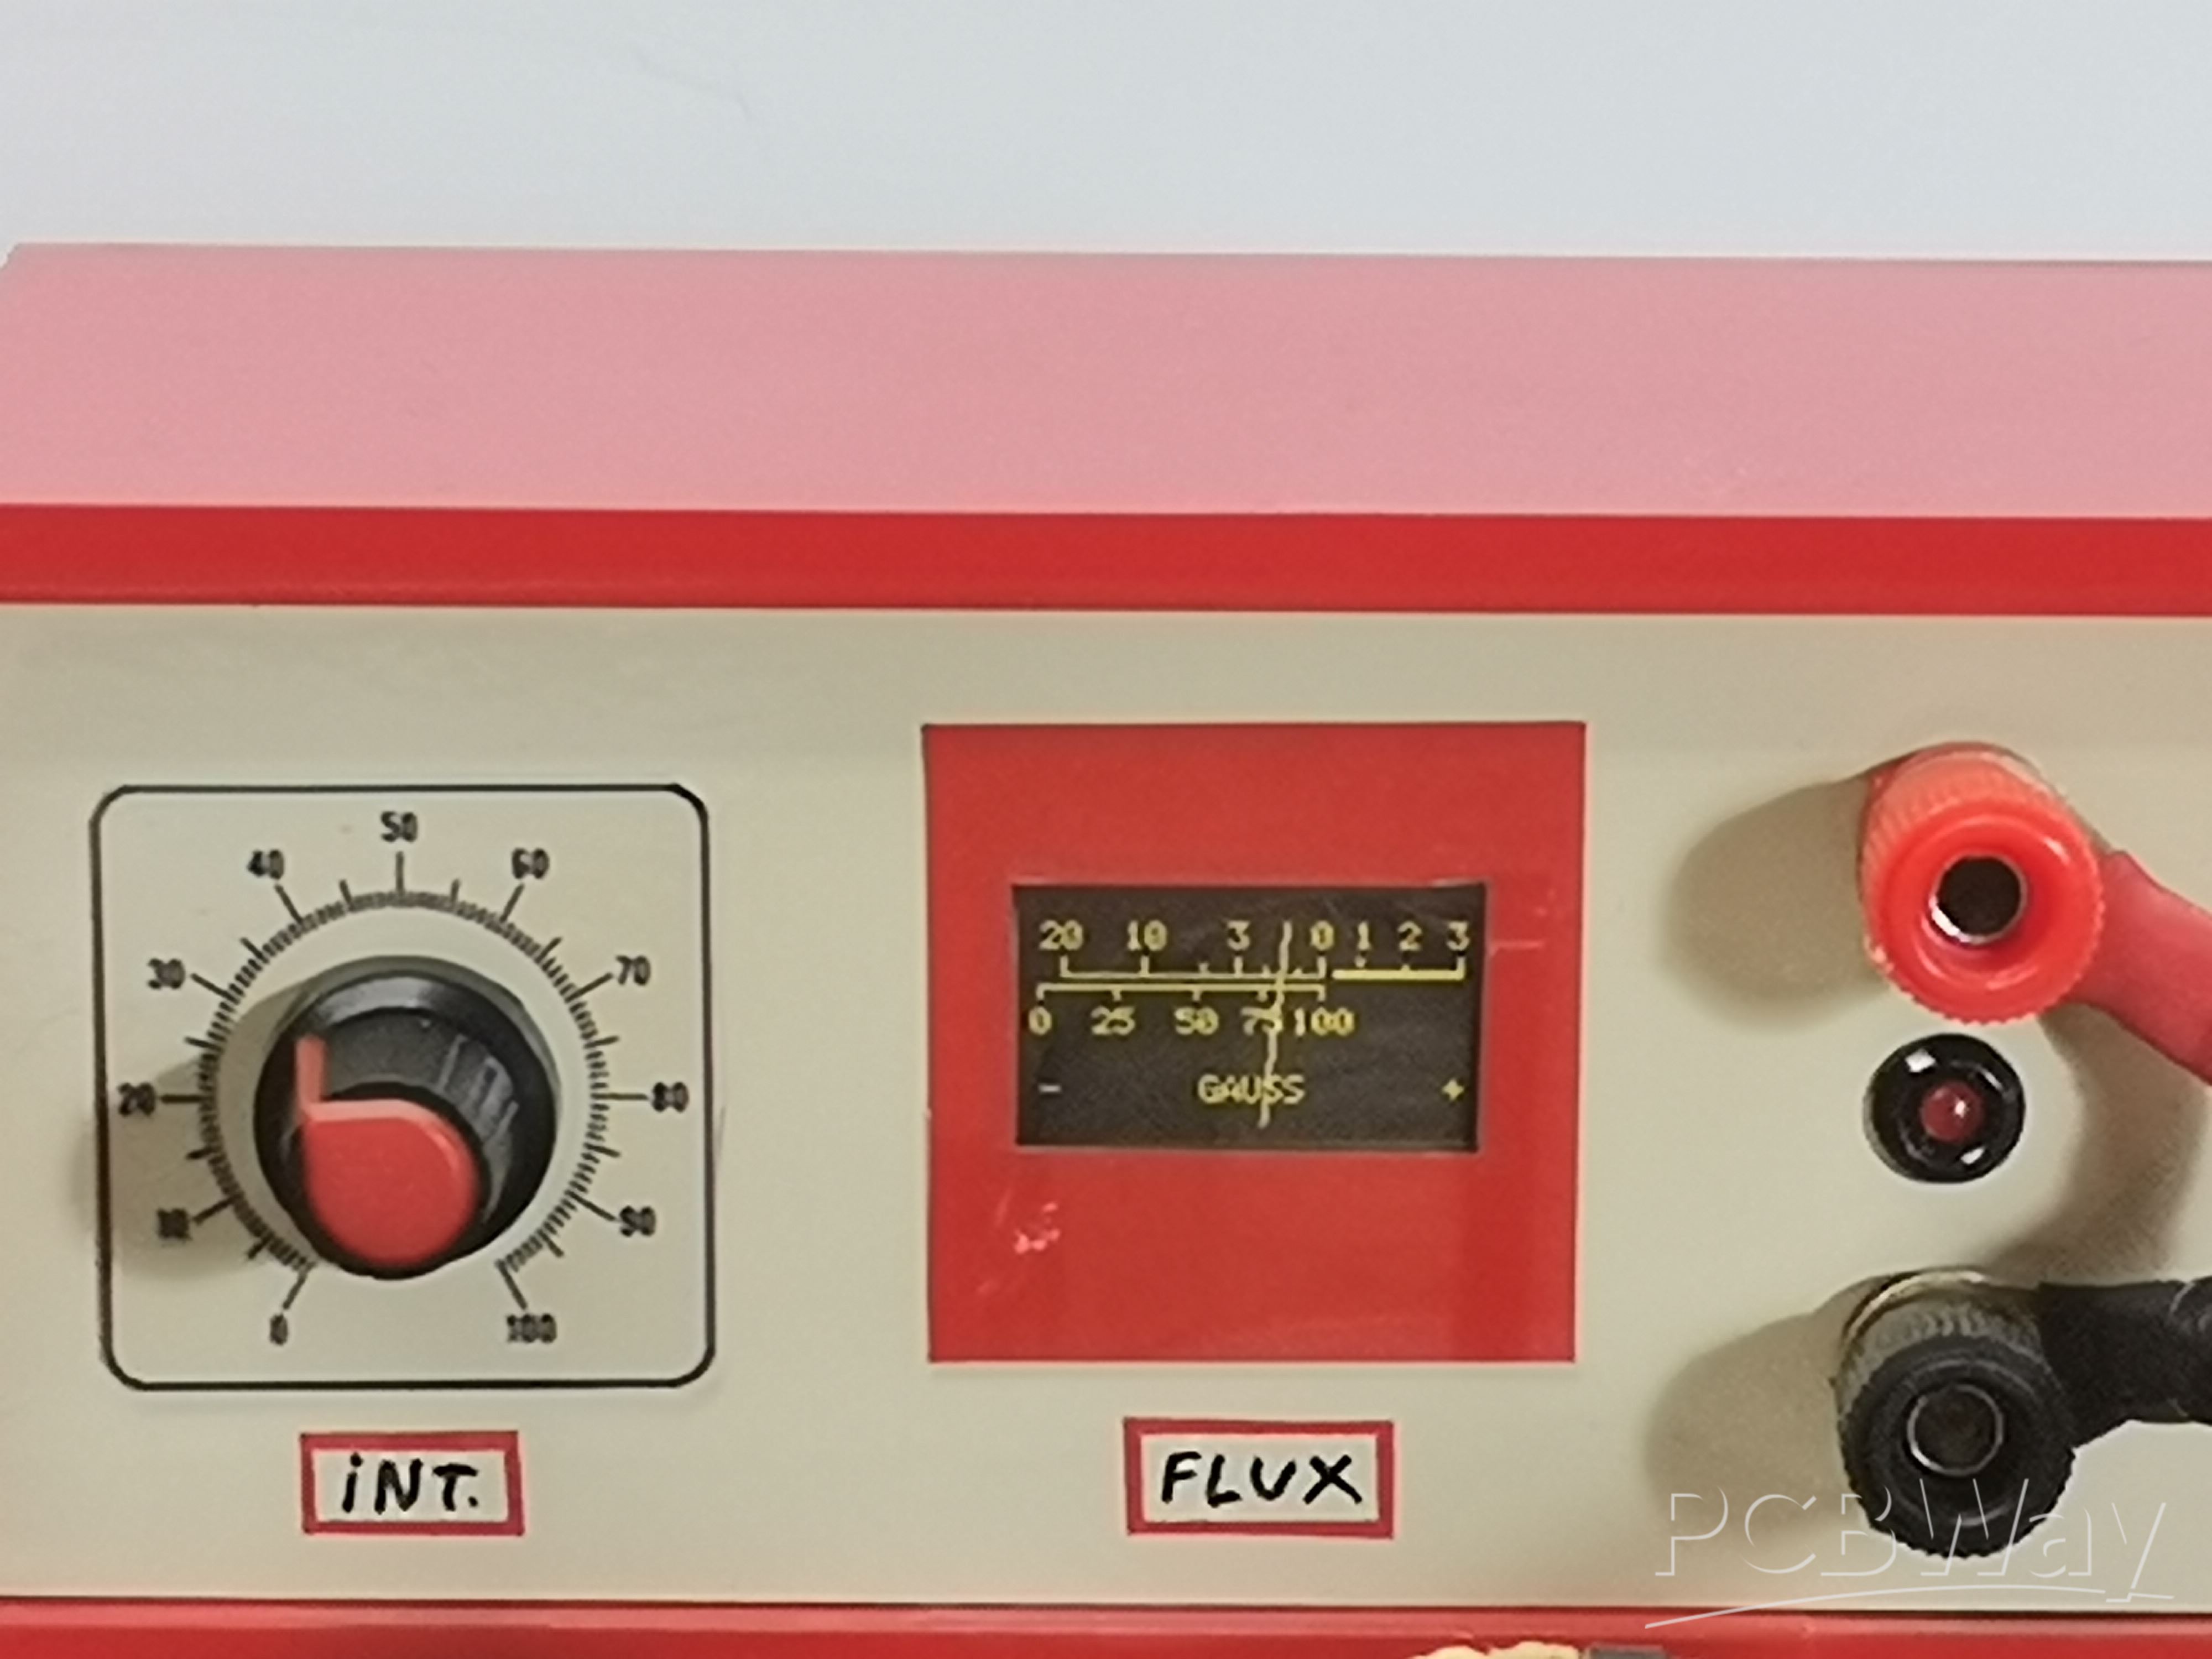
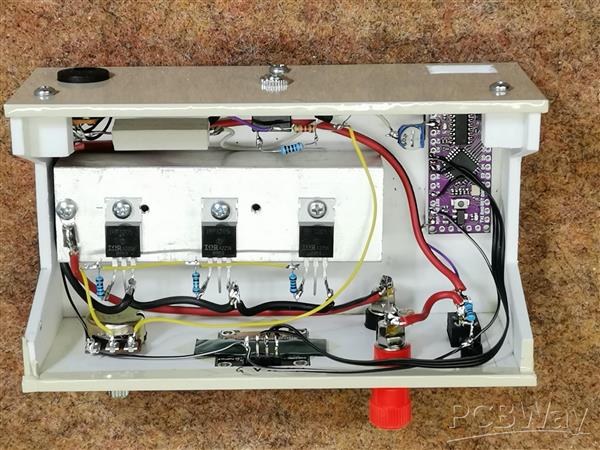
The device also has a meter of the strength of the emitted magnetic field made with an Arduino microcontroller, but this time we will leave this part out for a simpler design.
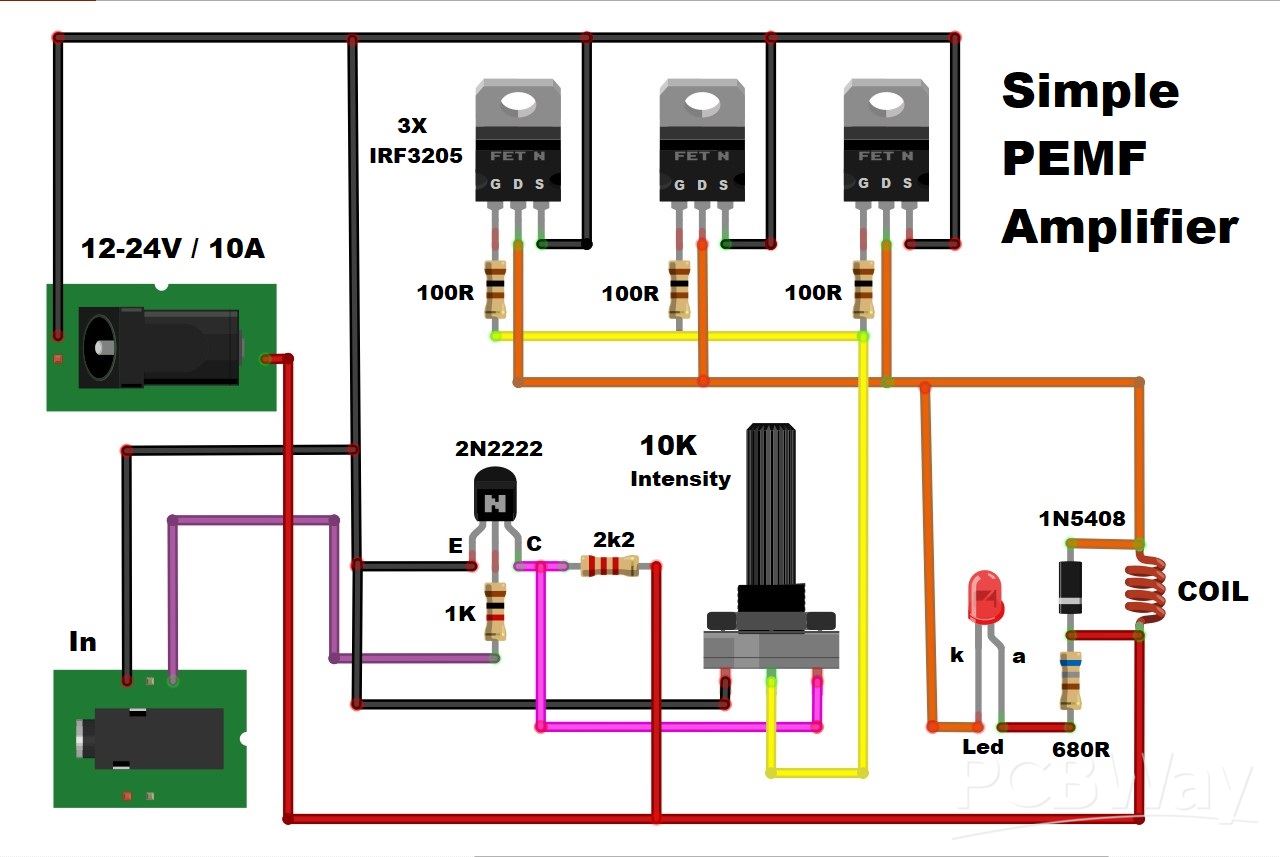
Only a few components are used when making the device
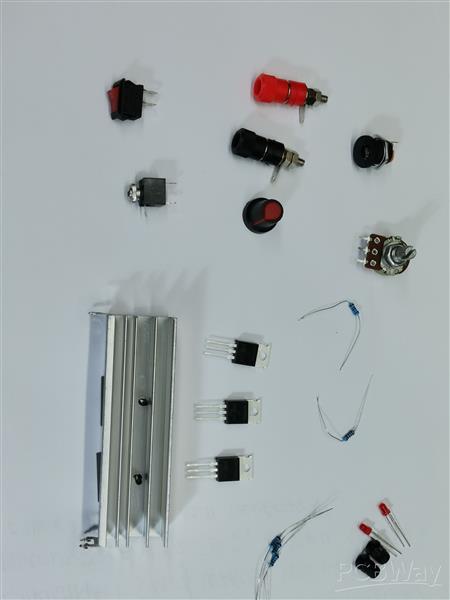
- 3 Power Mosfets (I use IRF3205, but any with similar characteristics can be used)
- Three 100 Ohm resistors
- Diode 1N5408
- 10K Potentiometer
- Signal shifter (one NPN transistor and two resistors)
- Power supply 12 V minimum 60 Watts
- And a coilс in which the magnetic field is generated and radiated
- Optionally I installed a power meter, and I will describe its construction in one of my next videos.
This project is sponsored by PCBWay. They has all the services you need to create your project at the best price, whether is a scool project, or complex professional project. On PCBWay you can share your experiences, or get inspiration for your next project. They also provide completed Surface mount SMT PCB assemblY service at a best price, and ISO9001 quality control. Visit www.pcbway.com for more services

The power meter is a very useful addition to the device, but it is a little more complex to make, so you can also use a standard milli or microammeter with a moving needle, in which case the sensitivity of the instrument is adjusted using the trimmer potentiometer.

Now let's see how the device works in real conditions
First, as a PEMF signal source I use my PC with the "CHIamp" software created by Ken Uzzell, which you can download for free on the spectrotek site. Unfortunately, there software is in .exe format and the anti-virus program detects it as a virus, but after I downloaded it, I scanned it with multiple anti-virus programs and it turned out to be clean. CHIamp is Inspired by the Infratonics instrument. Application contains predefined programs for several diseases, but we can also create our own custom program. We can change the intensity of the signal, then the shape of the signal, and here the duration of the therapy.

From the Line Out output of the sound card, we bring the signal to the input of the device, and start the program. Next we move the potentiometer to a certain degree and as we see the meter responds. If we get closer a magnet near the coil, it oscillates with the frequency set in the application.
Now let me briefly explain the relationship between coil type, radiation, and power
- A coil with a larger diameter radiates a field over a larger area, but with a lower intensity. The smaller coil radiates a directional stronger magnetic field, but over a smaller area.
- A coil with lower resistance (made with thicker wire) generally radiates a stronger magnetic field than one with higher resistance (made with thinner wire)
- It is very important to emphasize that the minimum ohmic resistance of the coil should not be lower than 0.5 ohms. In the case where a coil with low resistance is used, the power supply should be capable of delivering a current of 10 Amps and more.

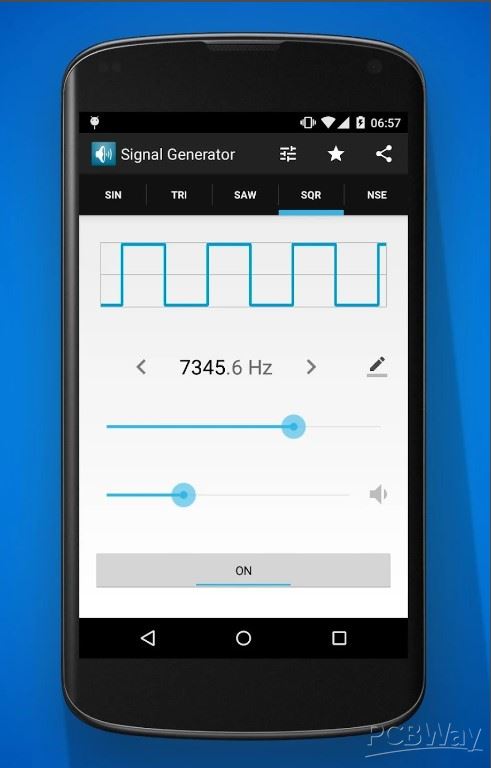
Instead of a personal computer, we can use as a source of PEMF signal if we have a commercial PEMF device with an output signal port, or simply an android smartphone with a Signal Generator application.
And finally a short conclusion. This universal device is actually only a PEMF signal amplifier and not a complete PEMF device, but therefore it can be connected to various sources of such a signal, and even previously recorded audio material on some kind of information carrier, for example a USB stick.
The device is installed in a suitable box made of PVC board with a thickness of 3 and 5 mm and coated with a colored self-adhesive label.

DIY PC controlled high power PEMF Therapy Device


Raspberry Pi 5 7 Inch Touch Screen IPS 1024x600 HD LCD HDMI-compatible Display for RPI 4B 3B+ OPI 5 AIDA64 PC Secondary Screen(Without Speaker)
BUY NOW


- Comments(0)
- Likes(0)
More by Mirko Pavleski
-
 Arduino 3D Printed self Balancing Cube
Self-balancing devices are electronic devices that use sensors and motors to keep themselves balanc...
Arduino 3D Printed self Balancing Cube
Self-balancing devices are electronic devices that use sensors and motors to keep themselves balanc...
-
 DIY Green Laser Night Sky Object Finder - Find Stars & Galaxies Instantly with great accuracy
As an amateur astronomer, especially at the beginning, the most difficult part of observing the nig...
DIY Green Laser Night Sky Object Finder - Find Stars & Galaxies Instantly with great accuracy
As an amateur astronomer, especially at the beginning, the most difficult part of observing the nig...
-
 DIY Avionics Simulator with ESP32 - Artificial Horizon, Compass & Altimeter
The inspiration for this project comes from classical aircraft cockpit instruments used for navigat...
DIY Avionics Simulator with ESP32 - Artificial Horizon, Compass & Altimeter
The inspiration for this project comes from classical aircraft cockpit instruments used for navigat...
-
 DIY Miniature X-Ray Machine using a TV Vacuum Tube DY86
An X-ray machine (or radiograph) is a quick, painless medical test that produces images of the struc...
DIY Miniature X-Ray Machine using a TV Vacuum Tube DY86
An X-ray machine (or radiograph) is a quick, painless medical test that produces images of the struc...
-
 Simple SDR Receiver Using 2x NE612 - Dual Conversion, Superheterodyne (0.1–30 MHz)
SDR (Software Defined Radio) is a radio system in which most of the functions of a classic radio (f...
Simple SDR Receiver Using 2x NE612 - Dual Conversion, Superheterodyne (0.1–30 MHz)
SDR (Software Defined Radio) is a radio system in which most of the functions of a classic radio (f...
-
 DIY Vintage TV VU Meter with peak indicators
Some time ago in one of my projects I presented you a way to turn a black and white old mini TV int...
DIY Vintage TV VU Meter with peak indicators
Some time ago in one of my projects I presented you a way to turn a black and white old mini TV int...
-
 DIY Tesla Coil based Plasma Rife Machine
In several of my previous videos, I presented you with different ways to make a Rife Machine, from ...
DIY Tesla Coil based Plasma Rife Machine
In several of my previous videos, I presented you with different ways to make a Rife Machine, from ...
-
 ESP32 Analog VU Meter – Smooth Needle, Real Audio Response (DIY Build)
In several of my previous videos I have shown you how to make analog VU meters emulated on differen...
ESP32 Analog VU Meter – Smooth Needle, Real Audio Response (DIY Build)
In several of my previous videos I have shown you how to make analog VU meters emulated on differen...
-
 The Ultimate Smartphone VFO ESP32 & Si5351 Wireless Control
Variable frequency oscillators (VFOs) are commonly used in radio transmitters and receivers, especi...
The Ultimate Smartphone VFO ESP32 & Si5351 Wireless Control
Variable frequency oscillators (VFOs) are commonly used in radio transmitters and receivers, especi...
-
 DIY Shortwave Propagation Monitor - Measure Ionosphere Conditions
Shortwave Propagation is the way radio waves in the 3 to 30 MHz range travel from point A to point ...
DIY Shortwave Propagation Monitor - Measure Ionosphere Conditions
Shortwave Propagation is the way radio waves in the 3 to 30 MHz range travel from point A to point ...
-
 Professional grade Smart Lock with ESP32, BLE and Android App Control
An electronic codelock is a security device that grants access using a numerical sequence—a PIN cod...
Professional grade Smart Lock with ESP32, BLE and Android App Control
An electronic codelock is a security device that grants access using a numerical sequence—a PIN cod...
-
 Building a 3-Input Stereo ECC83 (12AX7) Tube Preamp
Some time ago I presented you a project for a 3W stereo tube amplifier with a GU32 output vacuum t...
Building a 3-Input Stereo ECC83 (12AX7) Tube Preamp
Some time ago I presented you a project for a 3W stereo tube amplifier with a GU32 output vacuum t...
-
 ESP32 Weather Dashboard with Satellite Maps and 16-day Weather Forecast
As you can see from my previous videos, besides Electronics, my fields of experimentation and proje...
ESP32 Weather Dashboard with Satellite Maps and 16-day Weather Forecast
As you can see from my previous videos, besides Electronics, my fields of experimentation and proje...
-
 Retro Analog VU Meter on Round dispalys (ESP32 and GC9A01)
Recently, in one of my previous videos I presented you a Retro VU Meter project on round displays ...
Retro Analog VU Meter on Round dispalys (ESP32 and GC9A01)
Recently, in one of my previous videos I presented you a Retro VU Meter project on round displays ...
-
 Ultimate 2-Player Reaction Timer with WS2812B LED Strips & Arduino
Arcade reaction game is a genre of play designed to test a player's physical response time and hand...
Ultimate 2-Player Reaction Timer with WS2812B LED Strips & Arduino
Arcade reaction game is a genre of play designed to test a player's physical response time and hand...
-
 Building a Vintage Tube-Style Internet Radio with Raspberry Pi & Rotary Encoder
Internet radio (also known as web radio or net radio) is a digital audio service transmitted via th...
Building a Vintage Tube-Style Internet Radio with Raspberry Pi & Rotary Encoder
Internet radio (also known as web radio or net radio) is a digital audio service transmitted via th...
-
 DIY Smart Code Lock with CrowPanel 1.28 ESP32 Rotary Display
A code lock is a keyless security device—either mechanical or electronic—that restricts access to d...
DIY Smart Code Lock with CrowPanel 1.28 ESP32 Rotary Display
A code lock is a keyless security device—either mechanical or electronic—that restricts access to d...
-
 SDR Panadapter for Vintage Tube Radios – Step-by-Step Tutorial
A radio panadapter (or panoramic adapter) is a device or software tool used in amateur radio and ot...
SDR Panadapter for Vintage Tube Radios – Step-by-Step Tutorial
A radio panadapter (or panoramic adapter) is a device or software tool used in amateur radio and ot...
-
Programmable Mist Maker - XIAO / QT PY Extension
469 1 0 -
RadioHAT - Raspberry Pi radio development platform
374 0 1 -
-
-
-
-
ARPS-2 – Arduino-Compatible Robot Project Shield for Arduino UNO
2907 0 6 -
A Compact Charging Breakout Board For Waveshare ESP32-C3
3412 3 8 -
AI-driven LoRa & LLM-enabled Kiosk & Food Delivery System
3747 2 2


