


|
|
Espressif ESP32 Development Board |
x 1 | |
|
|
Si5351 Clock Generator module |
x 1 | |
|
|
smartphone |
x 1 |

|
Soldering Iron Kit |
|

|
arduino IDEArduino
|
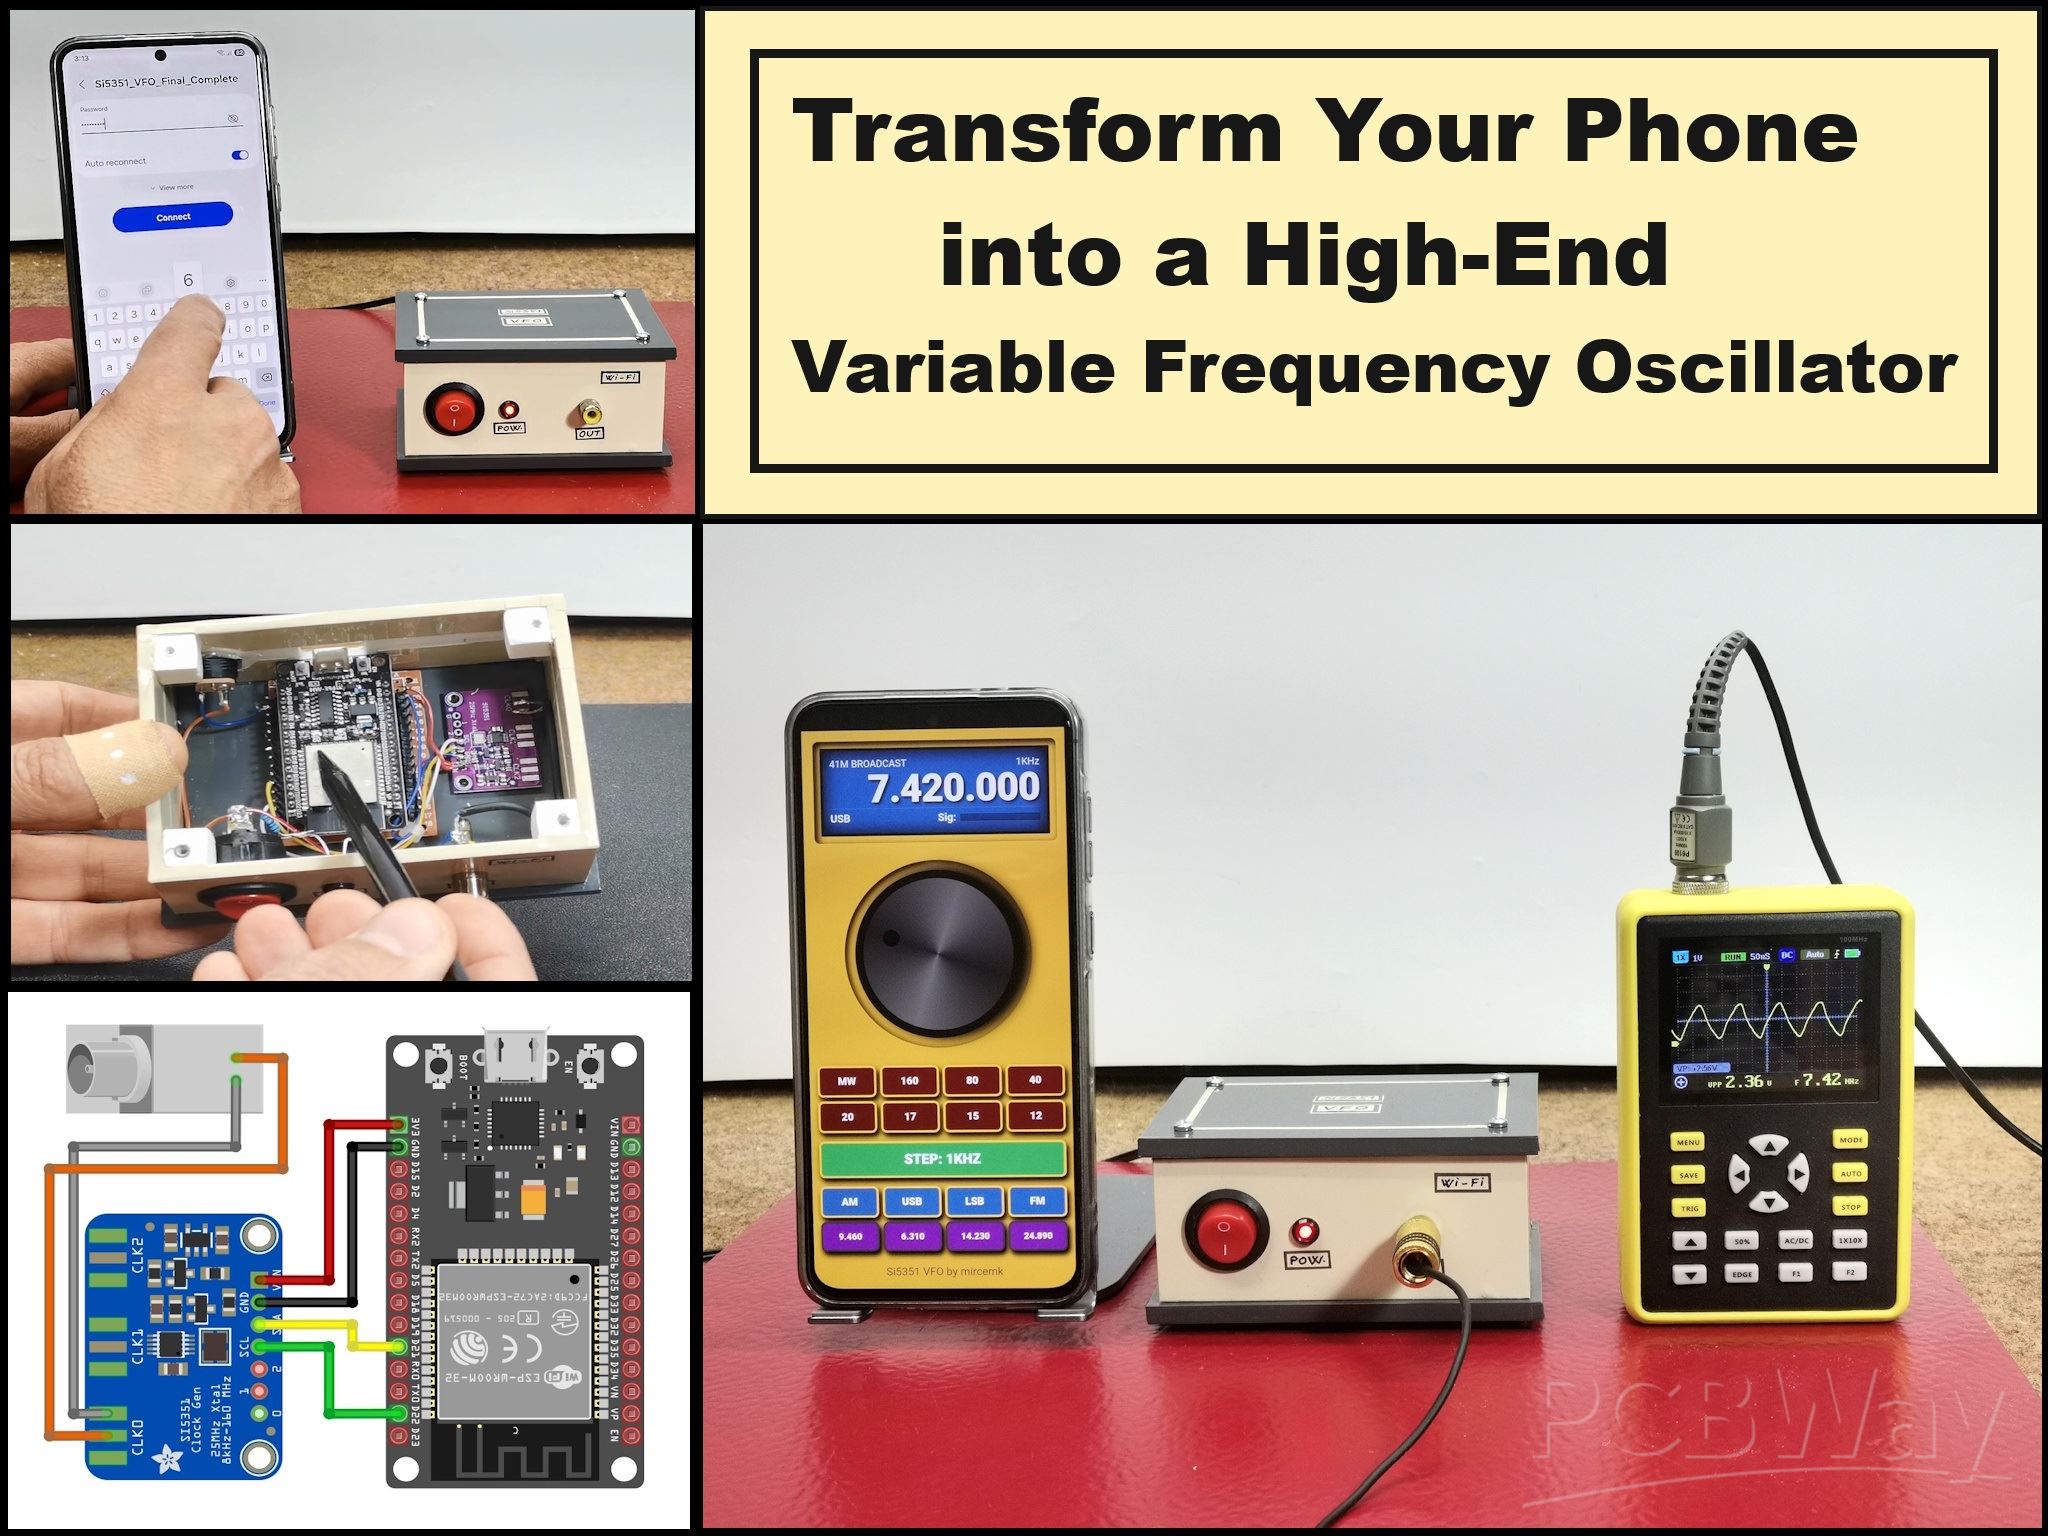
The Ultimate Smartphone VFO ESP32 & Si5351 Wireless Control
Variable frequency oscillators (VFOs) are commonly used in radio transmitters and receivers, especially superheterodyne receivers, where they allow the adjustment of the operating frequency. They are essential for amateur radio, communication systems, and test electronics. In several of my previous videos I have shown you several different ways to create VFOs which basically differ in the way the generated frequency is displayed.
This time I will again describe a way to make such a device, but now significantly different and more practical than the previous ones.
However, its manufacture is much simpler and cheaper, because we do not use a display, or even a rotary encoder, which is a basic part of every VFO. All this is achieved thanks to the use of a smartphone in the function of controlling and displaying the generated frequencies. Now the device is extremely simple and consists of only two inexpensive components: an ESP32 microcontroller board, and a Si5351 clock generator modulе which is connected to the ESP32 with only 4 wires.

The frequency is generated directly on the CLK0 output of the signal generator. Using a smartphone as a user interface (UI) instead of a classic LCD is a great way to get a graphically rich display without spending money on expensive touchscreens. The ESP32 is perfect for this because it has built-in Wi-Fi and enough muscle to simultaneously run a web server and communicate with the Si5351 via the I2C protocol.

This project is sponsored by PCBWay . From concept to production, PCBWay provide cutting-edge electronic design solutions for global innovators, Including hardware design, software development, mechanical design, product testing and certification. PCBWay engineering team consists of experienced engineers in electronics, embedded systems, and product development. They successfully delivered hundreds of projects across industries such as medical devices, industrial automation, consumer electronics, smart home, and IoT.
At first, the challenge was to achieve that "smooth" rotation effect without lag, so I started with the ESPAsyncWebServer library, which allows control via WebSocket, but several bugs appeared, so I continued with the built-in WiFi.h and WebServer.h libraries, which are quite sufficient for optimal control and operation of the device. Then I gradually created a visually beautiful graphical interface with an LCD display, a central rotary knob, and more functional small buttons with different functions.
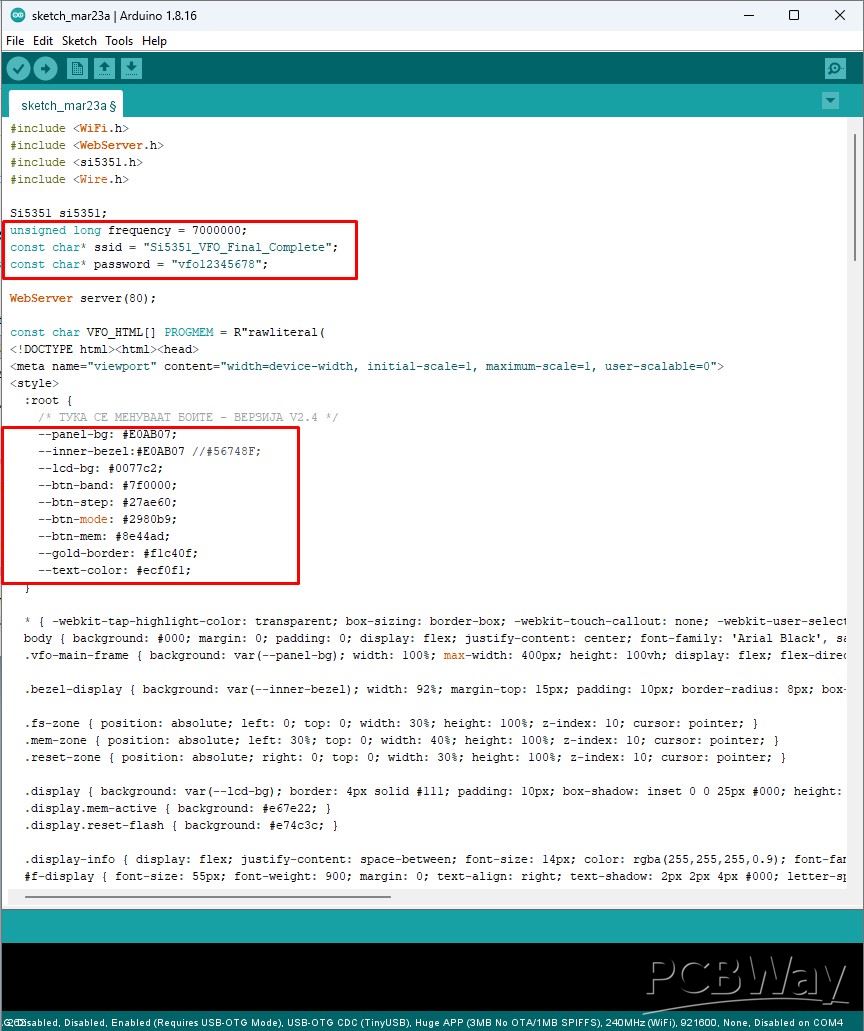
The code is designed in a way that you can easily change multiple parameters, from bandwidth and frequencies, to changing all the colors in one place.
First, let me explain to you the method of starting and all the functions of this hybrid VFO. We turn on the hardware part and on the Smartphone we search for a Wi-Fi network (access point) with the name SI5351_VFO_Final_Complete.
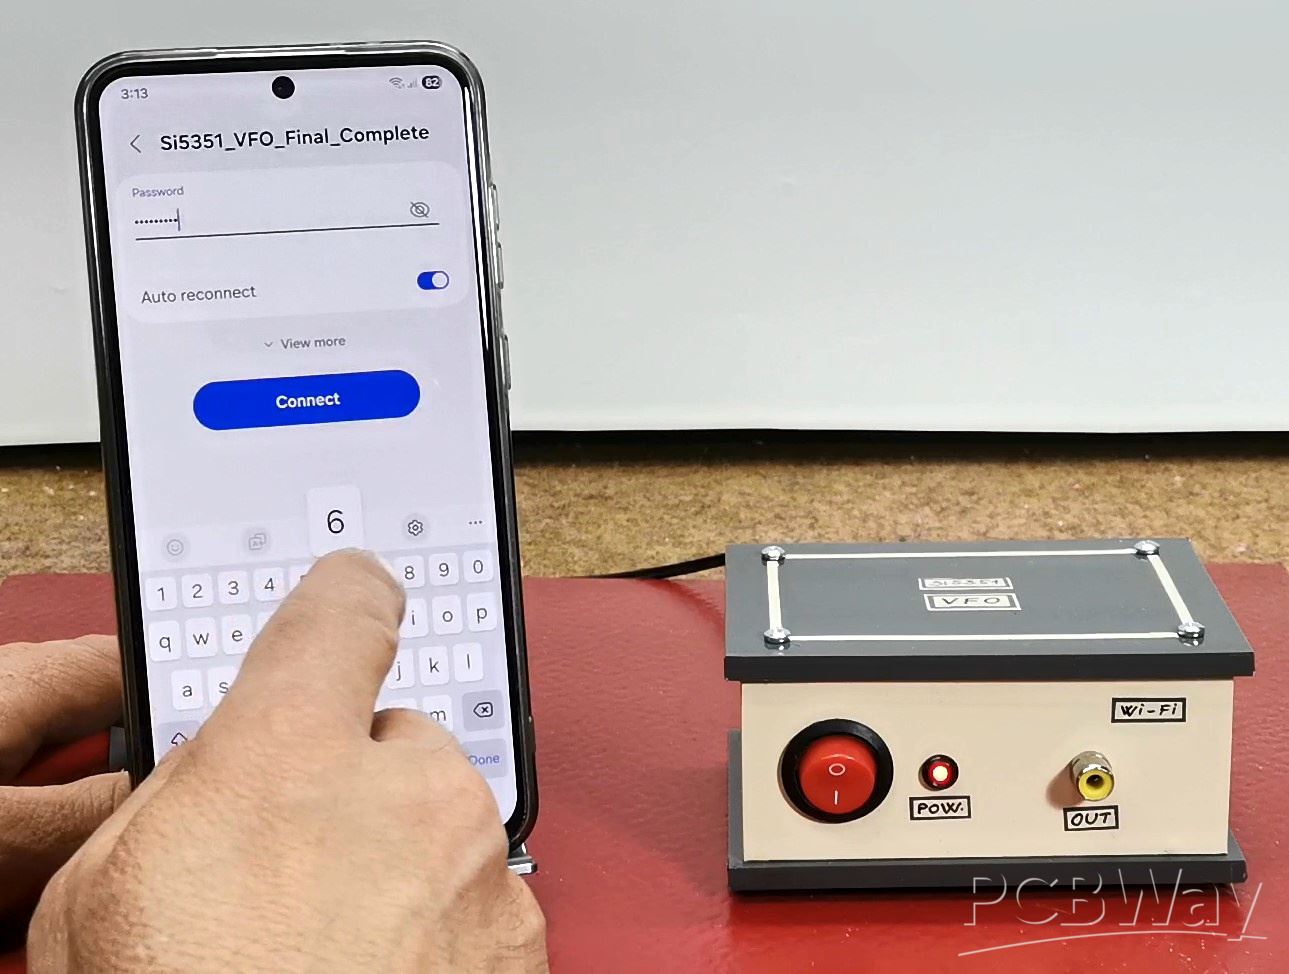
Then we connect to that network with the password "vfo12345678". Now in the Web Browser we enter the address 192.168.4.1. By pressing enter, a mask of a professionally made instrument appears on the display. This image actually represents a web interface through which we will control the hardware. A great advantage is the fact that we do not install any application on the smartphone at all, but only open a web page.
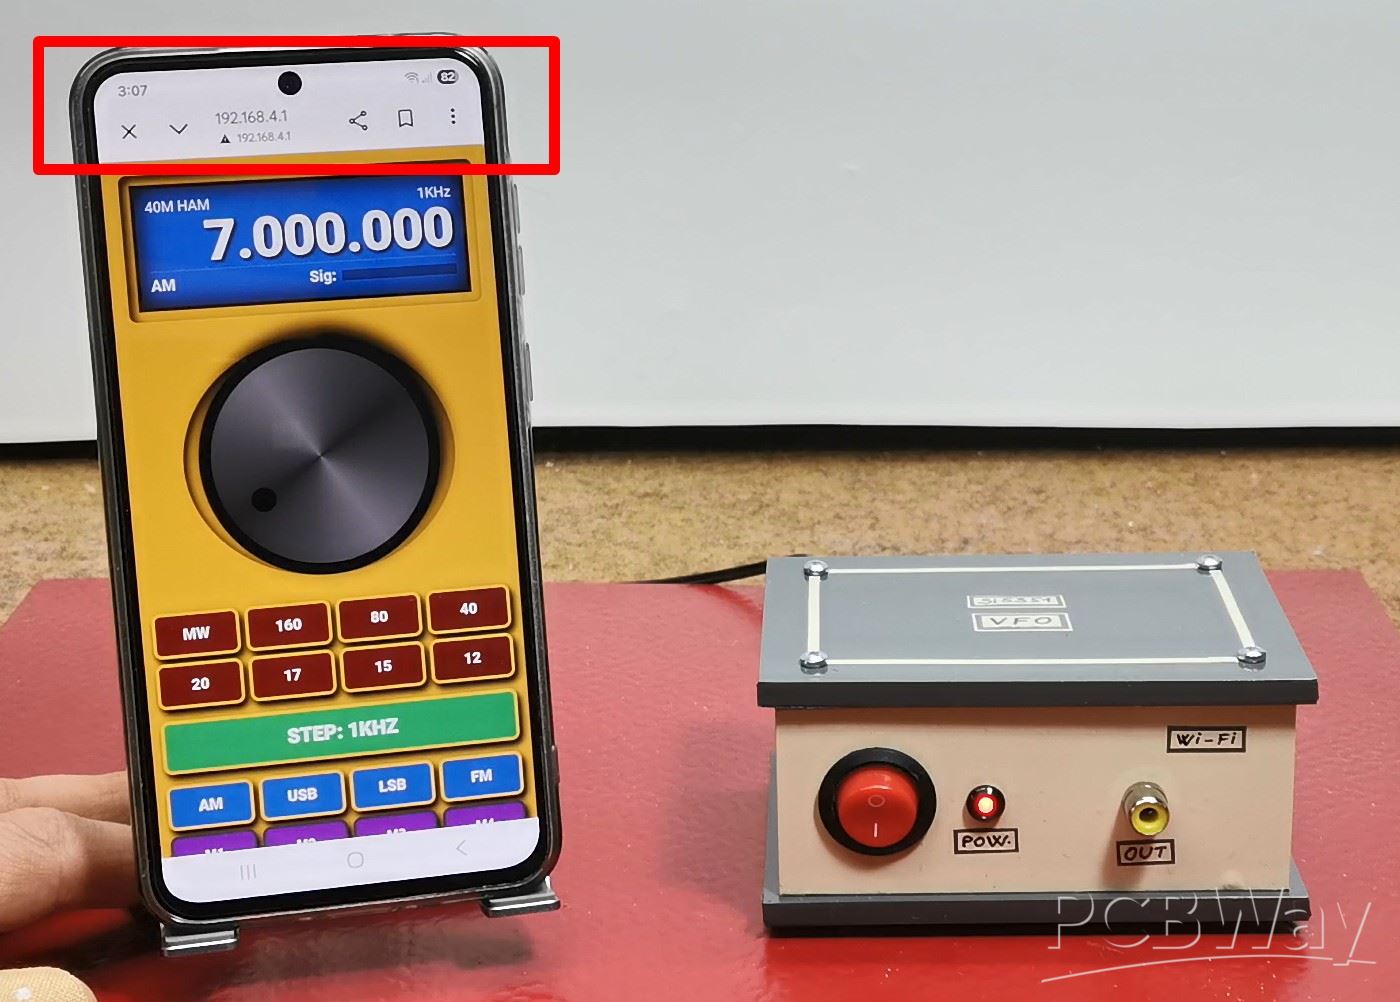
Thus, there is no danger of introducing malicious software, and the compatibility with different smartphone models is unlimited, taking into account that the only requirement is to activate a web browser. By pressing the bottom of the display, fullscreen mode is activated and now the instrument is ready for operation. The LCD display shows the starting frequency, which is defined in the code. The upper left part of the screen shows the modulation type and the Band, and the lower left shows the step with which the frequency changes. At the very right bottom is the Signal Bar, which in a real receiver or transmitter would display the signal strength. This Bar is connected to GPIO34 and by applying a voltage signal to this input, the display is activated. Below the display is a large round knob centrally placed with which we set the desired frequency.As I said earlier, the knob moves very smoothly and the data is transmitted almost instantly to the device. In reality, during operation, there is no noticeable delay at all. Several small functional buttons follow,.
- First, the Amateur band areas are defined,
- below them is the STEP button, which is very often used and therefore larger
- below STEP are the MODE buttons AM, SSB, USB, FM
- and at the bottom are the memory buttons.
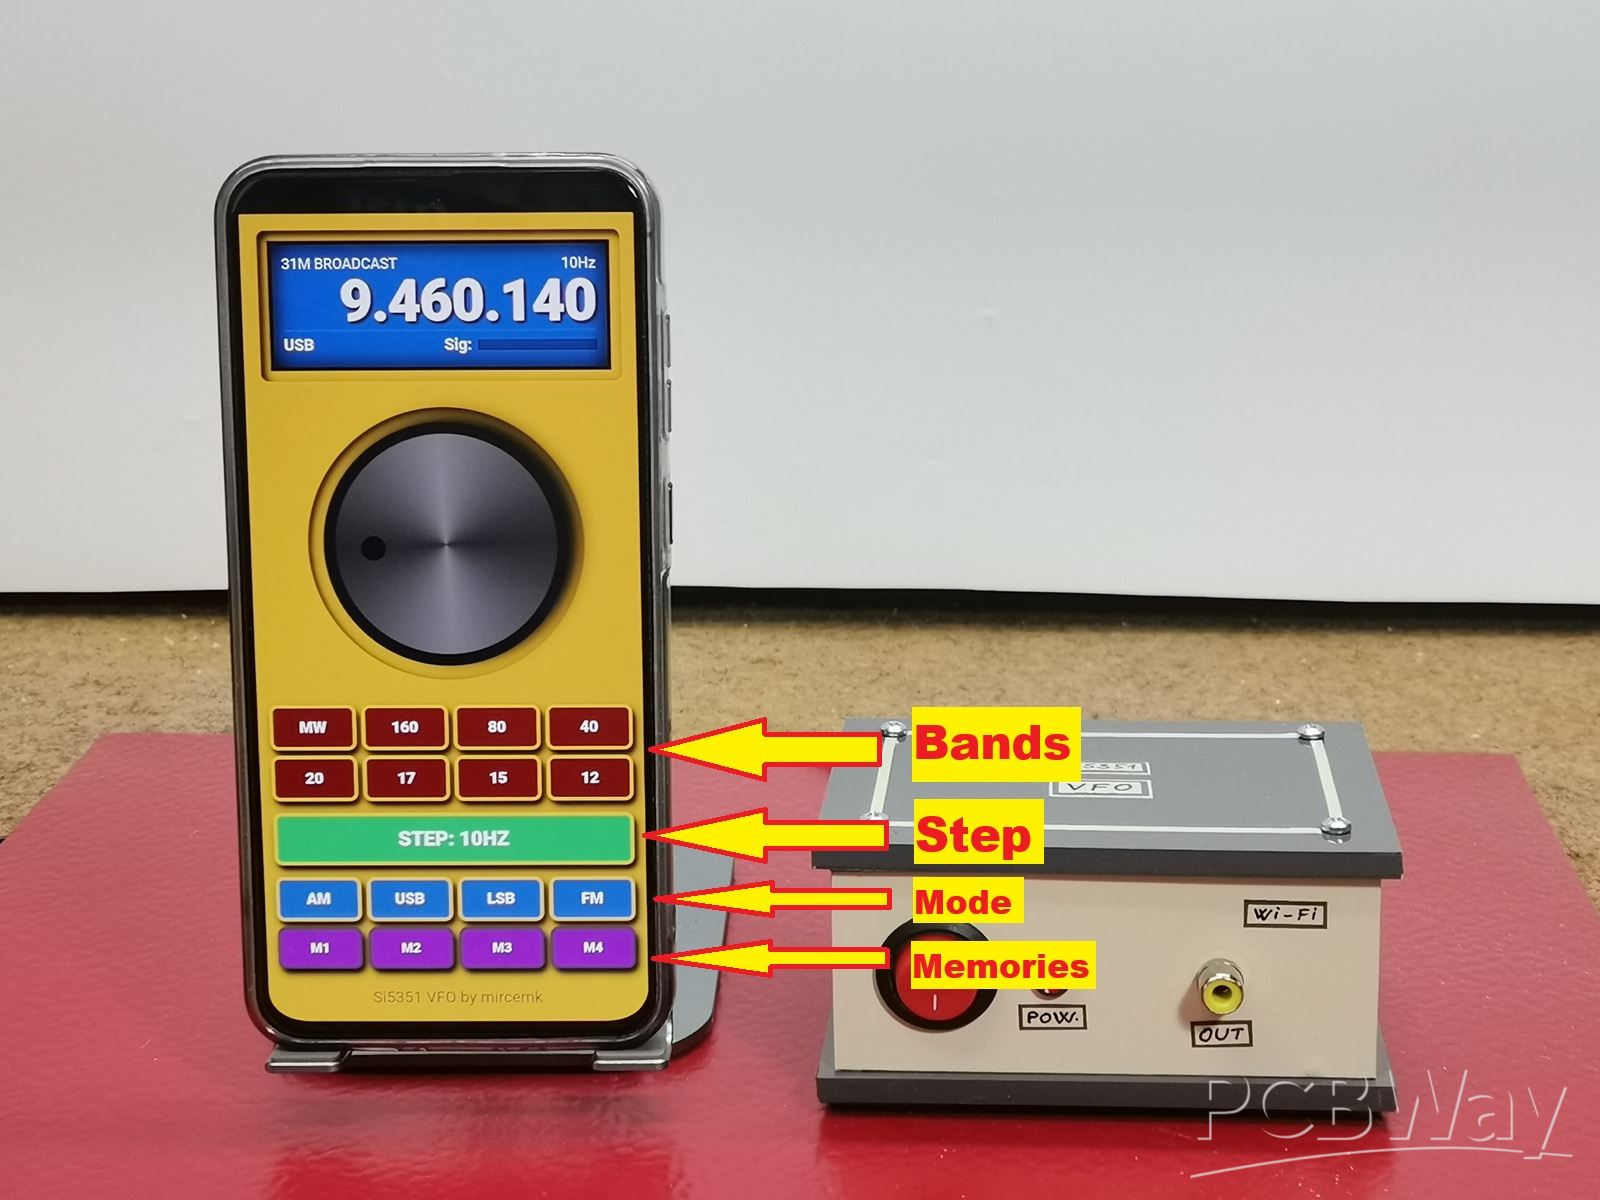
If we want to memorize a frequency, we first press the number at the top of the display, during which the memory buttons start flashing and by pressing one of them, the frequency is memorized. In case we want to delete all previously memorized frequencies, press the button in the middle of the LCD display.
Now let's see how this device works in real conditions.
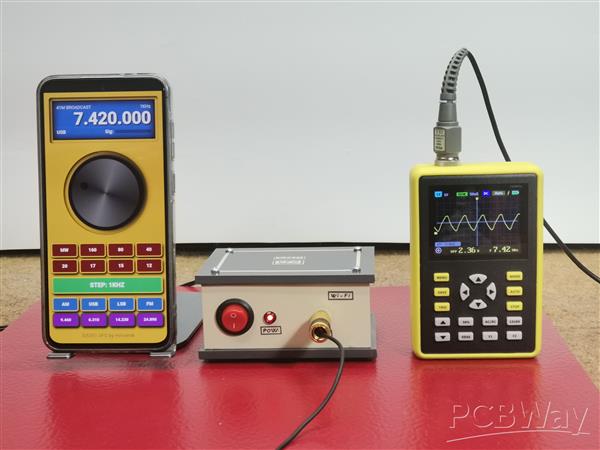
To do this, we will connect a small oscilloscope to the output of the hardware part, on which we will observe the change in frequency and signal shape.
And finally a short conclusion. This project proves you don't need expensive touchscreens to have a beautiful, professional-grade interface for your radio projects. By combining an ESP32 and an Si5351 with your smartphone, you can build a highly functional, retro-styled VFO that fits right in your pocket.
// by mircemk May, 2026

#include <WiFi.h>
#include <WebServer.h>
#include <si5351.h>
#include <Wire.h>

Si5351 si5351;
unsigned long frequency = 7000000;
const char* ssid = "Si5351_VFO_Final_Complete";
const char* password = "vfo12345678";

WebServer server(80);

const char VFO_HTML[] PROGMEM = R"rawliteral(
<!DOCTYPE html><html><head>
<meta name="viewport" content="width=device-width, initial-scale=1, maximum-scale=1, user-scalable=0">
<style>
  :root {
    /* ТУКА СЕ МЕНУВААТ БОИТЕ - ВЕРЗИЈА V2.4 */
    --panel-bg: #E0AB07;
    --inner-bezel:#E0AB07 //#56748F;
    --lcd-bg: #0077c2;
    --btn-band: #7f0000;
    --btn-step: #27ae60;
    --btn-mode: #2980b9;
    --btn-mem: #8e44ad;
    --gold-border: #f1c40f;
    --text-color: #ecf0f1;
  }

  * { -webkit-tap-highlight-color: transparent; box-sizing: border-box; -webkit-touch-callout: none; -webkit-user-select: none; user-select: none; }
  body { background: #000; margin: 0; padding: 0; display: flex; justify-content: center; font-family: 'Arial Black', sans-serif; color: var(--text-color); overflow: hidden; }
  .vfo-main-frame { background: var(--panel-bg); width: 100%; max-width: 400px; height: 100vh; display: flex; flex-direction: column; align-items: center; border-left: 2px solid #444; border-right: 2px solid #111; }

  .bezel-display { background: var(--inner-bezel); width: 92%; margin-top: 15px; padding: 10px; border-radius: 8px; box-shadow: inset 4px 4px 10px #000, 2px 2px 5px rgba(255,255,255,0.1); position: relative; }

  .fs-zone { position: absolute; left: 0; top: 0; width: 30%; height: 100%; z-index: 10; cursor: pointer; }
  .mem-zone { position: absolute; left: 30%; top: 0; width: 40%; height: 100%; z-index: 10; cursor: pointer; }
  .reset-zone { position: absolute; right: 0; top: 0; width: 30%; height: 100%; z-index: 10; cursor: pointer; }

  .display { background: var(--lcd-bg); border: 4px solid #111; padding: 10px; box-shadow: inset 0 0 25px #000; height: 125px; display: flex; flex-direction: column; justify-content: space-between; position: relative; transition: background 0.2s; }
  .display.mem-active { background: #e67e22; }
  .display.reset-flash { background: #e74c3c; }

  .display-info { display: flex; justify-content: space-between; font-size: 14px; color: rgba(255,255,255,0.9); font-family: Arial, sans-serif; }
  #f-display { font-size: 55px; font-weight: 900; margin: 0; text-align: right; text-shadow: 2px 2px 4px #000; letter-spacing: -1px; line-height: 1; }

  .display-footer { display: flex; align-items: center; border-top: 1px solid rgba(255,255,255,0.2); padding-top: 5px; margin-bottom: 4px; }
  #mode-label, .sig-text { font-size: 15px; font-weight: bold; }

  .s-meter-container { display: flex; align-items: center; gap: 6px; flex-grow: 1; justify-content: flex-end; margin-left: 25px; }
  .s-grid { display: flex; gap: 1px; height: 10px; width: 115px; background: rgba(0,0,0,0.3); border: 1px solid #111; }
  .s-seg { flex: 1; background: #222; }
  .s-on { background: #ffffff; box-shadow: 0 0 6px #ffffff; }

  .bezel-knob { background: var(--inner-bezel); width: 270px; height: 270px; margin: 25px 0; border-radius: 50%; box-shadow: inset 3px 3px 10px #000, 2px 2px 5px rgba(255,255,255,0.05); display: flex; justify-content: center; align-items: center; }
  #knob { width: 240px; height: 240px; background: conic-gradient(from 0deg, #333, #777 25%, #333 50%, #777 75%, #333); border-radius: 50%; border: 12px solid #1a1a1a; position: relative; will-change: transform; cursor: pointer; box-shadow: 5px 10px 20px #000; }
  #knob::after { content: ''; position: absolute; top: 25px; left: 50%; transform: translateX(-50%); width: 24px; height: 24px; background: #111; border-radius: 50%; box-shadow: inset 2px 2px 5px #000; }

  .controls-container { width: 94%; display: flex; flex-direction: column; }
  .grid { display: grid; gap: 6px; width: 100%; grid-template-columns: repeat(4, 1fr); }
  .group-margin { margin-bottom: 12px; }

  .btn { border: 3px solid var(--gold-border); border-radius: 8px; color: #fff; font-weight: 900; font-size: 15px; padding: 11px 0; text-align: center; cursor: pointer; box-shadow: 3px 5px 8px #000; text-transform: uppercase; transition: transform 0.05s; }
  .btn:active { transform: translateY(2px); box-shadow: 1px 2px 4px #000; }

  .b-band { background: var(--btn-band); }
  .b-step { background: var(--btn-step); font-size: 20px; padding: 12px; grid-column: span 4; }
  .b-mode { background: var(--btn-mode); }
  .b-mem { background: var(--btn-mem); border-color: #555; font-size: 13px; }

  .signature { color: #555; font-size: 16px; margin-top: 20px; text-align: center; width: 100%; padding-bottom: 15px; font-weight: normal; }
</style>
</head><body>
  <div class="vfo-main-frame">
    <div class="bezel-display">
      <div class="fs-zone" onclick="toggleFS()"></div>
      <div class="mem-zone" onclick="startMem()"></div>
      <div class="reset-zone" onclick="clearAllMem()"></div>

      <div class="display" id="main-display">
        <div class="display-info"><span id="band-label">40M HAM</span><span id="step-label">100Hz</span></div>
        <h1 id="f-display">07.000.000</h1>
        <div class="display-footer">
          <span id="mode-label">USB</span>
          <div class="s-meter-container">
            <span class="sig-text">Sig:</span>
            <div class="s-grid" id="s-grid"></div>
          </div>
        </div>
      </div>
    </div>
    <div class="bezel-knob"><div id="knob"></div></div>
    <div class="controls-container">
      <div class="grid group-margin">
        <div class="btn b-band" onclick="setBand(531000, 'MW')">MW</div>
        <div class="btn b-band" onclick="setBand(1810000, '160M')">160</div>
        <div class="btn b-band" onclick="setBand(3500000, '80M')">80</div>
        <div class="btn b-band" onclick="setBand(7000000, '40M')">40</div>
        <div class="btn b-band" onclick="setBand(14000000, '20M')">20</div>
        <div class="btn b-band" onclick="setBand(18068000, '17M')">17</div>
        <div class="btn b-band" onclick="setBand(21000000, '15M')">15</div>
        <div class="btn b-band" onclick="setBand(24890000, '12M')">12</div>
      </div>
      <div class="grid group-margin">
        <div class="btn b-step" id="step-btn" onclick="nextStep()">STEP: 100Hz</div>
      </div>
      <div class="grid">
        <div class="btn b-mode" onclick="setMode('AM')">AM</div>
        <div class="btn b-mode" onclick="setMode('USB')">USB</div>
        <div class="btn b-mode" onclick="setMode('LSB')">LSB</div>
        <div class="btn b-mode" onclick="setMode('FM')">FM</div>
        <div class="btn b-mem" id="m1" onclick="handleMem(1)">M1</div>
        <div class="btn b-mem" id="m2" onclick="handleMem(2)">M2</div>
        <div class="btn b-mem" id="m3" onclick="handleMem(3)">M3</div>
        <div class="btn b-mem" id="m4" onclick="handleMem(4)">M4</div>
      </div>
    </div>
    <div class="signature">Si5351 VFO by mircemk</div>
  </div>

  <script>
    var freq = 7000000;
    var curMode = "USB"; var lastAngle = 0; var curRot = 0; var isDrag = false; var lastSent = 0;
    var steps = [10, 100, 1000, 5000, 10000, 100000];
    var stepLabels = ["10Hz", "100Hz", "1KHz", "5KHz", "10KHz", "100KHz"];
    var stepIdx = 1;
    var isMemMode = false;

    function loadSavedMem() {
      for(let i=1; i<=4; i++){
        let saved = localStorage.getItem('vfo_m'+i);
        if(saved) document.getElementById('m'+i).innerText = (saved/1000000).toFixed(3);
        else document.getElementById('m'+i).innerText = "M"+i;
      }
    }

    function clearAllMem() {
      for(let i=1; i<=4; i++) localStorage.removeItem('vfo_m'+i);
      loadSavedMem();
      let d = document.getElementById('main-display');
      d.classList.add('reset-flash');
      setTimeout(() => d.classList.remove('reset-flash'), 300);
    }

    function startMem() {
      isMemMode = true;
      document.getElementById('main-display').classList.add('mem-active');
      document.querySelectorAll('.b-mem').forEach(b => b.classList.add('save-ready'));
    }

    function handleMem(id) {
      if(isMemMode) {
        localStorage.setItem('vfo_m'+id, freq);
        document.getElementById('m'+id).innerText = (freq/1000000).toFixed(3);
        isMemMode = false;
        document.getElementById('main-display').classList.remove('mem-active');
        document.querySelectorAll('.b-mem').forEach(b => b.classList.remove('save-ready'));
      } else {
        let saved = localStorage.getItem('vfo_m'+id);
        if(saved) { freq = parseInt(saved); updateUI(); sendFreq(); }
      }
    }

    function toggleFS() {
      var d = document.documentElement;
      if(!document.fullscreenElement) d.requestFullscreen().catch(e=>{});
      else document.exitFullscreen();
    }

    function updateBandLabel() {
      let b = document.getElementById('band-label');
      // ПРЕЗЕМЕНИ ОПСЕЗИ ОД V1.9
      if (freq >= 1810000 && freq <= 2000000) b.innerText = "160M HAM";
      else if (freq >= 3500000 && freq <= 3800000) b.innerText = "80M HAM";
      else if (freq >= 7000000 && freq <= 7200000) b.innerText = "40M HAM";
      else if (freq >= 14000000 && freq <= 14350000) b.innerText = "20M HAM";
      else if (freq >= 18068000 && freq <= 18168000) b.innerText = "17M HAM";
      else if (freq >= 21000000 && freq <= 21450000) b.innerText = "15M HAM";
      else if (freq >= 24890000 && freq <= 24990000) b.innerText = "12M HAM";
      else if (freq >= 28000000 && freq <= 29700000) b.innerText = "10M HAM";
      else if (freq >= 531000 && freq <= 1602000) b.innerText = "MW BROADCAST";
      else if (freq >= 5900000 && freq <= 6200000) b.innerText = "49M BROADCAST";
      else if (freq >= 7200001 && freq <= 7450000) b.innerText = "41M BROADCAST";
      else if (freq >= 9400000 && freq <= 9900000) b.innerText = "31M BROADCAST";
      else if (freq >= 11600000 && freq <= 12100000) b.innerText = "25M BROADCAST";
      else if (freq >= 15100000 && freq <= 15830000) b.innerText = "19M BROADCAST";
      else b.innerText = "GEN";
    }

    function updateUI() {
      document.getElementById('f-display').innerText = Number(freq).toLocaleString('de-DE').replace(/,/g, '.');
      document.getElementById('mode-label').innerText = curMode;
      updateBandLabel();
    }

    function setBand(f, n) { freq = f; updateUI(); sendFreq(); }
    function setMode(m) { curMode = m; updateUI(); }
    function nextStep() {
      stepIdx = (stepIdx + 1) % steps.length;
      document.getElementById('step-btn').innerText = "STEP: " + stepLabels[stepIdx];
      document.getElementById('step-label').innerText = stepLabels[stepIdx];
    }
    function sendFreq() {
      let now = Date.now();
      if (now - lastSent > 50) { fetch('/set?f=' + freq); lastSent = now; }
    }
    function getAngle(x, y) {
      let r = document.getElementById('knob').getBoundingClientRect();
      return Math.atan2(y - (r.top + r.height/2), x - (r.left + r.width/2)) * 180 / Math.PI;
    }
    function move(e) {
      if (!isDrag) return;
      let ev = e.touches ? e.touches[0] : e;
      let ang = getAngle(ev.clientX, ev.clientY);
      let d = ang - lastAngle;
      if (d > 180) d -= 360; if (d < -180) d += 360;
      curRot += d;
      freq += Math.round(d) * (steps[stepIdx] / 10);
      if (freq < 100000) freq = 100000;
      updateUI();
      document.getElementById('knob').style.transform = 'rotate(' + curRot + 'deg)';
      sendFreq();
      lastAngle = ang;
    }
    let knob = document.getElementById('knob');
    knob.addEventListener('mousedown', function(e) { isDrag = true; lastAngle = getAngle(e.clientX, e.clientY); });
    knob.addEventListener('touchstart', function(e) { isDrag = true; lastAngle = getAngle(e.touches[0].clientX, e.touches[0].clientY); e.preventDefault(); }, {passive: false});
    window.addEventListener('mouseup', () => isDrag = false);
    window.addEventListener('touchend', () => isDrag = false);
    window.addEventListener('mousemove', move);
    window.addEventListener('touchmove', move, {passive: false});

    setInterval(() => {
      fetch('/getS').then(r => r.text()).then(v => {
        let segs = document.querySelectorAll('.s-seg');
        let act = Math.floor((v/100)*20);
        segs.forEach((s,i) => { if(i<act) s.classList.add('s-on'); else s.classList.remove('s-on'); });
      });
    }, 250);

    loadSavedMem();
    updateUI();
  </script>
</body></html>
)rawliteral";

void updateFrequency(unsigned long f) { si5351.set_freq(f * 100ULL, SI5351_CLK0); }

void setup() {
  Serial.begin(115200); Wire.begin(21, 22);
  pinMode(32, INPUT);
  analogReadResolution(12);
  analogSetAttenuation(ADC_6db);
  WiFi.mode(WIFI_AP); WiFi.softAP(ssid, password);
  si5351.init(SI5351_CRYSTAL_LOAD_8PF, 0, 0);
  updateFrequency(frequency);
  server.on("/", []() { server.send(200, "text/html", VFO_HTML); });
  server.on("/set", []() { if (server.hasArg("f")) { frequency = server.arg("f").toInt(); si5351.set_freq(frequency * 100ULL, SI5351_CLK0); server.send(200, "text/plain", "OK"); } });
  server.on("/getS", []() { int val = analogRead(32); int percent = map(val, 0, 1200, 0, 100); if(percent > 100) percent = 100; server.send(200, "text/plain", String(percent)); });
  server.begin();
}
void loop() { server.handleClient(); }
The Ultimate Smartphone VFO ESP32 & Si5351 Wireless Control


Raspberry Pi 5 7 Inch Touch Screen IPS 1024x600 HD LCD HDMI-compatible Display for RPI 4B 3B+ OPI 5 AIDA64 PC Secondary Screen(Without Speaker)
BUY NOW


- Comments(3)
- Likes(1)
More by Mirko Pavleski
-
 Arduino 3D Printed self Balancing Cube
Self-balancing devices are electronic devices that use sensors and motors to keep themselves balanc...
Arduino 3D Printed self Balancing Cube
Self-balancing devices are electronic devices that use sensors and motors to keep themselves balanc...
-
 DIY Avionics Simulator with ESP32 - Artificial Horizon, Compass & Altimeter
The inspiration for this project comes from classical aircraft cockpit instruments used for navigat...
DIY Avionics Simulator with ESP32 - Artificial Horizon, Compass & Altimeter
The inspiration for this project comes from classical aircraft cockpit instruments used for navigat...
-
 DIY Miniature X-Ray Machine using a TV Vacuum Tube DY86
An X-ray machine (or radiograph) is a quick, painless medical test that produces images of the struc...
DIY Miniature X-Ray Machine using a TV Vacuum Tube DY86
An X-ray machine (or radiograph) is a quick, painless medical test that produces images of the struc...
-
 Simple SDR Receiver Using 2x NE612 - Dual Conversion, Superheterodyne (0.1–30 MHz)
SDR (Software Defined Radio) is a radio system in which most of the functions of a classic radio (f...
Simple SDR Receiver Using 2x NE612 - Dual Conversion, Superheterodyne (0.1–30 MHz)
SDR (Software Defined Radio) is a radio system in which most of the functions of a classic radio (f...
-
 DIY Vintage TV VU Meter with peak indicators
Some time ago in one of my projects I presented you a way to turn a black and white old mini TV int...
DIY Vintage TV VU Meter with peak indicators
Some time ago in one of my projects I presented you a way to turn a black and white old mini TV int...
-
 DIY Tesla Coil based Plasma Rife Machine
In several of my previous videos, I presented you with different ways to make a Rife Machine, from ...
DIY Tesla Coil based Plasma Rife Machine
In several of my previous videos, I presented you with different ways to make a Rife Machine, from ...
-
 ESP32 Analog VU Meter – Smooth Needle, Real Audio Response (DIY Build)
In several of my previous videos I have shown you how to make analog VU meters emulated on differen...
ESP32 Analog VU Meter – Smooth Needle, Real Audio Response (DIY Build)
In several of my previous videos I have shown you how to make analog VU meters emulated on differen...
-
 The Ultimate Smartphone VFO ESP32 & Si5351 Wireless Control
Variable frequency oscillators (VFOs) are commonly used in radio transmitters and receivers, especi...
The Ultimate Smartphone VFO ESP32 & Si5351 Wireless Control
Variable frequency oscillators (VFOs) are commonly used in radio transmitters and receivers, especi...
-
 DIY Shortwave Propagation Monitor - Measure Ionosphere Conditions
Shortwave Propagation is the way radio waves in the 3 to 30 MHz range travel from point A to point ...
DIY Shortwave Propagation Monitor - Measure Ionosphere Conditions
Shortwave Propagation is the way radio waves in the 3 to 30 MHz range travel from point A to point ...
-
 Professional grade Smart Lock with ESP32, BLE and Android App Control
An electronic codelock is a security device that grants access using a numerical sequence—a PIN cod...
Professional grade Smart Lock with ESP32, BLE and Android App Control
An electronic codelock is a security device that grants access using a numerical sequence—a PIN cod...
-
 Building a 3-Input Stereo ECC83 (12AX7) Tube Preamp
Some time ago I presented you a project for a 3W stereo tube amplifier with a GU32 output vacuum t...
Building a 3-Input Stereo ECC83 (12AX7) Tube Preamp
Some time ago I presented you a project for a 3W stereo tube amplifier with a GU32 output vacuum t...
-
 ESP32 Weather Dashboard with Satellite Maps and 16-day Weather Forecast
As you can see from my previous videos, besides Electronics, my fields of experimentation and proje...
ESP32 Weather Dashboard with Satellite Maps and 16-day Weather Forecast
As you can see from my previous videos, besides Electronics, my fields of experimentation and proje...
-
 Retro Analog VU Meter on Round dispalys (ESP32 and GC9A01)
Recently, in one of my previous videos I presented you a Retro VU Meter project on round displays ...
Retro Analog VU Meter on Round dispalys (ESP32 and GC9A01)
Recently, in one of my previous videos I presented you a Retro VU Meter project on round displays ...
-
 Ultimate 2-Player Reaction Timer with WS2812B LED Strips & Arduino
Arcade reaction game is a genre of play designed to test a player's physical response time and hand...
Ultimate 2-Player Reaction Timer with WS2812B LED Strips & Arduino
Arcade reaction game is a genre of play designed to test a player's physical response time and hand...
-
 Building a Vintage Tube-Style Internet Radio with Raspberry Pi & Rotary Encoder
Internet radio (also known as web radio or net radio) is a digital audio service transmitted via th...
Building a Vintage Tube-Style Internet Radio with Raspberry Pi & Rotary Encoder
Internet radio (also known as web radio or net radio) is a digital audio service transmitted via th...
-
 DIY Smart Code Lock with CrowPanel 1.28 ESP32 Rotary Display
A code lock is a keyless security device—either mechanical or electronic—that restricts access to d...
DIY Smart Code Lock with CrowPanel 1.28 ESP32 Rotary Display
A code lock is a keyless security device—either mechanical or electronic—that restricts access to d...
-
 SDR Panadapter for Vintage Tube Radios – Step-by-Step Tutorial
A radio panadapter (or panoramic adapter) is a device or software tool used in amateur radio and ot...
SDR Panadapter for Vintage Tube Radios – Step-by-Step Tutorial
A radio panadapter (or panoramic adapter) is a device or software tool used in amateur radio and ot...
-
 Oscilloscope Clock Simulation on a Round ESP32 Display
An oscilloscope clock is a circuit that turns an old analog oscilloscope into a stylish, retro-them...
Oscilloscope Clock Simulation on a Round ESP32 Display
An oscilloscope clock is a circuit that turns an old analog oscilloscope into a stylish, retro-them...
-
Programmable Mist Maker - XIAO / QT PY Extension
277 0 0 -
RadioHAT - Raspberry Pi radio development platform
276 0 1 -
-
-
-
-
ARPS-2 – Arduino-Compatible Robot Project Shield for Arduino UNO
2834 0 6 -
A Compact Charging Breakout Board For Waveshare ESP32-C3
3337 3 8 -
AI-driven LoRa & LLM-enabled Kiosk & Food Delivery System
3638 2 2


