


|
|
ESP32 Dev Board |
x 2 | |
|
|
GC9A01 Round Display |
x 2 | |
|
|
VLMS1300-GS08LED - Generic
|
x 2 | |
|
|
resistors, capacitors |
x 1 |

|
arduino IDEArduino
|
|

|
Soldering Iron Kit |
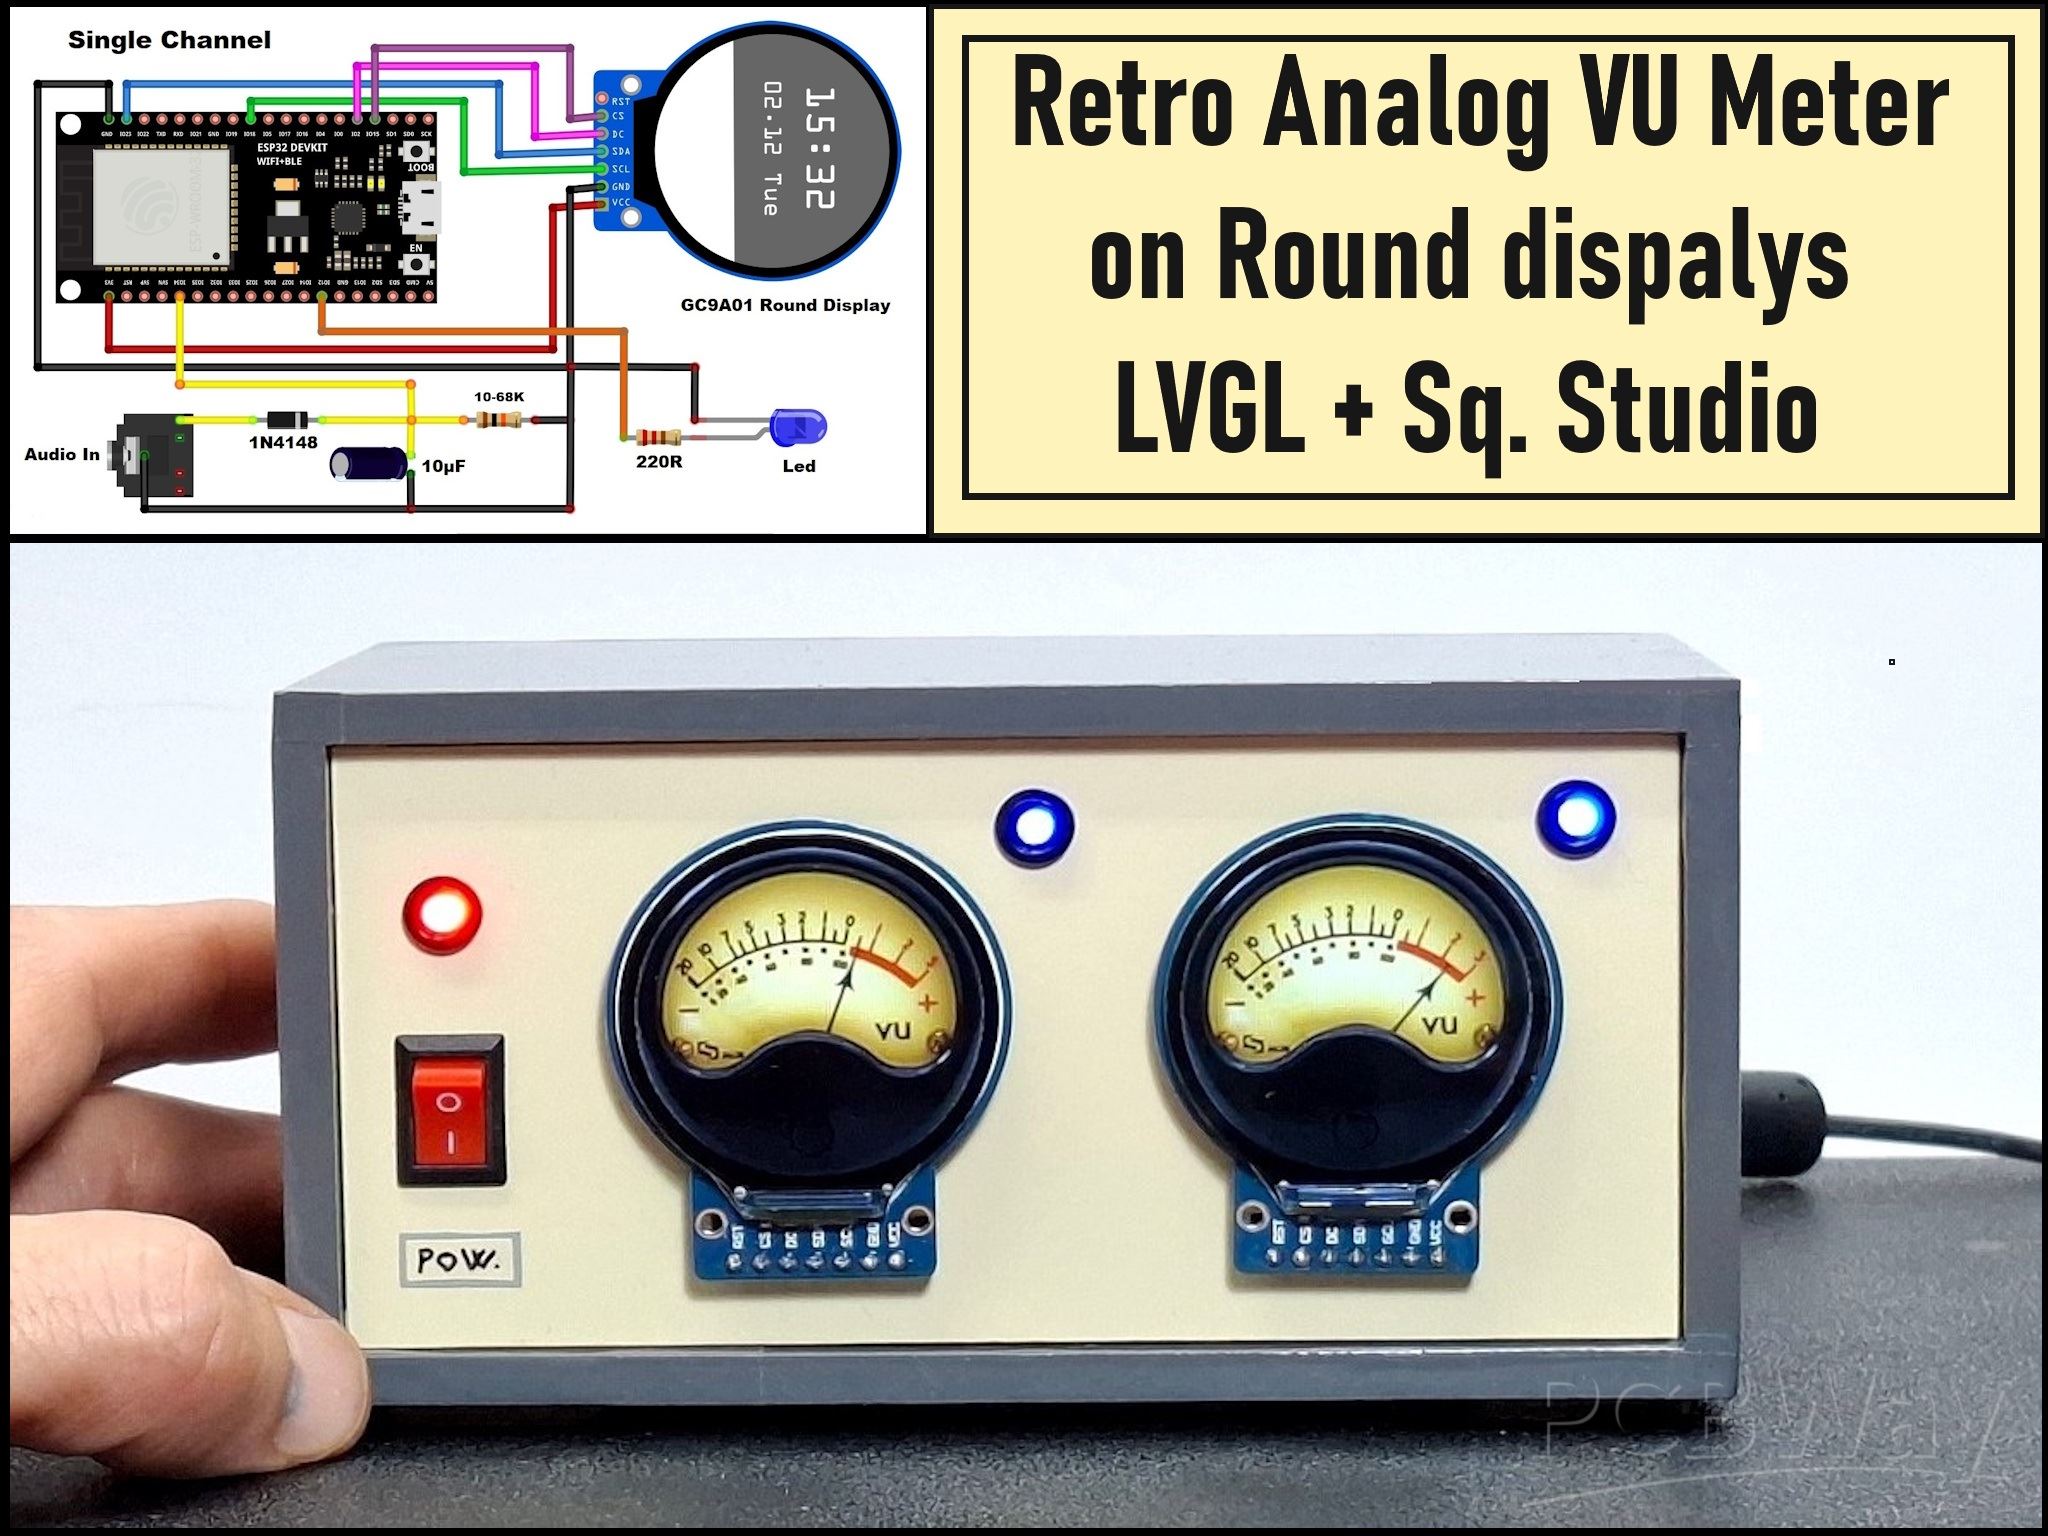
Retro Analog VU Meter on Round dispalys (ESP32 and GC9A01)
Recently, in one of my previous videos I presented you a Retro VU Meter project on round displays with ESP32 Microcontrollers and the Adafruit GFX library. In that case, the VU meters are drawn using the library functions, but the code is still relatively complex and you could see the result in that video.

In this project I will also show you a way to make a Retro VU Meter, but now using LVGL wich is a free and open-source library that enables you to create graphical user interfaces for any MCUs from any vendor on any platform, and also Squarelinestudio UI editor to design and develop beautiful UIs for your embedded devices quickly and easily. The result of using these two tools is immediately visible, the VU meters are extremely realistic, and at the same time the code is much simpler and more flexible.
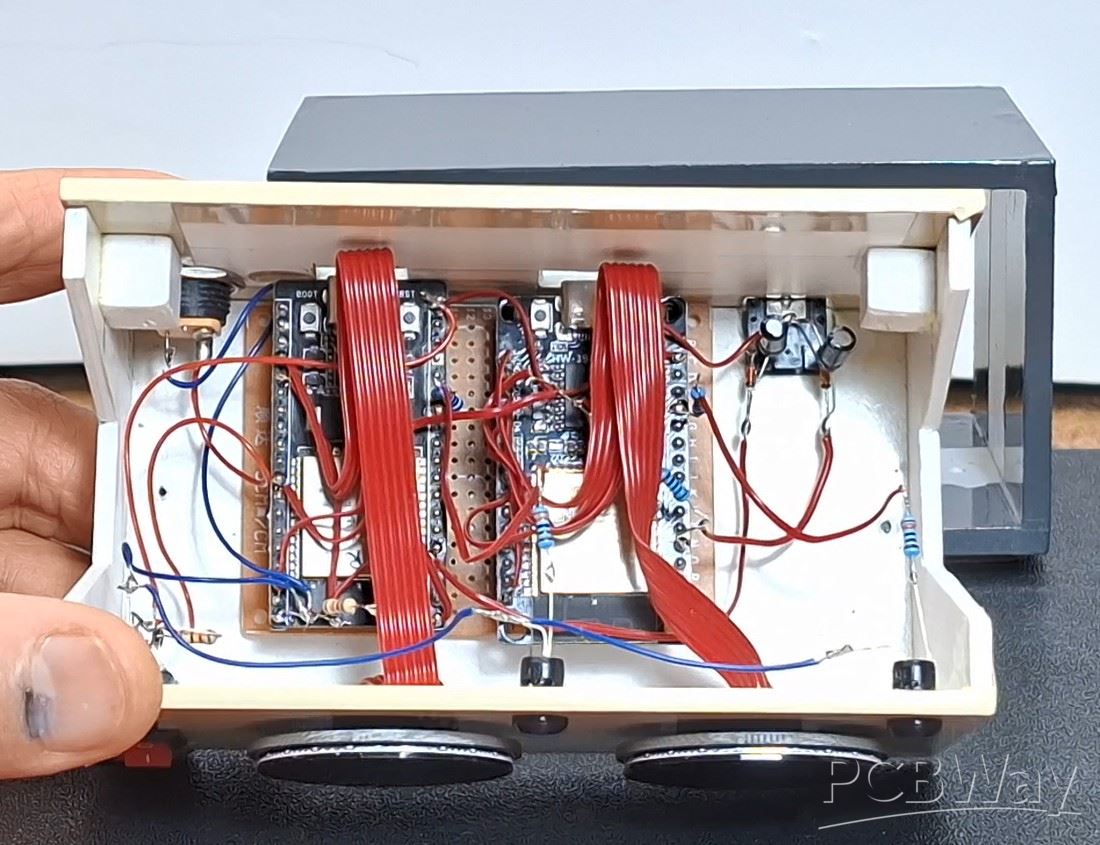
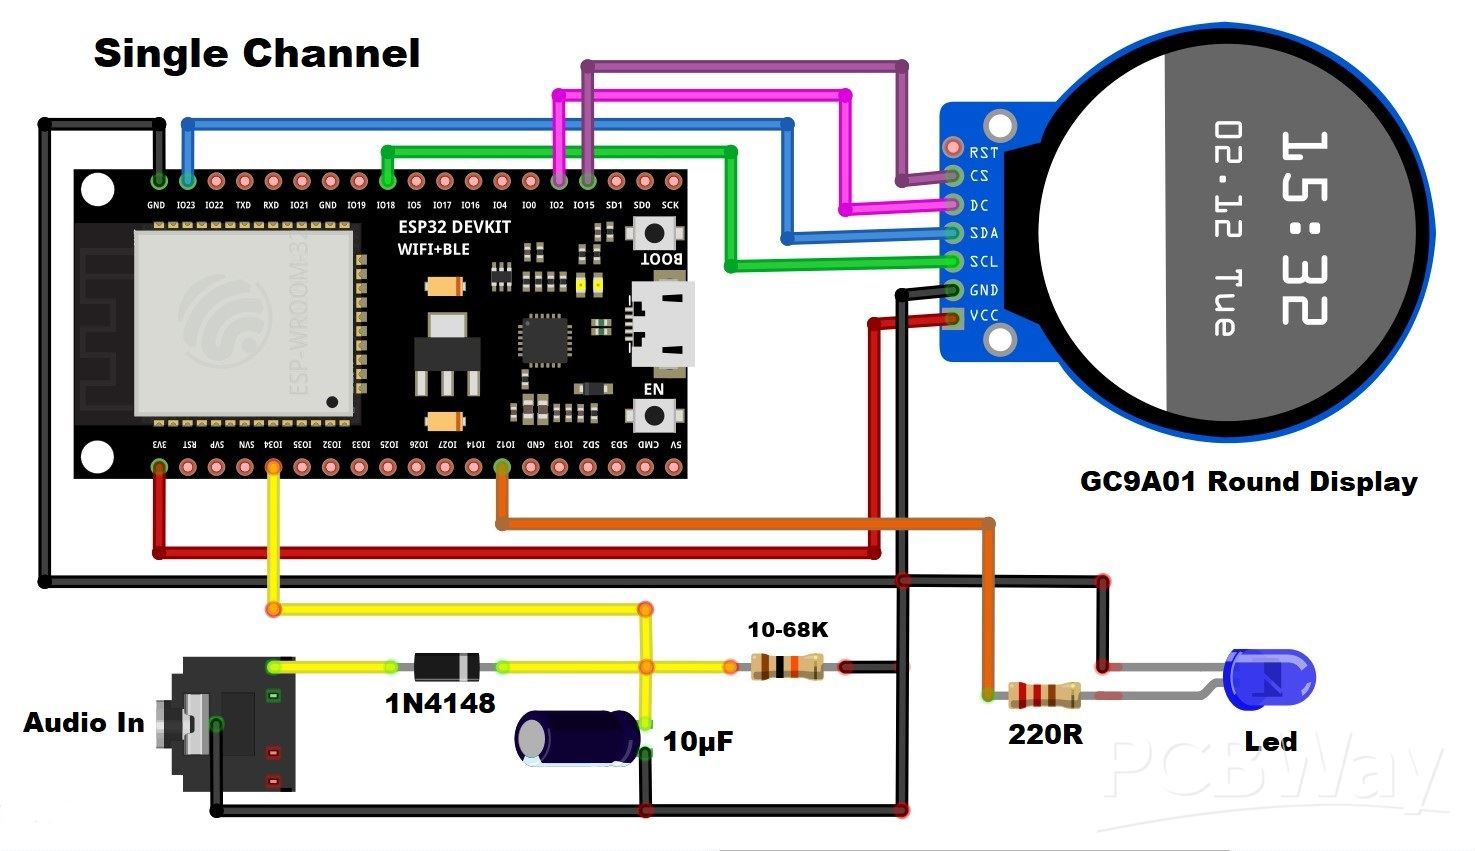
The hardware part is identical to that of the previously mentioned project and consists of only a few cheap components:
- Two ESP32 microcontroller boards, one for each channel separately. Here I should mention that I could have made the project with one MCU, but considering the price, I decided to use two, which makes the production simpler and has more advantages.
- then two round displays 1.28 inches 240x240, with GC9A01 driver chip
- several resistors
- two diodes and capacitors for processing the input signal
- And two LEDs for the Peak Meter function
The diodes together with the capacitors at the input make up a so-called Envelope Follower circuit that brings a signal suitable for further processing to the input of the MCU. The Peak Meter LEDs are connected via appropriate current limiting resistors and the displays are connected via the SPI Interface.

This project is sponsored by PCBWay . From concept to production, PCBWay provide cutting-edge electronic design solutions for global innovators, Including hardware design, software development, mechanical design, product testing and certification. PCBWay engineering team consists of experienced engineers in electronics, embedded systems, and product development. They successfully delivered hundreds of projects across industries such as medical devices, industrial automation, consumer electronics, smart home, and IoT.
As for the code, it generally consists of two parts: UI files generated with SquareLine Studio and the basic .ino code that uses the LVGL library to "manage" these files.
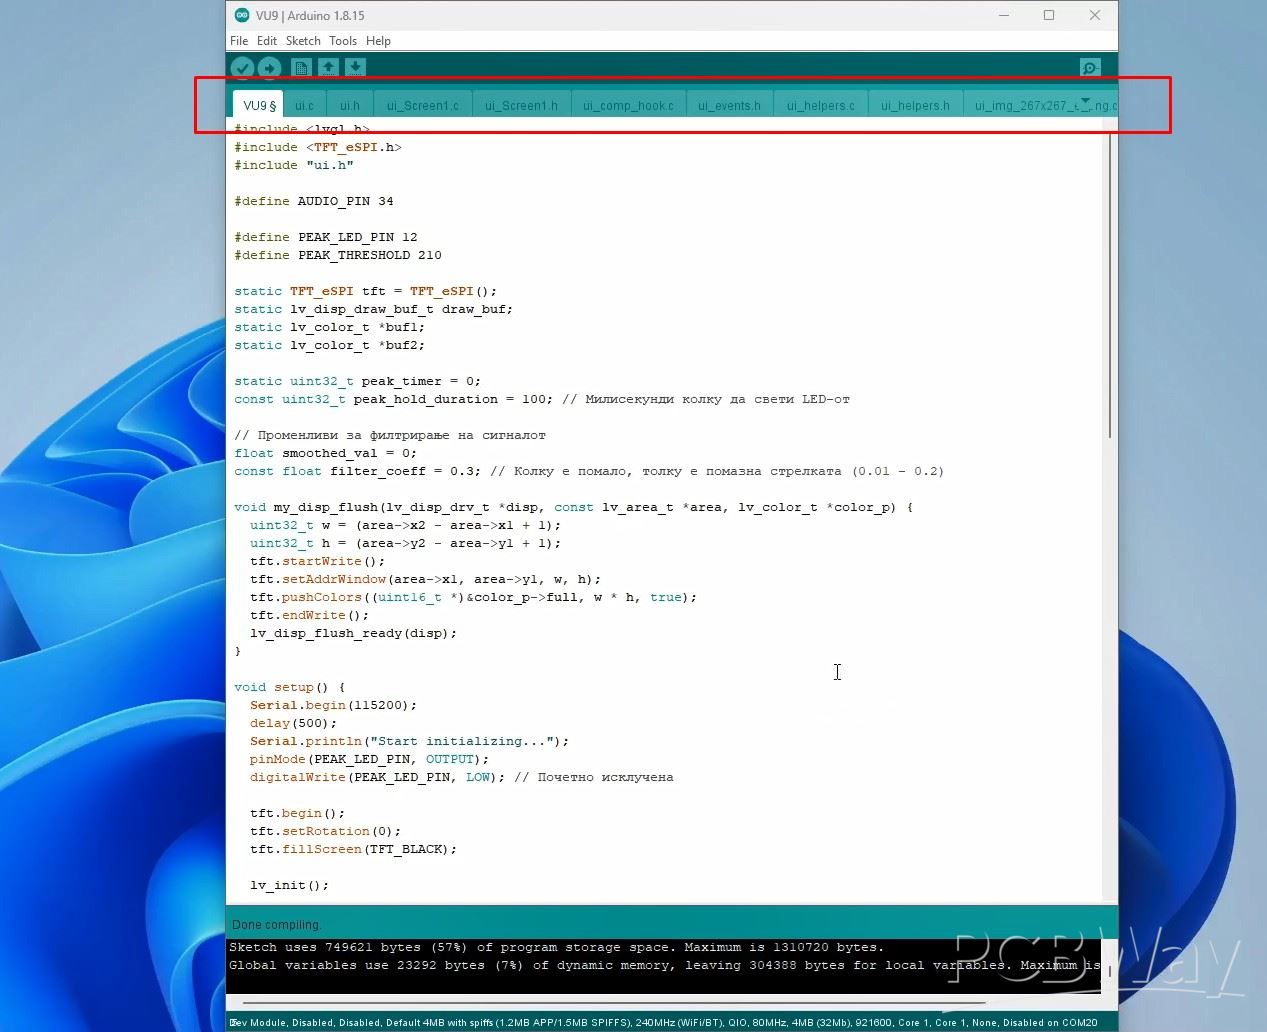
To briefly mention that I am using Arduino IDE version 1.8.16, ESP32 Core ver. 2.0.14 and LVGL library ver. 8.3.11. The name of the folder containing the code files should be the same as the name of the .ino file inside the code. Now we simply run the .ino file and compile and upload the code. We make the basic settings directly in this file.

Code have the part where you can change value at which the Peak LEDs are turned on, then the duration of the activated LED, the way the arrow reacts, and finally the sensitivity of the inputs. The code is identical for both channels. By the way, I should mention that we can also adjust the input sensitivity in a simple way with a stereo potentiometer.
Now let's see how the device reacts in real conditions. Immediately after switching on the VU meter is active, and the arrows move, following the intensity of the incoming audio signal. If this signal crosses the previously defined limit, the Peak LEDs light up. As I mentioned earlier, the speed and the way the arrows move can be changed in the code.

And finally a short conclusion. This project is a modern twist on the classic analog VU meter, using a powerful ESP32 microcontroller and a circular TFT display to achieve an authentic retro look with modern precision. Using the LVGL library and SquareLine Studio, I created a visualization that is not only functional, but also aesthetically enriches any audio system.
Retro Analog VU Meter on Round dispalys (ESP32 and GC9A01)


Raspberry Pi 5 7 Inch Touch Screen IPS 1024x600 HD LCD HDMI-compatible Display for RPI 4B 3B+ OPI 5 AIDA64 PC Secondary Screen(Without Speaker)
BUY NOW


- Comments(1)
- Likes(0)
More by Mirko Pavleski
-
 Arduino 3D Printed self Balancing Cube
Self-balancing devices are electronic devices that use sensors and motors to keep themselves balanc...
Arduino 3D Printed self Balancing Cube
Self-balancing devices are electronic devices that use sensors and motors to keep themselves balanc...
-
 DIY Avionics Simulator with ESP32 - Artificial Horizon, Compass & Altimeter
The inspiration for this project comes from classical aircraft cockpit instruments used for navigat...
DIY Avionics Simulator with ESP32 - Artificial Horizon, Compass & Altimeter
The inspiration for this project comes from classical aircraft cockpit instruments used for navigat...
-
 DIY Miniature X-Ray Machine using a TV Vacuum Tube DY86
An X-ray machine (or radiograph) is a quick, painless medical test that produces images of the struc...
DIY Miniature X-Ray Machine using a TV Vacuum Tube DY86
An X-ray machine (or radiograph) is a quick, painless medical test that produces images of the struc...
-
 Simple SDR Receiver Using 2x NE612 - Dual Conversion, Superheterodyne (0.1–30 MHz)
SDR (Software Defined Radio) is a radio system in which most of the functions of a classic radio (f...
Simple SDR Receiver Using 2x NE612 - Dual Conversion, Superheterodyne (0.1–30 MHz)
SDR (Software Defined Radio) is a radio system in which most of the functions of a classic radio (f...
-
 DIY Vintage TV VU Meter with peak indicators
Some time ago in one of my projects I presented you a way to turn a black and white old mini TV int...
DIY Vintage TV VU Meter with peak indicators
Some time ago in one of my projects I presented you a way to turn a black and white old mini TV int...
-
 DIY Tesla Coil based Plasma Rife Machine
In several of my previous videos, I presented you with different ways to make a Rife Machine, from ...
DIY Tesla Coil based Plasma Rife Machine
In several of my previous videos, I presented you with different ways to make a Rife Machine, from ...
-
 ESP32 Analog VU Meter – Smooth Needle, Real Audio Response (DIY Build)
In several of my previous videos I have shown you how to make analog VU meters emulated on differen...
ESP32 Analog VU Meter – Smooth Needle, Real Audio Response (DIY Build)
In several of my previous videos I have shown you how to make analog VU meters emulated on differen...
-
 The Ultimate Smartphone VFO ESP32 & Si5351 Wireless Control
Variable frequency oscillators (VFOs) are commonly used in radio transmitters and receivers, especi...
The Ultimate Smartphone VFO ESP32 & Si5351 Wireless Control
Variable frequency oscillators (VFOs) are commonly used in radio transmitters and receivers, especi...
-
 DIY Shortwave Propagation Monitor - Measure Ionosphere Conditions
Shortwave Propagation is the way radio waves in the 3 to 30 MHz range travel from point A to point ...
DIY Shortwave Propagation Monitor - Measure Ionosphere Conditions
Shortwave Propagation is the way radio waves in the 3 to 30 MHz range travel from point A to point ...
-
 Professional grade Smart Lock with ESP32, BLE and Android App Control
An electronic codelock is a security device that grants access using a numerical sequence—a PIN cod...
Professional grade Smart Lock with ESP32, BLE and Android App Control
An electronic codelock is a security device that grants access using a numerical sequence—a PIN cod...
-
 Building a 3-Input Stereo ECC83 (12AX7) Tube Preamp
Some time ago I presented you a project for a 3W stereo tube amplifier with a GU32 output vacuum t...
Building a 3-Input Stereo ECC83 (12AX7) Tube Preamp
Some time ago I presented you a project for a 3W stereo tube amplifier with a GU32 output vacuum t...
-
 ESP32 Weather Dashboard with Satellite Maps and 16-day Weather Forecast
As you can see from my previous videos, besides Electronics, my fields of experimentation and proje...
ESP32 Weather Dashboard with Satellite Maps and 16-day Weather Forecast
As you can see from my previous videos, besides Electronics, my fields of experimentation and proje...
-
 Retro Analog VU Meter on Round dispalys (ESP32 and GC9A01)
Recently, in one of my previous videos I presented you a Retro VU Meter project on round displays ...
Retro Analog VU Meter on Round dispalys (ESP32 and GC9A01)
Recently, in one of my previous videos I presented you a Retro VU Meter project on round displays ...
-
 Ultimate 2-Player Reaction Timer with WS2812B LED Strips & Arduino
Arcade reaction game is a genre of play designed to test a player's physical response time and hand...
Ultimate 2-Player Reaction Timer with WS2812B LED Strips & Arduino
Arcade reaction game is a genre of play designed to test a player's physical response time and hand...
-
 Building a Vintage Tube-Style Internet Radio with Raspberry Pi & Rotary Encoder
Internet radio (also known as web radio or net radio) is a digital audio service transmitted via th...
Building a Vintage Tube-Style Internet Radio with Raspberry Pi & Rotary Encoder
Internet radio (also known as web radio or net radio) is a digital audio service transmitted via th...
-
 DIY Smart Code Lock with CrowPanel 1.28 ESP32 Rotary Display
A code lock is a keyless security device—either mechanical or electronic—that restricts access to d...
DIY Smart Code Lock with CrowPanel 1.28 ESP32 Rotary Display
A code lock is a keyless security device—either mechanical or electronic—that restricts access to d...
-
 SDR Panadapter for Vintage Tube Radios – Step-by-Step Tutorial
A radio panadapter (or panoramic adapter) is a device or software tool used in amateur radio and ot...
SDR Panadapter for Vintage Tube Radios – Step-by-Step Tutorial
A radio panadapter (or panoramic adapter) is a device or software tool used in amateur radio and ot...
-
 Oscilloscope Clock Simulation on a Round ESP32 Display
An oscilloscope clock is a circuit that turns an old analog oscilloscope into a stylish, retro-them...
Oscilloscope Clock Simulation on a Round ESP32 Display
An oscilloscope clock is a circuit that turns an old analog oscilloscope into a stylish, retro-them...
-
Programmable Mist Maker - XIAO / QT PY Extension
241 0 0 -
RadioHAT - Raspberry Pi radio development platform
263 0 1 -
-
-
-
-
ARPS-2 – Arduino-Compatible Robot Project Shield for Arduino UNO
2820 0 6 -
A Compact Charging Breakout Board For Waveshare ESP32-C3
3325 3 8 -
AI-driven LoRa & LLM-enabled Kiosk & Food Delivery System
3619 2 2


