


|
|
GRM188Z71A475KE15DmuRata *
|
x 1 | |
|
|
CL10B104KB8NNNCSamsung
|
x 1 | |
|
|
SM04B-SRSS-TB (LF)(SN)JST
|
x 2 | |
|
|
RC0603FR-0710KLYAGEO
|
x 2 | |
|
|
VL53L4CDV0DH/1ST
|
x 1 |
|
|
KiCad 10.0KiCad
|
QWIIC-VL53L4CD Time-of-Flight Distance Sensor Module
The good old HC-SR04 SONAR module, and its newer, 3.3V HC-SR04P sibling, have long been go-to distance sensors for hobby robot circuits. The downside is that these modules are distinctively large, with prominent transducer 'eyes', making it difficult to tuck them into smaller robot designs. While my BEAPER Nano and BEAPER Pico robot circuits both include header sockets to mount these SONAR modules on top of their PCBs, I wanted a smaller, LASER-based ToF (Time-of-Flight) distance sensor module that could be embedded inside the BEAPER Bot robot chassis.
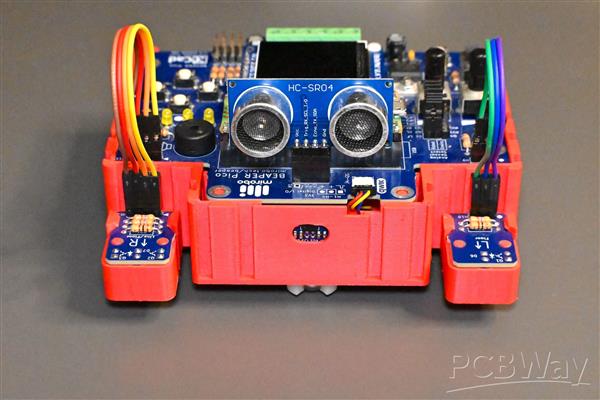
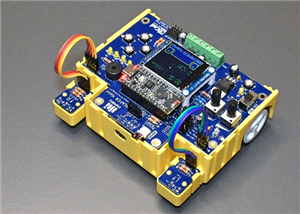
Photo: A BEAPER Pico robot with an HC-SR04P SONAR distance sensing module mounted on top, and a Laser ToF distance sensor mounted in the oval cut-out on the front of the robot.
A number of common ToF modules exist, including the older and slower single-zone VL6180 and VL53L0X modules, the long-range VL53L1 and VL53L1X modules, newer generation sensors in the VL53L4xx family, as well as the latest, multi-zone 8x8 area sensor modules such as the VL53L7CX and VL53L8CX. Most of these connect to a microcontroller using the I2C bus, and a few of the latest area sensors even include SPI.
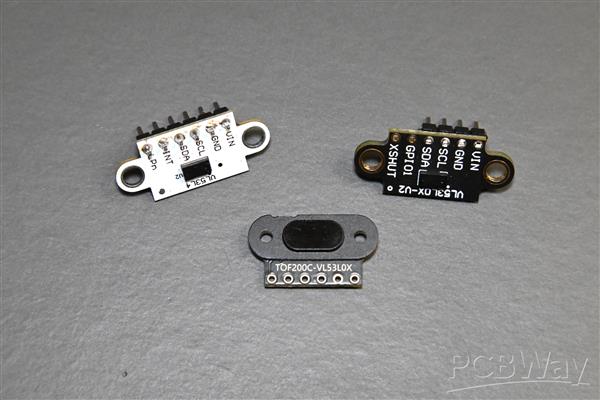
Photo: Three different ToF distance sensor modules.
For my BEAPER robots I was ideally looking to find a small, accurate ToF sensor with a range of about 1m. After both trying a number of different modules and finding this comparison in a community forum post, I decided the STMicroelectronics VL53L4CD module would be the best fit for my small robots. The VL53L4CD is a fast, single zone sensor, with an update rate of up to 100Hz and a detection range from about 5mm to a maximum of 1.3m.
Connections, but make it QWIIC!
The ToF distance sensor modules I purchased for testing all have a set of 6-pin header contacts to connect them with a microcontroller. Four of the six contacts provide the required I2C connections (VDD, GND, SCL, and SDA), and the other two contacts are for an interrupt output signal and a shutdown/control signal, neither of which I need for my application.
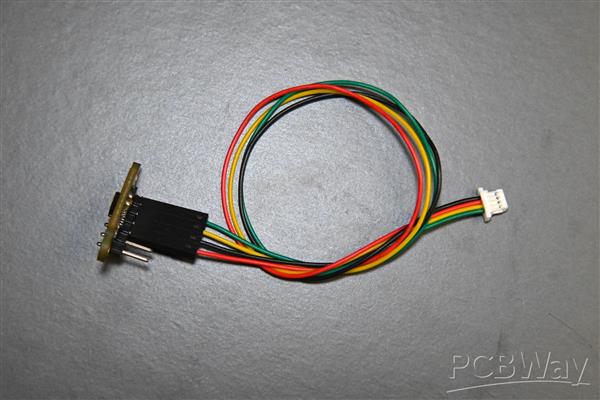
Photo: A ToF module (left) connects through socket headers and wires leading to a QWIIC JST-SH connector (right).
To connect one of these modules to the QWIIC connector on my BEAPER robots, I would need some kind of adapter. The simplest connection can be made using a QWIIC prototyping cable with the QWIIC JST-SH connector at one end and four Dupont-style header sockets at the other end. By soldering a 4-pin header onto the module, I could simply attach the socket ends of the QWIIC cable to the sensor, and then plug the QWIIC connector into my robot circuit.
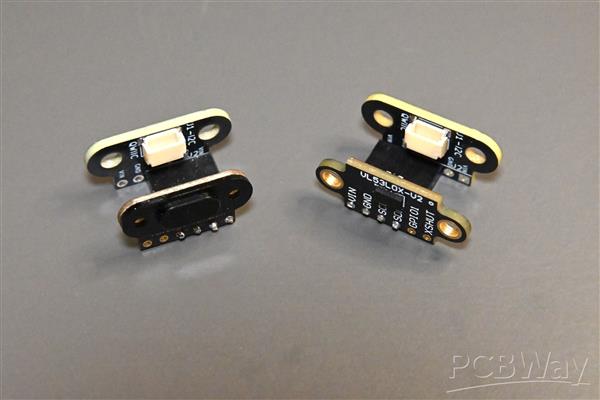
Photo: Two different ToF modules plugged into adapter circuits that provide them with QWIIC (JST-SH) sockets.
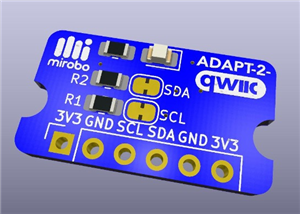
Instead, I wanted a slimmer solution, and one that could take advantage of QWIIC extension cables with JST-SH connectors on both ends. My first attempt at a solution was to design an adapter board having its own on-board QWIIC connector. The latest version of my QWIIC adapter circuit is shared on PCBWay as the Adapt-2-QWIIC project.
The QWIIC VL53L4CD Design
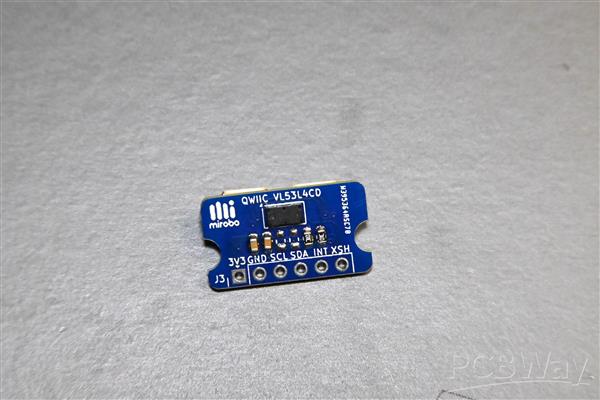
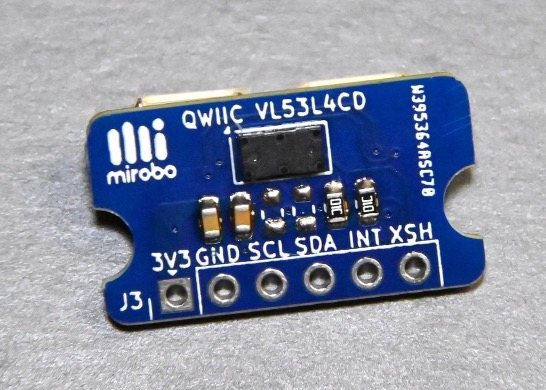
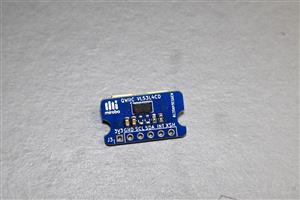
Photo: The front of my QWIIC VL53L4CD prototype circuit showing the ToF sensor module (large, black rectangle), and 0603 SMD capacitors and resistors above a row of header pads.
While the QWIIC adapter board works fine for testing, I wan't happy with the combined size of both the ToF module and a QWIIC adapter circuit. To reduce the size, I decided to create my own all-in-one distance sensor, aiming for a tiny form factor PCB that would allow the sensor to fit into the smallest of spaces in my 3D-printed robot chassis. The semi-circular dimples enable 3D-printed spring clips to hold the module in place, and can also be used for screw mounting without the module having the extended wings that would be necessary to fully enclose mounting holes.
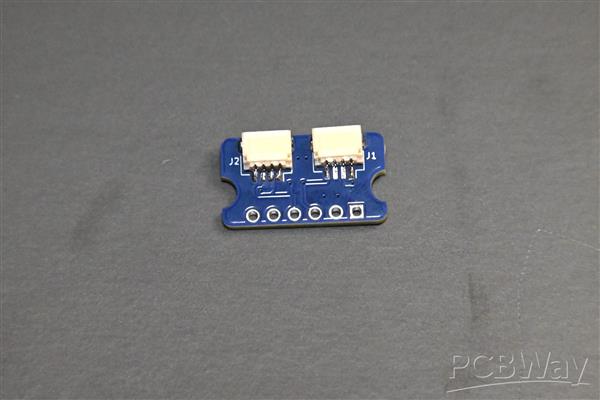
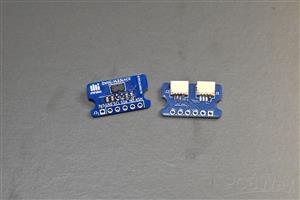
Photo: The back of my QWIIC VL53L4CD distance sensor showing the two QWIIC (JST-SH) connectors.
Since I2C is a multi-drop bus, I added two QWIIC (JST-SH) connectors on the back of the PCB – with both of them extending from the same side of the unit. Many of the commercial offerings I have seen put their QWIIC connectors on opposite sides of the circuit boards, requiring extra space either above and below, or on both the left and right sides of a module, making the modules potentially more difficult to mount in tight spaces
The rest of the front of the circuit consists of supporting parts for the ToF module, including the recommended filter capacitors, 10kΩ pull-up resistors for the interrupt and shutdown control pins, and SMD pads for optional I2C SCL and SDA pull-up resistors. There is even a 6-pin header strip at the bottom of the PCB that matches the layout of the other common ToF modules.
While I designed this circuit specifically for the VL53L4CD ToF distance sensor, all of the single-zone STMicroelectronics VL53xxx sensors use the same pin-out and pad layout, so this single PCB design can work with any single-zone ToF distance sensor in the VL53xx family.
Assembling QWIIC VL53L4CD is not so quick
I assembled the prototype circuits by applying solder paste to the front side pads for the ToF sensor, resistors, and capacitors using an SMD stencil. After placing all of the front-mounted components (except for the SCL ad SDA pull-ups), the boards were soldered on a hot plate.
Assembling the back side is a bit more tedious, as I solder the two JST-SH QWIIC connectors by hand. I could probably use a lower temperature solder paste with a hot-air system to solder these connectors, but manual soldering worked okay as I only needed a couple of units to verify their operation. Having PCBWay do the assembly ($29 for up to 20 pieces) is, in my mind, a better trade-off than soldering a larger batch of boards by hand.
Measuring distance
Measuring distance using a ToF distance sensor module isn't as simple as writing a few lines of code for a SONAR module. ToF sensors incorporate their own on-device microcontroller and proprietary firmware. This requires your microcontroller to run a driver program that properly initializes them and then enables communication with the ToF sensor. Each model of ToF sensor is different, and requires its own, specific driver.
For Arduino, search for a VL53L4CD driver in the Library Manager of the Arduino IDE, or look for an Arduino VL53L4CD driver on the internet. Since the VL53L4CD is one of the newest single-zone distance sensors, fewer drivers are available for it than for the older and more common VL53L0X and VL53L1X ToF modules.
STMicroelectronics publishes a sample C language ultra-lite driver for the VL53L4CD, and I used this example code to create an Arduino VL53L4CD driver (also linked below) as well as a MicroPython VL53L4CD driver module. Find example MicroPython programs using this driver module for both BEAPER Nano and BEAPER Pico in their GitHub repositories.
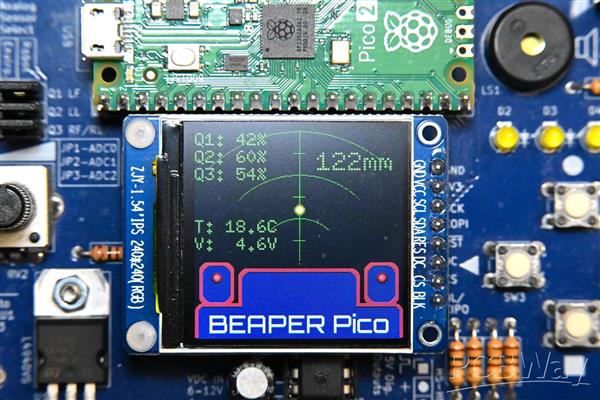
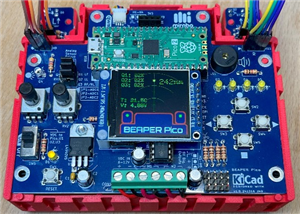
Photo: A radar-like range display on the LCD of a BEAPER Pico circuit displaying distance read from the QWIIC VL53L4CD sensor module.
Using a ToF driver involves two steps: initializing the sensor, and then starting distance measurements. Distance measurements with a VL53L4CD repeat automatically, using polling (or a hardware interrupt) used to determine when new readings are ready – unlike having your program initiate individual readings when using a SONAR distance sensor. Distance from the ToF driver is returned in mm (millimetres), along with other information about each measurement including validity and various signal statistics (most if which is not usually needed, but can help to refine measurement settings and accuracy).
Another big difference between ToF and SONAR distance sensors is that ToF sensors include a programmable measurement timing budget. This timing budget, specified in ms (milliseconds), not only affects the measurement rate, but also the measurement accuracy. Longer timing budgets provide more accurate distance results, while faster update rates sacrifice accuracy for speed. For the VL53L4CD sensor, the timing budget can range from 10-200ms (5-100Hz update rates), with the default set at 50ms (or up to 20 distance measurements per second).
Going the distance
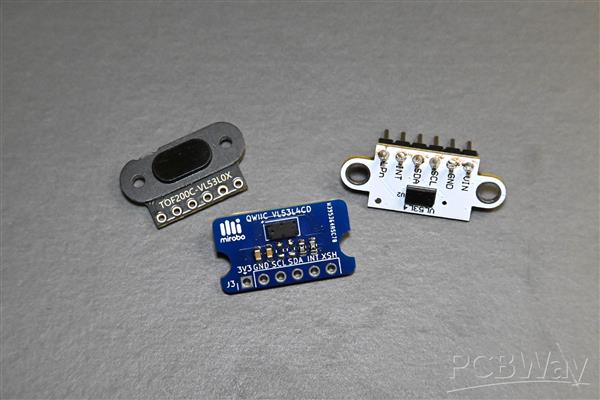
Photo: My QWIIC VL53L4CD sensor (blue) along with some comparable commercial offerings.
While off-the-shelf distance sensors are a quick and easy solution, I'm really happy that I decided to create my own sensor module, and with the way it turned out. I've now got a very small, accurate, and fast sensor that will be easy to integrate into my robots and future projects, and I'm sharing it here in the hope that it might be a useful distance sensor for you as well!
QWIIC-VL53L4CD Time-of-Flight Distance Sensor Module
Project images are for reference only. Actual production is based on the manufacturing files on the project page.
Please review the designer's notes (e.g., PCB thickness) and select the appropriate options.
PCBWay is not responsible
for issues caused by unsuitable parameter selections.
For more important ordering information, please refer to
Read More


Raspberry Pi 5 7 Inch Touch Screen IPS 1024x600 HD LCD HDMI-compatible Display for RPI 4B 3B+ OPI 5 AIDA64 PC Secondary Screen(Without Speaker)
BUY NOW


- Comments(0)
- Likes(1)
More by John Rampelt
-
 QWIIC-VL53L4CD Time-of-Flight Distance Sensor Module
The good old HC-SR04 SONAR module, and its newer, 3.3V HC-SR04P sibling, have long been go-to distan...
QWIIC-VL53L4CD Time-of-Flight Distance Sensor Module
The good old HC-SR04 SONAR module, and its newer, 3.3V HC-SR04P sibling, have long been go-to distan...
-
 ARPS-2 – Arduino-Compatible Robot Project Shield for Arduino UNO
Meet ARPS-2ARPS-2 is version two of my Arduino-compatible Robot Project Shield for Arduino UNO. ARPS...
ARPS-2 – Arduino-Compatible Robot Project Shield for Arduino UNO
Meet ARPS-2ARPS-2 is version two of my Arduino-compatible Robot Project Shield for Arduino UNO. ARPS...
-
 BEAPER Pico 0.1: A (Prototype) Beginner Electronics and Programming Educational Robot for Raspberry Pi Pico
BackgroundI have been teaching high school electronics and computer technology courses for over thir...
BEAPER Pico 0.1: A (Prototype) Beginner Electronics and Programming Educational Robot for Raspberry Pi Pico
BackgroundI have been teaching high school electronics and computer technology courses for over thir...
-
 CHRP4 Beginner Robotics Developer Board
CHRP4 OverviewCHRP4 (Common Hardware Robotics Project - version 4) is beginner-friendly microcontrol...
CHRP4 Beginner Robotics Developer Board
CHRP4 OverviewCHRP4 (Common Hardware Robotics Project - version 4) is beginner-friendly microcontrol...
-
 Adapt-2-QWIIC
Lately, I've been playing with a number of interesting and inexpensive I2C modules purchased online....
Adapt-2-QWIIC
Lately, I've been playing with a number of interesting and inexpensive I2C modules purchased online....
-
 BEAPER Nano V1.01 – Beginner Electronics and Programming Educational Robot for Arduino Nano ESP32
BEAPER Nano built as a simple obstacle-sensing robot using left and right optical floor sensor modul...
BEAPER Nano V1.01 – Beginner Electronics and Programming Educational Robot for Arduino Nano ESP32
BEAPER Nano built as a simple obstacle-sensing robot using left and right optical floor sensor modul...
-
 BEAPER Pico v1.00 – Beginner Electronics and Programming Educational Robot for Raspberry Pi Pico and Pico 2
Meet BEAPER PicoBEAPER stands for Beginner Electronics and Programming Educational Robot, and Pico r...
BEAPER Pico v1.00 – Beginner Electronics and Programming Educational Robot for Raspberry Pi Pico and Pico 2
Meet BEAPER PicoBEAPER stands for Beginner Electronics and Programming Educational Robot, and Pico r...
-
 BEAPER Bot Robot Chassis
BEAPER BotBEAPER (Beginner Electronics and Programming Educational Robot) Bot is a 3D-printable BEAP...
BEAPER Bot Robot Chassis
BEAPER BotBEAPER (Beginner Electronics and Programming Educational Robot) Bot is a 3D-printable BEAP...
-
 BEAPER Nano 1.0: the Beginner Electronics and Programming Educational Robot circuit for Arduino Nano ESP32
When the Arduino Nano ESP32 was released with a combination of a fast, powerful microcontroller, lot...
BEAPER Nano 1.0: the Beginner Electronics and Programming Educational Robot circuit for Arduino Nano ESP32
When the Arduino Nano ESP32 was released with a combination of a fast, powerful microcontroller, lot...
-
 BEAPER Nano (Beginner Electronics and Programming Educational Robot) for Arduino Nano ESP32
Note: This is the first prototype BEAPER Nano circuit. See the newest BEAPER Nano 1.0 circuit. BEAPE...
BEAPER Nano (Beginner Electronics and Programming Educational Robot) for Arduino Nano ESP32
Note: This is the first prototype BEAPER Nano circuit. See the newest BEAPER Nano 1.0 circuit. BEAPE...
-
 BPStick (Breadboard Power Stick) - 5V through hole version
When schools start teaching STEM programs, or hobbyists embark on learning electronics, one of their...
BPStick (Breadboard Power Stick) - 5V through hole version
When schools start teaching STEM programs, or hobbyists embark on learning electronics, one of their...
-
 UPS (USB Power Stick) breadboard power adapter
When schools start teaching STEM programs, or hobbyists embark on learning electronics, one of their...
UPS (USB Power Stick) breadboard power adapter
When schools start teaching STEM programs, or hobbyists embark on learning electronics, one of their...
-
 ARPS – A Beginner Arduino®-compatible Robot Project Shield
ARPS OverviewARPS (Arduino®-compatible Robot Project Shield) is beginner-friendly add-on shield for ...
ARPS – A Beginner Arduino®-compatible Robot Project Shield
ARPS OverviewARPS (Arduino®-compatible Robot Project Shield) is beginner-friendly add-on shield for ...
-
 UBMP4 Beginner Microcontroller Development Board
UBMP4 OverviewUBMP4 (USB-based Beginner Multipurpose Project - version 4) is beginner-friendly micro...
UBMP4 Beginner Microcontroller Development Board
UBMP4 OverviewUBMP4 (USB-based Beginner Multipurpose Project - version 4) is beginner-friendly micro...
-
Programmable Mist Maker - XIAO / QT PY Extension
1116 2 1 -
RadioHAT - Raspberry Pi radio development platform
928 0 2 -
-
-
-
-
ARPS-2 – Arduino-Compatible Robot Project Shield for Arduino UNO
3361 0 6 -
A Compact Charging Breakout Board For Waveshare ESP32-C3
3968 3 8 -
AI-driven LoRa & LLM-enabled Kiosk & Food Delivery System
4360 2 2


