


|
KiCad 9.0 |
|
|
Arduino Lab for MicroPythonArduino
|
|

|
arduino IDEArduino
|
|

|
TinkerCad |
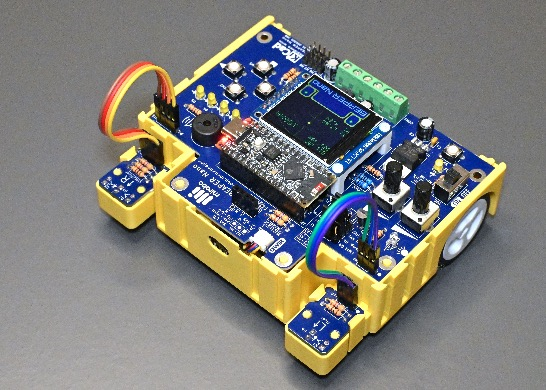
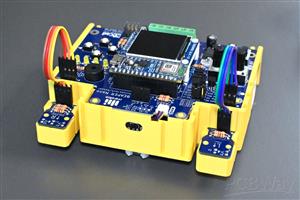
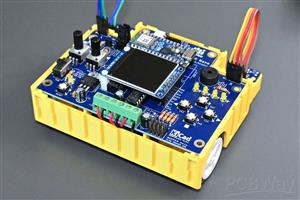
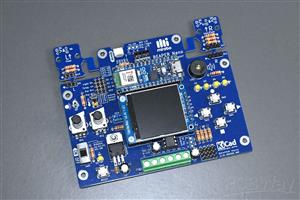
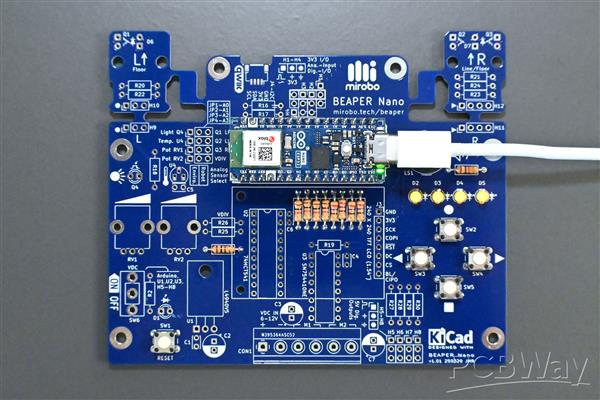
BEAPER Nano V1.01 – Beginner Electronics and Programming Educational Robot for Arduino Nano ESP32
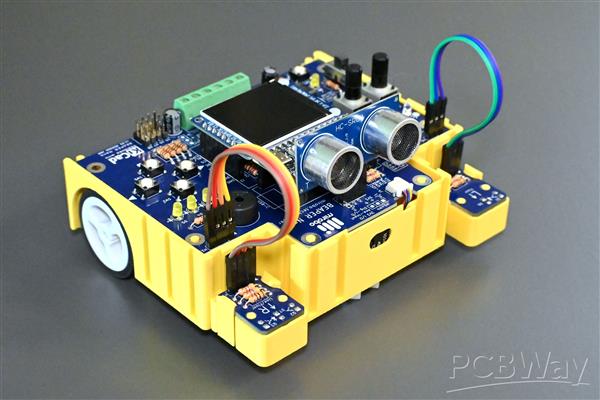
BEAPER Nano built as a simple obstacle-sensing robot using left and right optical floor sensor modules (connected by header extension cables) and a front-mounted SONAR distance sensor module.
Meet BEAPER Nano
BEAPER stands for Beginner Electronics and Programming Educational Robot, and Nano refers to the Arduino Nano ESP32 microcontroller it's designed for.
I created BEAPER Nano to be a versatile platform for teaching beginner electronics and computer technology classes, but its features also make it a great platform to help anyone focus on learning microcontroller programming without the interruptions of building and debugging breadboard circuits.
BEAPER Nano includes all of the typical beginner I/O devices on-board, plus additional circuitry that lets it become much more capable as learners progress and develop advanced programming skills. Learners can build BEAPER Nano into a variety of projects such as an environmental monitoring system, a servo or NeoPixel controller, a basic IoT device, a simple gaming system, and a few different types of robots!
BEAPER Nano was the first circuit I designed designed to use a plug-in microcontroller module instead of using a microcontroller IC, and it also became the inspiration for BEAPER Pico – its sibling circuit for the Raspberry Pi Pico family of microcontrollers. This is v.1.01 – BEAPER Nano's latest revision.
Designed for versatility
BEAPER Nano starts as a bare, through-hole PCB designed to be assembled by beginners in stages – three common beginner build configurations are described below. Assembling the circuit in stages enables learners to use its basic input and output circuits to start learning programming quickly, while providing instructors with the ability to tailor BEAPER Nano to their needs, enable student project differentiation, save on component costs, and even form the basis of a multi-semester or multi-year course.
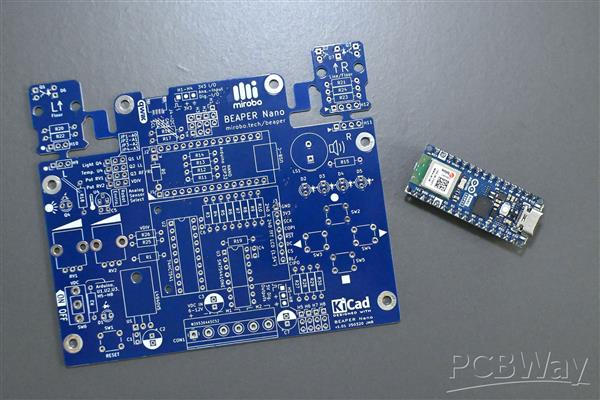
A bare BEAPER Nano PCB beside an Arduino Nano ESP32 module.
BEAPER Nano is designed for the Arduino Nano ESP32 – a small, yet amazingly powerful and inexpensive microcontroller module. It can be programmed using the Arduino IDE – making it instantly familiar to instructors who have previously taught using traditional Arduino UNO or Nano boards – taking advantage of the resource-rich Arduino ecosystem that has developed to support novice programmers.
Arduino Nano ESP32 can also be programmed using MicroPython in the Arduino Lab for MicroPython editor or Thonny. MicroPython provides beginners with an easier to learn programming alternative that uses a simpler syntax, has a rich and powerful feature set, nearly instant program modification, and interactive debugging.
BEAPER Nano build configurations
Educational Starter configuration
BEAPER Nano assembled in a fast-build, minimal-components Educational Starter configuration with just four pushbuttons, four LEDs, and a piezo speaker (under the USB cable plug).
The Educational Starter configuration is designed to mimic a typical beginner breadboard circuit – just without the difficult to insert parts and the rat's nest of wires! This configuration is quick to build and provides learners with:
- an Arduino Nano ESP32 microcontroller module with an on-module RGB LED
- 4 user pushbuttons
- 4 user LEDs
- a piezo speaker
Using these starter components allows learners to develop a fundamental understanding of input, output, variables, loops, sound output, and simple software functions. Adding an ambient light sensor, an analog temperature sensor, and one or both potentiometers to the starter configuration enables beginners to progress to learning the basics of analog input and output processing as well.
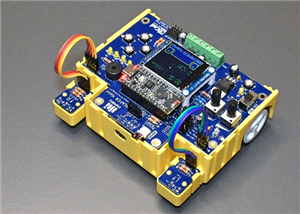
Robot Starter configuration
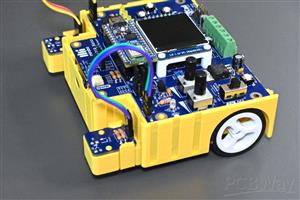
BEAPER Nano includes on-board circuits that provide beginners with everything they need to make line-following robots, wall- or floor-sensing robots, and even remotely-controlled robots using Arduino Nano ESP32's on-module WiFi and Bluetooth capabilities. An external battery and two DC motors quickly attach to its screw terminal strip, and its 5V header pins support up to four servos. In addition, a four-pin header socket makes it easy to plug in a 3.3V SONAR distance sensing module, and the I2C/QWIIC connector can be used to connect an optical ToF (Time of Flight) distance sensor module.
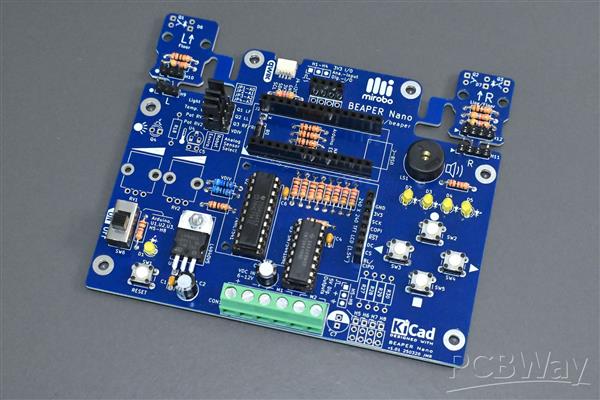
BEAPER Nano assembled in the Robot Starter configuration with (bottom, from left) a power switch and power LED, low-dropout voltage regulator, level shifter IC, H-bridge motor driver IC, and a screw terminal strip. Across the top, resistors and headers are populated in both break-away optical sensor modules, QWIIC I2C bus connector, and a SONAR module header socket are also installed.
The Robot Starter configuration includes all of the components in the Educational Starter configuration and adds:
- 5V low drop-out linear regulator and power switch circuit
- 74AHCT541 3.3V to 5V level shifter IC to drive external servos and the on-board motor driver
- SN754410NE motor driver IC (an improved L293D) and screw terminal strip
- 2 break-away optical floor and line sensor modules containing IR LEDs and phototransistors
- 3-pin jumpers to route analog floor sensor inputs to the Arduino Nano ESP32's ADC (Analog-to-Digital Converter)
- optional 4-pin header socket to mount an HC-SR04P 3.3V SONAR distance sensor module
- optional JST-SH QWIIC connector to connect a ToF distance sensor module and other I2C devices
Mount BEAPER Nano on a simple chassis to make basic floor-sensing and line-following robots, or 3D print the more sophisticated BEAPER Bot robot chassis design shown in the top image. BEAPER Bot is designed to hold two N-20 gear motors, a 4-AA battery holder, and slide-in optical sensor and servo modules. All of BEAPER Bot's components are assembled by snapping, sliding, and clipping their parts together – no fasteners are needed! The BEAPER Bot design is shared in TinkerCad (search BEAPER) making it easy for novices and education users to create their own add-on robot components.
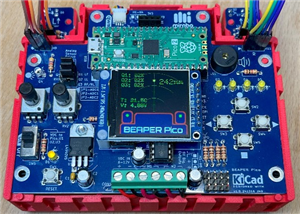
IoT configuration
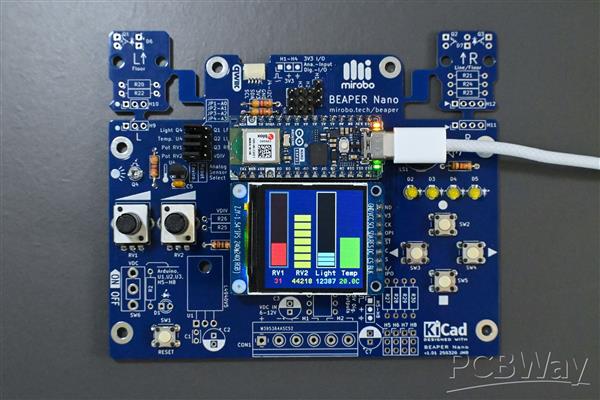
BEAPER Nano's optional LCD display demonstrating various types of bar graphs that show its two potentiometer positions, as well as the ambient light level and temperature from its on-board sensors (located above the potentiometers).
The built-in WiFi and Bluetooth capabilities of Arduino Nano ESP32 enable any BEAPER Nano configuration to become a simple IoT (Internet of Things) device or controller, and creating a beginner IoT-focused configuration is easy to do by adding the following components to the Educational Starter configuration:
- an ambient light sensor, an analog temperature sensor, and one or both potentiometers
- 4 I/O headers to connect external, 3.3V digital or analog devices
- I2C/QWIIC connector to connect external 3.3V I2C devices and sensors
- an optional full-colour 240 X 240 pixel TFT LCD display panel
Beginners can use the on-board analog devices to easily experiment with analog signal processing, while the expansion headers and QWIIC connector enable a wide range of additional sensors and capabilities to be added.
Installing the optional graphical LCD enables learners to display parameters, develop UIs (user interfaces), and even learn to program simple games!
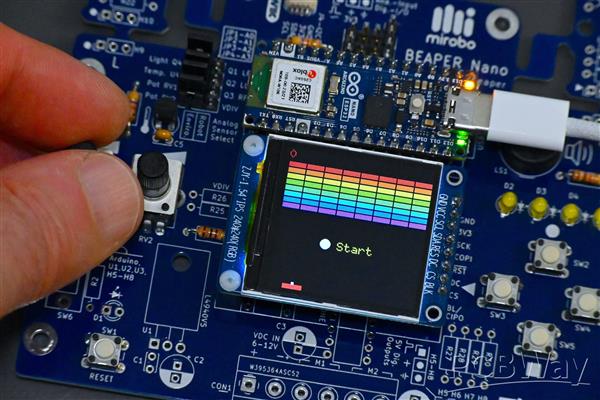
BEAPER Nano's display showing a block-breaker game programming in MicroPython with the paddle position controlled by one of the two potentiometers.
How can I get started with BEAPER Nano?
Start with a bare PCB or complete DIY kit
As a retired high school computer technology teacher, I understand the challenges of properly funding computer technology and STEM programs. To make BEAPER Nano more accessible for educational users, BEAPER Nano PCBs can be ordered in bulk directly from PCBWay at the lowest possible cost.
For individual users, bare BEAPER Nano PCBs as well as complete BEAPER Nano parts kits are available for sale on the mirobo.tech website as well as on my Lectronz store (best for EU purchasers).
Choose your BEAPER Nano build configuration
Users ordering bare PCBs can determine their own custom BEAPER Nano configuration, and instructors only need to purchase the parts that are required for their course. The full BEAPER Nano component list is shared on the DigiKey website.
Users purchasing BEAPER Nano component kits can choose to start with a simpler configuration and complete their BEAPER Nano later, or assemble the full build of BEAPER Nano to explore all of its capabilities right away!
Learn programming with my beginner programming activities
I've been teaching microcontroller programming for over thirty years, and in that time I have developed a good understanding of how to introduce and sequence programming concepts in a way that encourages and reinforces learning. I'm continuously refining my learning materials, and I've completely re-written and expanded my beginner learning activities for BEAPER Nano, BEAPER Pico, and my ARPS-2 Arduino UNO shield.
These structured beginner programming activities lead users through all of the concepts needed to make BEAPER Nano into a robot, an alarm system, an environmental control system, a NeoPixel driver, and more. Two complete sets of beginner activities are shared on GitHub – one written for learners starting with Arduino C/C++, and the other for programmers learning MicroPython. Both sets of learning activities cover all of the following topics:
- Output
- Timing
- Input
- Constants and Variables
- Decision Structures
- Conditional Loops
- Counted Loops
- Functions
- Analog input
- Analog Output
- Non-blocking Timing
- State Machines
- Starter templates for various extension and challenge projects
I'm currently creating a set of intermediate learning activities to introduce data structures, teach I2C device interfacing, demonstrate the use of the LCD display, and implement hardware features such as interrupts and power management. All of these will be shared in the GitHub repository when they're finished and thoroughly tested.
BEAPER Nano V1.01 – Beginner Electronics and Programming Educational Robot for Arduino Nano ESP32
*PCBWay community is a sharing platform. We are not responsible for any design issues and parameter issues (board thickness, surface finish, etc.) you choose.


Raspberry Pi 5 7 Inch Touch Screen IPS 1024x600 HD LCD HDMI-compatible Display for RPI 4B 3B+ OPI 5 AIDA64 PC Secondary Screen(Without Speaker)
BUY NOW


- Comments(0)
- Likes(1)
More by John Rampelt
-
 QWIIC-VL53L4CD Time-of-Flight Distance Sensor Module
The good old HC-SR04 SONAR module, and its newer, 3.3V HC-SR04P sibling, have long been go-to distan...
QWIIC-VL53L4CD Time-of-Flight Distance Sensor Module
The good old HC-SR04 SONAR module, and its newer, 3.3V HC-SR04P sibling, have long been go-to distan...
-
 ARPS-2 – Arduino-Compatible Robot Project Shield for Arduino UNO
Meet ARPS-2ARPS-2 is version two of my Arduino-compatible Robot Project Shield for Arduino UNO. ARPS...
ARPS-2 – Arduino-Compatible Robot Project Shield for Arduino UNO
Meet ARPS-2ARPS-2 is version two of my Arduino-compatible Robot Project Shield for Arduino UNO. ARPS...
-
 BEAPER Pico 0.1: A (Prototype) Beginner Electronics and Programming Educational Robot for Raspberry Pi Pico
BackgroundI have been teaching high school electronics and computer technology courses for over thir...
BEAPER Pico 0.1: A (Prototype) Beginner Electronics and Programming Educational Robot for Raspberry Pi Pico
BackgroundI have been teaching high school electronics and computer technology courses for over thir...
-
 CHRP4 Beginner Robotics Developer Board
CHRP4 OverviewCHRP4 (Common Hardware Robotics Project - version 4) is beginner-friendly microcontrol...
CHRP4 Beginner Robotics Developer Board
CHRP4 OverviewCHRP4 (Common Hardware Robotics Project - version 4) is beginner-friendly microcontrol...
-
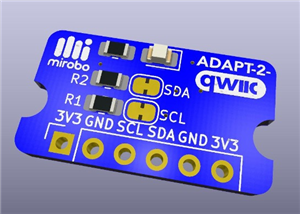 Adapt-2-QWIIC
Lately, I've been playing with a number of interesting and inexpensive I2C modules purchased online....
Adapt-2-QWIIC
Lately, I've been playing with a number of interesting and inexpensive I2C modules purchased online....
-
 BEAPER Nano V1.01 – Beginner Electronics and Programming Educational Robot for Arduino Nano ESP32
BEAPER Nano built as a simple obstacle-sensing robot using left and right optical floor sensor modul...
BEAPER Nano V1.01 – Beginner Electronics and Programming Educational Robot for Arduino Nano ESP32
BEAPER Nano built as a simple obstacle-sensing robot using left and right optical floor sensor modul...
-
 BEAPER Pico v1.00 – Beginner Electronics and Programming Educational Robot for Raspberry Pi Pico and Pico 2
Meet BEAPER PicoBEAPER stands for Beginner Electronics and Programming Educational Robot, and Pico r...
BEAPER Pico v1.00 – Beginner Electronics and Programming Educational Robot for Raspberry Pi Pico and Pico 2
Meet BEAPER PicoBEAPER stands for Beginner Electronics and Programming Educational Robot, and Pico r...
-
 BEAPER Bot Robot Chassis
BEAPER BotBEAPER (Beginner Electronics and Programming Educational Robot) Bot is a 3D-printable BEAP...
BEAPER Bot Robot Chassis
BEAPER BotBEAPER (Beginner Electronics and Programming Educational Robot) Bot is a 3D-printable BEAP...
-
 BEAPER Nano 1.0: the Beginner Electronics and Programming Educational Robot circuit for Arduino Nano ESP32
When the Arduino Nano ESP32 was released with a combination of a fast, powerful microcontroller, lot...
BEAPER Nano 1.0: the Beginner Electronics and Programming Educational Robot circuit for Arduino Nano ESP32
When the Arduino Nano ESP32 was released with a combination of a fast, powerful microcontroller, lot...
-
 BEAPER Nano (Beginner Electronics and Programming Educational Robot) for Arduino Nano ESP32
Note: This is the first prototype BEAPER Nano circuit. See the newest BEAPER Nano 1.0 circuit. BEAPE...
BEAPER Nano (Beginner Electronics and Programming Educational Robot) for Arduino Nano ESP32
Note: This is the first prototype BEAPER Nano circuit. See the newest BEAPER Nano 1.0 circuit. BEAPE...
-
 BPStick (Breadboard Power Stick) - 5V through hole version
When schools start teaching STEM programs, or hobbyists embark on learning electronics, one of their...
BPStick (Breadboard Power Stick) - 5V through hole version
When schools start teaching STEM programs, or hobbyists embark on learning electronics, one of their...
-
 UPS (USB Power Stick) breadboard power adapter
When schools start teaching STEM programs, or hobbyists embark on learning electronics, one of their...
UPS (USB Power Stick) breadboard power adapter
When schools start teaching STEM programs, or hobbyists embark on learning electronics, one of their...
-
 ARPS – A Beginner Arduino®-compatible Robot Project Shield
ARPS OverviewARPS (Arduino®-compatible Robot Project Shield) is beginner-friendly add-on shield for ...
ARPS – A Beginner Arduino®-compatible Robot Project Shield
ARPS OverviewARPS (Arduino®-compatible Robot Project Shield) is beginner-friendly add-on shield for ...
-
 UBMP4 Beginner Microcontroller Development Board
UBMP4 OverviewUBMP4 (USB-based Beginner Multipurpose Project - version 4) is beginner-friendly micro...
UBMP4 Beginner Microcontroller Development Board
UBMP4 OverviewUBMP4 (USB-based Beginner Multipurpose Project - version 4) is beginner-friendly micro...
-
Programmable Mist Maker - XIAO / QT PY Extension
676 1 0 -
RadioHAT - Raspberry Pi radio development platform
520 0 1 -
-
-
-
-
ARPS-2 – Arduino-Compatible Robot Project Shield for Arduino UNO
3030 0 6 -
A Compact Charging Breakout Board For Waveshare ESP32-C3
3634 3 8 -
AI-driven LoRa & LLM-enabled Kiosk & Food Delivery System
3905 2 2


