


|
|
DY86 Vacuum Tube |
x 1 | |
|
|
Bench Power Supply, DC |
x 1 | |
|
|
AC High Voltage Source |
x 1 | |
|
|
Cockroft Walton Multiplayer |
x 1 | |
|
|
HV Trafo from old B&W TV |
x 1 |

|
Solder Wire, Lead Free |
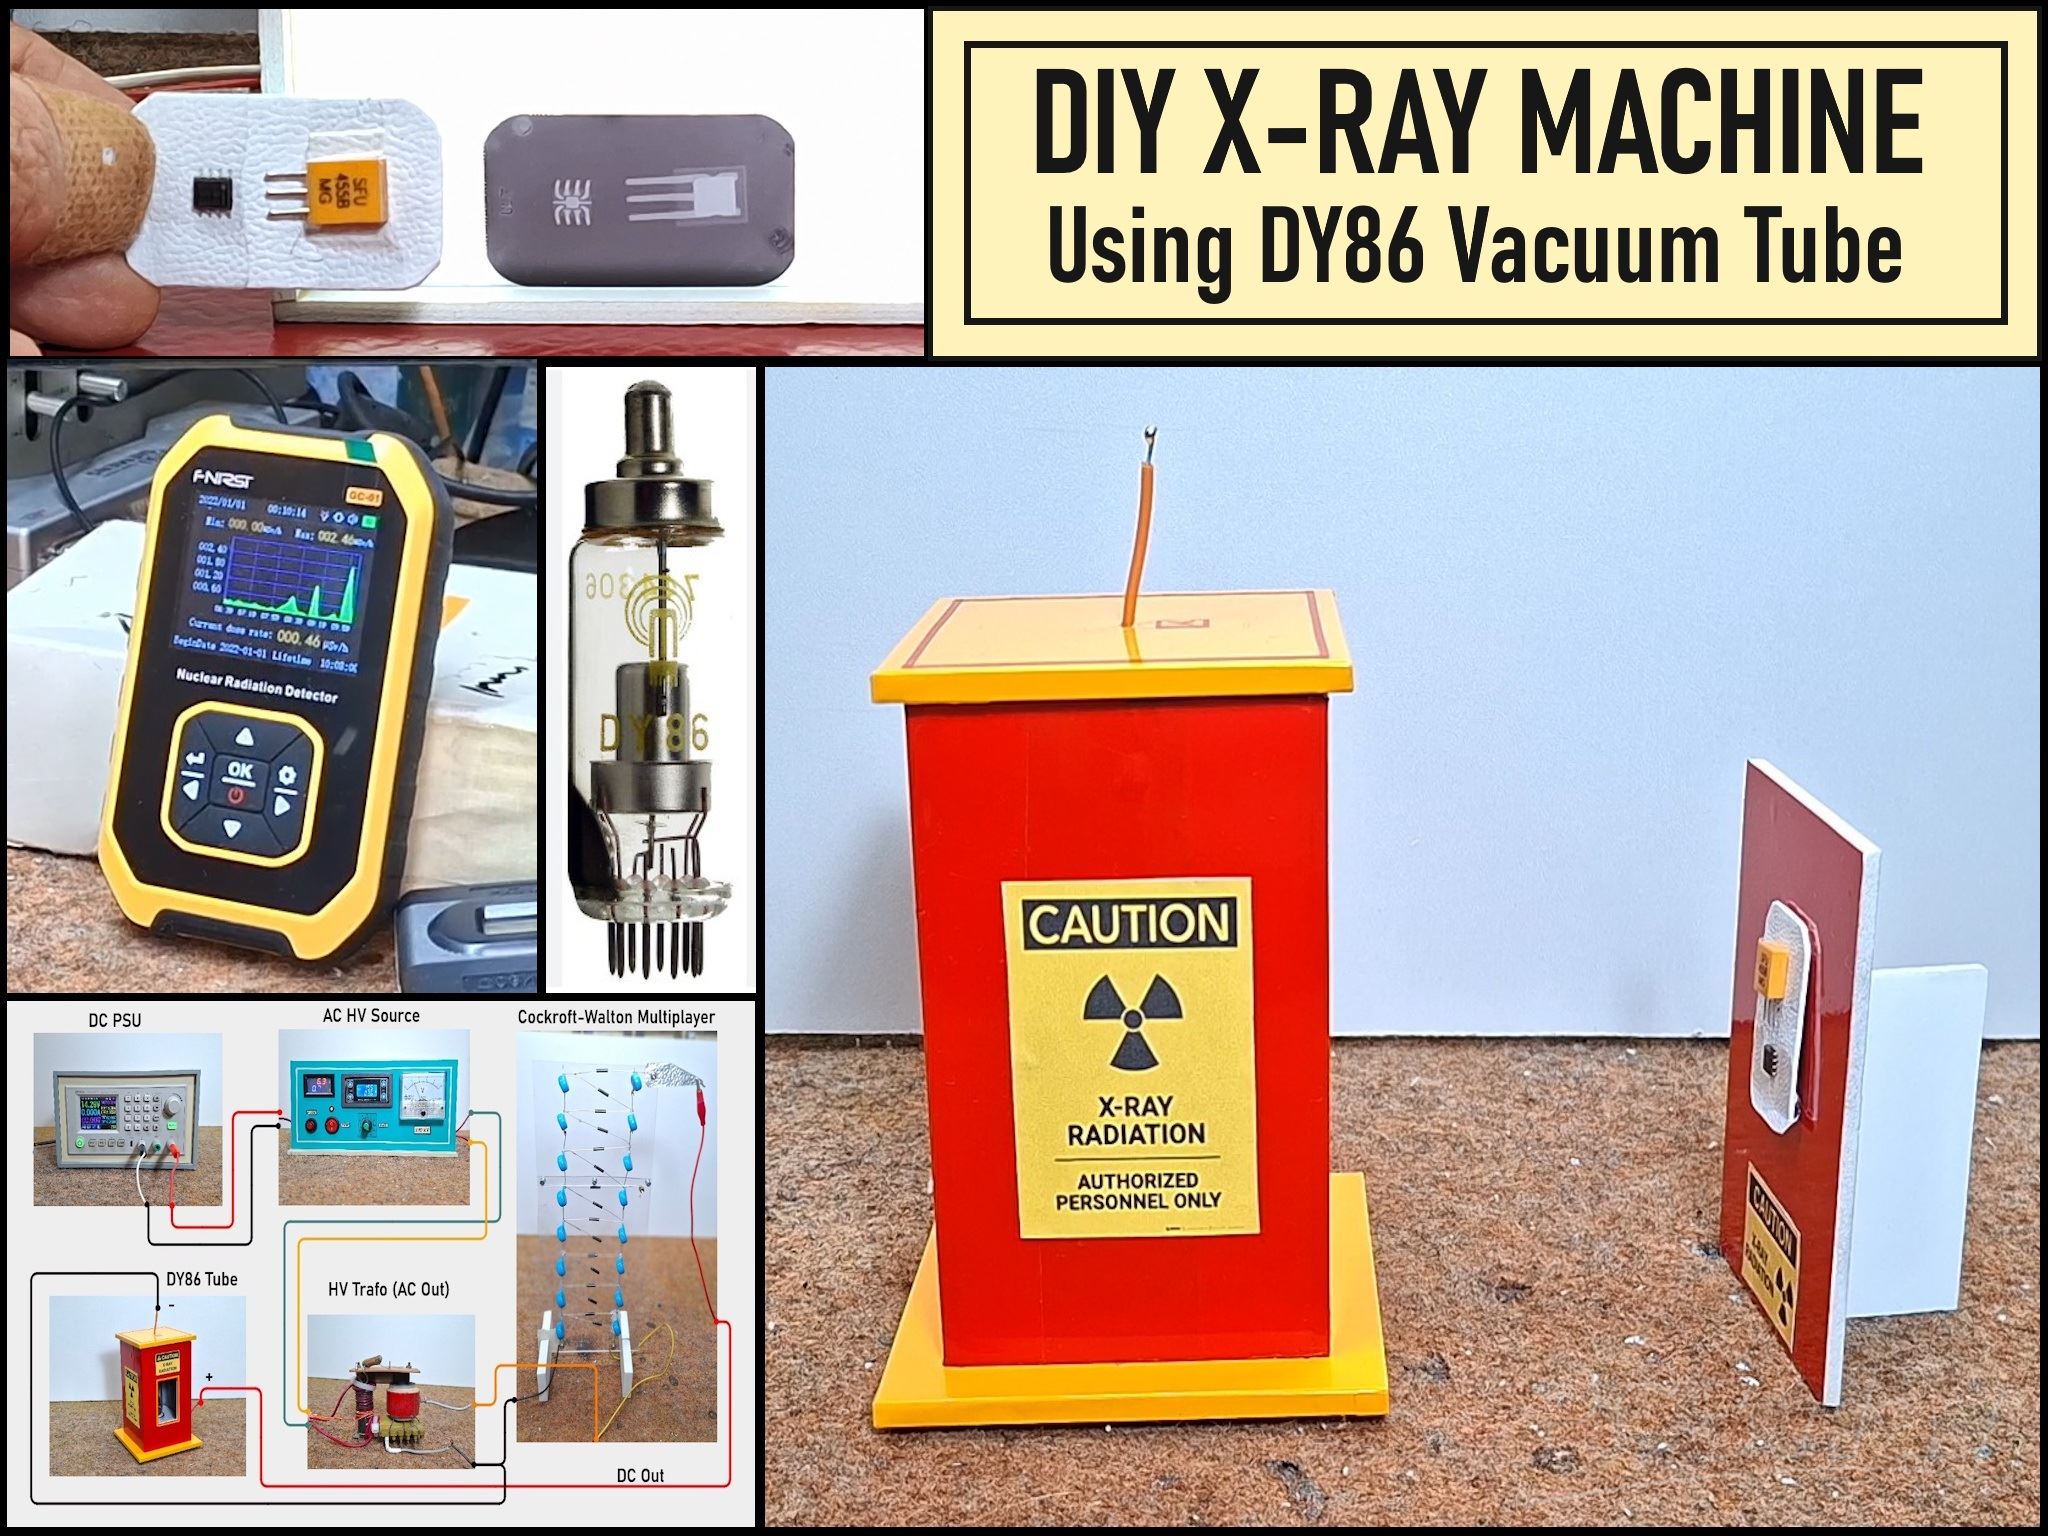
DIY Miniature X-Ray Machine using a TV Vacuum Tube DY86
An X-ray machine (or radiograph) is a quick, painless medical test that produces images of the structures inside your body—particularly your bones. It is one of the oldest and most frequently used forms of medical imaging. The process is based on a specific type of high-energy electromagnetic radiation. An X-ray machine produces a concentrated beam of X-ray photons. This beam is aimed at the specific part of the body being examined.
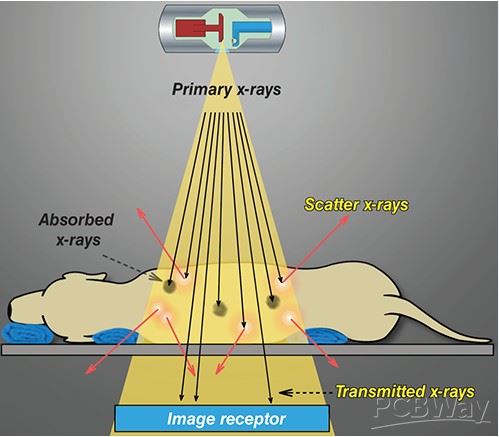
As the rays pass through your body, different tissues absorb them at different rates depending on their density. On the other side of your body, there is a specialized film or a digital sensor. This detector captures the rays that managed to pass through you.
Security X-ray systems at border crossings and airports work on the same basic principles as medical X-rays, but they are tuned specifically to identify materials rather than anatomy. In this project I will show you how I made a miniature X-ray machine with standard components that can be easily purchased on the market and at the same time their manufacturing cost is very low.
Even the manufacturing method is relatively simple, but for safety reasons I do not recommend trying to recreate it. X-rays are extremely dangerous to human health and if appropriate protective measures are not used, serious consequences can occur. Keep in mind that the X-ray radiation that we receive in our body remains forever and increases cumulatively with each new dose.

This project is sponsored by PCBWay . From concept to production, PCBWay provide cutting-edge electronic design solutions for global innovators, Including hardware design, software development, mechanical design, product testing and certification. PCBWay engineering team consists of experienced engineers in electronics, embedded systems, and product development. They successfully delivered hundreds of projects across industries such as medical devices, industrial automation, consumer electronics, smart home, and IoT.
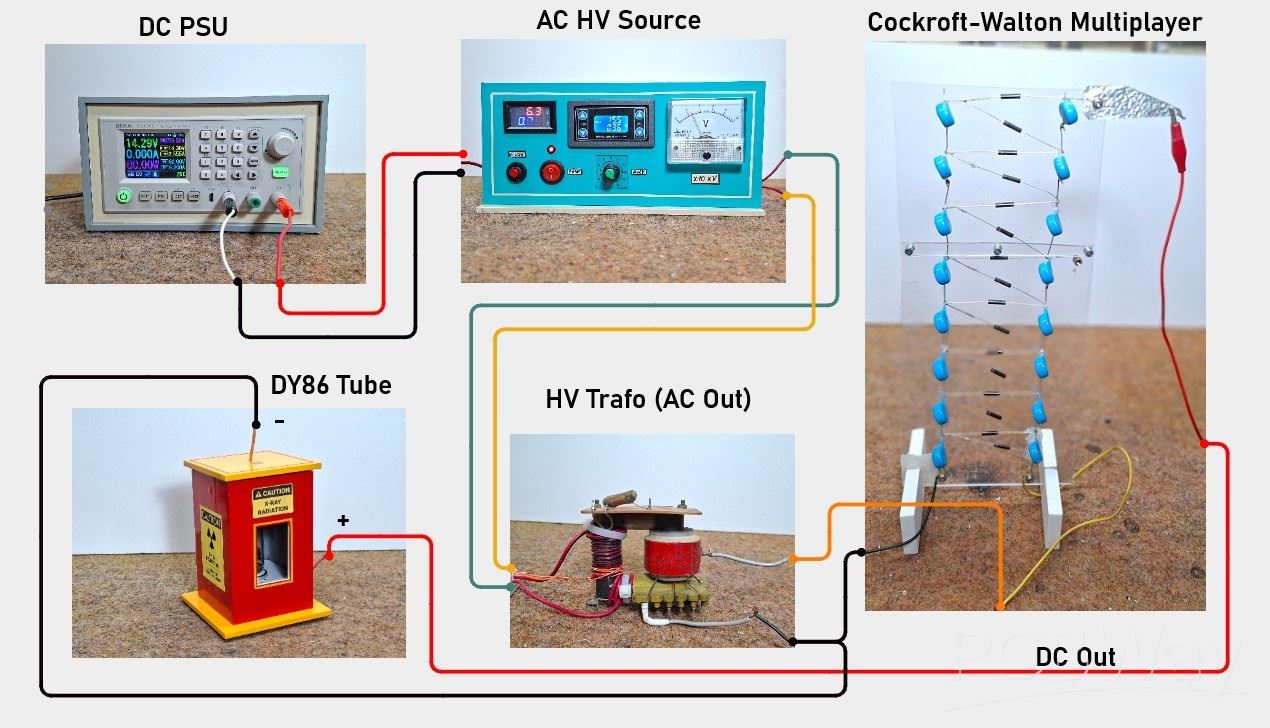
Generally, the X-ray machine consists of several components:
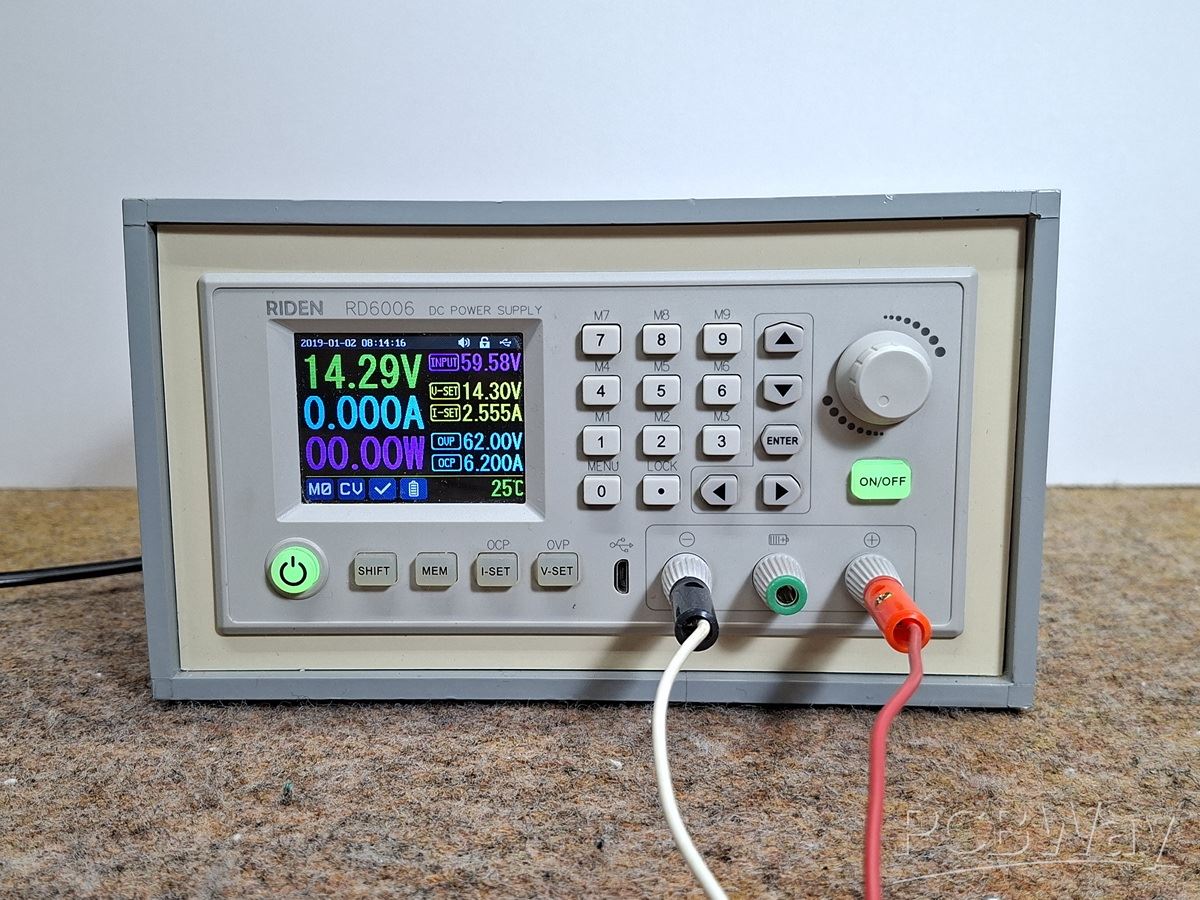
- A source of low DC voltage, in my case a laboratory power supply, and a battery can also be used.
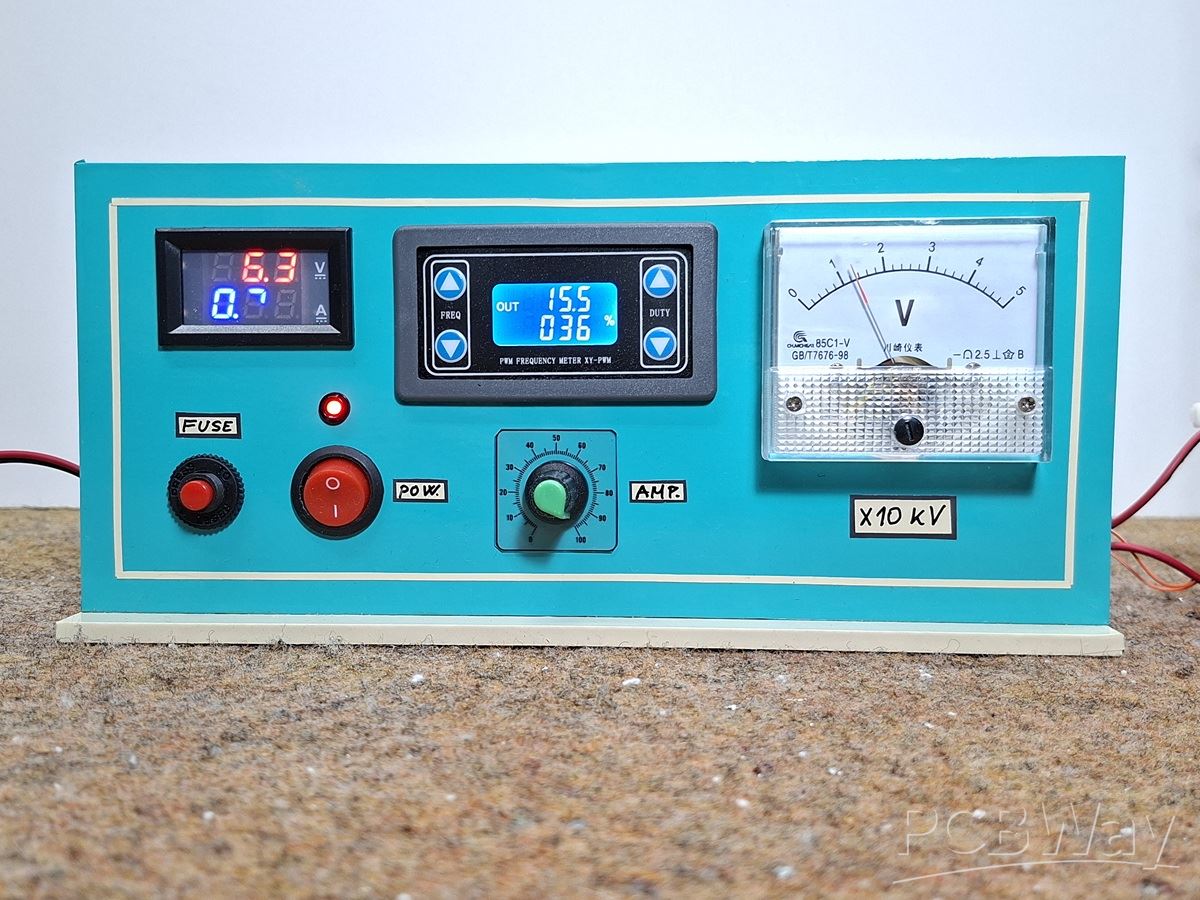
- Then a high AC voltage generator, preferably with the ability to continuously regulate the voltage and current - specifically, I use this device from a previous project of mine, which is ideally suited for this purpose.
- Next is a Cockroft-Walton voltage multiplier, which rectifies and increases the input AC voltage from the line transformer. By the way, this multiplier is also from a previous project of mine.
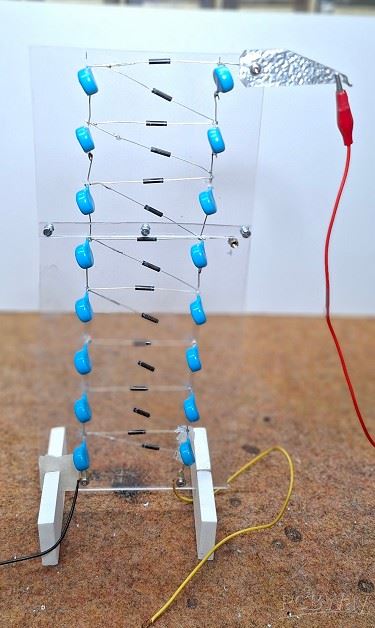
- Тhe source of x-ray radiation, which in this case is a cheap DY86 rectifier vacuum tube from an old black-and-white TV.
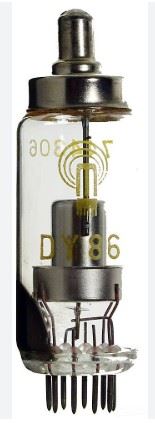
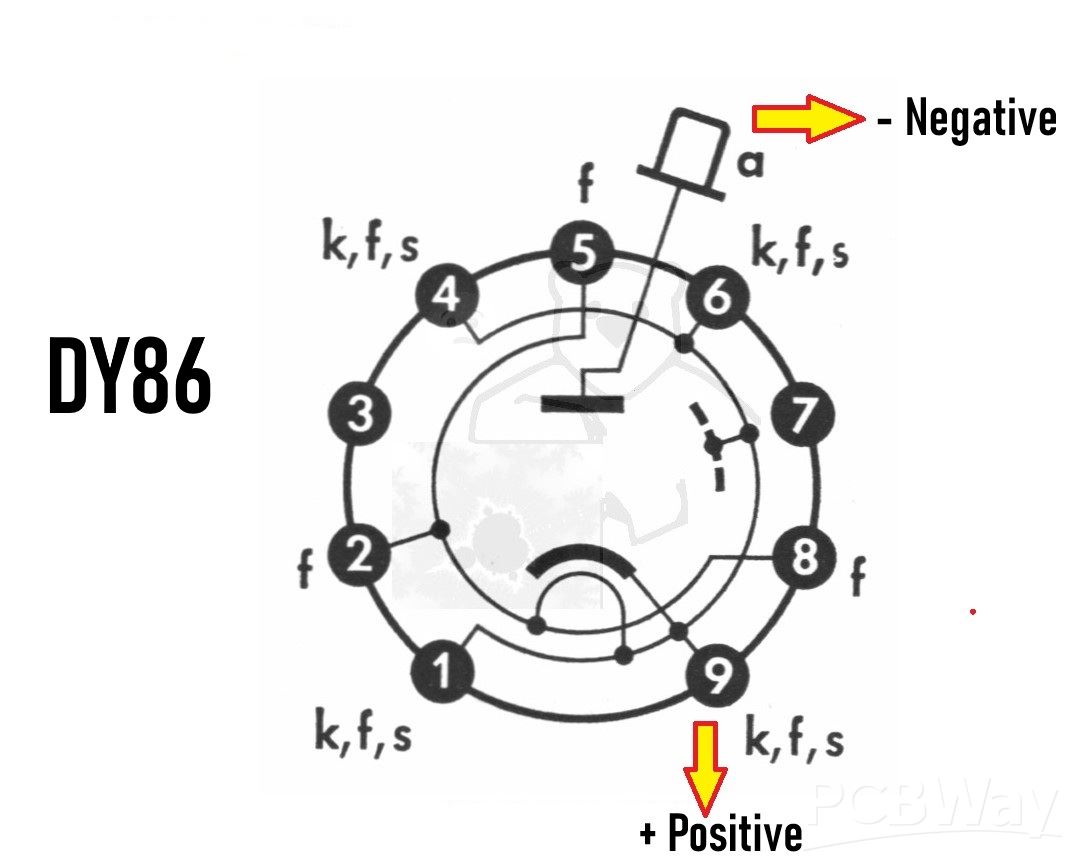
In fact, this is the biggest advantage of this concept, since even the smallest dental x-ray tube costs several hundred dollars. The only downside is that the exposure has to last much longer due to the low radiation level, but in fact this is desirable in such dangerous DIY experiments. The DY86 tube is connected inversely, i.e. the cathode to plus and the anode to minus, which significantly increases its lifespan.
Even when exposed lasts longer than 1 hour, the tube temperature does not exceed 30 degrees - that's why this is called a cold emission.
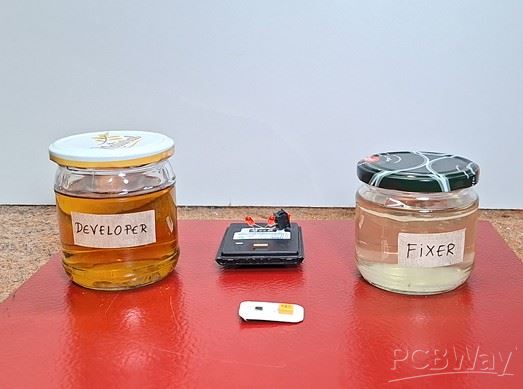
- And finally, the medium on which the image is formed, specifically for that purpose I use dental film and appropriate chemicals for developing and fixing the image.
For this project, it is necessary to achieve a controlled radiation intensity in order to obtain a clear image after only a few tests. I managed to produce x-rays with a tolerance of +/- few µSv, which is incredibly precise control.
My first goal was to make the DY86 tube start emitting x-rays. I had several flyback trafos from old CRT monitors at my disposal, which generate DC high voltage at the output. I also purchased 7pcs. DY86 tubes, 3 of which had lost their vacuum from standing for a long time. There is a trick to test the vacuum: with a plastic stick, we hit the glass of the tube, and if the sound is ringing, the tube has good vacuum, and if the sound is dull and muffled, that is a sure sign that the tube is unusable. Unfortunately, during the experiment I "managed" to destroy 3 Tubes and only with the last one did I reach the desired result. Namely, directly with a flyback transfo it is very difficult to make the tube emit X-Rays. In fact, at a certain point it may start emitting but soon after, due to the fact that the voltage in these transformers is too low, and the current is too high, the Anode quickly overheats and the lamp is then destroyed. The solution is a line-type HV transformer without a cascade that outputs AC voltage, to which a voltage multiplier is connected. In this way, very high voltages are obtained with low currents. Through experimentation, I found the "sweet spot" so that the highest radiation is obtained with relatively low consumption. This is very important considering that when forming the X-ray image, we have to expose the film for a very long time to these relatively weak X-rays.
And let me immediately mention that all protective measures should be taken because this is very dangerous invisible radiation that has very harmful consequences for human health. The tube should be surrounded by a lead plate with a thickness of 1mm or more with a opening on the side where the film will be located. We are also not allowed to stay in the room where the experiment is being performed. It is even preferable to turn the X-ray machine on and off remotely. Below you can see a short clip of the moment when X-rays begin to be emitted.
Here is what the final version of the container that houses the X-ray generator, i.e. the DY87 tube, looks like.
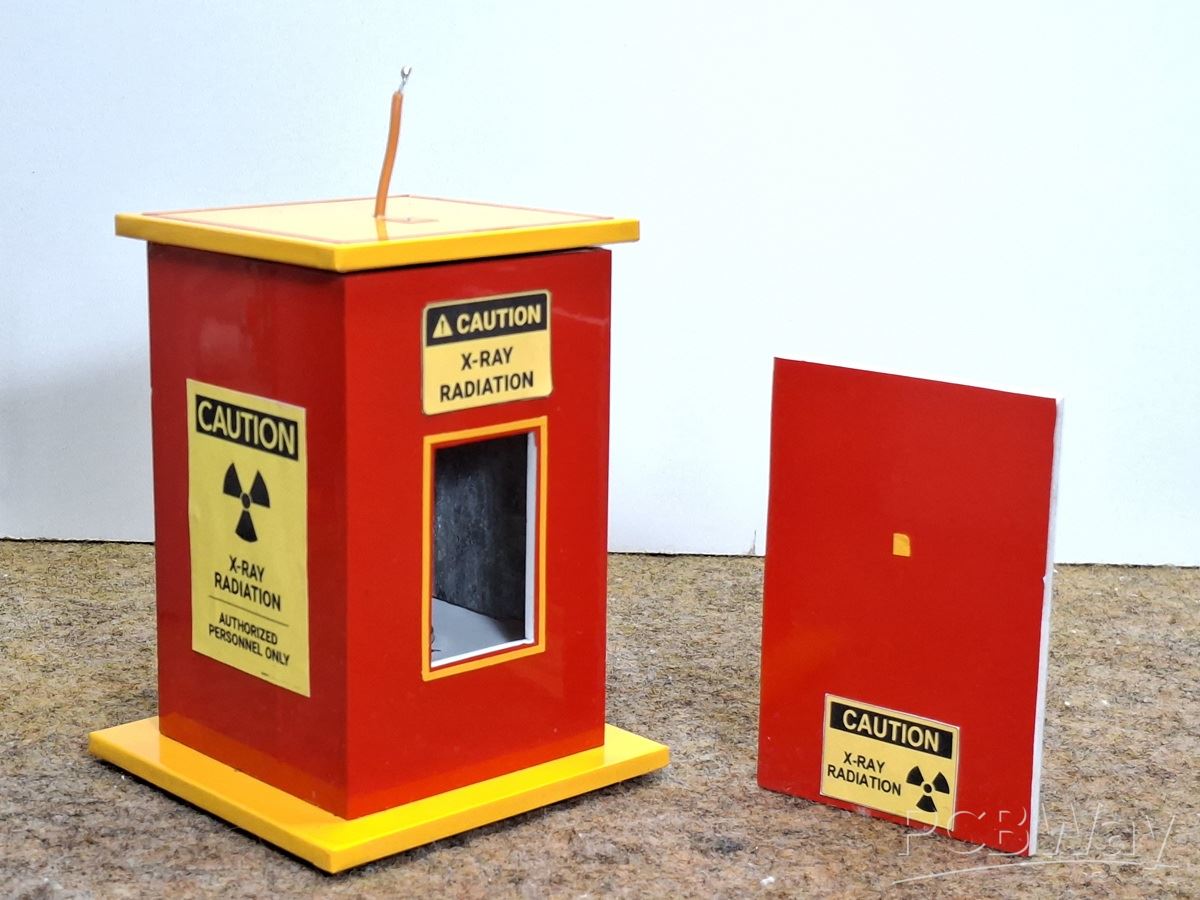
On three sides there is a protective lead plate, and in front there is an opening of which the object that we are recording is placed. Since we are working with extremely high voltages, specially insulated wires are used, which also need to be spaced apart from each other, as well as from the shield. I place the object at a distance of 10 to 15 centimeters from the source and start the irradiation. The exposure time depends on the intensity of the x-rays and the distance from the source.
Specifically, I get the best results with the following parameters:
- Distance from the source 10cm (at that point the radiation has an intensity of about 200µSv)
- and Exposure time from 30 to 60 min depending on the object we are imaging (for objects with thicker and more impermeable material the exposure is longer).
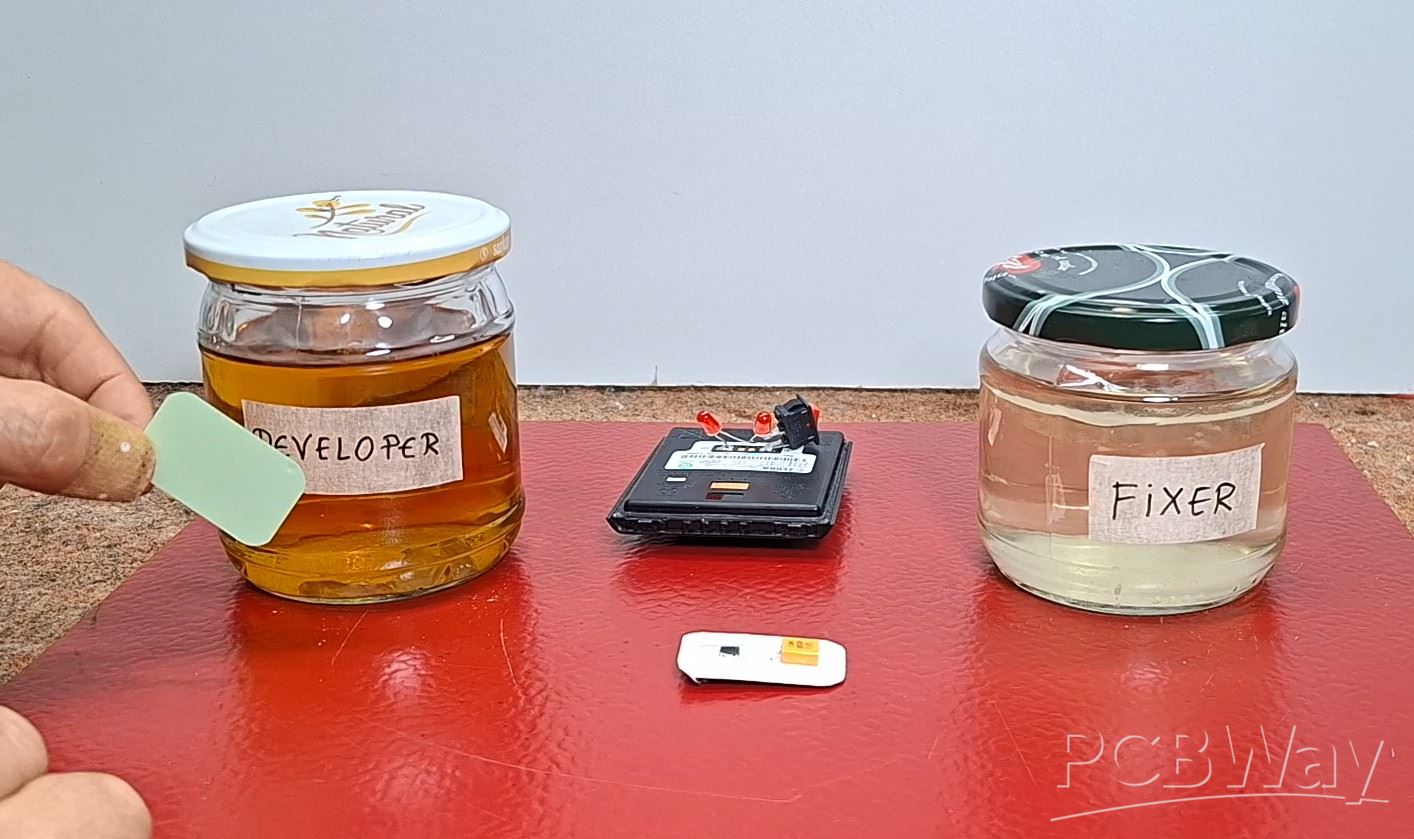
When the exposure is over, we move on to film processing. This is done in a completely dark room, possibly slightly illuminated with a discreet red light source. For this purpose, I use 3 red 5mm LEDs.
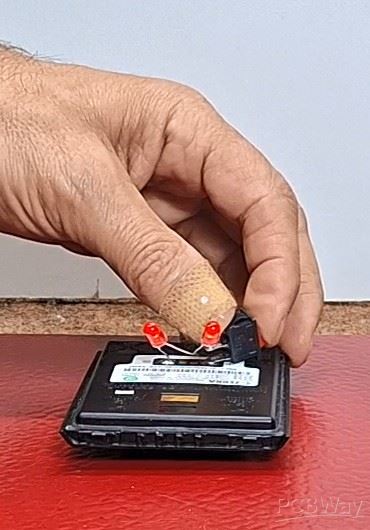
I carefully open the film and immerse it in the developing solution for about 30-40 seconds. Then I wash it in water, then put it in a fixing solution for 2 to 3 minutes.
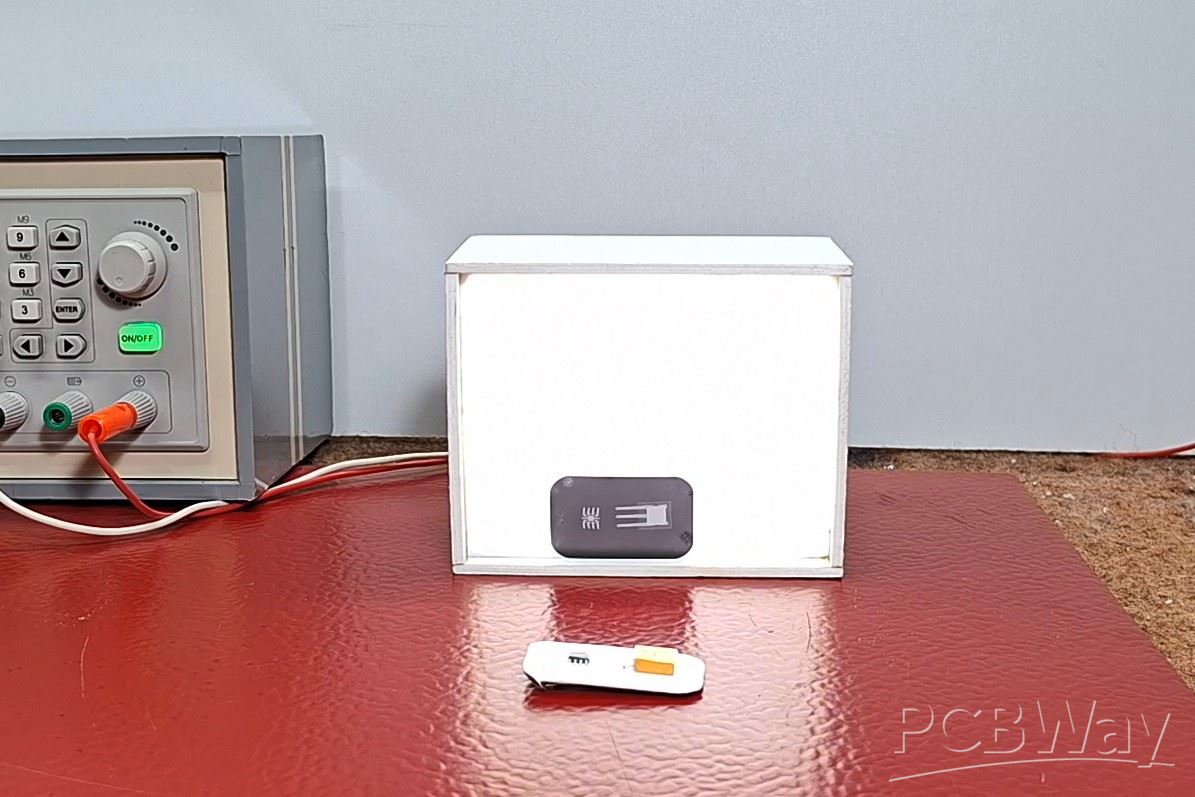
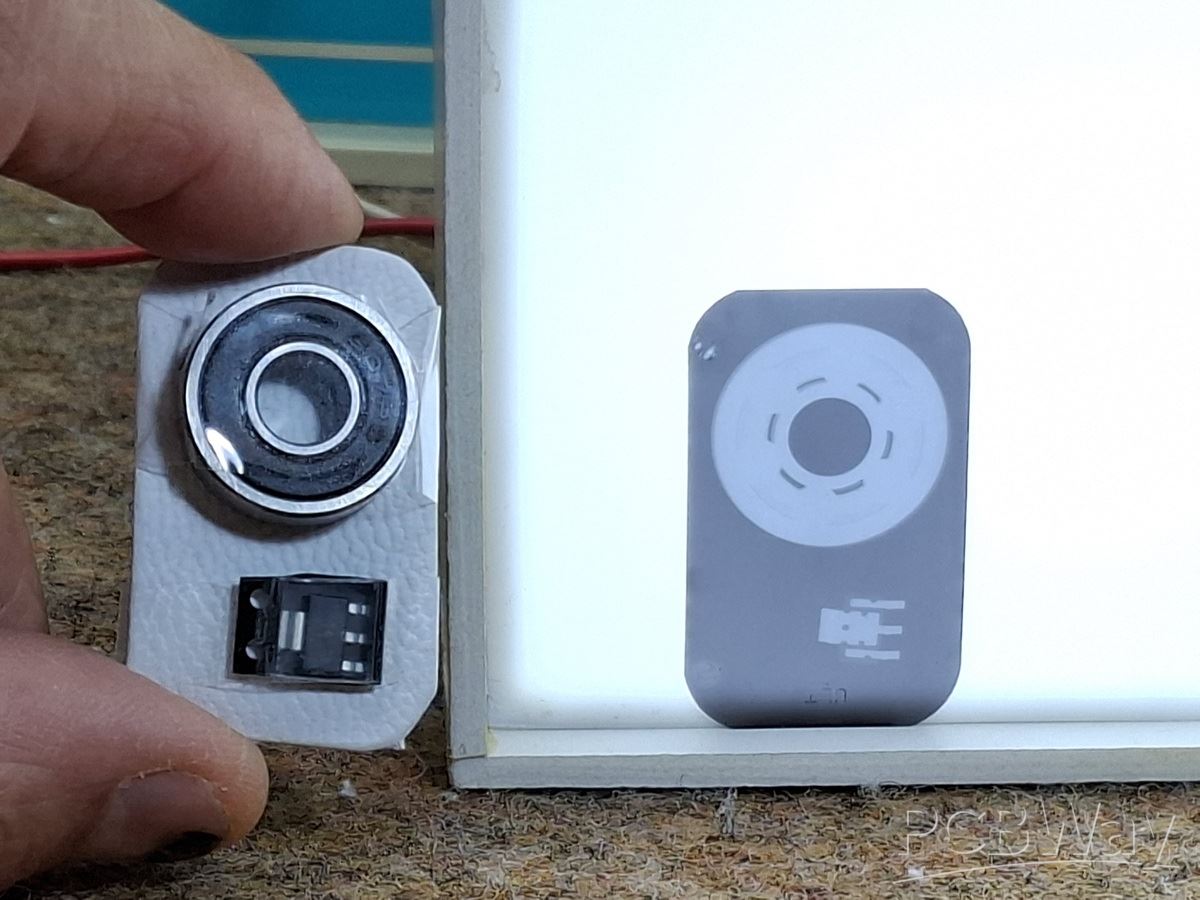
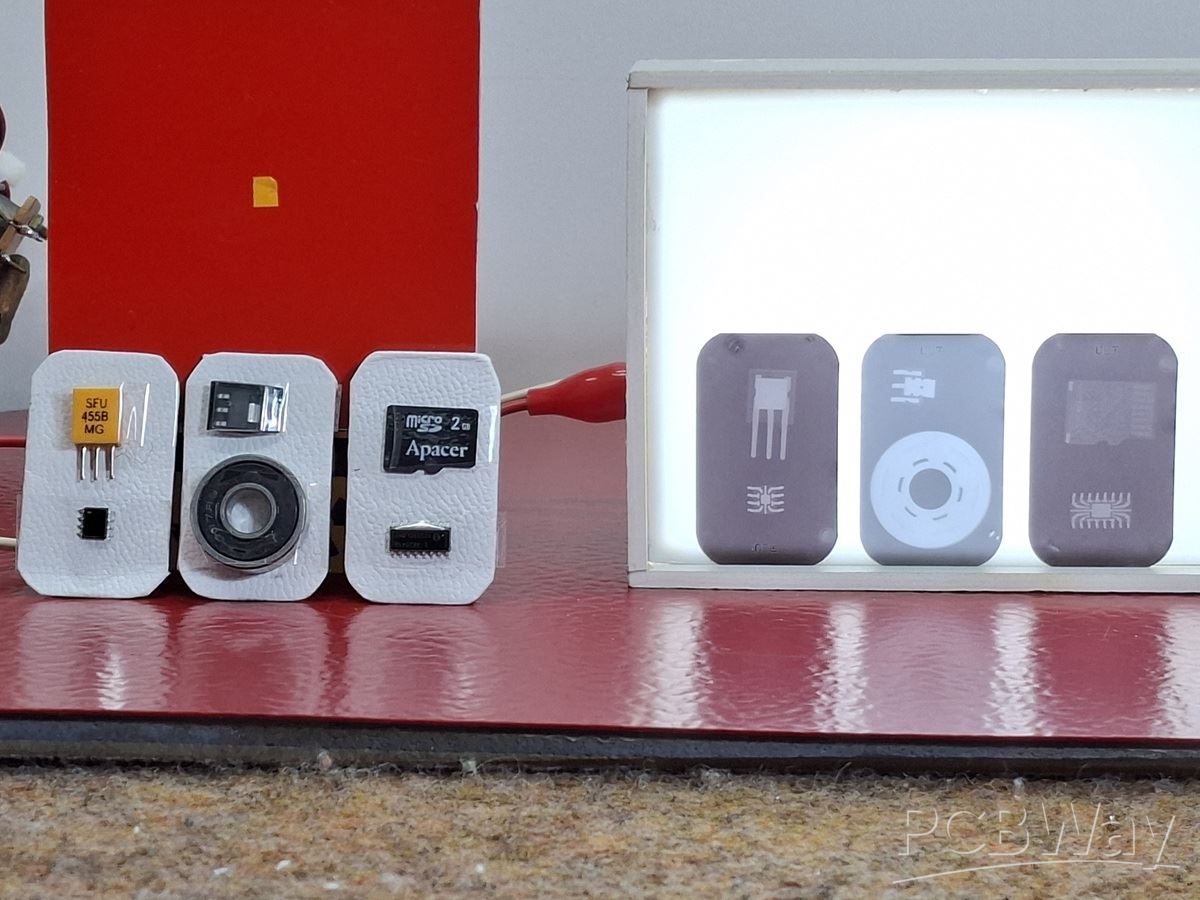
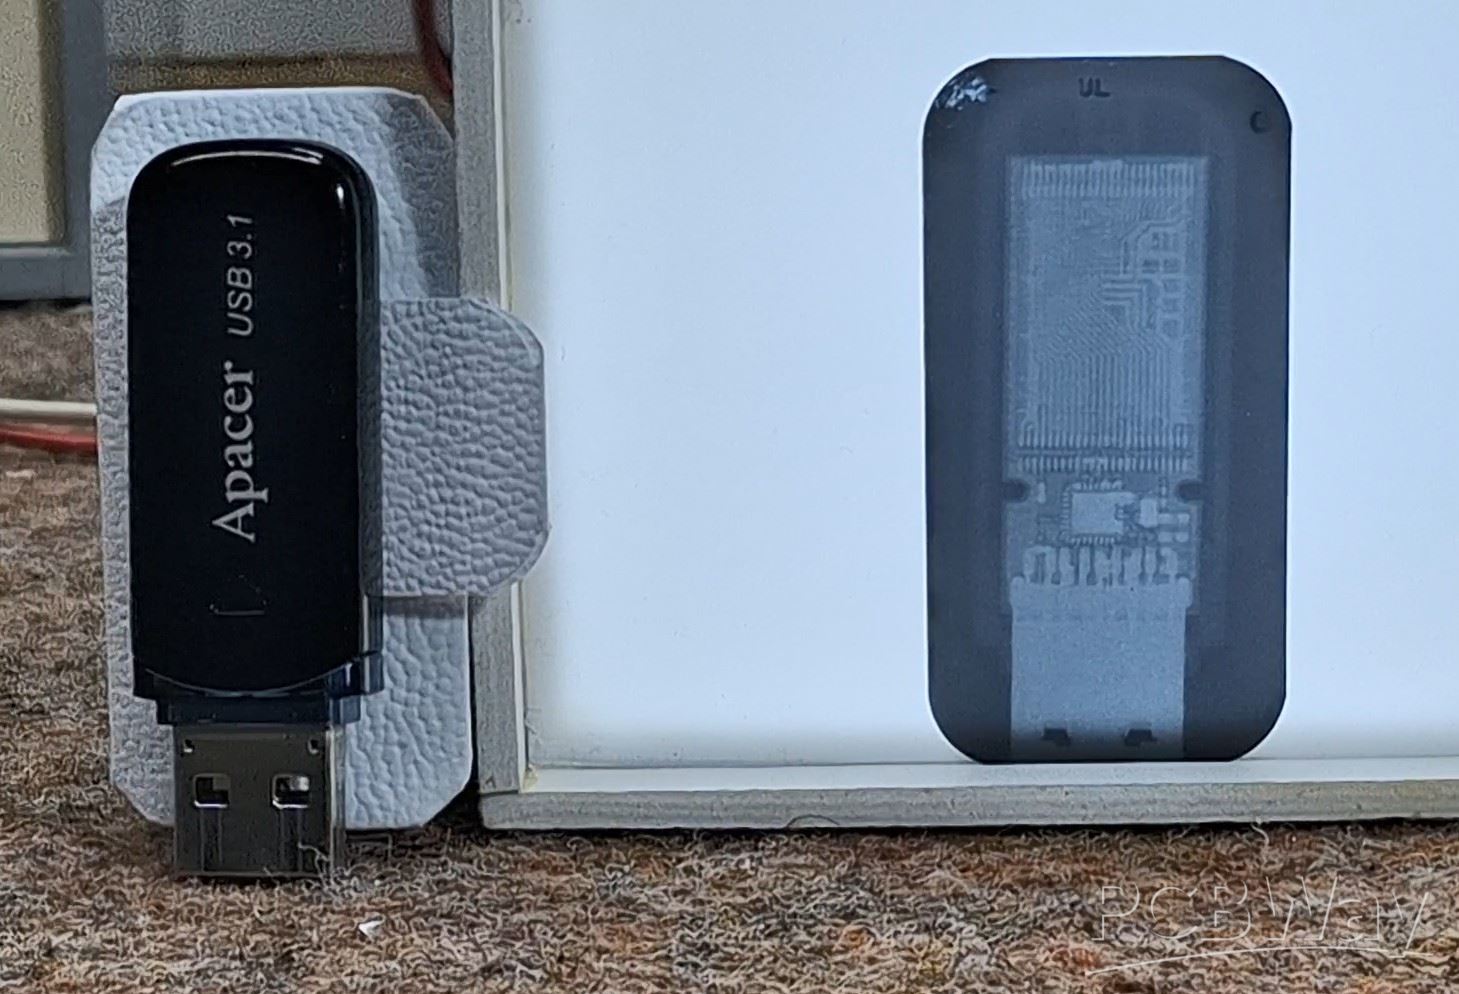
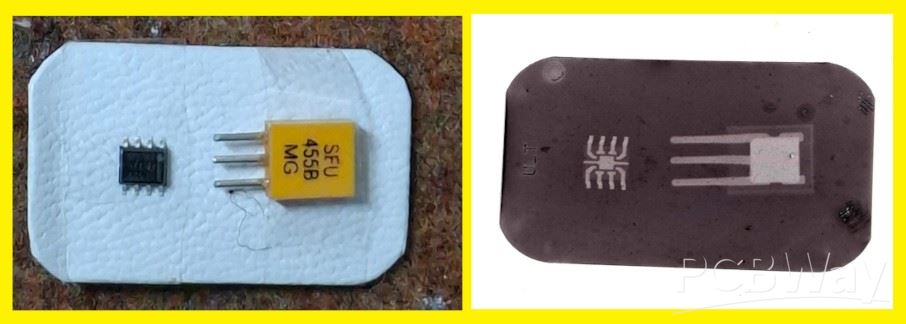
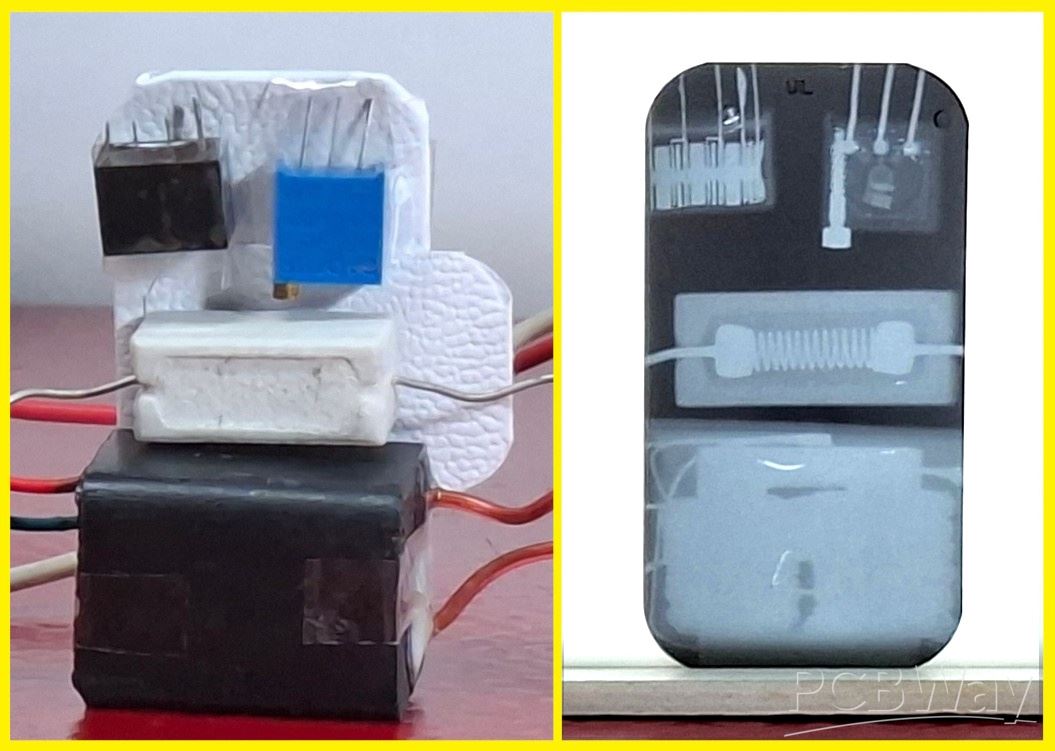
After this, the film is no longer sensitive to white light and we can wash it well under a strong stream of water and let it dry. The processed films are best viewed when placed under intense white diffuse light. For this purpose I have made this small screen.
Now you will see what some of the objects processed with this X-ray machine look like.
And finally a short conclusion. This project successfully demonstrates how I build a low-cost, miniature DIY X-ray machine using a DY86 vacuum tube and a Cockcroft-Walton voltage multiplier. By achieving precise control over high-voltage levels and radiation intensity, I can produce high-quality radiographs of electronic components using dental film.
SAFETY NOTES: Due to the extreme health risks involved, this video is for educational and documentary purposes only. X-rays are very dangerous ionizing radiation. They are invisible and pass through human body, and they can cause fatal diseases. Do not attempt to recreate this experiment at home. If you decide to carry it out despite the warning, I take no responsibility for your injuries - you do everything at your own risk.
DIY Miniature X-Ray Machine using a TV Vacuum Tube DY86


Raspberry Pi 5 7 Inch Touch Screen IPS 1024x600 HD LCD HDMI-compatible Display for RPI 4B 3B+ OPI 5 AIDA64 PC Secondary Screen(Without Speaker)
BUY NOW


- Comments(0)
- Likes(0)
More by Mirko Pavleski
-
 Arduino 3D Printed self Balancing Cube
Self-balancing devices are electronic devices that use sensors and motors to keep themselves balanc...
Arduino 3D Printed self Balancing Cube
Self-balancing devices are electronic devices that use sensors and motors to keep themselves balanc...
-
 Elecrow All-in-One Arduino Starter Kit Review - 20 Projects & 16 Modules
This time I will describe a simple and practical way to enter the world of microcontrollers, specif...
Elecrow All-in-One Arduino Starter Kit Review - 20 Projects & 16 Modules
This time I will describe a simple and practical way to enter the world of microcontrollers, specif...
-
 ESP32-C3 Color Detector with TCS34725, Real-Time RGB Detection & Web Interface
Color detection is a fundamental task in many embedded systems – from industrial sorting machines t...
ESP32-C3 Color Detector with TCS34725, Real-Time RGB Detection & Web Interface
Color detection is a fundamental task in many embedded systems – from industrial sorting machines t...
-
 DIY ESP32 Telegram Flood Protection System - Smart Home Automation
Recently I had an unpleasant experience in my home, specifically my ground floor was flooded as a r...
DIY ESP32 Telegram Flood Protection System - Smart Home Automation
Recently I had an unpleasant experience in my home, specifically my ground floor was flooded as a r...
-
 Real-Time Air Traffic Radar using ESP32 + ADS-B Data
ADS-B, which stands for Automatic Dependent Surveillance-Broadcast, is the modern standard for trac...
Real-Time Air Traffic Radar using ESP32 + ADS-B Data
ADS-B, which stands for Automatic Dependent Surveillance-Broadcast, is the modern standard for trac...
-
 DIY Green Laser Night Sky Object Finder - Find Stars & Galaxies Instantly with great accuracy
As an amateur astronomer, especially at the beginning, the most difficult part of observing the nig...
DIY Green Laser Night Sky Object Finder - Find Stars & Galaxies Instantly with great accuracy
As an amateur astronomer, especially at the beginning, the most difficult part of observing the nig...
-
 DIY Avionics Simulator with ESP32 - Artificial Horizon, Compass & Altimeter
The inspiration for this project comes from classical aircraft cockpit instruments used for navigat...
DIY Avionics Simulator with ESP32 - Artificial Horizon, Compass & Altimeter
The inspiration for this project comes from classical aircraft cockpit instruments used for navigat...
-
 DIY Miniature X-Ray Machine using a TV Vacuum Tube DY86
An X-ray machine (or radiograph) is a quick, painless medical test that produces images of the struc...
DIY Miniature X-Ray Machine using a TV Vacuum Tube DY86
An X-ray machine (or radiograph) is a quick, painless medical test that produces images of the struc...
-
 Simple SDR Receiver Using 2x NE612 - Dual Conversion, Superheterodyne (0.1–30 MHz)
SDR (Software Defined Radio) is a radio system in which most of the functions of a classic radio (f...
Simple SDR Receiver Using 2x NE612 - Dual Conversion, Superheterodyne (0.1–30 MHz)
SDR (Software Defined Radio) is a radio system in which most of the functions of a classic radio (f...
-
 DIY Vintage TV VU Meter with peak indicators
Some time ago in one of my projects I presented you a way to turn a black and white old mini TV int...
DIY Vintage TV VU Meter with peak indicators
Some time ago in one of my projects I presented you a way to turn a black and white old mini TV int...
-
 DIY Tesla Coil based Plasma Rife Machine
In several of my previous videos, I presented you with different ways to make a Rife Machine, from ...
DIY Tesla Coil based Plasma Rife Machine
In several of my previous videos, I presented you with different ways to make a Rife Machine, from ...
-
 ESP32 Analog VU Meter – Smooth Needle, Real Audio Response (DIY Build)
In several of my previous videos I have shown you how to make analog VU meters emulated on differen...
ESP32 Analog VU Meter – Smooth Needle, Real Audio Response (DIY Build)
In several of my previous videos I have shown you how to make analog VU meters emulated on differen...
-
 The Ultimate Smartphone VFO ESP32 & Si5351 Wireless Control
Variable frequency oscillators (VFOs) are commonly used in radio transmitters and receivers, especi...
The Ultimate Smartphone VFO ESP32 & Si5351 Wireless Control
Variable frequency oscillators (VFOs) are commonly used in radio transmitters and receivers, especi...
-
 DIY Shortwave Propagation Monitor - Measure Ionosphere Conditions
Shortwave Propagation is the way radio waves in the 3 to 30 MHz range travel from point A to point ...
DIY Shortwave Propagation Monitor - Measure Ionosphere Conditions
Shortwave Propagation is the way radio waves in the 3 to 30 MHz range travel from point A to point ...
-
 Professional grade Smart Lock with ESP32, BLE and Android App Control
An electronic codelock is a security device that grants access using a numerical sequence—a PIN cod...
Professional grade Smart Lock with ESP32, BLE and Android App Control
An electronic codelock is a security device that grants access using a numerical sequence—a PIN cod...
-
 Building a 3-Input Stereo ECC83 (12AX7) Tube Preamp
Some time ago I presented you a project for a 3W stereo tube amplifier with a GU32 output vacuum t...
Building a 3-Input Stereo ECC83 (12AX7) Tube Preamp
Some time ago I presented you a project for a 3W stereo tube amplifier with a GU32 output vacuum t...
-
 ESP32 Weather Dashboard with Satellite Maps and 16-day Weather Forecast
As you can see from my previous videos, besides Electronics, my fields of experimentation and proje...
ESP32 Weather Dashboard with Satellite Maps and 16-day Weather Forecast
As you can see from my previous videos, besides Electronics, my fields of experimentation and proje...
-
 Retro Analog VU Meter on Round dispalys (ESP32 and GC9A01)
Recently, in one of my previous videos I presented you a Retro VU Meter project on round displays ...
Retro Analog VU Meter on Round dispalys (ESP32 and GC9A01)
Recently, in one of my previous videos I presented you a Retro VU Meter project on round displays ...
-
Programmable Mist Maker - XIAO / QT PY Extension
1133 2 1 -
RadioHAT - Raspberry Pi radio development platform
942 0 2 -
-
-
-
-
ARPS-2 – Arduino-Compatible Robot Project Shield for Arduino UNO
3366 0 6 -
A Compact Charging Breakout Board For Waveshare ESP32-C3
3985 3 8 -
AI-driven LoRa & LLM-enabled Kiosk & Food Delivery System
4374 2 2


