


|
|
NE612 double-balanced mixer IC |
x 2 | |
|
|
455KHz filter |
x 1 | |
|
|
465kHz Crystal Resonator |
x 1 | |
|
|
Capacitors , Resistors |
x 1 | |
|
|
VFO 0-30MHz |
x 1 |

|
Soldering Iron Kit |
|

|
arduino IDEArduino
|
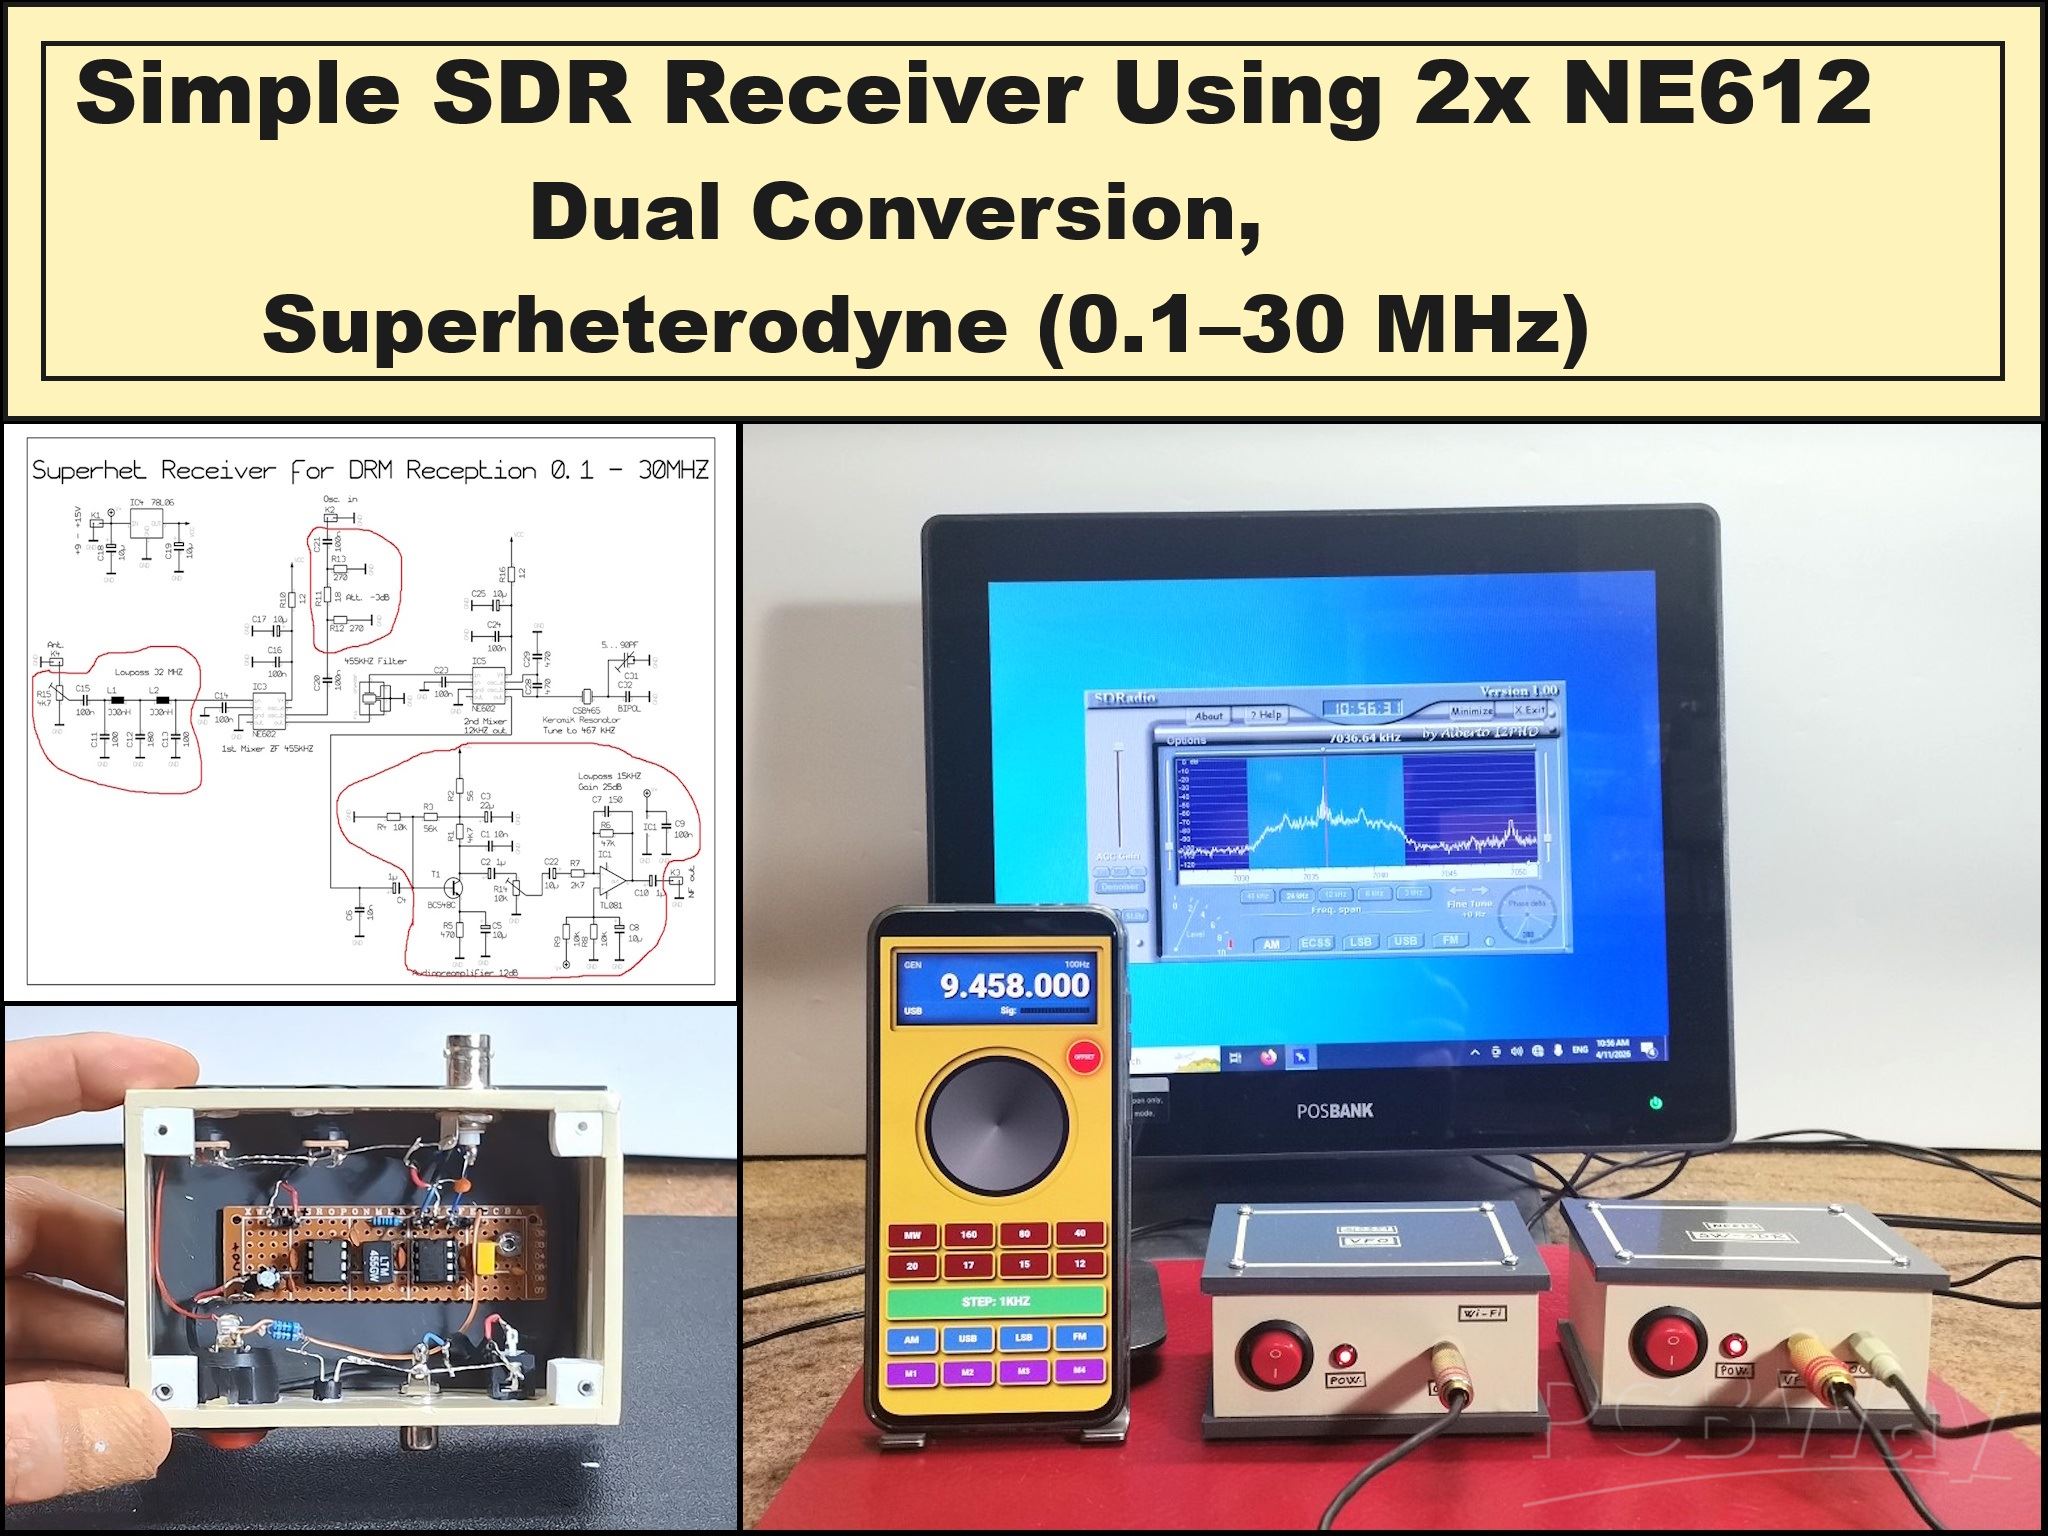
Simple SDR Receiver Using 2x NE612 - Dual Conversion, Superheterodyne (0.1–30 MHz)
SDR (Software Defined Radio) is a radio system in which most of the functions of a classic radio (filtering, demodulation, tuning, AGC) are performed by software instead of hardware. The hardware serves mainly as a receiver and signal converter, and then the computer processes the signal. The main advantage is flexibility: with the same device you can listen to AM, SSB, FM, DRM and other signals just by changing the software. The disadvantage is that it requires digital processing and often a computer, but therefore allows much greater precision and capabilities than classic radios.
In this project I will present you a simple way to build a superheterodyne type SDR radio, which despite its simplicity, gives excellent results and according to its characteristics is comparable to many modern SW radios. The original circuit diagram is presented on several forums but I think the source is Andreas Stefan, DL5MGD. For the sake of simplicity, I omitted several parts of the original diagram, such as the low-pass filters on the VFO and RF input, and I bring the signal from the second mixer directly to the microphone input of the PC sound card. First, I made the original project and I can tell you that the difference between it and this minimal version of mine is almost imperceptible. That is quite ok for this kind of experimental SDR receiver, because my main goal when making it was a compromise between minimal design and maximum results.

Let me briefly explain the principle of operation: The antenna collects a wide range of RF signals that are mixed in the first mixer with the signal from the local oscillator that generates a frequency 455 kHz higher than the specific frequency that we want to separate from the RF signal. This is our IF frequency (|RF – LO| = 455 kHz). Next is a 455 kHz filter that passes only a narrow band around 455 kHz and rejects all other mixed products. This is the key to selectivity and a clean signal. Then the signal goes to the second mixer in which a conversion from 455 to 12 kHz is performed so that the sound card can read and process this signal appropriately. So this is a classic dual conversion superhet receiver.

This project is sponsored by PCBWay . From concept to production, PCBWay provide cutting-edge electronic design solutions for global innovators, Including hardware design, software development, mechanical design, product testing and certification. PCBWay engineering team consists of experienced engineers in electronics, embedded systems, and product development. They successfully delivered hundreds of projects across industries such as medical devices, industrial automation, consumer electronics, smart home, and IoT.
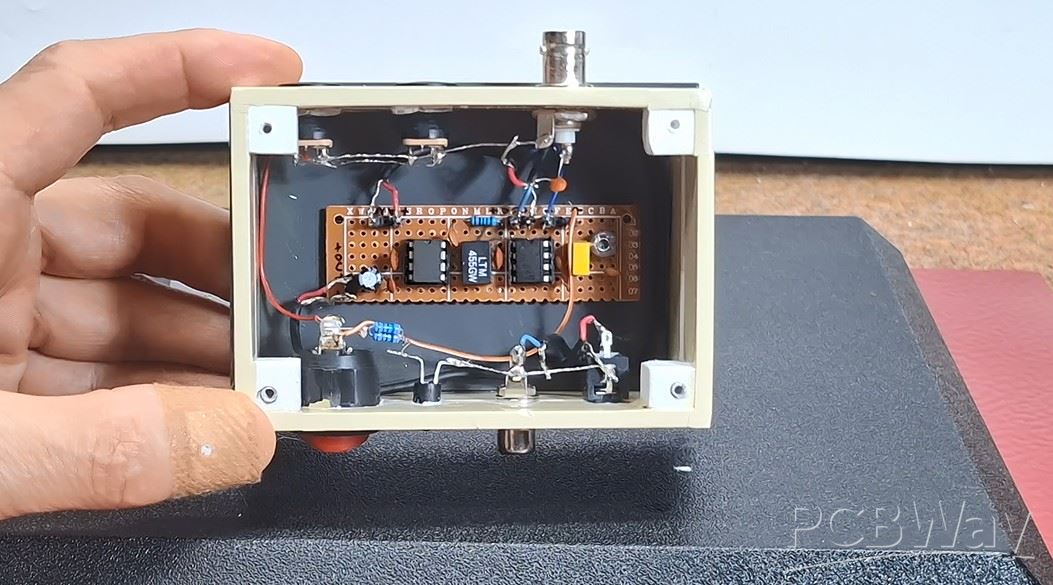
Here's what the inside of this box looks like, which houses the hardware part of the radio, just two NE612 chips and a few passive elements.
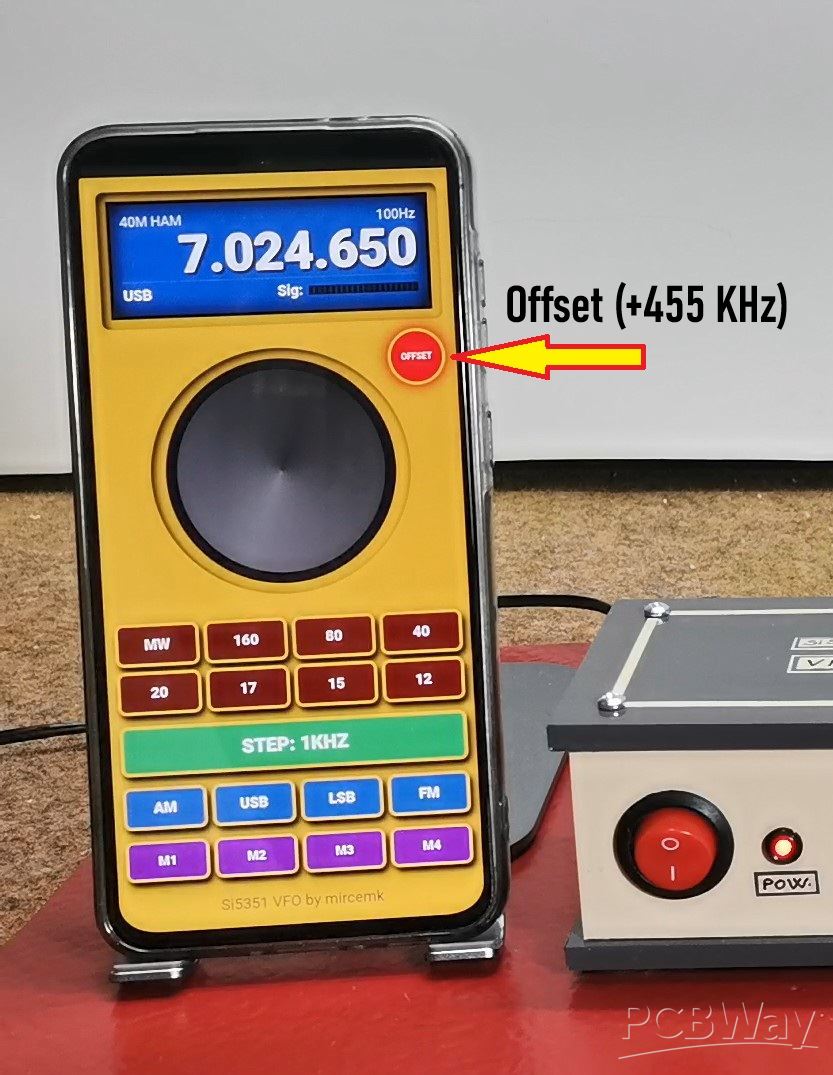
It does not contain any coils and does not require any tuning. The Local Oscillator signal is generated by my latest Smartphone Wi-Fi VFO, the construction of which is described in one of my previous videos. For the needs of this superhet receiver I added a new option to the VFO project - Offset frequency - in this case +455KHz which is activated by pressing a virtual button on the smartphone.
At the end of the text is given the latest modified code.
The output of this SDR front-end is processed by the "Sdradio" free software by Alberto I2PHD which you can download on the given page .

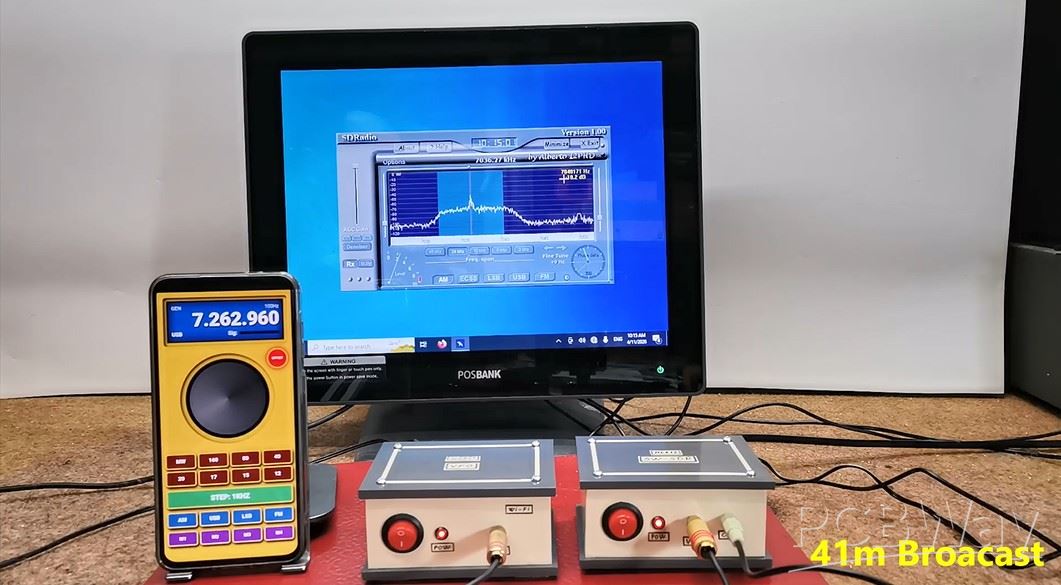
Now let's see how the device performs in real conditions. I will use my long wire antenna mounted on the roof. As I mentioned at the beginning, the reception is surprisingly good for such a simple receiver, and on all bands of the SW range.
And finally a short conclusion. This project shows that a powerful SDR receiver doesn’t need complex hardware—just smart design and software processing. With minimal components, you can achieve surprisingly high performance across the entire shortwave band.
// By mircemk, June 2026

#include <WiFi.h>
#include <WebServer.h>
#include <si5351.h>
#include <Wire.h>

Si5351 si5351;
unsigned long frequency = 7000000;
bool offsetActive = false;
const unsigned long IF_OFFSET = 455000; // 455 kHz Offset за суперхетеродин

const char* ssid = "Si5351_VFO_Final_Complete";
const char* password = "vfo12345678";

WebServer server(80);

const char VFO_HTML[] PROGMEM = R"rawliteral(
<!DOCTYPE html><html><head>
<meta name="viewport" content="width=device-width, initial-scale=1, maximum-scale=1, user-scalable=0">
<style>
  :root {
    --panel-bg: #E0AB07;
    --inner-bezel: #E0AB07;
    --lcd-bg: #0077c2;
    --btn-band: #7f0000;
    --btn-step: #27ae60;
    --btn-mode: #2980b9;
    --btn-mem: #8e44ad;
    --gold-border: #f1c40f;
    --text-color: #ecf0f1;
  }
  * { -webkit-tap-highlight-color: transparent; box-sizing: border-box; user-select: none; }
  body { background: #000; margin: 0; display: flex; justify-content: center; font-family: 'Arial Black', sans-serif; color: var(--text-color); overflow: hidden; }
  .vfo-main-frame { background: var(--panel-bg); width: 100%; max-width: 400px; height: 100vh; display: flex; flex-direction: column; align-items: center; position: relative; }

  .bezel-display { background: var(--inner-bezel); width: 92%; margin-top: 15px; padding: 10px; border-radius: 8px; box-shadow: inset 4px 4px 10px #000; position: relative; }
  .fs-zone { position: absolute; left: 0; top: 0; width: 30%; height: 100%; z-index: 10; cursor: pointer; }
  .mem-zone { position: absolute; left: 30%; top: 0; width: 40%; height: 100%; z-index: 10; cursor: pointer; }
  .reset-zone { position: absolute; right: 0; top: 0; width: 30%; height: 100%; z-index: 10; cursor: pointer; }

  .display { background: var(--lcd-bg); border: 4px solid #111; padding: 10px; box-shadow: inset 0 0 25px #000; height: 125px; display: flex; flex-direction: column; justify-content: space-between; position: relative; transition: background 0.2s; }
  .display.mem-active { background: #e67e22; }
  .display.reset-flash { background: #e74c3c; }

  #f-display { font-size: 55px; font-weight: 900; margin: 0; text-align: right; text-shadow: 2px 2px 4px #000; letter-spacing: -1px; line-height: 1; }
  .display-info { display: flex; justify-content: space-between; font-size: 14px; color: rgba(255,255,255,0.9); font-family: Arial, sans-serif; }
  .display-footer { display: flex; align-items: center; border-top: 1px solid rgba(255,255,255,0.2); padding-top: 5px; margin-bottom: 4px; }
  #mode-label, .sig-text { font-size: 15px; font-weight: bold; color: #fff; }

  .s-meter-container { display: flex; align-items: center; gap: 6px; flex-grow: 1; justify-content: flex-end; margin-left: 25px; }
  .s-grid { display: flex; gap: 1px; height: 10px; width: 115px; background: rgba(0,0,0,0.3); border: 1px solid #111; }
  .s-seg { flex: 1; background: #222; }
  .s-on { background: #ffffff; box-shadow: 0 0 6px #ffffff; }

  /* OFFSET DUGME */
  .offset-btn {
    position: absolute; right: 17px; top: 175px;
    width: 60px; height: 60px; border-radius: 50%;
    background: #3d0000; border: 3px solid #222;
    color: #fff; font-size: 9px; font-weight: bold;
    display: flex; align-items: center; justify-content: center;
    cursor: pointer; box-shadow: 3px 3px 8px #000; z-index: 50;
  }
  .offset-btn.active { background: #ff0000; box-shadow: 0 0 15px #ff0000; border-color: #f1c40f; }

  .bezel-knob { background: var(--inner-bezel); width: 270px; height: 270px; margin: 25px 0; border-radius: 50%; box-shadow: inset 3px 3px 10px #000; display: flex; justify-content: center; align-items: center; }
  #knob { width: 240px; height: 240px; background: conic-gradient(#333, #777, #333); border-radius: 50%; border: 12px solid #1a1a1a; position: relative; will-change: transform; cursor: pointer; }

  .controls-container { width: 94%; display: flex; flex-direction: column; }
  .grid { display: grid; gap: 6px; width: 100%; grid-template-columns: repeat(4, 1fr); }
  .btn { border: 3px solid var(--gold-border); border-radius: 8px; color: #fff; font-weight: 900; font-size: 15px; padding: 11px 0; text-align: center; cursor: pointer; box-shadow: 3px 5px 8px #000; text-transform: uppercase; }
  .b-band { background: var(--btn-band); }
  .b-step { background: var(--btn-step); font-size: 20px; padding: 12px; grid-column: span 4; margin: 12px 0; }
  .b-mode { background: var(--btn-mode); }
  .b-mem { background: var(--btn-mem); font-size: 13px; margin-top: 6px; }
</style>
</head><body>
  <div class="vfo-main-frame">
    <div class="bezel-display">
      <div class="fs-zone" onclick="toggleFS()"></div>
      <div class="mem-zone" onclick="startMem()"></div>
      <div class="reset-zone" onclick="clearAllMem()"></div>
      <div class="display" id="main-display">
        <div class="display-info"><span id="band-label">40M HAM</span><span id="step-label">100Hz</span></div>
        <h1 id="f-display">07.000.000</h1>
        <div class="display-footer">
            <span id="mode-label">USB</span>
            <div class="s-meter-container">
                <span class="sig-text">Sig:</span>
                <div class="s-grid" id="s-grid"></div>
            </div>
        </div>
      </div>
    </div>
    <div id="offset-led" class="offset-btn" onclick="toggleOffset()">OFFSET</div>
    <div class="bezel-knob"><div id="knob"></div></div>
    <div class="controls-container">
      <div class="grid">
        <div class="btn b-band" onclick="setBand(531000)">MW</div>
        <div class="btn b-band" onclick="setBand(1810000)">160</div>
        <div class="btn b-band" onclick="setBand(3500000)">80</div>
        <div class="btn b-band" onclick="setBand(7000000)">40</div>
        <div class="btn b-band" onclick="setBand(14000000)">20</div>
        <div class="btn b-band" onclick="setBand(18068000)">17</div>
        <div class="btn b-band" onclick="setBand(21000000)">15</div>
        <div class="btn b-band" onclick="setBand(24890000)">12</div>
      </div>
      <div class="btn b-step" id="step-btn" onclick="nextStep()">STEP: 100Hz</div>
      <div class="grid">
        <div class="btn b-mode" onclick="setMode('AM')">AM</div>
        <div class="btn b-mode" onclick="setMode('USB')">USB</div>
        <div class="btn b-mode" onclick="setMode('LSB')">LSB</div>
        <div class="btn b-mode" onclick="setMode('FM')">FM</div>
        <div class="btn b-mem" id="m1" onclick="handleMem(1)">M1</div>
        <div class="btn b-mem" id="m2" onclick="handleMem(2)">M2</div>
        <div class="btn b-mem" id="m3" onclick="handleMem(3)">M3</div>
        <div class="btn b-mem" id="m4" onclick="handleMem(4)">M4</div>
      </div>
    </div>
  </div>
  <script>
    var freq = 7000000; var lastAngle = 0; var curRot = 0; var isDrag = false; var lastSent = 0;
    var steps = [10, 100, 1000, 5000, 10000, 100000]; var stepIdx = 1;
    var isMemMode = false; var isOffset = false;

    const sGrid = document.getElementById('s-grid');
    for(let i=0; i<20; i++) { let d=document.createElement('div'); d.className='s-seg'; sGrid.appendChild(d); }

    function toggleOffset() {
      isOffset = !isOffset;
      document.getElementById('offset-led').classList.toggle('active');
      fetch('/setOffset?state=' + (isOffset ? 1 : 0));
    }
    function sendFreq() {
      let now = Date.now();
      if (now - lastSent > 50) { fetch('/set?f=' + freq); lastSent = now; }
    }
    function updateUI() {
      document.getElementById('f-display').innerText = Number(freq).toLocaleString('de-DE').replace(/,/g, '.');
      updateBandLabel();
    }
    function move(e) {
      if (!isDrag) return;
      let ev = e.touches ? e.touches[0] : e;
      let r = document.getElementById('knob').getBoundingClientRect();
      let ang = Math.atan2(ev.clientY - (r.top + r.height/2), ev.clientX - (r.left + r.width/2)) * 180 / Math.PI;
      let d = ang - lastAngle;
      if (d > 180) d -= 360; if (d < -180) d += 360;
      curRot += d;
      freq += Math.round(d) * (steps[stepIdx] / 10);
      if (freq < 100000) freq = 100000;
      updateUI();
      document.getElementById('knob').style.transform = 'rotate(' + curRot + 'deg)';
      sendFreq();
      lastAngle = ang;
    }
    let knob = document.getElementById('knob');
    knob.addEventListener('mousedown', function(e) { isDrag = true; let r = knob.getBoundingClientRect(); lastAngle = Math.atan2(e.clientY - (r.top + r.height/2), e.clientX - (r.left + r.width/2)) * 180 / Math.PI; });
    knob.addEventListener('touchstart', function(e) { isDrag = true; let r = knob.getBoundingClientRect(); lastAngle = Math.atan2(e.touches[0].clientY - (r.top + r.height/2), e.touches[0].clientX - (r.left + r.width/2)) * 180 / Math.PI; e.preventDefault(); }, {passive: false});
    window.addEventListener('mouseup', () => isDrag = false);
    window.addEventListener('touchend', () => isDrag = false);
    window.addEventListener('mousemove', move);
    window.addEventListener('touchmove', move, {passive: false});

    function toggleFS() { if(!document.fullscreenElement) document.documentElement.requestFullscreen().catch(e=>{}); else document.exitFullscreen(); }
    function setBand(f) { freq = f; updateUI(); sendFreq(); }
    function setMode(m) { document.getElementById('mode-label').innerText = m; }
    function nextStep() { stepIdx = (stepIdx + 1) % steps.length; let labels = ["10Hz", "100Hz", "1KHz", "5KHz", "10KHz", "100KHz"]; document.getElementById('step-btn').innerText = "STEP: " + labels[stepIdx]; }
    function startMem() { isMemMode = true; document.getElementById('main-display').classList.add('mem-active'); }
    function clearAllMem() { localStorage.clear(); document.getElementById('main-display').classList.add('reset-flash'); setTimeout(() => location.reload(), 300); }
    function handleMem(id) {
      if(isMemMode) { localStorage.setItem('m'+id, freq); location.reload(); }
      else { let s = localStorage.getItem('m'+id); if(s) { freq = parseInt(s); updateUI(); sendFreq(); } }
    }
    function loadSavedMem() { for(let i=1; i<=4; i++){ let s = localStorage.getItem('m'+i); if(s) document.getElementById('m'+i).innerText = (parseInt(s)/1000000).toFixed(3); } }
    function updateBandLabel() {
      let b = document.getElementById('band-label');
      if (freq >= 7000000 && freq <= 7200000) b.innerText = "40M HAM";
      else if (freq >= 531000 && freq <= 1602000) b.innerText = "MW BROADCAST";
      else b.innerText = "GEN";
    }
    setInterval(() => {
      fetch('/getS').then(r => r.text()).then(v => {
        let segs = document.querySelectorAll('.s-seg');
        let act = Math.floor((v/100)*20);
        segs.forEach((s,i) => { if(i<act) s.classList.add('s-on'); else s.classList.remove('s-on'); });
      });
    }, 250);
    loadSavedMem(); updateUI();
  </script>
</body></html>
)rawliteral";

void updateSi5351() {
  unsigned long outFreq = frequency;
  if (offsetActive) outFreq += IF_OFFSET;
  si5351.set_freq(outFreq * 100ULL, SI5351_CLK0);
}

void setup() {
  Serial.begin(115200);
  Wire.begin(21, 22);

  pinMode(32, INPUT);
  analogReadResolution(12);
  analogSetAttenuation(ADC_6db);

  si5351.init(SI5351_CRYSTAL_LOAD_8PF, 0, 0);
  updateSi5351();

  WiFi.mode(WIFI_AP);
  WiFi.softAP(ssid, password);
  WiFi.setTxPower(WIFI_POWER_19_5dBm); // Максимално засилување на Wi-Fi

  server.on("/", []() { server.send(200, "text/html", VFO_HTML); });
  server.on("/set", []() {
    if (server.hasArg("f")) {
      frequency = server.arg("f").toInt();
      updateSi5351();
      server.send(200, "text/plain", "OK");
    }
  });
  server.on("/setOffset", []() {
    if (server.hasArg("state")) {
      offsetActive = server.arg("state").toInt() == 1;
      updateSi5351();
      server.send(200, "text/plain", "OK");
    }
  });
  server.on("/getS", []() {
    int val = analogRead(32);
    int percent = map(val, 0, 1200, 0, 100);
    if(percent > 100) percent = 100;
    server.send(200, "text/plain", String(percent));
  });

  server.begin();
}

void loop() { server.handleClient(); }
Simple SDR Receiver Using 2x NE612 - Dual Conversion, Superheterodyne (0.1–30 MHz)


Raspberry Pi 5 7 Inch Touch Screen IPS 1024x600 HD LCD HDMI-compatible Display for RPI 4B 3B+ OPI 5 AIDA64 PC Secondary Screen(Without Speaker)
BUY NOW


- Comments(1)
- Likes(0)
More by Mirko Pavleski
-
 Arduino 3D Printed self Balancing Cube
Self-balancing devices are electronic devices that use sensors and motors to keep themselves balanc...
Arduino 3D Printed self Balancing Cube
Self-balancing devices are electronic devices that use sensors and motors to keep themselves balanc...
-
 Simple SDR Receiver Using 2x NE612 - Dual Conversion, Superheterodyne (0.1–30 MHz)
SDR (Software Defined Radio) is a radio system in which most of the functions of a classic radio (f...
Simple SDR Receiver Using 2x NE612 - Dual Conversion, Superheterodyne (0.1–30 MHz)
SDR (Software Defined Radio) is a radio system in which most of the functions of a classic radio (f...
-
 DIY Vintage TV VU Meter with peak indicators
Some time ago in one of my projects I presented you a way to turn a black and white old mini TV int...
DIY Vintage TV VU Meter with peak indicators
Some time ago in one of my projects I presented you a way to turn a black and white old mini TV int...
-
 DIY Tesla Coil based Plasma Rife Machine
In several of my previous videos, I presented you with different ways to make a Rife Machine, from ...
DIY Tesla Coil based Plasma Rife Machine
In several of my previous videos, I presented you with different ways to make a Rife Machine, from ...
-
 ESP32 Analog VU Meter – Smooth Needle, Real Audio Response (DIY Build)
In several of my previous videos I have shown you how to make analog VU meters emulated on differen...
ESP32 Analog VU Meter – Smooth Needle, Real Audio Response (DIY Build)
In several of my previous videos I have shown you how to make analog VU meters emulated on differen...
-
 The Ultimate Smartphone VFO ESP32 & Si5351 Wireless Control
Variable frequency oscillators (VFOs) are commonly used in radio transmitters and receivers, especi...
The Ultimate Smartphone VFO ESP32 & Si5351 Wireless Control
Variable frequency oscillators (VFOs) are commonly used in radio transmitters and receivers, especi...
-
 DIY Shortwave Propagation Monitor - Measure Ionosphere Conditions
Shortwave Propagation is the way radio waves in the 3 to 30 MHz range travel from point A to point ...
DIY Shortwave Propagation Monitor - Measure Ionosphere Conditions
Shortwave Propagation is the way radio waves in the 3 to 30 MHz range travel from point A to point ...
-
 Professional grade Smart Lock with ESP32, BLE and Android App Control
An electronic codelock is a security device that grants access using a numerical sequence—a PIN cod...
Professional grade Smart Lock with ESP32, BLE and Android App Control
An electronic codelock is a security device that grants access using a numerical sequence—a PIN cod...
-
 Building a 3-Input Stereo ECC83 (12AX7) Tube Preamp
Some time ago I presented you a project for a 3W stereo tube amplifier with a GU32 output vacuum t...
Building a 3-Input Stereo ECC83 (12AX7) Tube Preamp
Some time ago I presented you a project for a 3W stereo tube amplifier with a GU32 output vacuum t...
-
 ESP32 Weather Dashboard with Satellite Maps and 16-day Weather Forecast
As you can see from my previous videos, besides Electronics, my fields of experimentation and proje...
ESP32 Weather Dashboard with Satellite Maps and 16-day Weather Forecast
As you can see from my previous videos, besides Electronics, my fields of experimentation and proje...
-
 Retro Analog VU Meter on Round dispalys (ESP32 and GC9A01)
Recently, in one of my previous videos I presented you a Retro VU Meter project on round displays ...
Retro Analog VU Meter on Round dispalys (ESP32 and GC9A01)
Recently, in one of my previous videos I presented you a Retro VU Meter project on round displays ...
-
 Ultimate 2-Player Reaction Timer with WS2812B LED Strips & Arduino
Arcade reaction game is a genre of play designed to test a player's physical response time and hand...
Ultimate 2-Player Reaction Timer with WS2812B LED Strips & Arduino
Arcade reaction game is a genre of play designed to test a player's physical response time and hand...
-
 Building a Vintage Tube-Style Internet Radio with Raspberry Pi & Rotary Encoder
Internet radio (also known as web radio or net radio) is a digital audio service transmitted via th...
Building a Vintage Tube-Style Internet Radio with Raspberry Pi & Rotary Encoder
Internet radio (also known as web radio or net radio) is a digital audio service transmitted via th...
-
 DIY Smart Code Lock with CrowPanel 1.28 ESP32 Rotary Display
A code lock is a keyless security device—either mechanical or electronic—that restricts access to d...
DIY Smart Code Lock with CrowPanel 1.28 ESP32 Rotary Display
A code lock is a keyless security device—either mechanical or electronic—that restricts access to d...
-
 SDR Panadapter for Vintage Tube Radios – Step-by-Step Tutorial
A radio panadapter (or panoramic adapter) is a device or software tool used in amateur radio and ot...
SDR Panadapter for Vintage Tube Radios – Step-by-Step Tutorial
A radio panadapter (or panoramic adapter) is a device or software tool used in amateur radio and ot...
-
 Oscilloscope Clock Simulation on a Round ESP32 Display
An oscilloscope clock is a circuit that turns an old analog oscilloscope into a stylish, retro-them...
Oscilloscope Clock Simulation on a Round ESP32 Display
An oscilloscope clock is a circuit that turns an old analog oscilloscope into a stylish, retro-them...
-
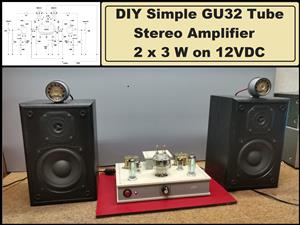 DIY Simple GU32 Tube Stereo Amplifier (2x3W on 12VDC)
Vacuum tube amplifiers are often favored for their smooth harmonic distortion, especially in the low...
DIY Simple GU32 Tube Stereo Amplifier (2x3W on 12VDC)
Vacuum tube amplifiers are often favored for their smooth harmonic distortion, especially in the low...
-
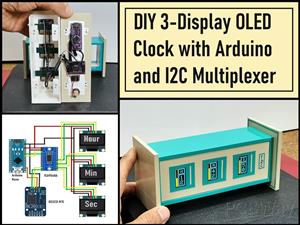 DIY 3-Display OLED Clock with Arduino and I2C Multiplexer
In this video I want to present you another unusual clock to add to my large collection of such DIY...
DIY 3-Display OLED Clock with Arduino and I2C Multiplexer
In this video I want to present you another unusual clock to add to my large collection of such DIY...
-
-
-
ARPS-2 – Arduino-Compatible Robot Project Shield for Arduino UNO
2615 0 5 -
A Compact Charging Breakout Board For Waveshare ESP32-C3
3087 3 8 -
AI-driven LoRa & LLM-enabled Kiosk & Food Delivery System
3307 2 1 -
-
-
-
ESP32-C3 BLE Keyboard - Battery Powered with USB-C Charging
3385 0 2


