


|
Soldering Iron Kit |
|

|
Soldering Iron Wire Welding Lead Roll |
DIY Sensitive Arduino IB METAL DETECTOR (coin from 25cm big object at 100+ cm)
A metal detector is an instrument that detects the presence of metal nearby. This time I will show you how to make a very sensitive, but simple to build "Inductoion Balance" type of metal detector made with the help of Arduino microcontroller and several other components. The Induction Balance principle uses two coils arranged in such a way that there is virtually no inductive pick-up between them. A modulated signal is fed in to one. When metal is brought near, the electromagnetic field is disturbed and the other coil picks-up an appreciably higher signal.
In a few of my previous videos you can see the making of different types of Metal Detectors. In terms of detection capability, this detector is the most sensitive, but also a big advantage is that it is a standalone instrument and does not use a smartphone, as one of the previous ones that has a sensitivity closest to this one. The construction is really simple thanks to the microcontroller, but also the module for weak signal amplification with LM358 IC which can be ordered for less than fifty cents. However for those who can not obtain this module, I also presented a schematic diagram in which the amplification is done with two standard NPN transistors, with the sensitivity of the device being the same as in the previous case.
The principle of operation is as follows: the Arduino generates a signal on pin 8, which is then amplified by a MOSFET transistor and fed to the Transmitter coil. Then, the signal of the Receiver coil is amplified with the LM358 module (or with two transistors in the second option) and carried to the A0 analog input. We also have two potentiometers on analog inputs that regulate the reaction threshold, and thus the sensitivity of the instrument. The buzzer and Led serve as a sound and visual indication when detecting a metal object.
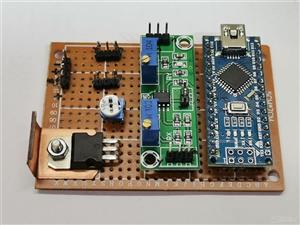
As I mentioned before, the device is relatively simple to build and contains several components:
- Arduino nano microcontroller
- LM358 low signal amolifier module
- Power mosfet transistor (in my case STP65NF06, but you can use any Power mosfet, for example IRF630)
- Two potentiometers 10K ohms
- Buzzer
- Led
- and Double D shape search coils with appropriate capacitors, in this case 1 microF.

And now a few words about the coils. They consist of 60 turns of 0,4mm^2 (32 s.w.g.) enamelled copper wire coiled in a circle with a diameter of 15 cm. Then they are bent in the shape of the letter D. The wire should be wound close together and kept well bunched and taped to keep it together when removed from the former. Two such coils are required,and both are identical. You will find more about how to wind the coils in my previous videos. The sensitivity of the detector mostly depends on the coils, and especially on their placement. Putting them in an ideal position requires a lot of patience and time, but that is the greatest pleasure in making a device, especially when we achieve the best performance.

First we need to lightly fix the two coils in the shape as you see in the video. Both potentiometers should be around the middle position, turn on the detector and carefully move the coils to the position where the sound will be lost. Then we move the potentiometers to the position before the sound appears. We are now testing the operation with a larger metal object. This procedure needs to be repeated many times, until we get the greatest sensitivity. In the version with the amplifier module we can try to increase the sensitivity even more by turning the two potentiometers counterclockwise, but then the detector is more unstable and very sensitive to minimal displacement of the coils.

As you can see in the video, this detector can detect a small coin at a distance of 20 cm or more, a hard disk drive at a distance of 40 cm, and a large metal object at a distance of more than 80 cm in the air.
The ability to locate objects buried in the soil are, of course, dependent on soil conditions. Dry sand being the most favourable, and clay is the worst medium.
void setup() {
pinMode(A0, INPUT);
pinMode(A1, INPUT);
pinMode(8, OUTPUT);
pinMode(A4, INPUT);
pinMode(A5, OUTPUT);
}
void loop() {
int val1 = 0;
int val2 = 0;
int val3 = 0;
int val4 = 0;
int val5 = 0;
int val6 = 0;
int val7 = 0;
int val8 = 0;
int val9 = 0;
int val10 = 0;
int sumval = 0;
int impuls = 120;   //select the pulse length depending on the frequency
int Delay = 0;
int base = 0;
Delay = analogRead(A4);
pinMode(A0, OUTPUT);
digitalWrite(A0, LOW);
pinMode(A0, INPUT);
digitalWrite(8,HIGH);
delayMicroseconds(impuls);
digitalWrite(8, LOW);
delayMicroseconds(Delay);
val1 = analogRead(A0);
digitalWrite(8,HIGH);
delayMicroseconds(impuls);
digitalWrite(8, LOW);
delayMicroseconds(Delay);
val2 = analogRead(A0);
digitalWrite(8,HIGH);
delayMicroseconds(impuls);
digitalWrite(8, LOW);
delayMicroseconds(Delay);
val3 = analogRead(A0);
digitalWrite(8,HIGH);
delayMicroseconds(impuls);
digitalWrite(8, LOW);
delayMicroseconds(Delay);
val4 = analogRead(A0);
digitalWrite(8,HIGH);
delayMicroseconds(impuls);
digitalWrite(8, LOW);
delayMicroseconds(Delay);
val5 = analogRead(A0);
digitalWrite(8,HIGH);
delayMicroseconds(impuls);
digitalWrite(8, LOW);
delayMicroseconds(Delay);
val6 = analogRead(A0);
digitalWrite(8,HIGH);
delayMicroseconds(impuls);
digitalWrite(8, LOW);
delayMicroseconds(Delay);
val7 = analogRead(A0);
digitalWrite(8,HIGH);
delayMicroseconds(impuls);
digitalWrite(8, LOW);
delayMicroseconds(Delay);
val8 = analogRead(A0);
digitalWrite(8,HIGH);
delayMicroseconds(impuls);
digitalWrite(8, LOW);
delayMicroseconds(Delay);
val9 = analogRead(A0);
digitalWrite(8,HIGH);
delayMicroseconds(impuls);
digitalWrite(8, LOW);
delayMicroseconds(Delay);
val10 = analogRead(A0);
sumval = val1 + val2 + val3 + val4 + val5 + val6 + val7 + val8 + val9 + val10;
sumval = sumval/5;
base = analogRead(A1);
if (sumval > base)
{tone(A5,1000);
delay(50);
noTone(A5);
}
else  {delay(50);
}
}


DIY Sensitive Arduino IB METAL DETECTOR (coin from 25cm big object at 100+ cm)


Raspberry Pi 5 7 Inch Touch Screen IPS 1024x600 HD LCD HDMI-compatible Display for RPI 4B 3B+ OPI 5 AIDA64 PC Secondary Screen(Without Speaker)
BUY NOW


- Comments(1)
- Likes(4)
More by Mirko Pavleski
-
 Arduino 3D Printed self Balancing Cube
Self-balancing devices are electronic devices that use sensors and motors to keep themselves balanc...
Arduino 3D Printed self Balancing Cube
Self-balancing devices are electronic devices that use sensors and motors to keep themselves balanc...
-
 Simple SDR Receiver Using 2x NE612 - Dual Conversion, Superheterodyne (0.1–30 MHz)
SDR (Software Defined Radio) is a radio system in which most of the functions of a classic radio (f...
Simple SDR Receiver Using 2x NE612 - Dual Conversion, Superheterodyne (0.1–30 MHz)
SDR (Software Defined Radio) is a radio system in which most of the functions of a classic radio (f...
-
 DIY Vintage TV VU Meter with peak indicators
Some time ago in one of my projects I presented you a way to turn a black and white old mini TV int...
DIY Vintage TV VU Meter with peak indicators
Some time ago in one of my projects I presented you a way to turn a black and white old mini TV int...
-
 DIY Tesla Coil based Plasma Rife Machine
In several of my previous videos, I presented you with different ways to make a Rife Machine, from ...
DIY Tesla Coil based Plasma Rife Machine
In several of my previous videos, I presented you with different ways to make a Rife Machine, from ...
-
 ESP32 Analog VU Meter – Smooth Needle, Real Audio Response (DIY Build)
In several of my previous videos I have shown you how to make analog VU meters emulated on differen...
ESP32 Analog VU Meter – Smooth Needle, Real Audio Response (DIY Build)
In several of my previous videos I have shown you how to make analog VU meters emulated on differen...
-
 The Ultimate Smartphone VFO ESP32 & Si5351 Wireless Control
Variable frequency oscillators (VFOs) are commonly used in radio transmitters and receivers, especi...
The Ultimate Smartphone VFO ESP32 & Si5351 Wireless Control
Variable frequency oscillators (VFOs) are commonly used in radio transmitters and receivers, especi...
-
 DIY Shortwave Propagation Monitor - Measure Ionosphere Conditions
Shortwave Propagation is the way radio waves in the 3 to 30 MHz range travel from point A to point ...
DIY Shortwave Propagation Monitor - Measure Ionosphere Conditions
Shortwave Propagation is the way radio waves in the 3 to 30 MHz range travel from point A to point ...
-
 Professional grade Smart Lock with ESP32, BLE and Android App Control
An electronic codelock is a security device that grants access using a numerical sequence—a PIN cod...
Professional grade Smart Lock with ESP32, BLE and Android App Control
An electronic codelock is a security device that grants access using a numerical sequence—a PIN cod...
-
 Building a 3-Input Stereo ECC83 (12AX7) Tube Preamp
Some time ago I presented you a project for a 3W stereo tube amplifier with a GU32 output vacuum t...
Building a 3-Input Stereo ECC83 (12AX7) Tube Preamp
Some time ago I presented you a project for a 3W stereo tube amplifier with a GU32 output vacuum t...
-
 ESP32 Weather Dashboard with Satellite Maps and 16-day Weather Forecast
As you can see from my previous videos, besides Electronics, my fields of experimentation and proje...
ESP32 Weather Dashboard with Satellite Maps and 16-day Weather Forecast
As you can see from my previous videos, besides Electronics, my fields of experimentation and proje...
-
 Retro Analog VU Meter on Round dispalys (ESP32 and GC9A01)
Recently, in one of my previous videos I presented you a Retro VU Meter project on round displays ...
Retro Analog VU Meter on Round dispalys (ESP32 and GC9A01)
Recently, in one of my previous videos I presented you a Retro VU Meter project on round displays ...
-
 Ultimate 2-Player Reaction Timer with WS2812B LED Strips & Arduino
Arcade reaction game is a genre of play designed to test a player's physical response time and hand...
Ultimate 2-Player Reaction Timer with WS2812B LED Strips & Arduino
Arcade reaction game is a genre of play designed to test a player's physical response time and hand...
-
 Building a Vintage Tube-Style Internet Radio with Raspberry Pi & Rotary Encoder
Internet radio (also known as web radio or net radio) is a digital audio service transmitted via th...
Building a Vintage Tube-Style Internet Radio with Raspberry Pi & Rotary Encoder
Internet radio (also known as web radio or net radio) is a digital audio service transmitted via th...
-
 DIY Smart Code Lock with CrowPanel 1.28 ESP32 Rotary Display
A code lock is a keyless security device—either mechanical or electronic—that restricts access to d...
DIY Smart Code Lock with CrowPanel 1.28 ESP32 Rotary Display
A code lock is a keyless security device—either mechanical or electronic—that restricts access to d...
-
 SDR Panadapter for Vintage Tube Radios – Step-by-Step Tutorial
A radio panadapter (or panoramic adapter) is a device or software tool used in amateur radio and ot...
SDR Panadapter for Vintage Tube Radios – Step-by-Step Tutorial
A radio panadapter (or panoramic adapter) is a device or software tool used in amateur radio and ot...
-
 Oscilloscope Clock Simulation on a Round ESP32 Display
An oscilloscope clock is a circuit that turns an old analog oscilloscope into a stylish, retro-them...
Oscilloscope Clock Simulation on a Round ESP32 Display
An oscilloscope clock is a circuit that turns an old analog oscilloscope into a stylish, retro-them...
-
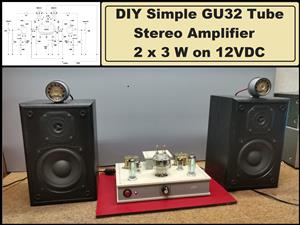 DIY Simple GU32 Tube Stereo Amplifier (2x3W on 12VDC)
Vacuum tube amplifiers are often favored for their smooth harmonic distortion, especially in the low...
DIY Simple GU32 Tube Stereo Amplifier (2x3W on 12VDC)
Vacuum tube amplifiers are often favored for their smooth harmonic distortion, especially in the low...
-
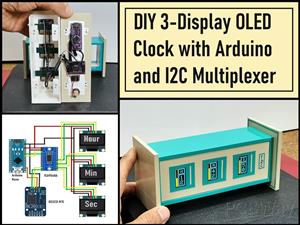 DIY 3-Display OLED Clock with Arduino and I2C Multiplexer
In this video I want to present you another unusual clock to add to my large collection of such DIY...
DIY 3-Display OLED Clock with Arduino and I2C Multiplexer
In this video I want to present you another unusual clock to add to my large collection of such DIY...
-
-
-
-
ARPS-2 – Arduino-Compatible Robot Project Shield for Arduino UNO
2656 0 5 -
A Compact Charging Breakout Board For Waveshare ESP32-C3
3142 3 8 -
AI-driven LoRa & LLM-enabled Kiosk & Food Delivery System
3399 2 1 -
-
-


