


|
|
Arduino_UNO_R3 |
x 1 | |
|
|
IR Flame Detector module |
x 1 | |
|
|
Water pump with hoses |
x 1 | |
|
|
5V Relay module |
x 1 | |
|
|
LED |
x 2 | |
|
|
Buzzer |
x 1 |

|
Soldering Iron Kit |
|

|
arduino IDEArduino
|
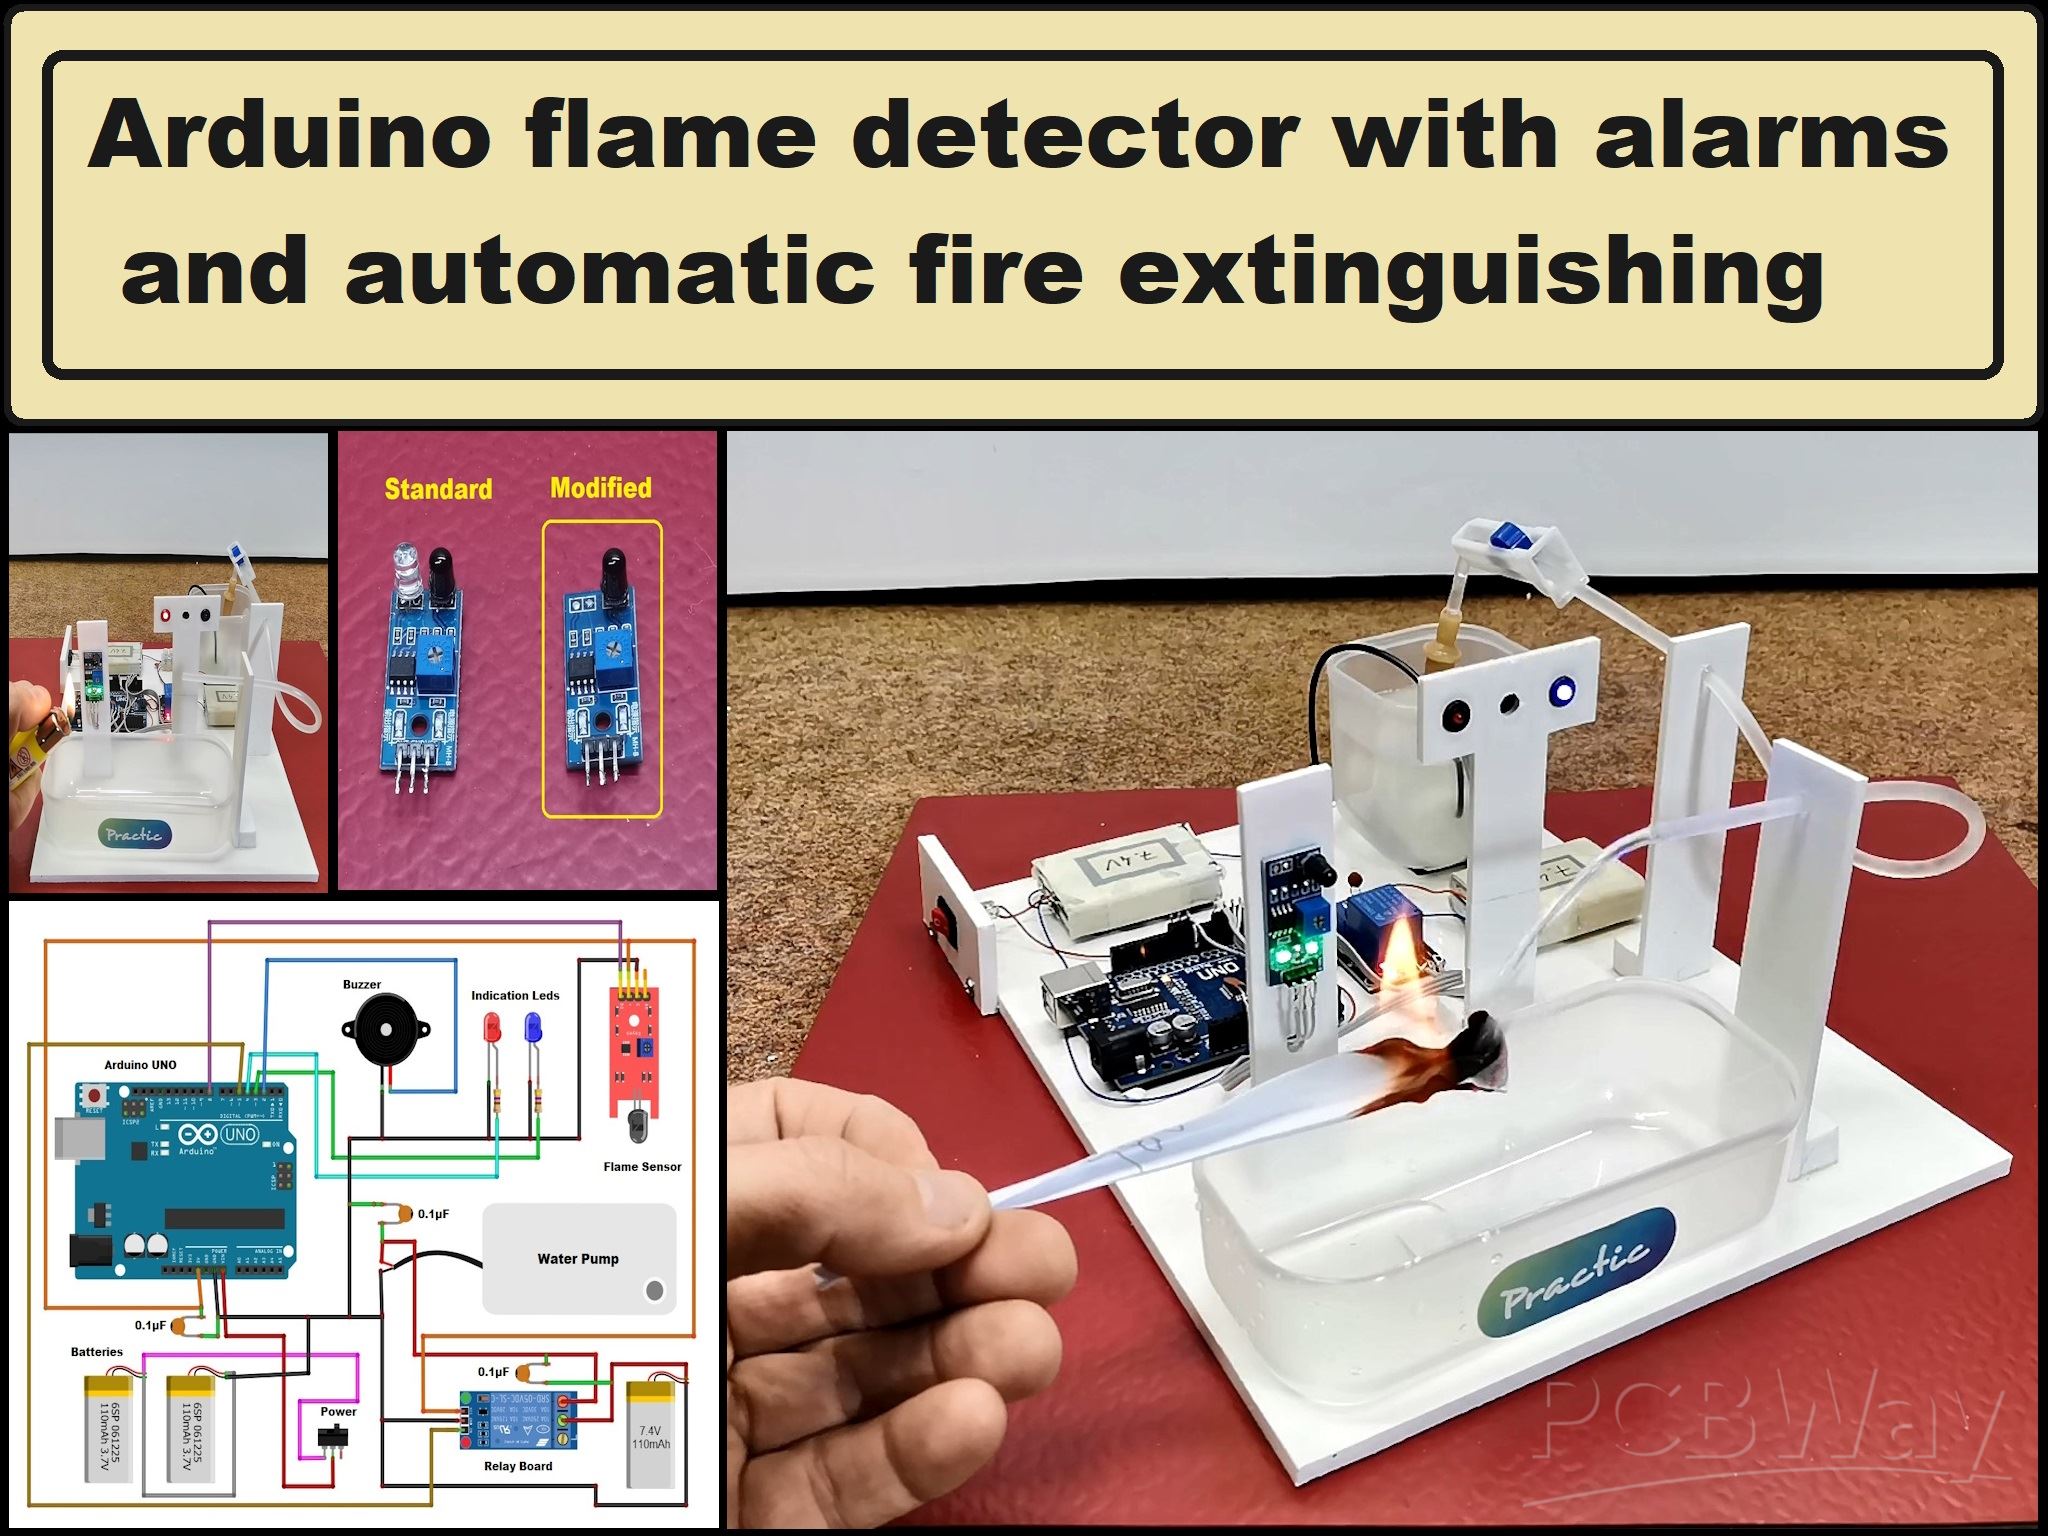
Arduino flame detector with alarms and automatic fire extinguishing
A flame detector is an electronic device designed to sense the presence of flames or fire. There are several types of flame detectors including ultraviolet, infrared, multispectrum detectors, and optical flame detectors. In the device described in this project, we will use an infrared type of flame detector which is widespread, inexpensive, and has satisfactory characteristics.
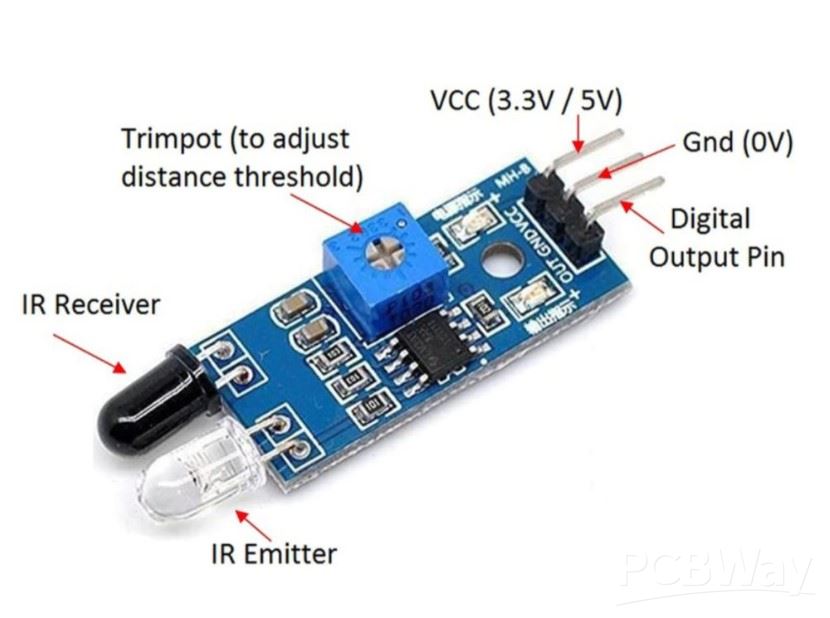
As the name itself tells us, this detector module consists of an Infrared receiving LED which is connected to an operational amplifier which processes the detected signal. Infrared LED has the ability to detect a light source in the infrared part of the spectrum. In the case of a flame, most of the spectrum that is emitted is in that infrared region.
In addition to the infrared sensor, we also use a microcontroller, which, when detecting a flame from the sensor, activates other processes, in this case a light and sound alarm, as well as a pump immersed in a water tank which at that moment begins to extinguish the flame to prevent its spread. Actually, I made this device together with one of my students and it is a high school graduation project.
This project is sponsored by PCBWay. This year, PCBWay is organizing the 11th badge design contest from March 3rd to April 31st. Follow the design requirements and Submit your designs in one of the given ways, and become the winner of one of the valuable prizes in cash and cupons. This contest is more than a competition—it’s a celebration of 11 years of innovation and a chance to dream about the boundless possibilities ahead with PCBWay.

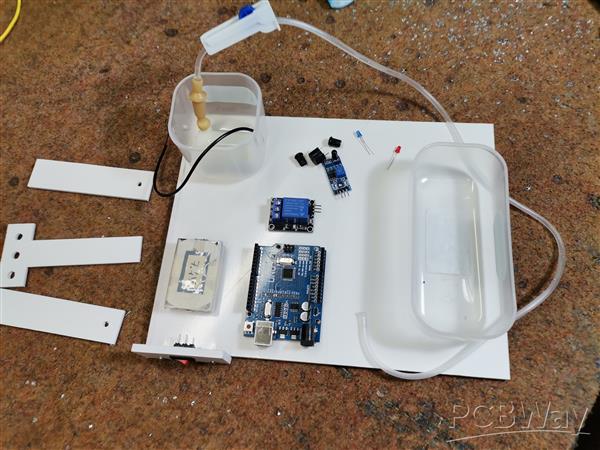
The device is very simple to make and consists of only a few components.
- Arduino Uno microcontroller board,
- Infrared Flame detector module,
- Water pump with hoses
- 5V Relay module
- 2 Leds with apropriate current limiting resistors 470 Ohms.
- Buzzer
- and Battery (in my case 2 lithium cells in series with total 7.4V and 1 cell for Water pump)
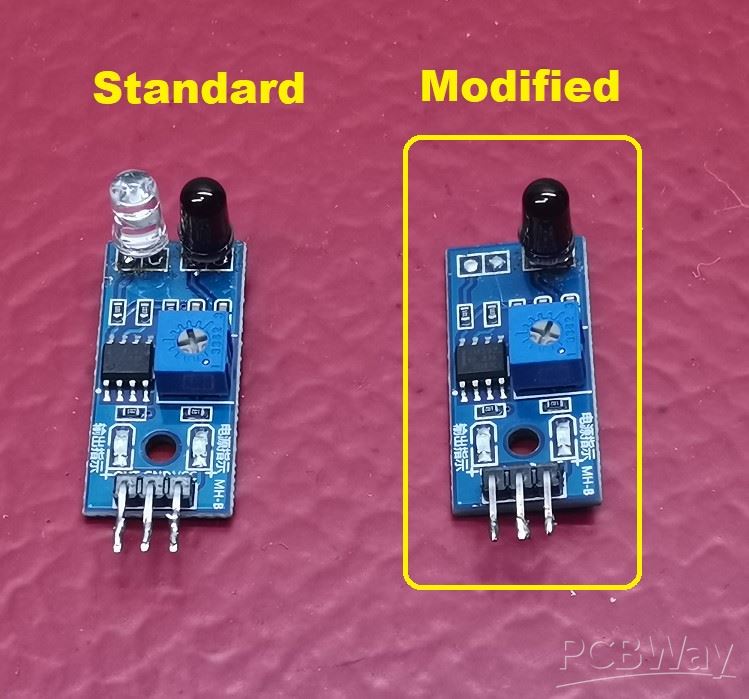
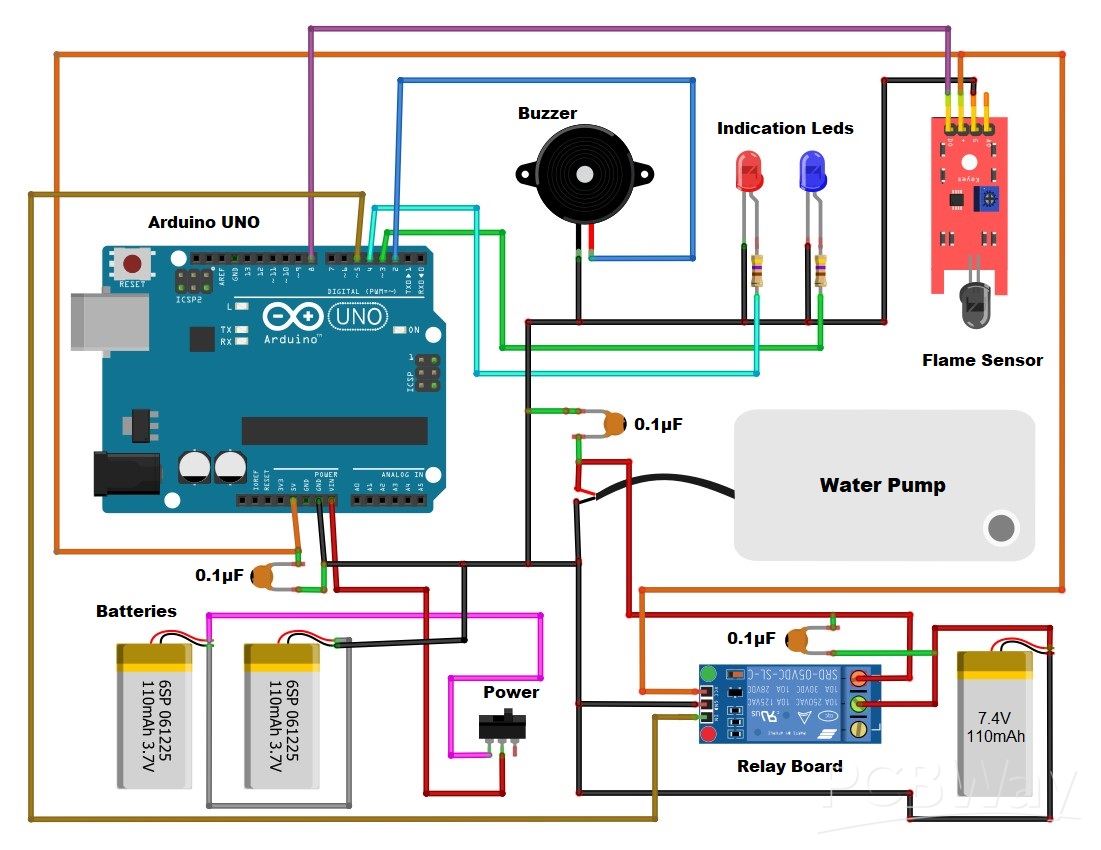
Let's first analyze the hardware part. For the Flame detector I use a standard IR sensor module with transmitter and receiver LEDs, where we need to unsolder and remove the transparent transmitter LED.
The main part of the water pump is an electric motor, which requires a current of more than 100mA to operate. On the other hand, the Arduino outputs can only handle a current of up to 40mA. For this reason, the water pump is connected via an electromagnetic relay module, which consumes about 20mA. The pump also uses a separate power source because the motor brushes often reset the microcontroller because they were previously connected to the same source. LEDs are by definition current consumers, so they are connected to the Arduino outputs through current limiting resistors with a value of 470 ohms, so according to Ohm's law, a current of about 5mA will flow through them. The buzzer is a component that connects directly to the Arduino and is controlled by pulse width modulation(PWM).
As for the Arduino code, it can be seen that it is extremely simple and therefore reliable, which should be a basic feature for this type of device.
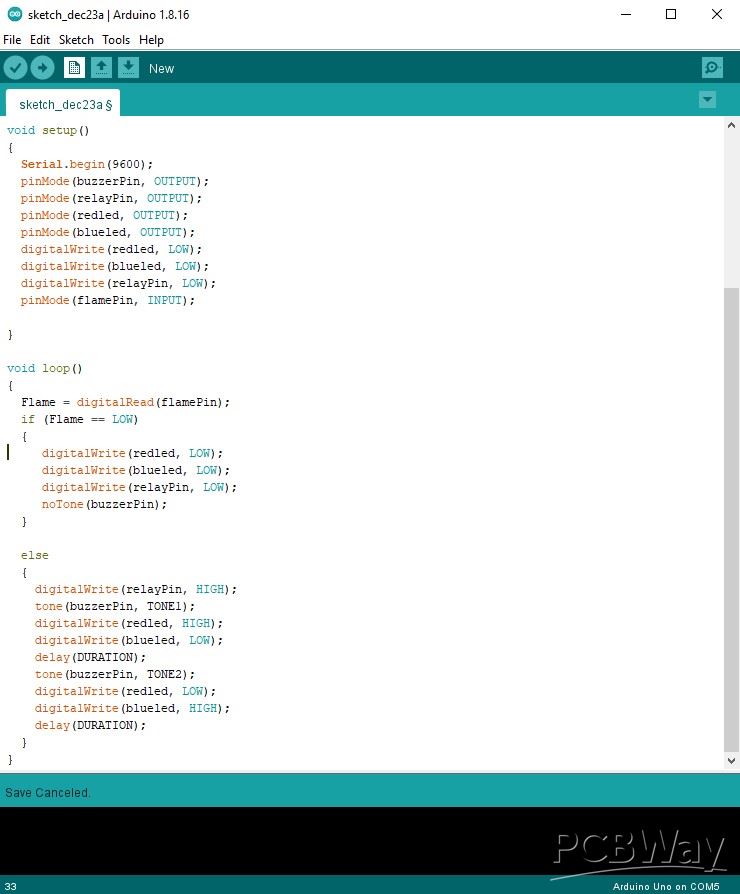
At the beginning, variables are defined and created, and then in void setup, the inputs and outputs are defined, as well as their starting values. Then in the loop function we use an if-else statement that allows you to make decisions depending on the value of a variable.
Now let's see how the device works in real conditions. First, I'll turn off the power to the water pump for practical reasons and test the rest of the device. First, we need to adjust the sensitivity of the IR detector using this small potentiometer. Now the sensor is adjusted and we can connect the pump.
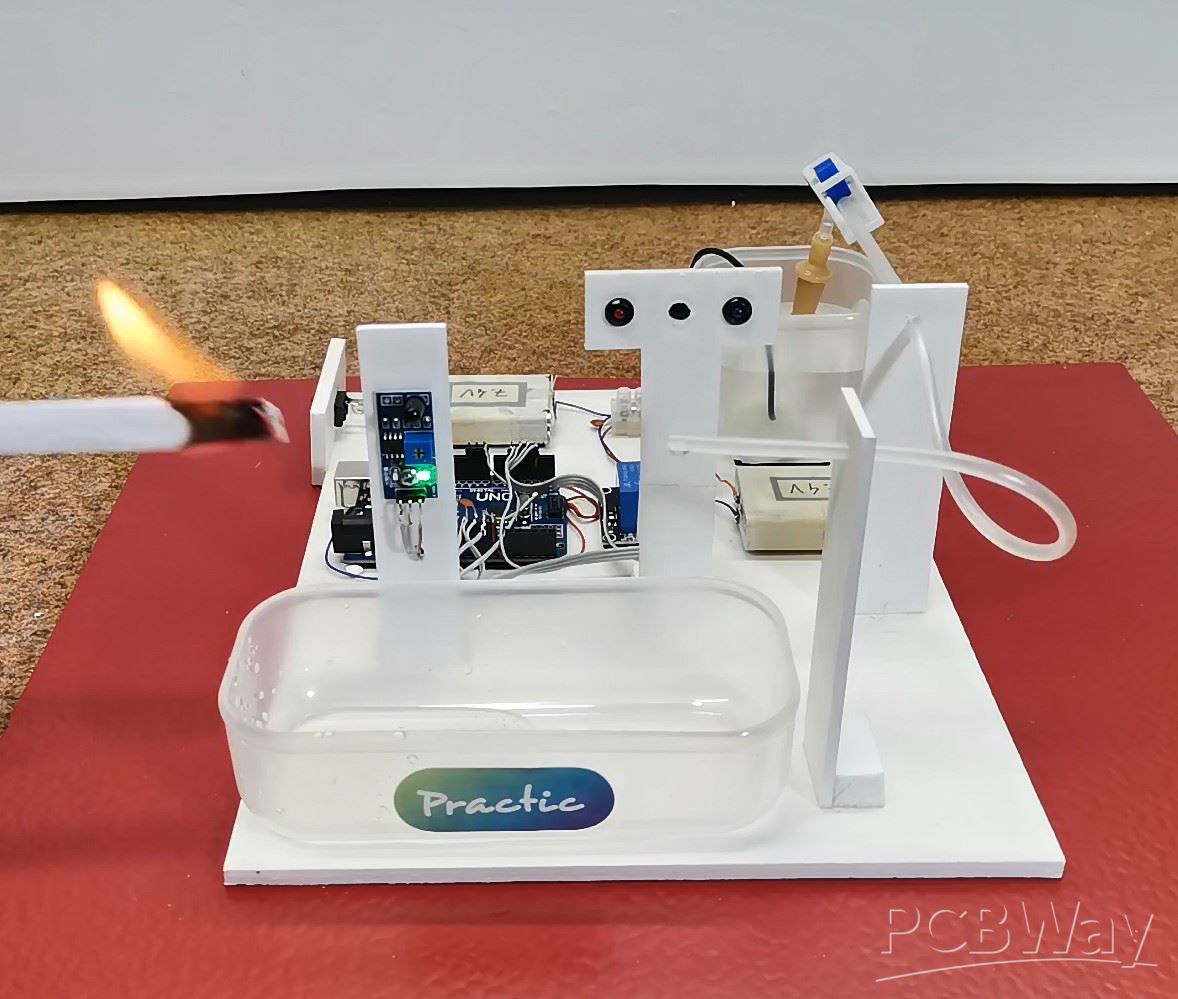
If a flame appears in front of the sensor, an audible and visual alarm will be activated, and the water pump will start drawing water from the tank to extinguish the fire.
And finally, a short conclusion. This Arduino project is very simple to make and has a huge practical application and represents an excellent demonstration of controlling external devices (in this case a pump, siren and light signal) depending on some occurring condition detected by an appropriate sensor. Just to mention again that we created this project together with my students as a final high school exam.
//Arduino Flame Detector

 int relayPin = 5;
 int buzzerPin = 2;
 int flamePin = 8;
 int TONE1 = 900;     // First tone frequency
 int TONE2 = 1200;    // Second tone frequency
 int DURATION = 500;  // Duration of each tone in milliseconds
 int blueled = 3;
 int redled = 4;
 int Flame = HIGH;

void setup()
{
  Serial.begin(9600);
  pinMode(buzzerPin, OUTPUT);
  pinMode(relayPin, OUTPUT);
  pinMode(redled, OUTPUT);
  pinMode(blueled, OUTPUT);
  digitalWrite(redled, LOW);
  digitalWrite(blueled, LOW);
  digitalWrite(relayPin, LOW);
  pinMode(flamePin, INPUT);

}

void loop()
{
  Flame = digitalRead(flamePin);
  if (Flame == LOW)
  {
     digitalWrite(buzzerPin, LOW);
     digitalWrite(redled, LOW);
     digitalWrite(blueled, LOW);
     digitalWrite(relayPin, LOW);
     noTone(buzzerPin);
  }

  else
  {
    digitalWrite(relayPin, HIGH);
    tone(buzzerPin, TONE1);
    digitalWrite(redled, HIGH);
    digitalWrite(blueled, LOW);
    delay(DURATION);
    tone(buzzerPin, TONE2);
    digitalWrite(redled, LOW);
    digitalWrite(blueled, HIGH);
    delay(DURATION);
  }
}
Arduino flame detector with alarms and automatic fire extinguishing


Raspberry Pi 5 7 Inch Touch Screen IPS 1024x600 HD LCD HDMI-compatible Display for RPI 4B 3B+ OPI 5 AIDA64 PC Secondary Screen(Without Speaker)
BUY NOW


- Comments(0)
- Likes(0)
More by Mirko Pavleski
-
 Arduino 3D Printed self Balancing Cube
Self-balancing devices are electronic devices that use sensors and motors to keep themselves balanc...
Arduino 3D Printed self Balancing Cube
Self-balancing devices are electronic devices that use sensors and motors to keep themselves balanc...
-
 Elecrow All-in-One Arduino Starter Kit Review - 20 Projects & 16 Modules
This time I will describe a simple and practical way to enter the world of microcontrollers, specif...
Elecrow All-in-One Arduino Starter Kit Review - 20 Projects & 16 Modules
This time I will describe a simple and practical way to enter the world of microcontrollers, specif...
-
 ESP32-C3 Color Detector with TCS34725, Real-Time RGB Detection & Web Interface
Color detection is a fundamental task in many embedded systems – from industrial sorting machines t...
ESP32-C3 Color Detector with TCS34725, Real-Time RGB Detection & Web Interface
Color detection is a fundamental task in many embedded systems – from industrial sorting machines t...
-
 DIY ESP32 Telegram Flood Protection System - Smart Home Automation
Recently I had an unpleasant experience in my home, specifically my ground floor was flooded as a r...
DIY ESP32 Telegram Flood Protection System - Smart Home Automation
Recently I had an unpleasant experience in my home, specifically my ground floor was flooded as a r...
-
 Real-Time Air Traffic Radar using ESP32 + ADS-B Data
ADS-B, which stands for Automatic Dependent Surveillance-Broadcast, is the modern standard for trac...
Real-Time Air Traffic Radar using ESP32 + ADS-B Data
ADS-B, which stands for Automatic Dependent Surveillance-Broadcast, is the modern standard for trac...
-
 DIY Green Laser Night Sky Object Finder - Find Stars & Galaxies Instantly with great accuracy
As an amateur astronomer, especially at the beginning, the most difficult part of observing the nig...
DIY Green Laser Night Sky Object Finder - Find Stars & Galaxies Instantly with great accuracy
As an amateur astronomer, especially at the beginning, the most difficult part of observing the nig...
-
 DIY Avionics Simulator with ESP32 - Artificial Horizon, Compass & Altimeter
The inspiration for this project comes from classical aircraft cockpit instruments used for navigat...
DIY Avionics Simulator with ESP32 - Artificial Horizon, Compass & Altimeter
The inspiration for this project comes from classical aircraft cockpit instruments used for navigat...
-
 DIY Miniature X-Ray Machine using a TV Vacuum Tube DY86
An X-ray machine (or radiograph) is a quick, painless medical test that produces images of the struc...
DIY Miniature X-Ray Machine using a TV Vacuum Tube DY86
An X-ray machine (or radiograph) is a quick, painless medical test that produces images of the struc...
-
 Simple SDR Receiver Using 2x NE612 - Dual Conversion, Superheterodyne (0.1–30 MHz)
SDR (Software Defined Radio) is a radio system in which most of the functions of a classic radio (f...
Simple SDR Receiver Using 2x NE612 - Dual Conversion, Superheterodyne (0.1–30 MHz)
SDR (Software Defined Radio) is a radio system in which most of the functions of a classic radio (f...
-
 DIY Vintage TV VU Meter with peak indicators
Some time ago in one of my projects I presented you a way to turn a black and white old mini TV int...
DIY Vintage TV VU Meter with peak indicators
Some time ago in one of my projects I presented you a way to turn a black and white old mini TV int...
-
 DIY Tesla Coil based Plasma Rife Machine
In several of my previous videos, I presented you with different ways to make a Rife Machine, from ...
DIY Tesla Coil based Plasma Rife Machine
In several of my previous videos, I presented you with different ways to make a Rife Machine, from ...
-
 ESP32 Analog VU Meter – Smooth Needle, Real Audio Response (DIY Build)
In several of my previous videos I have shown you how to make analog VU meters emulated on differen...
ESP32 Analog VU Meter – Smooth Needle, Real Audio Response (DIY Build)
In several of my previous videos I have shown you how to make analog VU meters emulated on differen...
-
 The Ultimate Smartphone VFO ESP32 & Si5351 Wireless Control
Variable frequency oscillators (VFOs) are commonly used in radio transmitters and receivers, especi...
The Ultimate Smartphone VFO ESP32 & Si5351 Wireless Control
Variable frequency oscillators (VFOs) are commonly used in radio transmitters and receivers, especi...
-
 DIY Shortwave Propagation Monitor - Measure Ionosphere Conditions
Shortwave Propagation is the way radio waves in the 3 to 30 MHz range travel from point A to point ...
DIY Shortwave Propagation Monitor - Measure Ionosphere Conditions
Shortwave Propagation is the way radio waves in the 3 to 30 MHz range travel from point A to point ...
-
 Professional grade Smart Lock with ESP32, BLE and Android App Control
An electronic codelock is a security device that grants access using a numerical sequence—a PIN cod...
Professional grade Smart Lock with ESP32, BLE and Android App Control
An electronic codelock is a security device that grants access using a numerical sequence—a PIN cod...
-
 Building a 3-Input Stereo ECC83 (12AX7) Tube Preamp
Some time ago I presented you a project for a 3W stereo tube amplifier with a GU32 output vacuum t...
Building a 3-Input Stereo ECC83 (12AX7) Tube Preamp
Some time ago I presented you a project for a 3W stereo tube amplifier with a GU32 output vacuum t...
-
 ESP32 Weather Dashboard with Satellite Maps and 16-day Weather Forecast
As you can see from my previous videos, besides Electronics, my fields of experimentation and proje...
ESP32 Weather Dashboard with Satellite Maps and 16-day Weather Forecast
As you can see from my previous videos, besides Electronics, my fields of experimentation and proje...
-
 Retro Analog VU Meter on Round dispalys (ESP32 and GC9A01)
Recently, in one of my previous videos I presented you a Retro VU Meter project on round displays ...
Retro Analog VU Meter on Round dispalys (ESP32 and GC9A01)
Recently, in one of my previous videos I presented you a Retro VU Meter project on round displays ...
-
Programmable Mist Maker - XIAO / QT PY Extension
1066 2 1 -
RadioHAT - Raspberry Pi radio development platform
877 0 2 -
-
-
-
-
ARPS-2 – Arduino-Compatible Robot Project Shield for Arduino UNO
3330 0 6 -
A Compact Charging Breakout Board For Waveshare ESP32-C3
3938 3 8 -
AI-driven LoRa & LLM-enabled Kiosk & Food Delivery System
4326 2 2


