


|
|
XHDATA-D219 Radio |
x 1 |

|
Drill, Screwdriver |
|

|
Soldering Iron Kit |
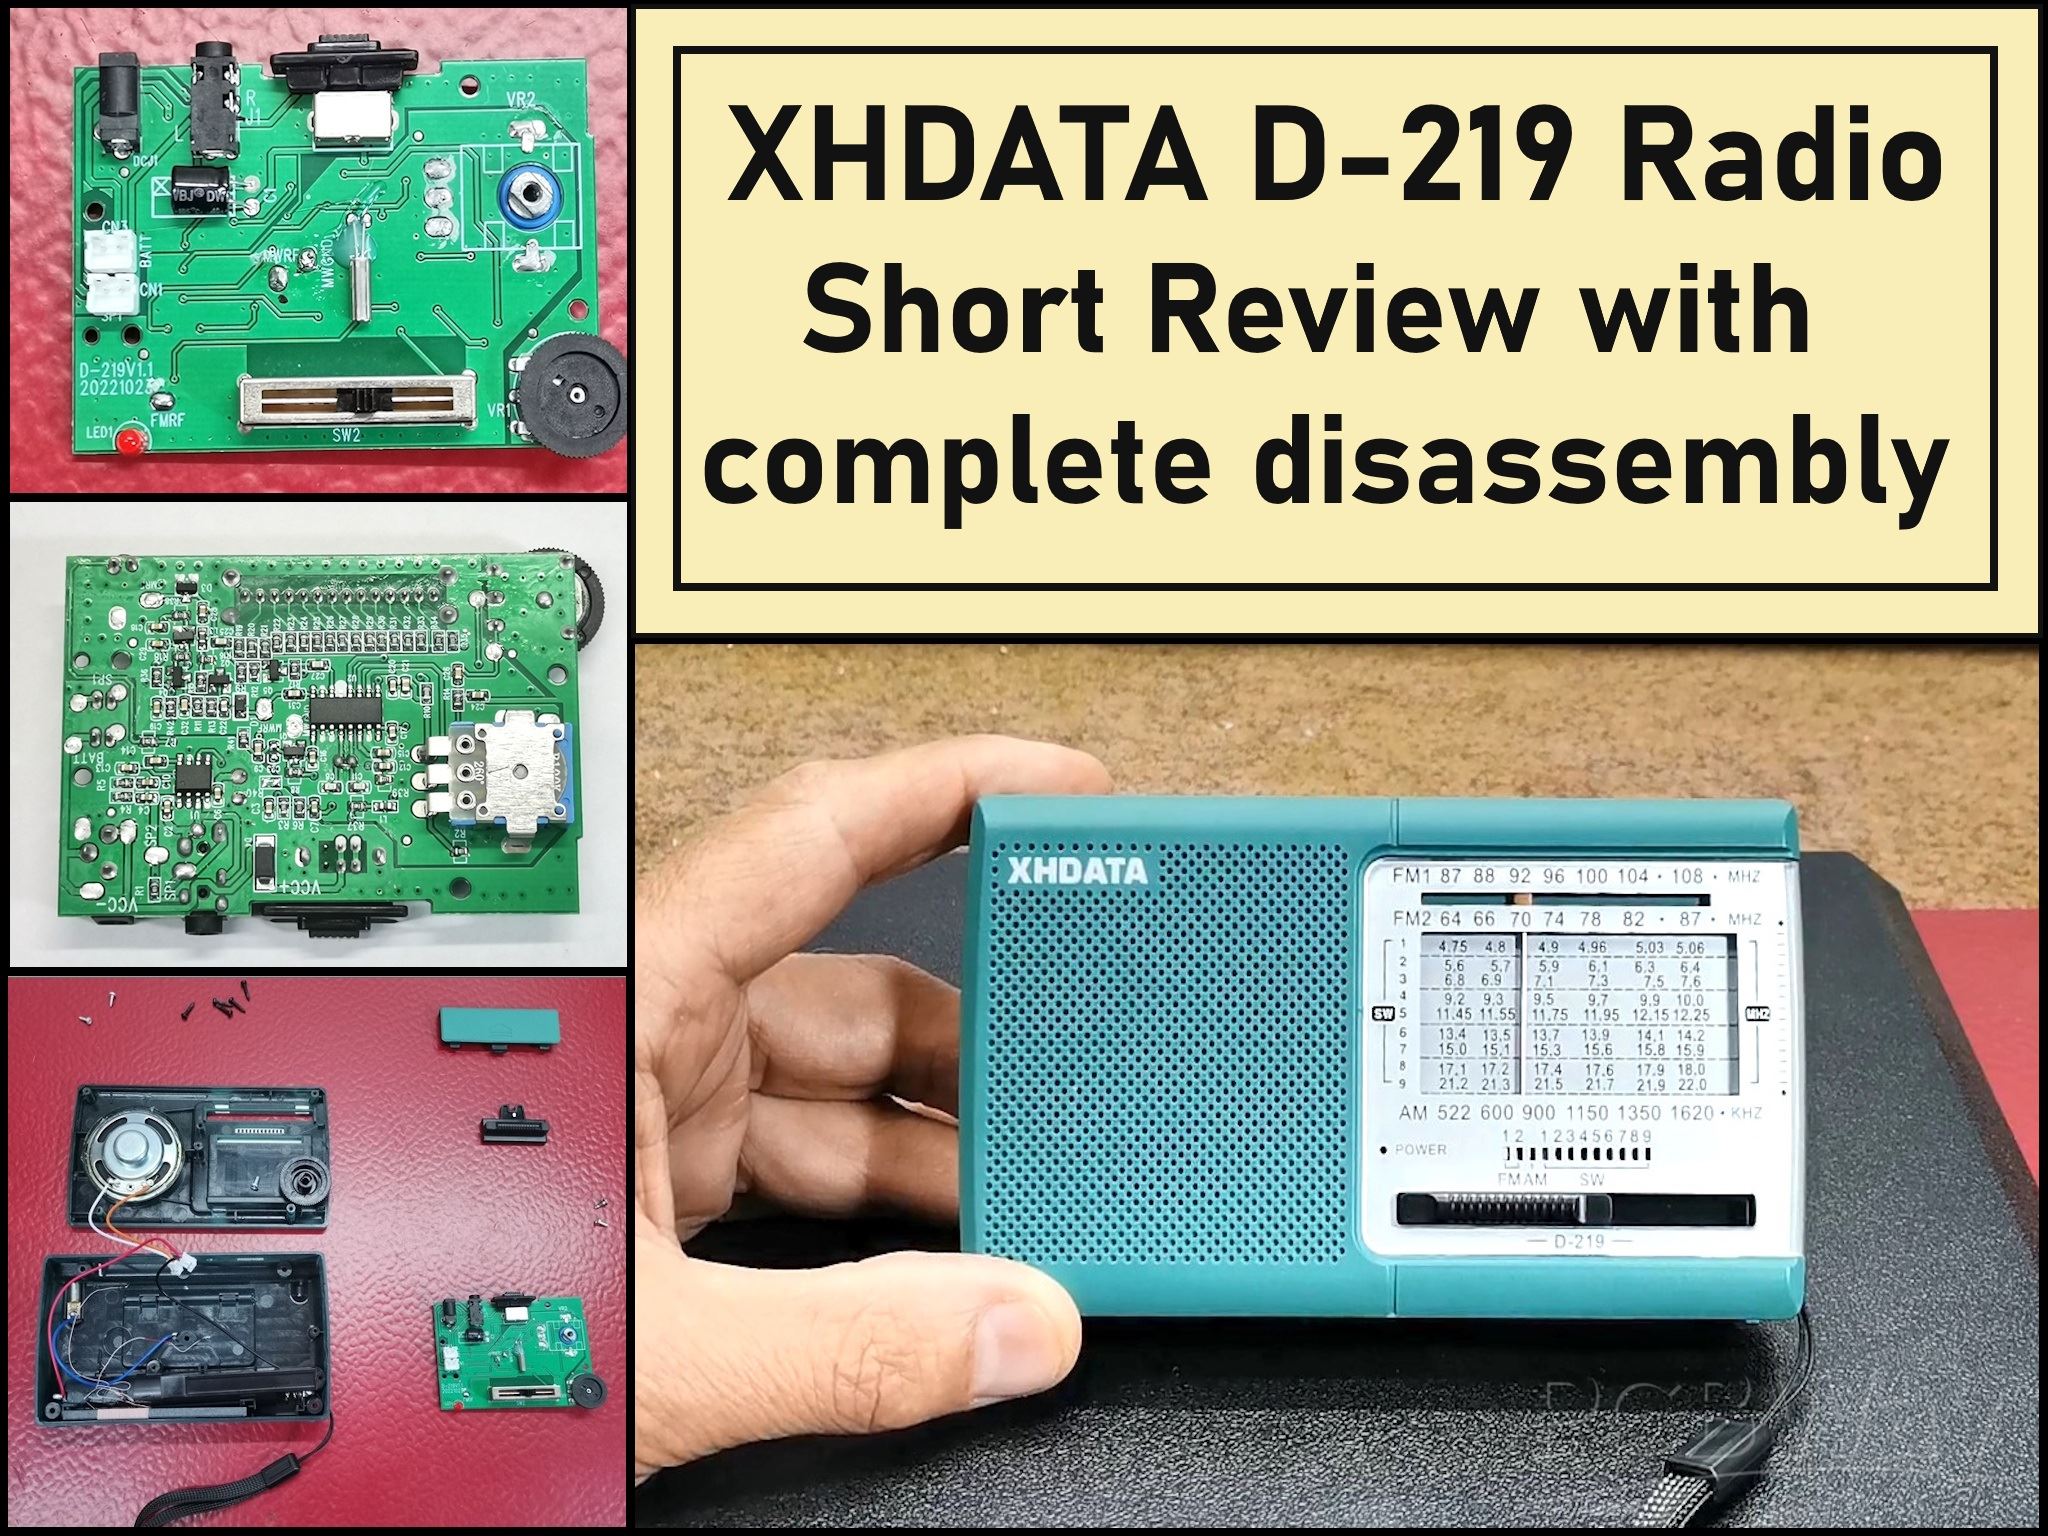
XHDATA D-219 Radio Short Review with complete disassembly
Some time ago I received an offer from XHDATA to be one of the first test users of their new radio model D219 as their regular user. Otherwise, I have previously purchased almost all of their radio models. First of all, let me tell you that I was pleasantly surprised by the offer because the email did not mention any advertising request or other obligation. And for that very reason I decided to do a short (and in my opinion realistic) review in terms of features and price.
My radio arrived today, nicely packaged and protected from any possible damage during transport.
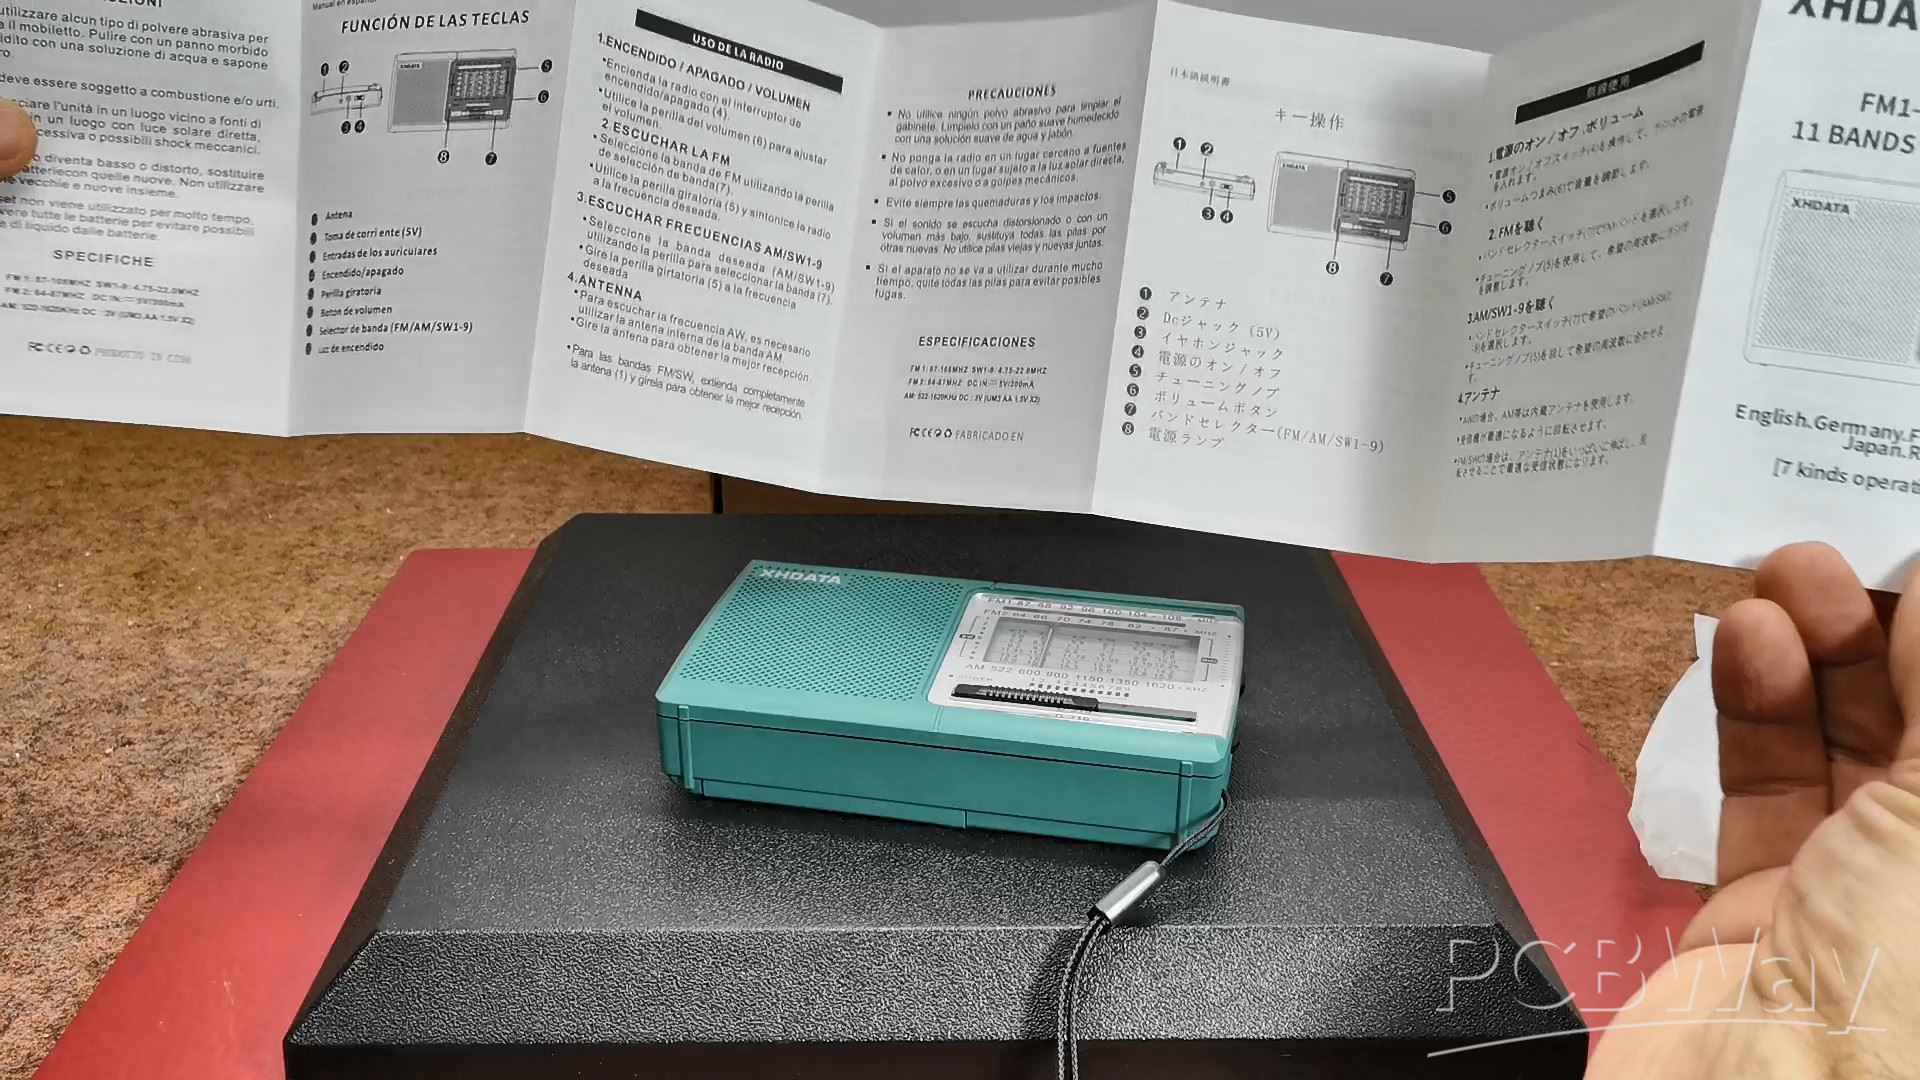
The box contains the radio and a user manual in multiple languages. This is a new limited edition of this model in matte colors specifically grayish white and malachite green like my sample. It is immediately noticeable that the radio, at least for now, is solidly made externally. On the front side there is a speaker, AM and FM scale, Power LED and Band switch.
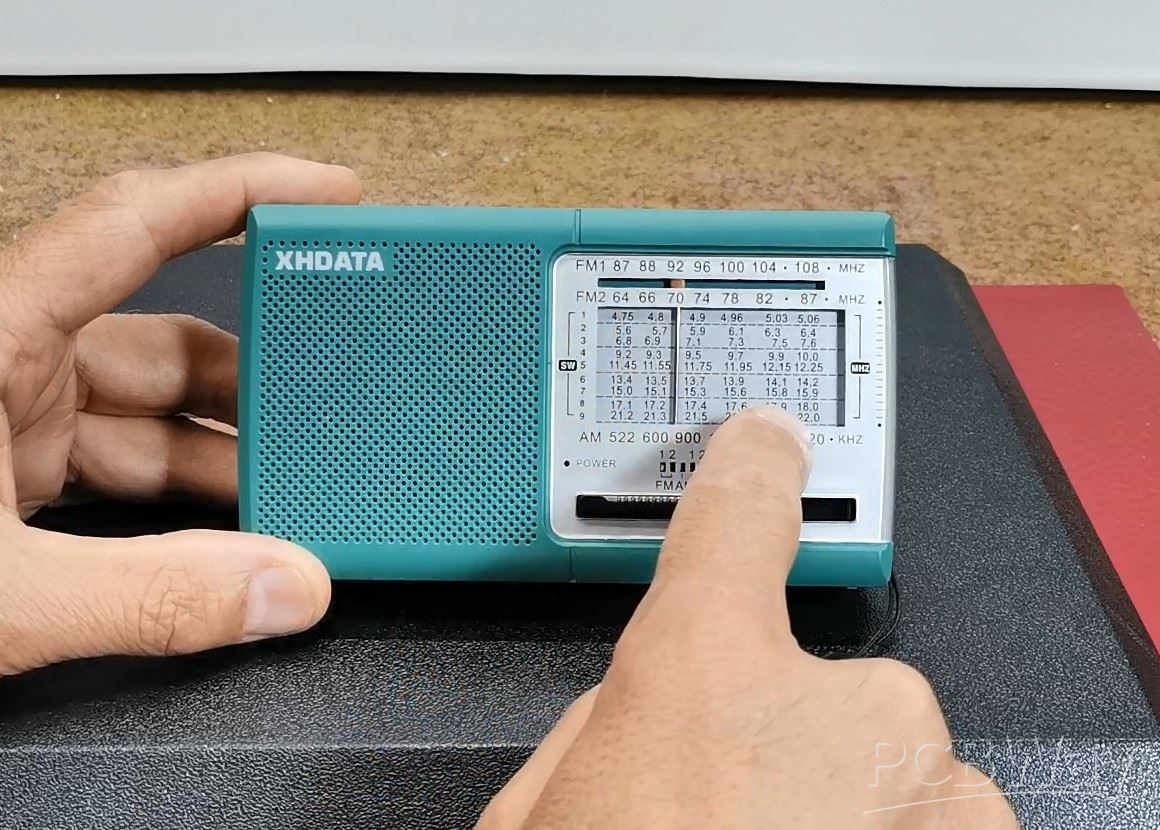
Both scales are clear with precisely printed readable font. The switch has 12 positions for selecting Band and moves easily with an audible click at each new position. Two dials are placed on the side, one for tuning and the other smaller for volume control.
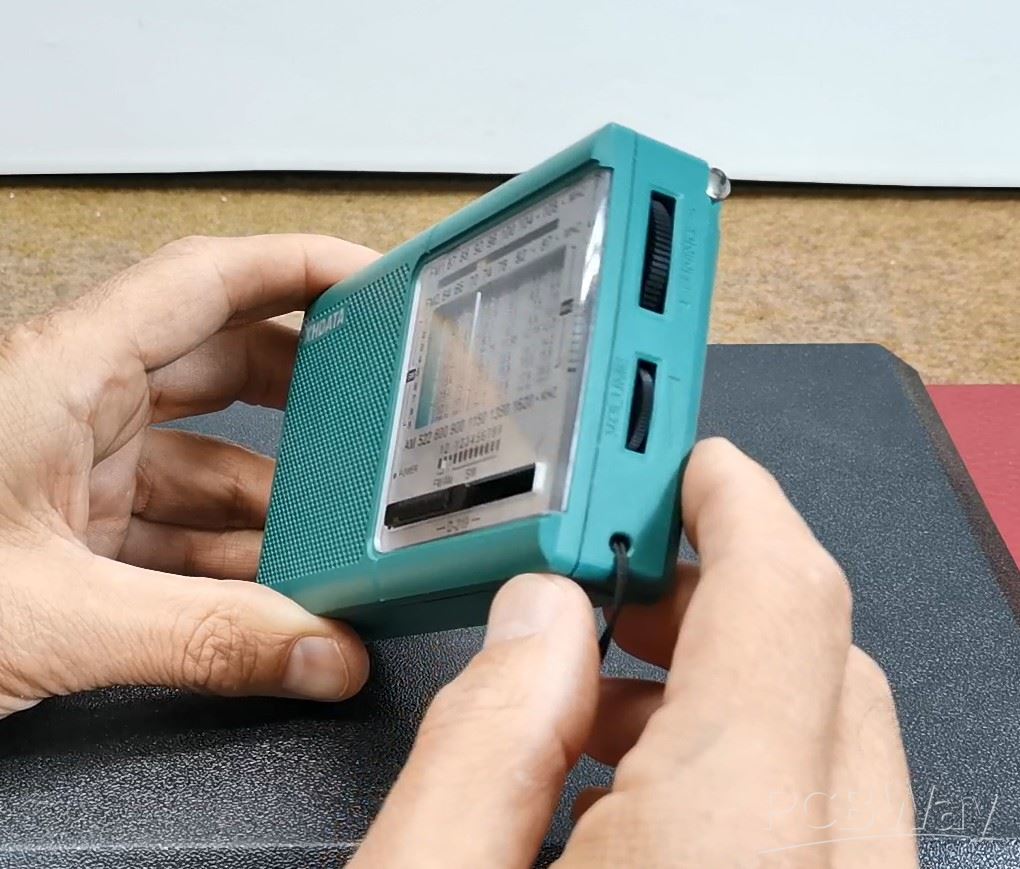
On the top side there is an On-OFF switch, a headphone jack, as well as an external 5-volt power supply. Also on the side there is a large telescopic antenna with a length of 55 cm for better reception.
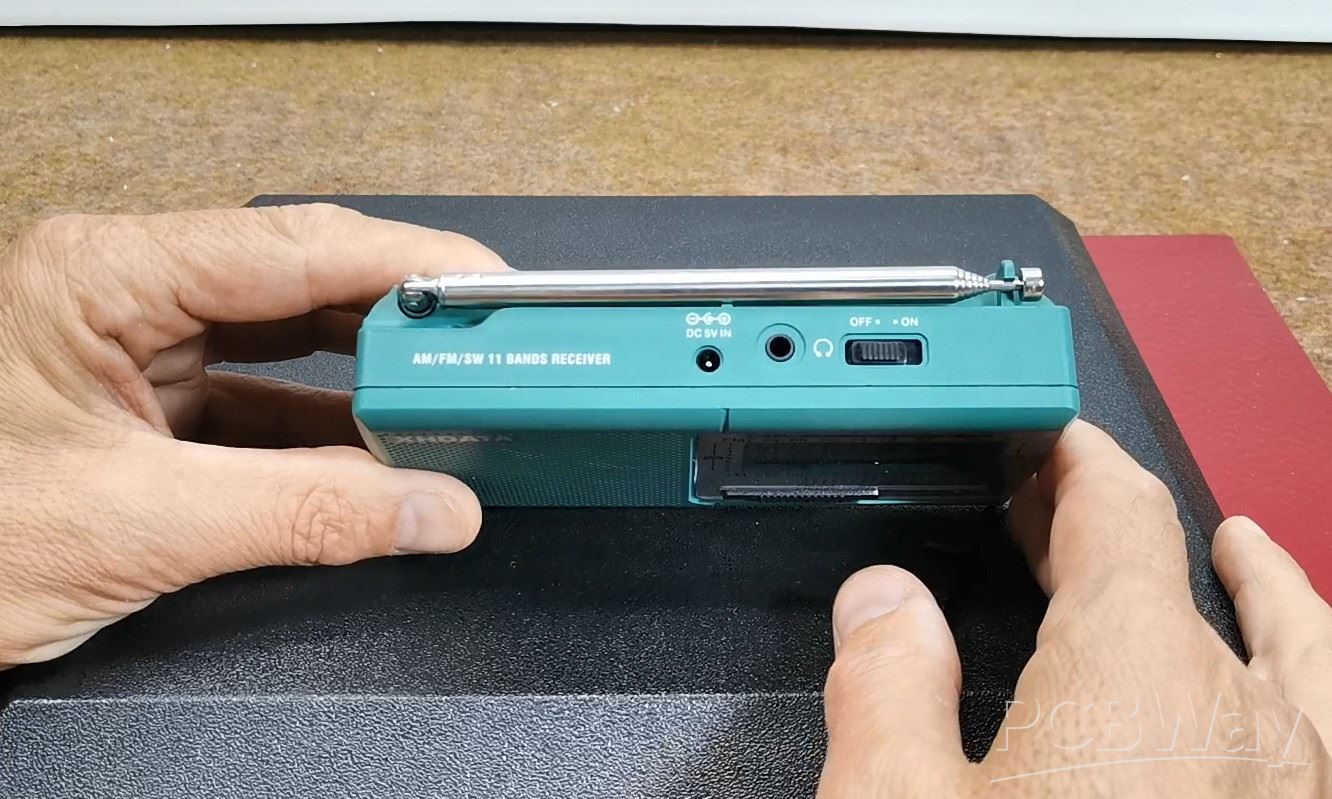
On the back there is a bracket for support and a space for batteries. The device works with two 1.5 Volt AA batteries, and this is perhaps the only small complaint, because for a price slightly lower than the 20 dollars total this receiver costs, it could have contained a lithium battery.

In general, at least externally, the radio is made in a retro style with mechanical dials and switches, and finally the power supply is in the same style, with standard batteries. Otherwise, I am a big fan and supporter of this style.
Now let's see how the radio works in real conditions. First, I will test the FM band. The reception of all local stations is excellent, the sound is clear and at maximum level there is no audible distortion. The maximum sound is surprisingly loud and sufficient for listening in a large room.
As for the SW and MW reception, it is known that it depends a lot on the propagation conditions, but I will still try to receive stations with this small telescopic antenna. I was positively surprised by the reception of SW radio stations at night, and especially the MW reception, which, thanks to the relatively large ferrite antenna, is excellent.
Unlike the exterior, at least according to the advertisements, the interior contains a modern DSP chip. To verify this claim, I decided to open it up and take a look at what the interior is made of.
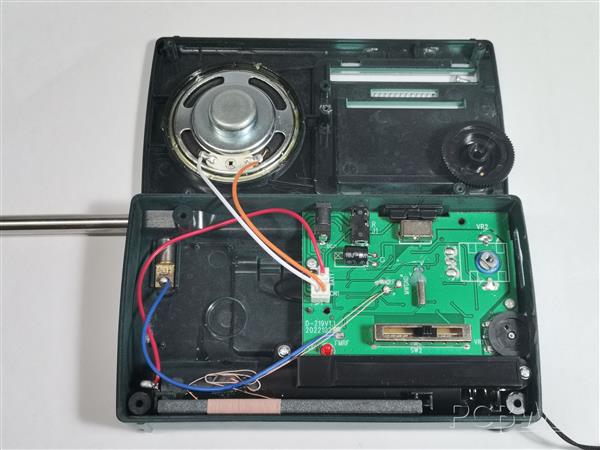
After opening the lid, a large speaker with a diameter of 5cm immediately catches the eye, which is actually the reason for the clean, voluminous sound.

Here is the main PCB with speaker and a battery connectors, then a large ferrite antenna for Medium Wave, potentiometers for selecting stations and volume, as well as switches. Let's see what is on the other side of the PCB.
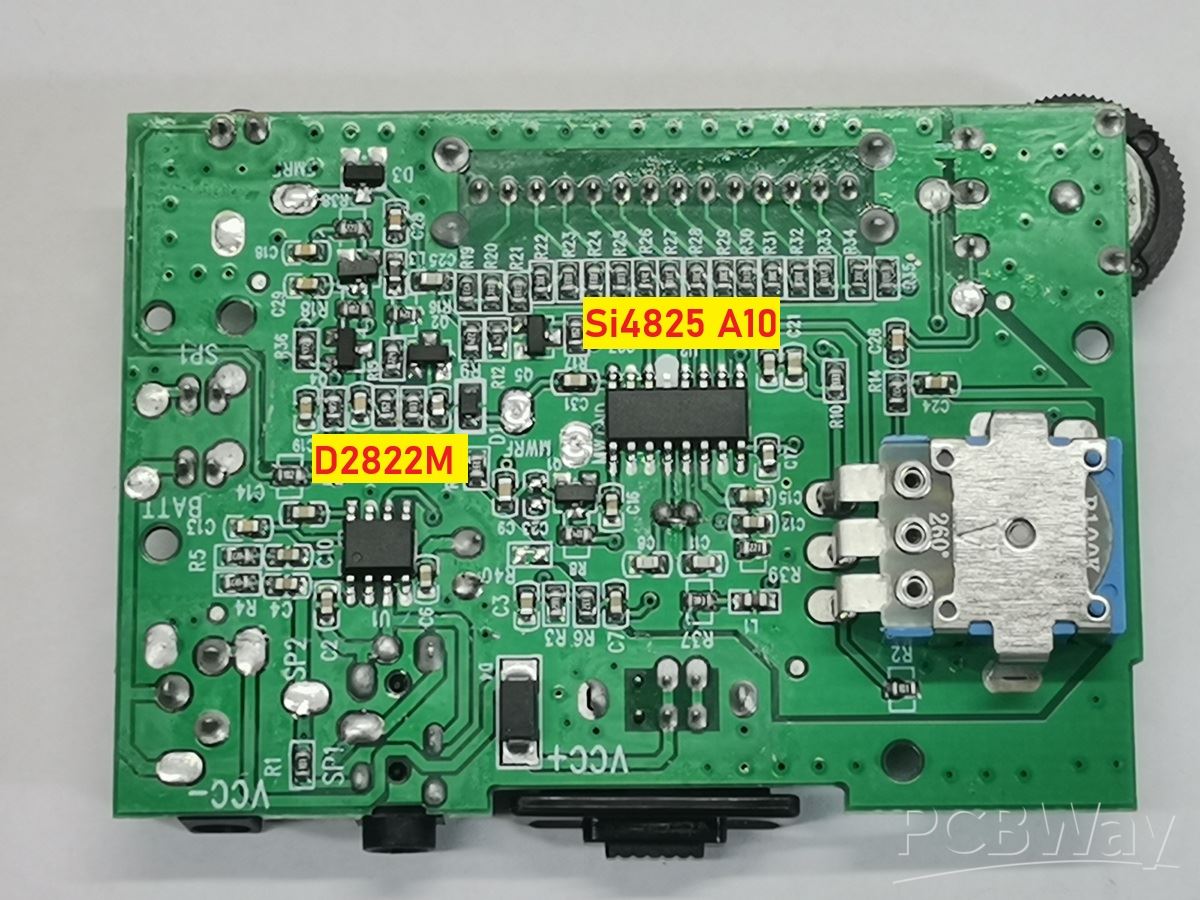
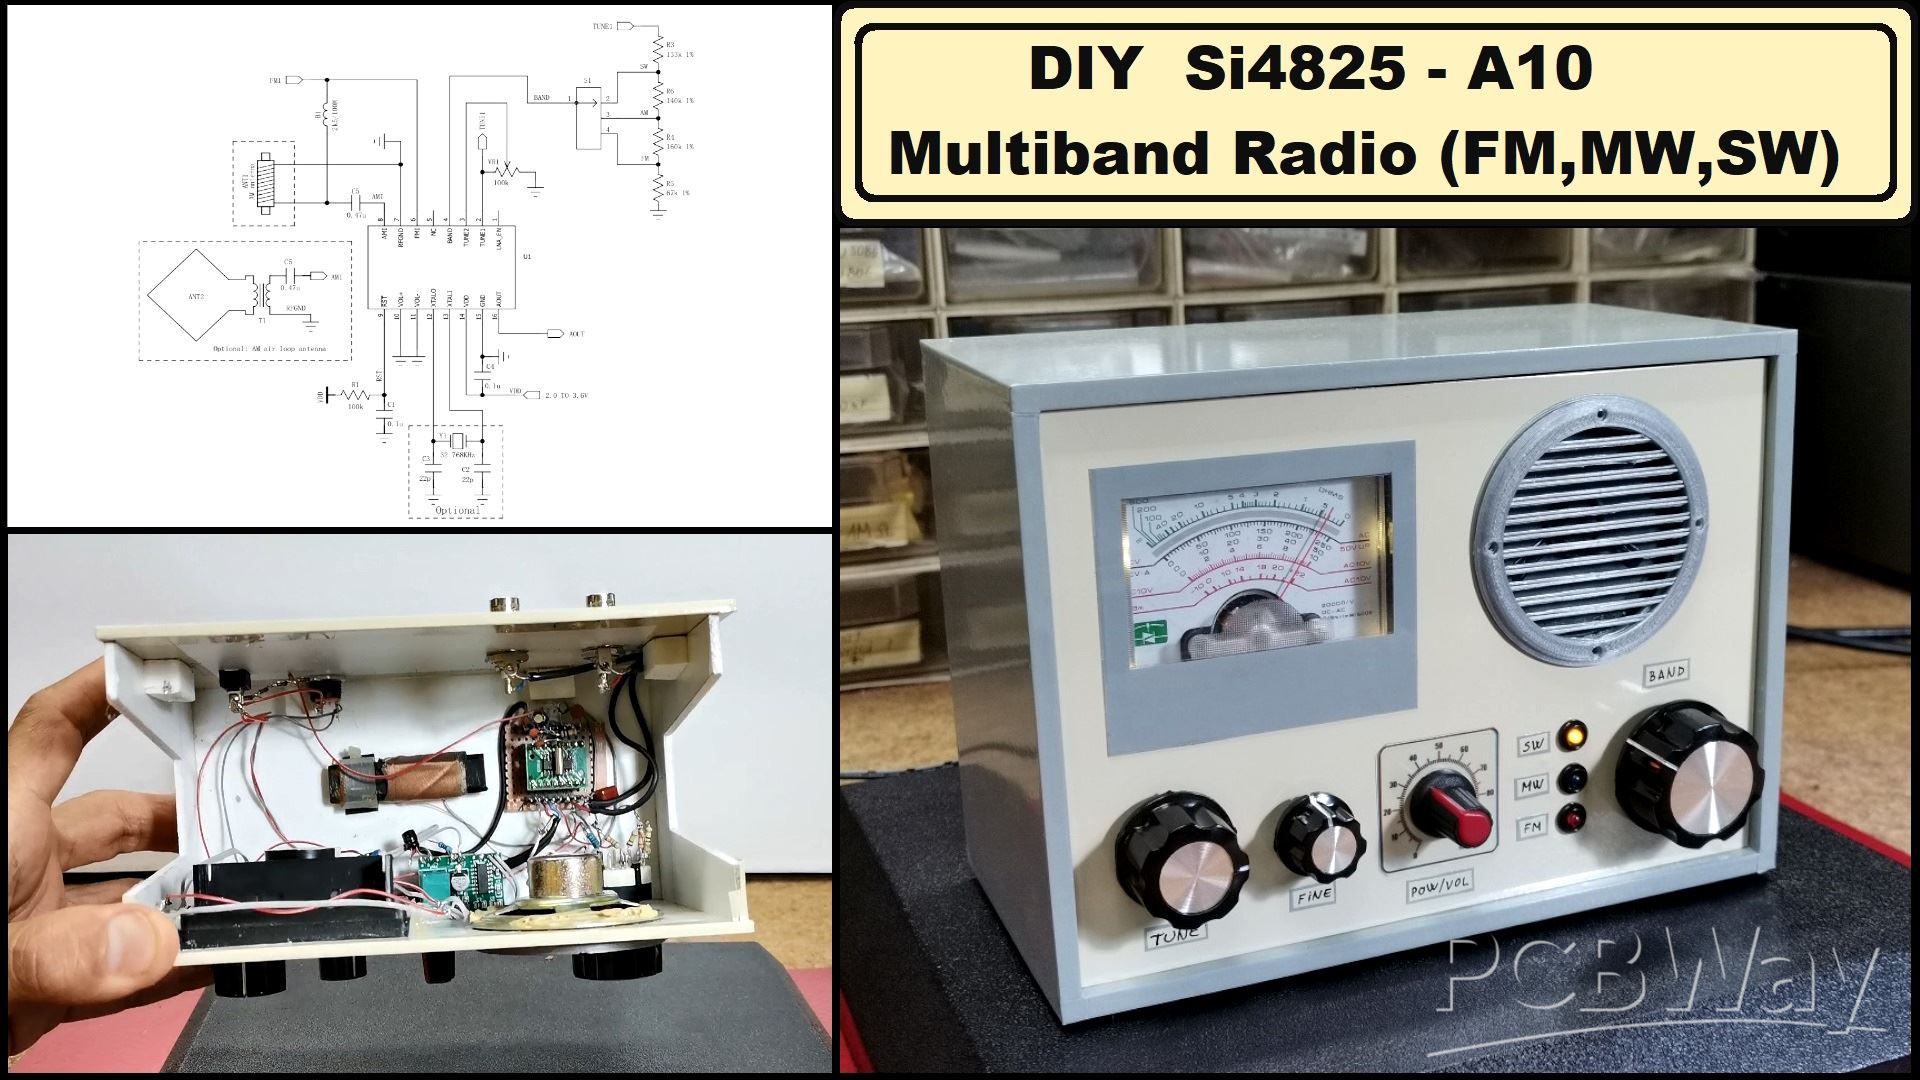
To get the PCB out I had to unsolder the antenna and the wires from the ferrite core coil. On the back of the PCB board are two SMD chips and the accompanying passive and active components. This is the well-known Si4825 A10 from Skyworks which is defined as a "broadcast mechanical tuning AM/FM/SW radio receiver". In one of my previous videos you can see how I made a radio receiver with this radio chip.
The smaller chip is the D2822M which is actually a Stereo audio amplifier, in this particular case connected in a mono bridge circuit for higher output power.
And finally, a short conclusion. This is a great cheap portable radio. The price without postage directly from the manufacturer is about 10 Dollars. You probably can't find a cheaper radio on the market than this with similar features.
XHDATA D-219 Radio Short Review with complete disassembly


Raspberry Pi 5 7 Inch Touch Screen IPS 1024x600 HD LCD HDMI-compatible Display for RPI 4B 3B+ OPI 5 AIDA64 PC Secondary Screen(Without Speaker)
BUY NOW


- Comments(0)
- Likes(1)
More by Mirko Pavleski
-
 Arduino 3D Printed self Balancing Cube
Self-balancing devices are electronic devices that use sensors and motors to keep themselves balanc...
Arduino 3D Printed self Balancing Cube
Self-balancing devices are electronic devices that use sensors and motors to keep themselves balanc...
-
 DIY Miniature X-Ray Machine using a TV Vacuum Tube DY86
An X-ray machine (or radiograph) is a quick, painless medical test that produces images of the struc...
DIY Miniature X-Ray Machine using a TV Vacuum Tube DY86
An X-ray machine (or radiograph) is a quick, painless medical test that produces images of the struc...
-
 Simple SDR Receiver Using 2x NE612 - Dual Conversion, Superheterodyne (0.1–30 MHz)
SDR (Software Defined Radio) is a radio system in which most of the functions of a classic radio (f...
Simple SDR Receiver Using 2x NE612 - Dual Conversion, Superheterodyne (0.1–30 MHz)
SDR (Software Defined Radio) is a radio system in which most of the functions of a classic radio (f...
-
 DIY Vintage TV VU Meter with peak indicators
Some time ago in one of my projects I presented you a way to turn a black and white old mini TV int...
DIY Vintage TV VU Meter with peak indicators
Some time ago in one of my projects I presented you a way to turn a black and white old mini TV int...
-
 DIY Tesla Coil based Plasma Rife Machine
In several of my previous videos, I presented you with different ways to make a Rife Machine, from ...
DIY Tesla Coil based Plasma Rife Machine
In several of my previous videos, I presented you with different ways to make a Rife Machine, from ...
-
 ESP32 Analog VU Meter – Smooth Needle, Real Audio Response (DIY Build)
In several of my previous videos I have shown you how to make analog VU meters emulated on differen...
ESP32 Analog VU Meter – Smooth Needle, Real Audio Response (DIY Build)
In several of my previous videos I have shown you how to make analog VU meters emulated on differen...
-
 The Ultimate Smartphone VFO ESP32 & Si5351 Wireless Control
Variable frequency oscillators (VFOs) are commonly used in radio transmitters and receivers, especi...
The Ultimate Smartphone VFO ESP32 & Si5351 Wireless Control
Variable frequency oscillators (VFOs) are commonly used in radio transmitters and receivers, especi...
-
 DIY Shortwave Propagation Monitor - Measure Ionosphere Conditions
Shortwave Propagation is the way radio waves in the 3 to 30 MHz range travel from point A to point ...
DIY Shortwave Propagation Monitor - Measure Ionosphere Conditions
Shortwave Propagation is the way radio waves in the 3 to 30 MHz range travel from point A to point ...
-
 Professional grade Smart Lock with ESP32, BLE and Android App Control
An electronic codelock is a security device that grants access using a numerical sequence—a PIN cod...
Professional grade Smart Lock with ESP32, BLE and Android App Control
An electronic codelock is a security device that grants access using a numerical sequence—a PIN cod...
-
 Building a 3-Input Stereo ECC83 (12AX7) Tube Preamp
Some time ago I presented you a project for a 3W stereo tube amplifier with a GU32 output vacuum t...
Building a 3-Input Stereo ECC83 (12AX7) Tube Preamp
Some time ago I presented you a project for a 3W stereo tube amplifier with a GU32 output vacuum t...
-
 ESP32 Weather Dashboard with Satellite Maps and 16-day Weather Forecast
As you can see from my previous videos, besides Electronics, my fields of experimentation and proje...
ESP32 Weather Dashboard with Satellite Maps and 16-day Weather Forecast
As you can see from my previous videos, besides Electronics, my fields of experimentation and proje...
-
 Retro Analog VU Meter on Round dispalys (ESP32 and GC9A01)
Recently, in one of my previous videos I presented you a Retro VU Meter project on round displays ...
Retro Analog VU Meter on Round dispalys (ESP32 and GC9A01)
Recently, in one of my previous videos I presented you a Retro VU Meter project on round displays ...
-
 Ultimate 2-Player Reaction Timer with WS2812B LED Strips & Arduino
Arcade reaction game is a genre of play designed to test a player's physical response time and hand...
Ultimate 2-Player Reaction Timer with WS2812B LED Strips & Arduino
Arcade reaction game is a genre of play designed to test a player's physical response time and hand...
-
 Building a Vintage Tube-Style Internet Radio with Raspberry Pi & Rotary Encoder
Internet radio (also known as web radio or net radio) is a digital audio service transmitted via th...
Building a Vintage Tube-Style Internet Radio with Raspberry Pi & Rotary Encoder
Internet radio (also known as web radio or net radio) is a digital audio service transmitted via th...
-
 DIY Smart Code Lock with CrowPanel 1.28 ESP32 Rotary Display
A code lock is a keyless security device—either mechanical or electronic—that restricts access to d...
DIY Smart Code Lock with CrowPanel 1.28 ESP32 Rotary Display
A code lock is a keyless security device—either mechanical or electronic—that restricts access to d...
-
 SDR Panadapter for Vintage Tube Radios – Step-by-Step Tutorial
A radio panadapter (or panoramic adapter) is a device or software tool used in amateur radio and ot...
SDR Panadapter for Vintage Tube Radios – Step-by-Step Tutorial
A radio panadapter (or panoramic adapter) is a device or software tool used in amateur radio and ot...
-
 Oscilloscope Clock Simulation on a Round ESP32 Display
An oscilloscope clock is a circuit that turns an old analog oscilloscope into a stylish, retro-them...
Oscilloscope Clock Simulation on a Round ESP32 Display
An oscilloscope clock is a circuit that turns an old analog oscilloscope into a stylish, retro-them...
-
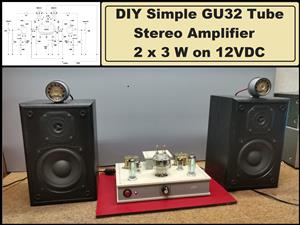 DIY Simple GU32 Tube Stereo Amplifier (2x3W on 12VDC)
Vacuum tube amplifiers are often favored for their smooth harmonic distortion, especially in the low...
DIY Simple GU32 Tube Stereo Amplifier (2x3W on 12VDC)
Vacuum tube amplifiers are often favored for their smooth harmonic distortion, especially in the low...
-
Programmable Mist Maker - XIAO / QT PY Extension
172 0 0 -
RadioHAT - Raspberry Pi radio development platform
182 0 1 -
-
-
-
-
ARPS-2 – Arduino-Compatible Robot Project Shield for Arduino UNO
2767 0 5 -
A Compact Charging Breakout Board For Waveshare ESP32-C3
3275 3 8 -
AI-driven LoRa & LLM-enabled Kiosk & Food Delivery System
3529 2 2


