


|
Soldering iron |
|

|
Soldering Iron Wire Welding Lead Roll |
|

|
arduino IDEArduino
|
Universal VFO 10 KHz-160 MHz with Retro Analog Scale (variable frequency oscillator)
A variable frequency oscillator (VFO) is an oscillator whose frequency can be tuned (i.e., varied) over some range. It is a necessary component in any tunable radio transmitter or receiver, and controls the frequency to which the radio is tuned. This time I will show you how to make a VFO that covers the range from 100 KHz to 160 MHz and uses a minimum number of components.
The selected frequency is displayed on a beautifully designed retro scale in the style of ham radios from the previous century. About 2 years ago, In one of my previous videos (https://www.youtube.com/watch?v=DSxK0jwMZw4&t=535s) I made a small shortwave radio receiver with this VFO, but the current version has additional functions for changing the tuning step, as well as storing frequencies. These options drastically simplify the operation of the device.
Otherwise, the device was originally designed by Japanese radio amateur JF3HZB, and the version that I present to you is modified by DJ7OO. I got the code from my friend Branko Zupan (http://users.triera.net/zupanbra/), on whose page you can find many projects and useful tips, especially in the field of Radio technology. For this project he has designed a custom PCB as well as an add-on Direct Conversion Receiver with the famous NE612 mixer IC. Also a different version of the PCB for this project is on DJ7OO's site.
So, if you want to make a PCB for this project, or for any other electronic project, PCBway is a great choice for you. PCBway is one of the most experienced PCB manufacturing company in China in field of PCB prototype and fabrication. They have a large online community where you can find a Open Source projects, and you can also share your project there. From my personal experience I can tell you that on this community you can find many useful projects with alredy designed PCBs, from where you can place an order directly.

As I mentioned before, the device is extremely simple to make and contains only a few components:
- ESP32 Dev. kit board
- 1.8" TFT Display with 128x160 dots resolution (ST7735 chip)
- SI5351 programmable clock generator board
- Rotary encoder with push button
- three buttons
- and Output connectors

Now let's see how the device works in reality. Immediately after switching on, the start frequency that is previously defined in the code appears on the screen. Turning the rotary encoder changes the frequency. The tuning step, and thus the scale rotation speed, is controlled by the two buttons, and ranges from 10 Hertz to 1 Megahertz. With the the rotary encoder button we memorize the current frequency, and after the next power-on of the device, it will be the initial frequency. The oscillator also has the ability to memorize previously defined frequencies in the code, that we can call up with the MEM button.

For the first few megahertz the signal has an approximately rectangular shape. Then by increasing the frequency, the shape of the signal becomes sinusoidal. Even at the highest frequencies, the shape is almost triangular and the amplitude of the signal decreases significantly.
It is interesting to note that as part of the code, in the "dial_prm.h" header file, many parameters can be changed, starting from the colors, through the dial radius, up to the definition of Length and Width of Dial pointer, space between Main and Sub Dial etc...

I plan to use this VFO in the construction of very simple AM and SSB radio receivers (mostly Direct Conversion receivers) that I will present to you in some of the following videos.
And finally, the whole device is embedded in a suitable box made of PVC material with a thickness of 3mm and 5mm, and coated with colored self-adhesive wallpaper.

Universal VFO 10 KHz-160 MHz with Retro Analog Scale (variable frequency oscillator)


Raspberry Pi 5 7 Inch Touch Screen IPS 1024x600 HD LCD HDMI-compatible Display for RPI 4B 3B+ OPI 5 AIDA64 PC Secondary Screen(Without Speaker)
BUY NOW


- Comments(0)
- Likes(8)
More by Mirko Pavleski
-
 Arduino 3D Printed self Balancing Cube
Self-balancing devices are electronic devices that use sensors and motors to keep themselves balanc...
Arduino 3D Printed self Balancing Cube
Self-balancing devices are electronic devices that use sensors and motors to keep themselves balanc...
-
 DIY Vintage TV VU Meter with peak indicators
Some time ago in one of my projects I presented you a way to turn a black and white old mini TV int...
DIY Vintage TV VU Meter with peak indicators
Some time ago in one of my projects I presented you a way to turn a black and white old mini TV int...
-
 DIY Tesla Coil based Plasma Rife Machine
In several of my previous videos, I presented you with different ways to make a Rife Machine, from ...
DIY Tesla Coil based Plasma Rife Machine
In several of my previous videos, I presented you with different ways to make a Rife Machine, from ...
-
 ESP32 Analog VU Meter – Smooth Needle, Real Audio Response (DIY Build)
In several of my previous videos I have shown you how to make analog VU meters emulated on differen...
ESP32 Analog VU Meter – Smooth Needle, Real Audio Response (DIY Build)
In several of my previous videos I have shown you how to make analog VU meters emulated on differen...
-
 The Ultimate Smartphone VFO ESP32 & Si5351 Wireless Control
Variable frequency oscillators (VFOs) are commonly used in radio transmitters and receivers, especi...
The Ultimate Smartphone VFO ESP32 & Si5351 Wireless Control
Variable frequency oscillators (VFOs) are commonly used in radio transmitters and receivers, especi...
-
 DIY Shortwave Propagation Monitor - Measure Ionosphere Conditions
Shortwave Propagation is the way radio waves in the 3 to 30 MHz range travel from point A to point ...
DIY Shortwave Propagation Monitor - Measure Ionosphere Conditions
Shortwave Propagation is the way radio waves in the 3 to 30 MHz range travel from point A to point ...
-
 Professional grade Smart Lock with ESP32, BLE and Android App Control
An electronic codelock is a security device that grants access using a numerical sequence—a PIN cod...
Professional grade Smart Lock with ESP32, BLE and Android App Control
An electronic codelock is a security device that grants access using a numerical sequence—a PIN cod...
-
 Building a 3-Input Stereo ECC83 (12AX7) Tube Preamp
Some time ago I presented you a project for a 3W stereo tube amplifier with a GU32 output vacuum t...
Building a 3-Input Stereo ECC83 (12AX7) Tube Preamp
Some time ago I presented you a project for a 3W stereo tube amplifier with a GU32 output vacuum t...
-
 ESP32 Weather Dashboard with Satellite Maps and 16-day Weather Forecast
As you can see from my previous videos, besides Electronics, my fields of experimentation and proje...
ESP32 Weather Dashboard with Satellite Maps and 16-day Weather Forecast
As you can see from my previous videos, besides Electronics, my fields of experimentation and proje...
-
 Retro Analog VU Meter on Round dispalys (ESP32 and GC9A01)
Recently, in one of my previous videos I presented you a Retro VU Meter project on round displays ...
Retro Analog VU Meter on Round dispalys (ESP32 and GC9A01)
Recently, in one of my previous videos I presented you a Retro VU Meter project on round displays ...
-
 Ultimate 2-Player Reaction Timer with WS2812B LED Strips & Arduino
Arcade reaction game is a genre of play designed to test a player's physical response time and hand...
Ultimate 2-Player Reaction Timer with WS2812B LED Strips & Arduino
Arcade reaction game is a genre of play designed to test a player's physical response time and hand...
-
 Building a Vintage Tube-Style Internet Radio with Raspberry Pi & Rotary Encoder
Internet radio (also known as web radio or net radio) is a digital audio service transmitted via th...
Building a Vintage Tube-Style Internet Radio with Raspberry Pi & Rotary Encoder
Internet radio (also known as web radio or net radio) is a digital audio service transmitted via th...
-
 DIY Smart Code Lock with CrowPanel 1.28 ESP32 Rotary Display
A code lock is a keyless security device—either mechanical or electronic—that restricts access to d...
DIY Smart Code Lock with CrowPanel 1.28 ESP32 Rotary Display
A code lock is a keyless security device—either mechanical or electronic—that restricts access to d...
-
 SDR Panadapter for Vintage Tube Radios – Step-by-Step Tutorial
A radio panadapter (or panoramic adapter) is a device or software tool used in amateur radio and ot...
SDR Panadapter for Vintage Tube Radios – Step-by-Step Tutorial
A radio panadapter (or panoramic adapter) is a device or software tool used in amateur radio and ot...
-
 Oscilloscope Clock Simulation on a Round ESP32 Display
An oscilloscope clock is a circuit that turns an old analog oscilloscope into a stylish, retro-them...
Oscilloscope Clock Simulation on a Round ESP32 Display
An oscilloscope clock is a circuit that turns an old analog oscilloscope into a stylish, retro-them...
-
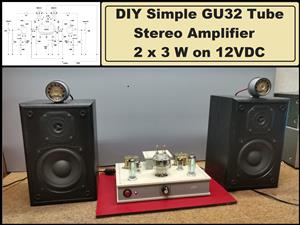 DIY Simple GU32 Tube Stereo Amplifier (2x3W on 12VDC)
Vacuum tube amplifiers are often favored for their smooth harmonic distortion, especially in the low...
DIY Simple GU32 Tube Stereo Amplifier (2x3W on 12VDC)
Vacuum tube amplifiers are often favored for their smooth harmonic distortion, especially in the low...
-
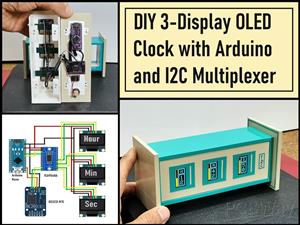 DIY 3-Display OLED Clock with Arduino and I2C Multiplexer
In this video I want to present you another unusual clock to add to my large collection of such DIY...
DIY 3-Display OLED Clock with Arduino and I2C Multiplexer
In this video I want to present you another unusual clock to add to my large collection of such DIY...
-
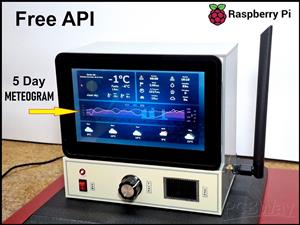 Build a 5-Day forecast Raspberry Pi Weather Dashboard (Step-by-Step)
Recently in one of my previous videos,I introduced you to the 7 inch Elecrow Pi Terminal and how to...
Build a 5-Day forecast Raspberry Pi Weather Dashboard (Step-by-Step)
Recently in one of my previous videos,I introduced you to the 7 inch Elecrow Pi Terminal and how to...
-
-
ARPS-2 – Arduino-Compatible Robot Project Shield for Arduino UNO
2541 0 5 -
A Compact Charging Breakout Board For Waveshare ESP32-C3
2996 3 8 -
AI-driven LoRa & LLM-enabled Kiosk & Food Delivery System
3204 2 1 -
-
-
-
ESP32-C3 BLE Keyboard - Battery Powered with USB-C Charging
3274 0 2


