


STD CH330N USB to Serial Converter 5V
Introduction
The CH330N is a versatile USB-to-serial converter chip that simplifies interfacing between microcontrollers and computers. In this article, we'll delve into the hardware design and PCB construction of a USB-to-serial converter using this chip.
For Full project:
https://electronicsworkshops.com/2024/09/29/std-ch330n-usb-to-serial-converter-5v/
 CH330N USB to Serial Converter 5V
Hardware Components:
CH330N Chip: The core component, responsible for the USB-to-serial conversion.
Micro USB Connector: For connecting the device to a computer.
Serial Connector: A header or connector for connecting to a microcontroller or other serial device (e.g., DB9, RJ45).
Crystal Oscillator: A precise timing source for the CH330N (optional, as the CH330N can use an internal oscillator).
Capacitors: For decoupling the power supply and providing stable operation.
Resistors: For pull-up resistors on the serial lines (optional, depending on the connected device).
PCB: A printed circuit board to hold all the components.
Circuit Design:
The circuit diagram for a basic USB-to-serial converter using the CH330N is relatively simple. Here's a breakdown:
Power Supply: The CH330N can be powered directly from the 5V supply on the USB connector.
USB Connection: The USB connector is connected to the USB D+ and D- pins of the CH330N.
Serial Connection: The TX and RX pins of the CH330N are connected to the corresponding pins of the serial connector.
Crystal Oscillator (Optional): If using an external crystal, connect it to the XTAL1 and XTAL2 pins of the CH330N.
PCB Layout:
A well-designed PCB layout is crucial for optimal performance and signal integrity. Consider the following guidelines:
Component Placement: Place components strategically to minimize trace lengths and crossovers.
Power and Ground Planes: Use solid copper planes for power and ground to reduce noise and improve signal quality.
Trace Routing: Route traces as short and direct as possible, avoiding sharp bends and long parallel runs.
Differential Pair Routing: If using differential signaling, maintain consistent spacing and impedance between the traces.
Decoupling Capacitors: Place decoupling capacitors as close as possible to the power supply pins of the CH330N.
PCB Fabrication and Assembly:
PCB Design Software: Use a PCB design software like Eagle, KiCad, or Altium Designer to create the PCB layout.
PCB Fabrication: Send the PCB design to a PCB fabrication service to have the PCB manufactured.
Component Placement: Assemble the components onto the PCB, ensuring correct orientation and polarity.
Soldering: Solder the components to the PCB, using a soldering iron and solder.
Testing: Test the USB-to-serial converter to ensure it functions correctly.
Additional Considerations:
Driver Installation: For Windows users, you may need to install a driver for the CH330N to recognize the device.
Baud Rate: The CH330N supports various baud rates. You can configure the baud rate using software or hardware settings, depending on the specific application.
Power Consumption: The CH330N is a low-power device, but it's important to consider power consumption, especially for battery-powered applications.
Environmental Factors: The operating temperature range and other environmental factors should be considered when selecting components and designing the PCB.
By following these guidelines, you can successfully design, build, and test a USB-to-serial converter using the CH330N.
The CH330N USB-to-serial converter is a versatile chip with various applications in the electronics and hobbyist domains. Here are some common use cases:
Microcontroller Development and Debugging:
Connecting Microcontrollers to Computers: Many microcontrollers, like Arduino, ESP32, and STM32, rely on serial communication for programming, debugging, and data transfer. A CH330N-based converter provides a convenient way to connect these devices to a computer's USB port.
Serial Debugging: You can use a terminal emulator like PuTTY or Tera Term to monitor serial output from your microcontroller, helping in debugging and troubleshooting.
STD CH330N USB to Serial Converter 5V
*PCBWay community is a sharing platform. We are not responsible for any design issues and parameter issues (board thickness, surface finish, etc.) you choose.


Raspberry Pi 5 7 Inch Touch Screen IPS 1024x600 HD LCD HDMI-compatible Display for RPI 4B 3B+ OPI 5 AIDA64 PC Secondary Screen(Without Speaker)
BUY NOW


- Comments(0)
- Likes(1)
More by Rabin Poudel
-
 Automatic Water Pump Control System Using ESP-12F
IntroductionWater scarcity and wastage are major challenges in residential, agricultural, and indust...
Automatic Water Pump Control System Using ESP-12F
IntroductionWater scarcity and wastage are major challenges in residential, agricultural, and indust...
-
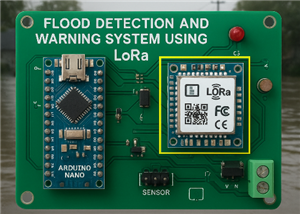 Flood Detection and warning system using LORA and Arduino
IntroductionFloods are one of the most devastating natural disasters, causing immense damage to life...
Flood Detection and warning system using LORA and Arduino
IntroductionFloods are one of the most devastating natural disasters, causing immense damage to life...
-
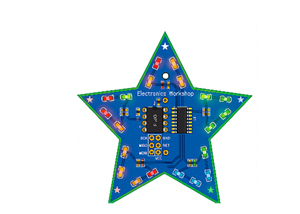 DIY LED Decoration Tiny Star PCB Project
IntroductionThe Tiny Star PCB is a small and fun DIY electronics project that is perfect for hobbyis...
DIY LED Decoration Tiny Star PCB Project
IntroductionThe Tiny Star PCB is a small and fun DIY electronics project that is perfect for hobbyis...
-
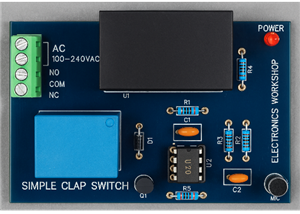 Simple and Cheap Clap Switch Circuit
IntroductionThe Simple and Cheap Clap Switch Circuit is a practical and fun DIY electronics project ...
Simple and Cheap Clap Switch Circuit
IntroductionThe Simple and Cheap Clap Switch Circuit is a practical and fun DIY electronics project ...
-
 Arduino-based Mist Maker and Hand Dryer
IntroductionIn today’s world, automation and hygiene have become essential, especially in public pla...
Arduino-based Mist Maker and Hand Dryer
IntroductionIn today’s world, automation and hygiene have become essential, especially in public pla...
-
 MPL3115A2 Barometric Pressure, Altitude, and Temperature Sensor
IntroductionThe MPL3115A2 is a highly accurate, low-power digital barometric pressure sensor from NX...
MPL3115A2 Barometric Pressure, Altitude, and Temperature Sensor
IntroductionThe MPL3115A2 is a highly accurate, low-power digital barometric pressure sensor from NX...
-
 E-Speaker Using ESP32
IntroductionThe E-Speaker is a smart, portable, and versatile audio system built using the ESP32 mic...
E-Speaker Using ESP32
IntroductionThe E-Speaker is a smart, portable, and versatile audio system built using the ESP32 mic...
-
 Heart Rate Monitor Circuit Using Photoplethysmography (PPG)
IntroductionHeart rate is a vital physiological parameter that reflects the health and fitness of an...
Heart Rate Monitor Circuit Using Photoplethysmography (PPG)
IntroductionHeart rate is a vital physiological parameter that reflects the health and fitness of an...
-
 Automated Greenhouse Control System using ESP32
IntroductionAn automated greenhouse control system leverages technology to optimize plant growth con...
Automated Greenhouse Control System using ESP32
IntroductionAn automated greenhouse control system leverages technology to optimize plant growth con...
-
 STD CH330N USB to Serial Converter 5V
IntroductionThe CH330N is a versatile USB-to-serial converter chip that simplifies interfacing betwe...
STD CH330N USB to Serial Converter 5V
IntroductionThe CH330N is a versatile USB-to-serial converter chip that simplifies interfacing betwe...
-
 KY-032 Obstacle avoidance sensor module
IntroductionIntroduction to Obstacle Avoidance SensorsObstacle avoidance sensors are essential compo...
KY-032 Obstacle avoidance sensor module
IntroductionIntroduction to Obstacle Avoidance SensorsObstacle avoidance sensors are essential compo...
-
 BC547 BASED WATER LEVEL INDICATOR
IntroductionA water level indicator using a BC547 transistor is a simple and effective electronic pr...
BC547 BASED WATER LEVEL INDICATOR
IntroductionA water level indicator using a BC547 transistor is a simple and effective electronic pr...
-
 How to Design Own Arduino Wifi shield PCB
OverviewArduino wifi shield connects the Arduino with a wifi chip through the serial communication p...
How to Design Own Arduino Wifi shield PCB
OverviewArduino wifi shield connects the Arduino with a wifi chip through the serial communication p...
-
 DIY Air Quality Tester
OverviewIn this project “DIY Air Quality Tester” we use Node MCU microcontroller and air quality sen...
DIY Air Quality Tester
OverviewIn this project “DIY Air Quality Tester” we use Node MCU microcontroller and air quality sen...
-
 Digital Clock Using Arduino
OverviewIn this project, “Digital clock using Arduino” we will make a PCB board for digital clock an...
Digital Clock Using Arduino
OverviewIn this project, “Digital clock using Arduino” we will make a PCB board for digital clock an...
-
 Bluetooth Controlled car using Arduino
OverviewA Bluetooth Controlled Car Using Arduino is a fascinating DIY project that involves building...
Bluetooth Controlled car using Arduino
OverviewA Bluetooth Controlled Car Using Arduino is a fascinating DIY project that involves building...
-
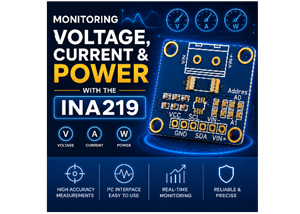 Monitoring Voltage, Current & Power with the INA219
IntroductionIf you’ve ever wanted to know exactly how much current your circuit is pulling, how much...
Monitoring Voltage, Current & Power with the INA219
IntroductionIf you’ve ever wanted to know exactly how much current your circuit is pulling, how much...
-
 MP2307 5V to 24V Buck Converter
IntroductionIf you've ever needed to step down a higher DC voltage say, from a 12V or 24V source dow...
MP2307 5V to 24V Buck Converter
IntroductionIf you've ever needed to step down a higher DC voltage say, from a 12V or 24V source dow...
-
Programmable Mist Maker - XIAO / QT PY Extension
241 0 0 -
RadioHAT - Raspberry Pi radio development platform
263 0 1 -
-
-
-
-
ARPS-2 – Arduino-Compatible Robot Project Shield for Arduino UNO
2820 0 6 -
A Compact Charging Breakout Board For Waveshare ESP32-C3
3325 3 8 -
AI-driven LoRa & LLM-enabled Kiosk & Food Delivery System
3619 2 2


