


Freon: Freeze On Neck personal cooler
Description
Are you tired of sweltering through hot days, feeling uncomfortable and unproductive?
Imagine having a refreshing, localized chill whenever and wherever you need it.
Freon is a revolutionary personal cooler designed to keep you comfortably cool, directly at your pulse points on your neck. No more full-body chills or ineffective air circulation – Freon targets your core temperature regulation, providing instant, personalized relief.
Introduction
How Freon Works Its Magic
At the heart of Freon is a Peltier element, a cutting-edge thermoelectric device that actively transfers heat away from your skin. This isn't just a fan blowing air around ; it's active cooling that genuinely drops the temperature.
But Freon is more than just a powerful cooler – it's smart. Integrated temperature sensors constantly monitor your comfort level, while intelligent controls automatically adjust the Peltier element's intensity and the integrated fan speed.
This means:
- Optimal Comfort: No more guessing games. Freon automatically maintains your preferred cooling sensation.
- Energy Efficiency: The system only uses the power it needs, extending battery life and reducing waste.
- Whisper-Quiet Operation: The fan only ramps up when necessary, ensuring discreet and comfortable use.
Why Freon?
- Instant Relief: Feel the difference immediately as Freon brings down your body's perceived temperature.
- Targeted Cooling: Directly cools your neck, a key area for thermal regulation, providing more effective relief than ambient air conditioning.
- Portable: Lightweight and designed for comfort, you can wear Freon anywhere – at your desk, during your commute, or enjoying outdoor activities. It's not actively discreet but can be hidden under your T-Shirt!
- Personalized Comfort: The smart controls adapt to your needs, not a one-size-fits-all solution.
- No More Discomfort: Stay fresh, focused, and productive, even on the hottest days.
Who is Freon For?
Freon is perfect for:
- Office workers seeking relief from stuffy environments.
- Commuters enduring hot trains or buses.
- Outdoor enthusiasts needing a quick cool-down.
- Anyone who struggles with heat and wants a personal, intelligent cooling solution.
Experience the Future of Personal Cooling
Freon isn't just a gadget; it's your personal oasis of cool, always ready to bring down the heat. Say goodbye to discomfort and hello to a new era of personalized thermal comfort.
Are you ready to "Freeze On Neck" and experience true cool? If yes, follow this project!
Tell me the truth
As an ingeneer, do I trust all the previous wording, generated by AI, and at the glory of Peltier coolers ?
Of course not...
Do not expect to have an "incredible" cooling efficiency with a 5x5cm cold metal plate in your neck...
But I have tested it and it works quite well to procure a fresh feeling. Blood under your skin will be refreshed and the effect will be clearly perceptible.
If you are still convinced, let's enter into more details and build the Freon !
Why is Freon even cooler ? Its price
As a DIY device, Freon uses on the shelf components and can be built for less than 30 €
For comparison, the Sony Reon Pro, which is of course a "smarter" system, is sold at 327 USD in Japan ...
Of course the Reon Pro is equiped with two peltier elements acting in "flip/flop", it's an industrial device with quite cool design, it can also act as a heater for winter... But Freon Lite is 10 times cheaper !
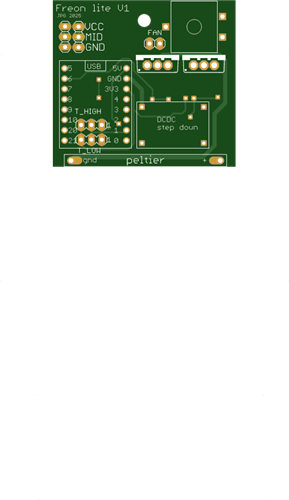
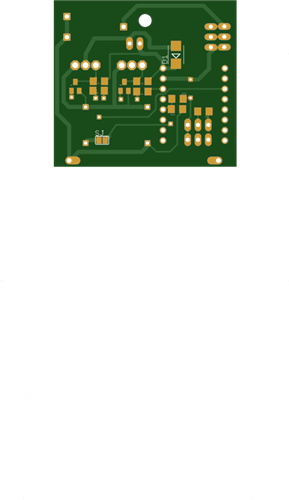
schematics
schematics are quite simple.
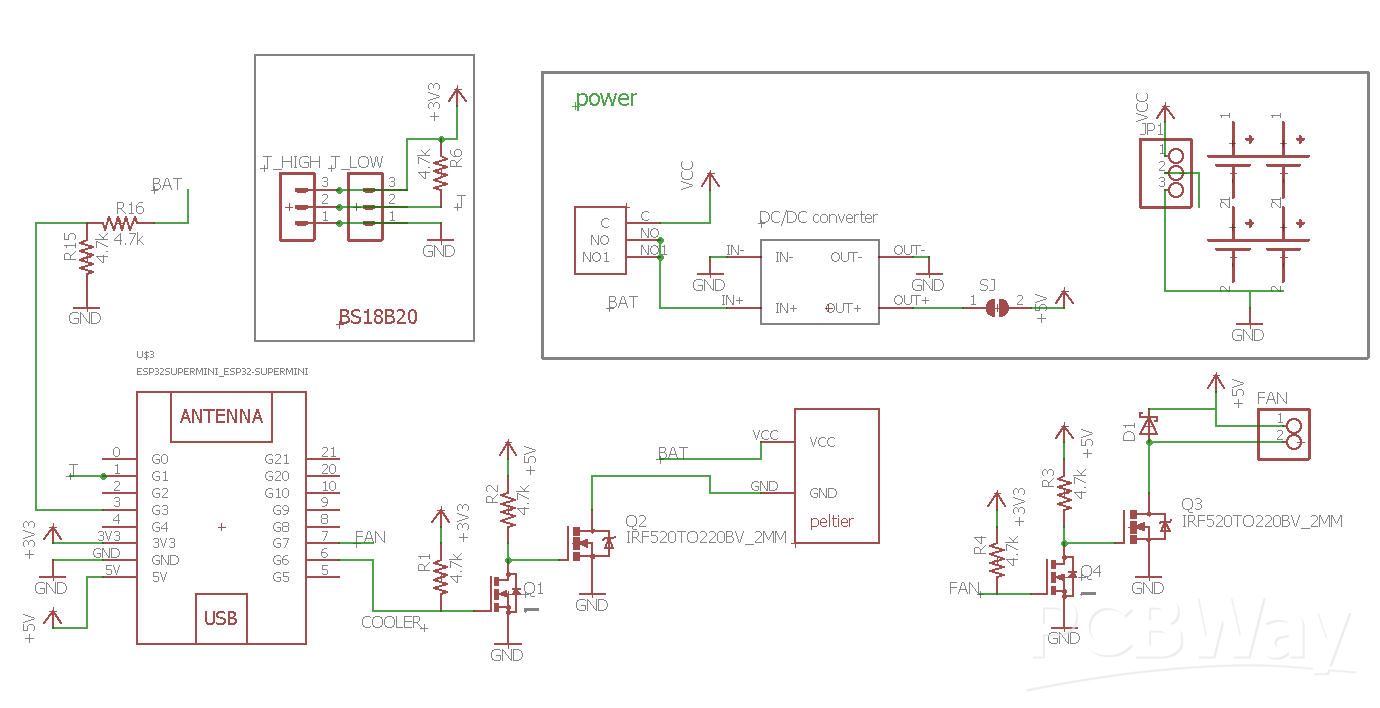
Power
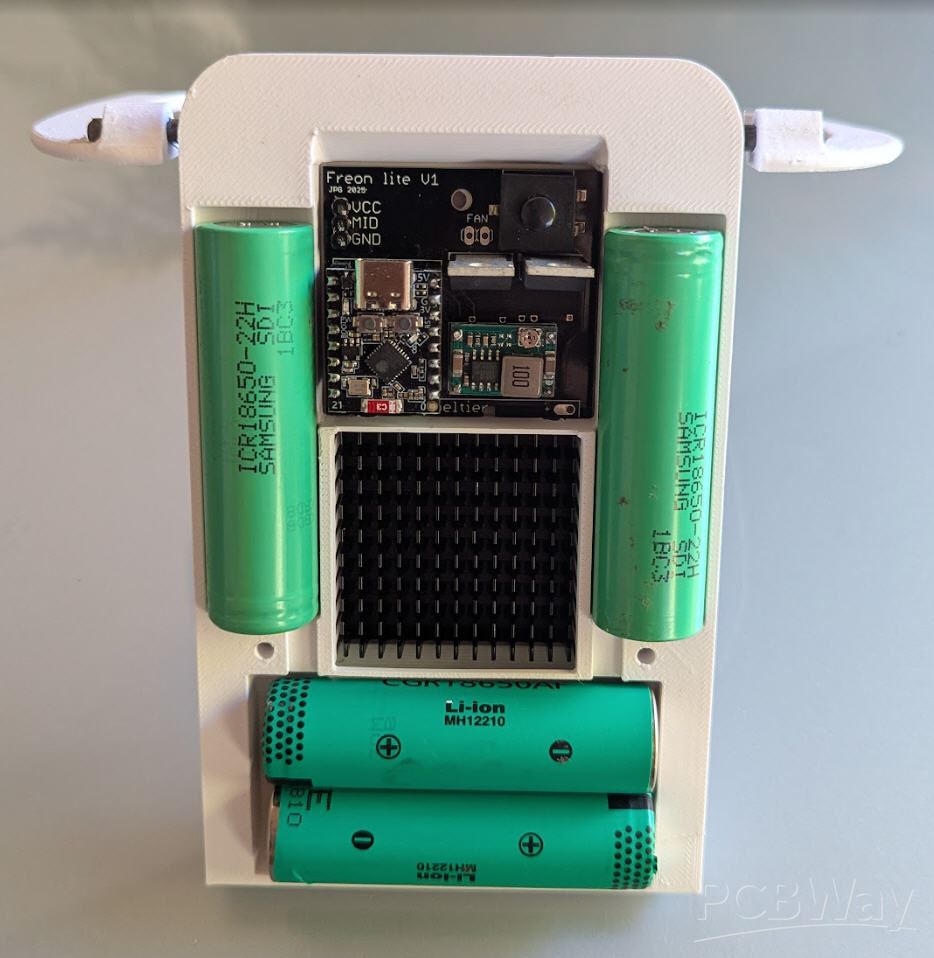
4 x 18650 Li-Ion batteries are wired into a 2s2p pack and can deliver 7.4 V to feed the peltier element.
The module I have choosen is a 12V one able to eat more than 5A... At these high values, this peltier can literally freeze water... and would be dangerous for your skin !
That's why 7.4V is more than enough and we will see later why !
Voltage of this battery pack can be totally cut with a switch to prevent draining the battery, even though this battery is monitored by R15/R16 voltage divider. When voltage is too low, peltier will be cut and ESP32 can go into deepsleep mode.
(Final values for ths voltage divider are 4.7k / 10k. For a full 8.4V 2s li-ion battery this would deliver 2.6V which is the upper limit for ESP32-C3 ADC)
To power the fan and the ESP32-C3 "supermini" MCU we need 5V. They are produced by a cheap DC/DC converter.
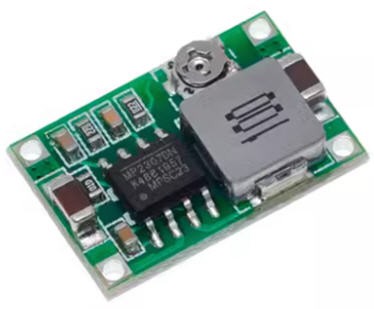
- first tune the trim pot value in order to get 5V output (do not power anything else before...)
- when this 5V is achieved, you can paint the trim pot with a drop of nail varnish to fix the potentiometer
- then (and only then) solder the SJ solder pad on the bottom side of the PCB. The 5V will now flow to the ESP32
Peltier
A TEC12706 40x40 mm 12V 60W peltier is used
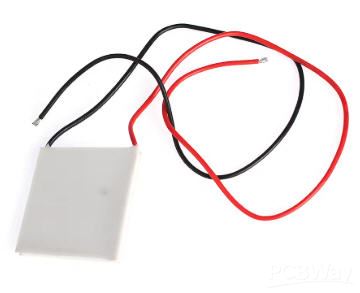
A Peltier cooler, heater, or thermoelectric heat pump is a solid-state active heat pump which transfers heat from one side of the device to the other, with consumption of electrical energy, depending on the direction of the current.
So you just apply DC voltage on the wires and one side cools down while the other one heats up.
Peltier elements are extremely inefficient... You produce much more heat than you produce cool... Read this paper to get useful technical informations on Peltiers.
The three most common ways for improving the Peltier element efficiency in case of cooling are:
- Reducing dT (difference of temprature) – optimize heatsink and fan
- Minimize power losses - isolate the cooled area
- Optimize COP - Select Peltier element of adequate power
In our use case:
- dT is difference of temperature between cold and hot sides of the peltier.
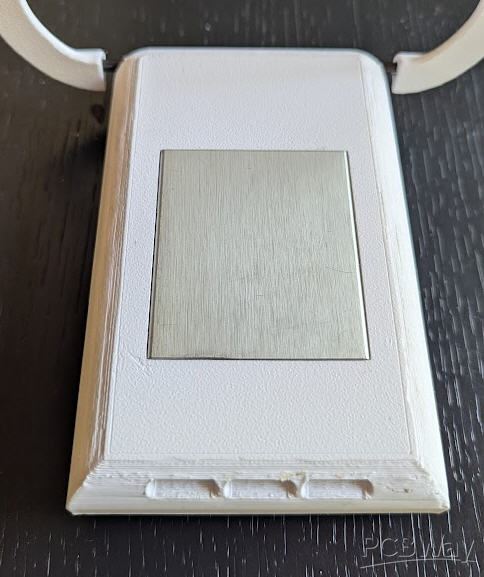
- Regarding cold side we apply a 50x50mm of metal to our skin expecting blood to spread the cool effet and to try to warm up the cool side.
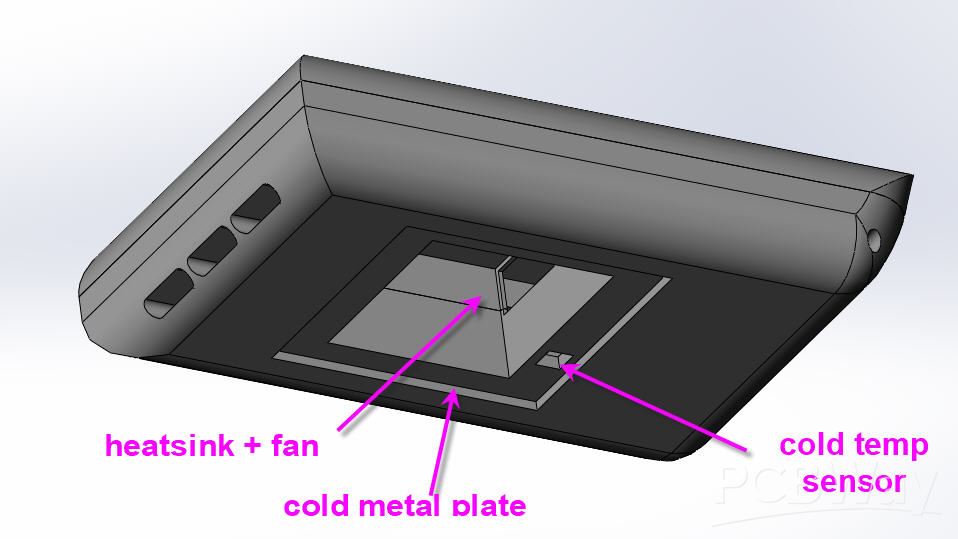
- Regarding hot side we will add an aluminium heatsink itself refreshed by a fan
- Regarding the Coefficient of Performance, we will monitor cold and hot temperatures and use our peltier at very low voltage/intensity

So some where between 1/10 and 1/3 of our peltier Imax current and trying to optimize dT around 10°C (if 30°C heat then look for 20°C on cold side). This should give a CoP around 2.5 and 3...
Of course you may want to increase the "cool" effect this will be achievable by increasing voltage and thus current. This will decrease the CoP to 1 or even less...
Safety first: Finally to avoid dangerous situation, the peltier element will never be powered at its full Imax (it will be impossible with 2x18650 batteries in serie). I have tested 7.4V on the peltier element on my neck: its very cold but not freezing !
fan and heatsink
For the heatsink I have selected a small aluminium one
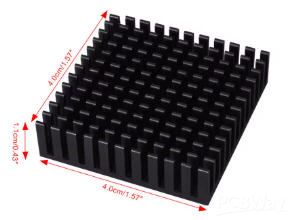
it will be thermically glued on the hot side of the peltier
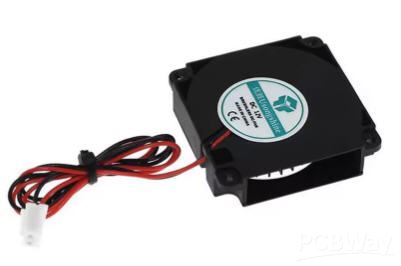
For the fan I have selected a radial blower used into 3d printer to cool the nozzle
it will go ontop the heatsink and pull/push air into it.
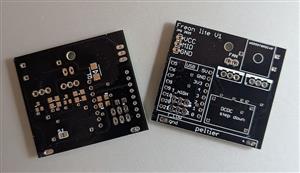
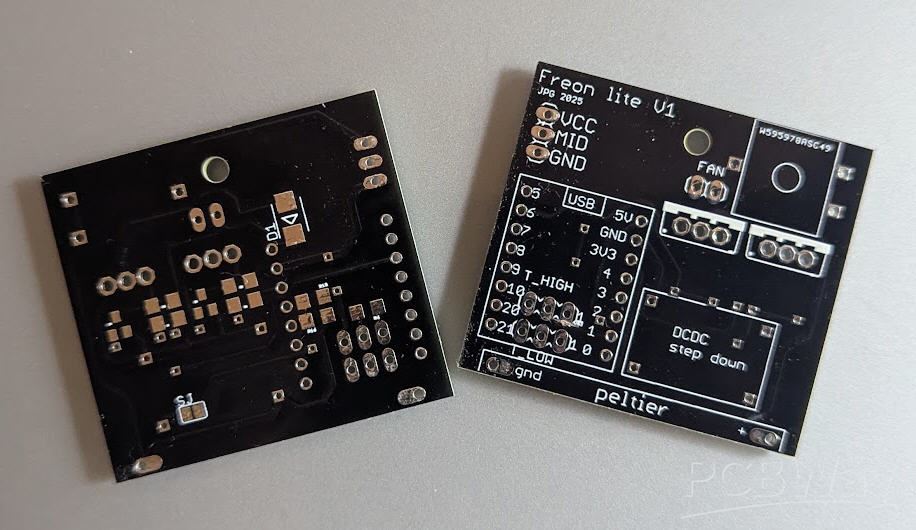
PCB for Freon
This schematics was easily routed on a dual sided PCB board.

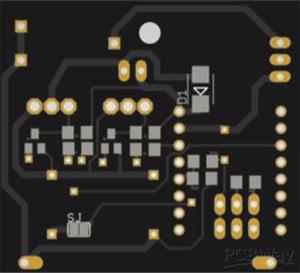
The PCB was kindly sponsored by PCBWay and is as usual of excellent quality.
You can order it directly on this project page. It's cheap, delivered very fast and so professional looking!
and if you are new to PCBWay please use this affiliated link : https://pcbway.com/g/o35z4O
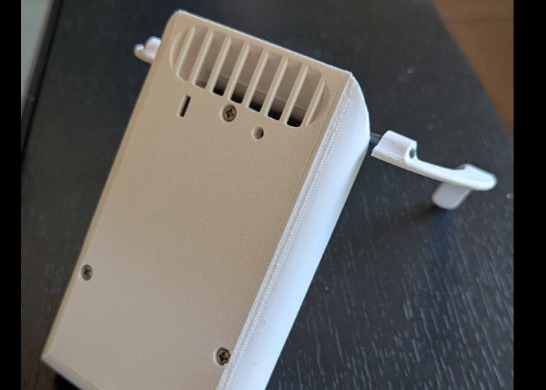
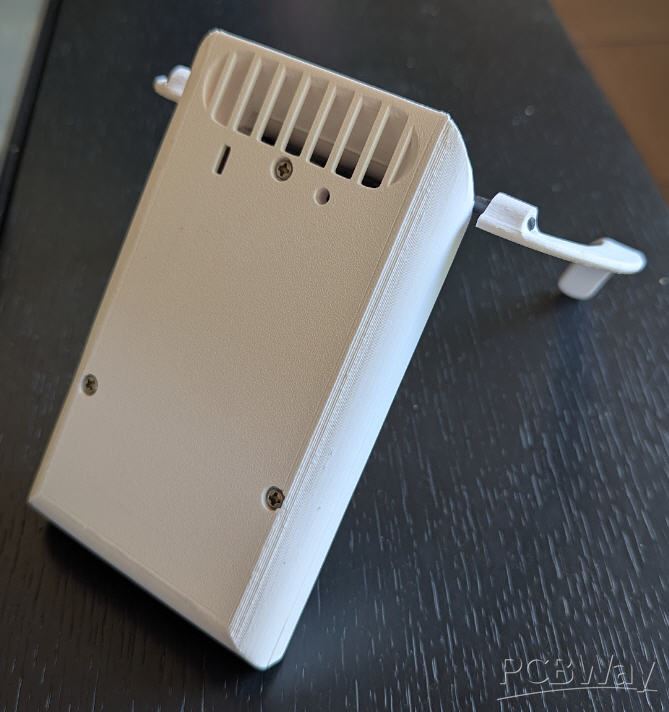
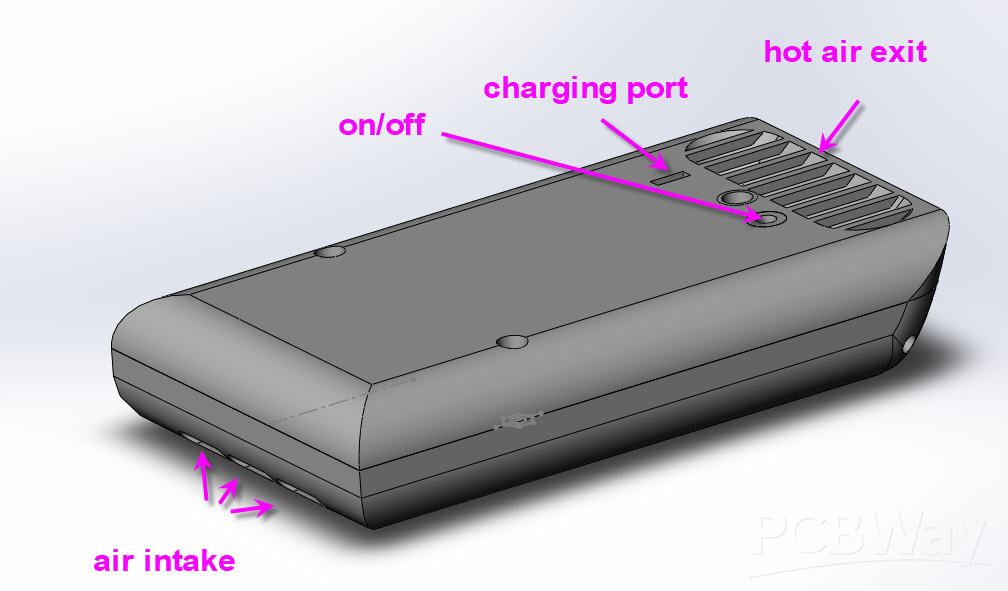
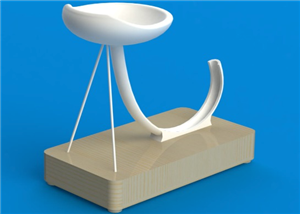
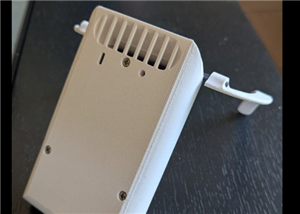
Box for Freon
Of course all these components must fit into the smallest box possible.
The box will go behind your neck and "shoulder straps" should hold it in place under your T-shirt.
Here is the box I designed
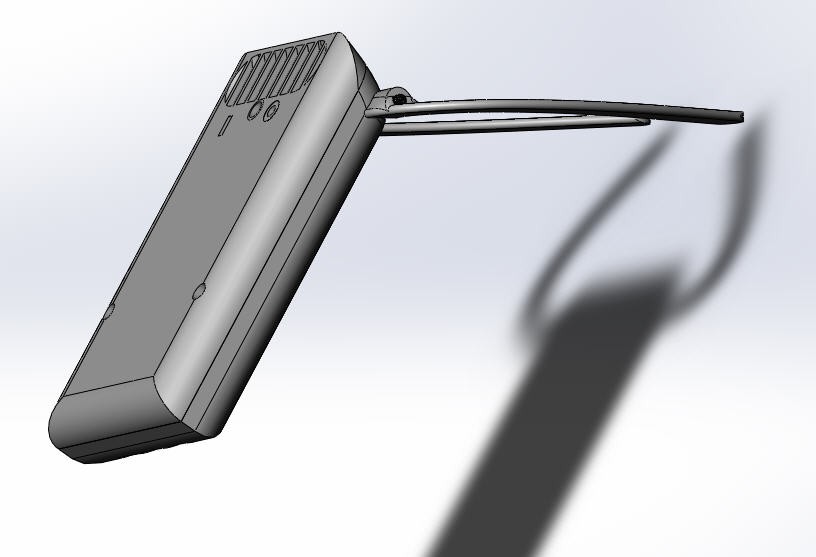
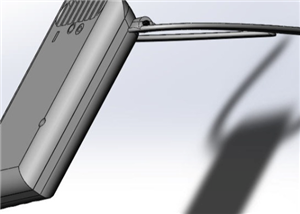
shoulder legs should be bent to accomodate your shoulders like this!
Inside the box there is almost no room left:
Then you can connect le Peltier on its connectors (see PCB) or (alternatively) connect its positive wire to the 5V DC/DC converter. This will deliver less power to the Peltier (5V instead of 7.4V) and is sufficient to have a working cooler with less heat dissipation... (I finally let my cooler connected to this 5V...)
You can finish by soldering the fan. Everything should look like this when finished (batteries not yet soldered)
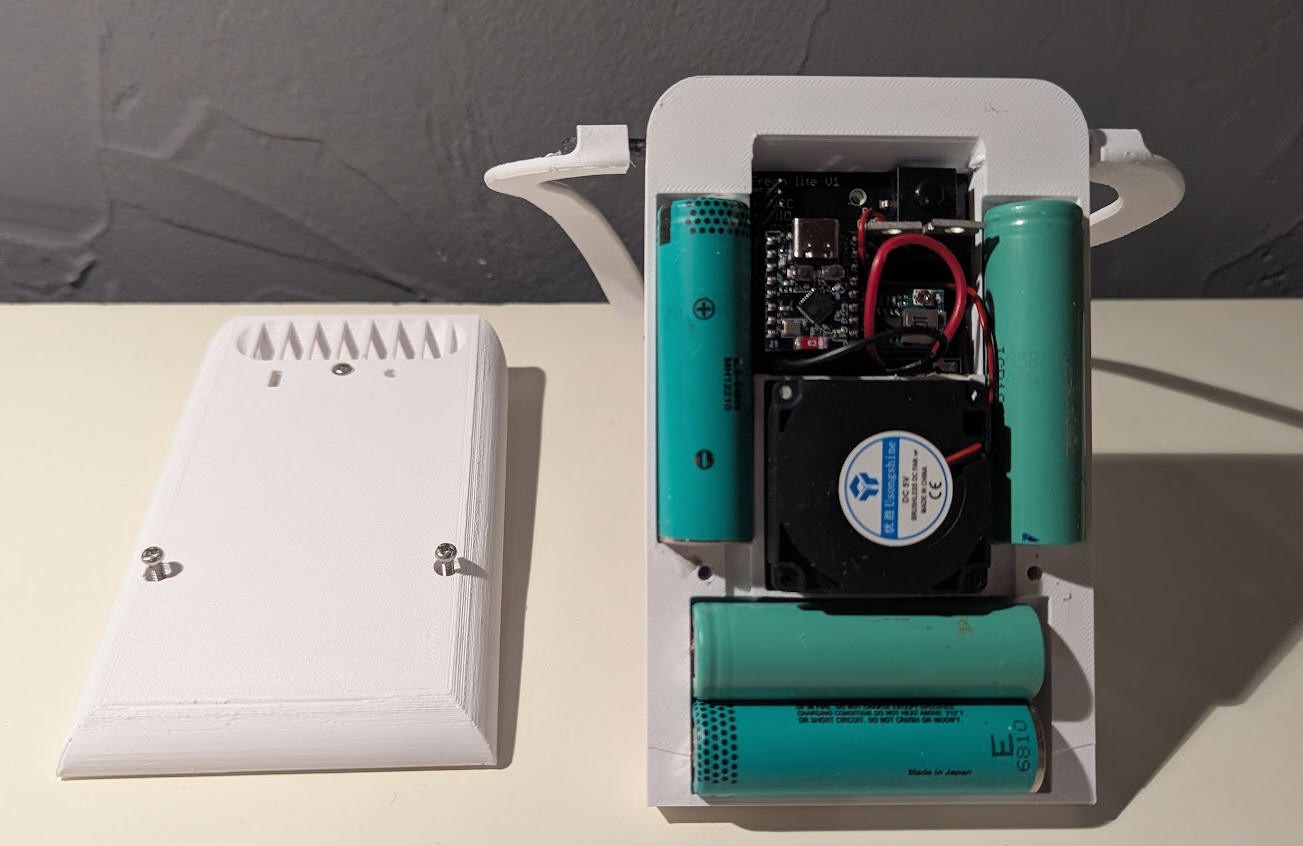
under the 18650 batteries you have air intake and exhaust is on the top side
Here is the metal plate when bow is finished :
 stl files for the box and shoulder straps are available on these links
- box bottom + straps
- box top
read carefully these links mainly to insert the 3 M3 hex nuts needed to close the box !
ANd here is a video to recap all this :
Software
software is divided into two parts
- ESP32 firmware
- Android application
firmware
The firmware source code is available on my Github project page
This fimware is running on an ESP32-C3 supermini board

To compile the code, you have to use the latest Espressif package into the board manager (version 3.3.0) and select the board named "Nologo ESP32C3 Super Mini"

How does the firmware work?
This code is quite simple, most of it is to handle the Bluetooth Low Energy communication with the ESP32. I will not enter into detail on this part. Simply know that messages are encoded into JSON format:
from ESP to Android only sensors data are sent {"C": 23.09,"H": 23.23,"V": 3.07,"D": 0}
- C for Cold temperature
- H for Hot temperature
- V for battery voltage
- D for current peltier dutyCycle
and from Android to ESP we receive commands to configure the firmware
For instance to change mode of operation {"Cmd":"Mode","value":1}
commands are:
- Mode for mode of operation (0 automatic, 1 manual)
- Pwr for peltier power
- Temp for target temperature
controlling the Peltier element
The peltier module can be controlled either manualy or automatically to regulate cold temperature
Controlling a Peltier could be done with a PWM signal but is not recommended as very inefficient.
So I decided to control the Peltier with a very very low frequency PWM! It's more or less as if a relay was switching the peltier on and off every 10s, thus controlling it with direct DC voltage.
The low frequency PWM cannot be done using ESP32-C3 hardware (it would have been possible with an dual core ESP32). So a software implementation was setup
controlling the fan
The fan has no issue of efficiency and can be controlled by an hardware PWM at 10kHz
The fan is used to push fresh air into the heatsink. Thus is must not be switched off immediately when the peltier is switched off... a delay of around 10s is added to allow the heatsink to cooldown.
cold temperature regulation
When mode of operation is set to "auto", cold temperature is regulated around the "targetTemp" value.
To do this we use a PID controller: PID = Proportional, Integral Derivative Controller
- input will be the cold temperature measured on the DS18B20
- setpoint the target temperature
- output will be directely the dutycycle to control the peltier
We will use the excellent PID library.
- As we have a system wherer when we increase the duty cycle we will apply more power to the peltier and thus decrease the output, our PID should be declared with the REVERSE attribute
- the PID is started into the setup function where we also tell to refresh it every 1s
- and we refresh it into the loop
//PID
input = coldTemp; //with run the PID on the cold temperature input
setpoint = targetTemp; //and use the target temerature aas the setpoint
myPID.Compute(); //will compute PID every 1s (1Hz is enough as the cold metal plate as a lot of thermal inertia)
Android application
As said previously, the android App is only there to monitor the sensors values and the behavior of the module, but also (and mainly) to send configuration parameters to the ESP32 board.
So that the ESP32 board doesn't need any screen nor button excepted the On/Off one !
Source code of the App as well as .apk precompiled file are available on my gitub page.
Be aware that, as the App is using Bluetooth Low Energy in the "beacon" mode, it absolutely needs "location permissions" as stated into the manifest file of the project :
- AddPermission(android.permission.ACCESS_FINE_LOCATION)
- AddPermission(android.permission.BLUETOOTH_SCAN)
- AddPermission(android.permission.BLUETOOTH_CONNECT)
Although the App does not use GPS, this device must be activated for the "fine location" to be activated to allow "beacon scanning" at least under Android 15 and 16 . This strange behavior is confirmed on my Google Pixel 6 smartphone...
So activate your GPS, activate your bluetooth and allow the permissions requested by the App! Trust me it's safe (you can verify with the source code !)
This being done, the App should work automatically and detect the Freon device and connect to it without any human intervention : Magic !
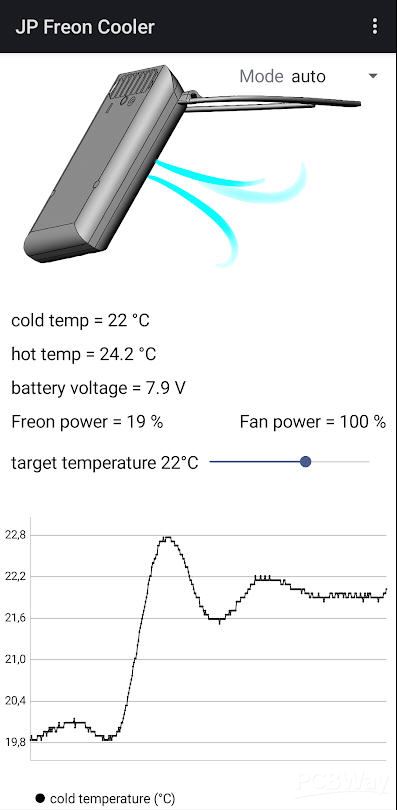
The App will display this kind of screen where you will be allowed to
- select mode of operation
- change the peltier applied power (manual mode). Or target temperature (auto mode)
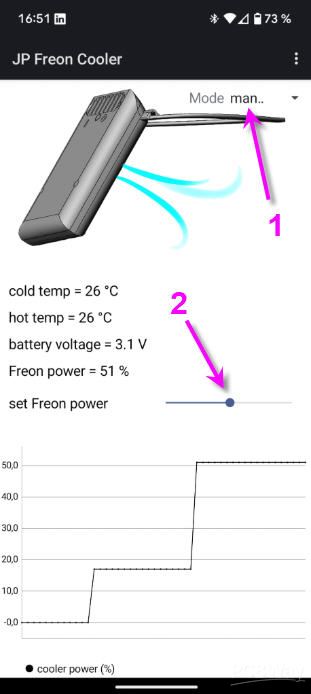
The cold temperature, hot temperature, battery voltage and Freon power are displayed. If you click on one of them, the curve will display the recorded values.
On this example I did change 2 times the peltier power !
If the board is powered and connected to the App, you will see points being added to the curves every 1s.
If you close the App, the Freon board will still work and the choosen parameters will be stored into the ESP32 flash and will be reused after switch off/on of the freon device.
After switching on the Freon you will recover :
- mode of operation
- selected freon power (manual mode)
- target cold temperature (auto mode)
- This should allow to use the Freon without your phone most of the time!
Here are two screenshots showing the temperature regulation in "Auto" mode
- from 22°C reaching a target at 20°C
- from 20°C reaching again 22°C

Freon: Freeze On Neck personal cooler
*PCBWay community is a sharing platform. We are not responsible for any design issues and parameter issues (board thickness, surface finish, etc.) you choose.


Raspberry Pi 5 7 Inch Touch Screen IPS 1024x600 HD LCD HDMI-compatible Display for RPI 4B 3B+ OPI 5 AIDA64 PC Secondary Screen(Without Speaker)
BUY NOW


- Comments(0)
- Likes(3)
More by Jean-Pierre Gleyzes
-
 RC radial engine spark plug heater
BackgroundMy friend bought this wonderful engine from UMS_technologiesIt's a 7 cylinders star engine...
RC radial engine spark plug heater
BackgroundMy friend bought this wonderful engine from UMS_technologiesIt's a 7 cylinders star engine...
-
 Convert a DC motor into a stepper one
This project is a way to convert a DC motor into a stepper motor.Of course "conversion" will not be ...
Convert a DC motor into a stepper one
This project is a way to convert a DC motor into a stepper motor.Of course "conversion" will not be ...
-
 OpenxSensor variometer and telemetry for RC planes
Ever wanted a very cheap variometer on your RC glider ?battery voltage monitoring ?extra RC channels...
OpenxSensor variometer and telemetry for RC planes
Ever wanted a very cheap variometer on your RC glider ?battery voltage monitoring ?extra RC channels...
-
 Air Quality station
OverviewThis DIY air quality monitoring system integrates precision sensors with a connected process...
Air Quality station
OverviewThis DIY air quality monitoring system integrates precision sensors with a connected process...
-
 2S LiPo High-Current Power Box with two Sbus inputs
Project Overview: 2S LiPo High-Current Power Box with two Sbus inputsThis circuit is a high-performa...
2S LiPo High-Current Power Box with two Sbus inputs
Project Overview: 2S LiPo High-Current Power Box with two Sbus inputsThis circuit is a high-performa...
-
 Power box for big RC plane
Project Overview: 2S LiPo High-Current Power BoxThis circuit is a high-performance power distributio...
Power box for big RC plane
Project Overview: 2S LiPo High-Current Power BoxThis circuit is a high-performance power distributio...
-
 A bluetooth Joystick for TX16s radio (or others)
This project is kind of follow on of this one : Buddy Box for Radiomaster TX16sI decided to write an...
A bluetooth Joystick for TX16s radio (or others)
This project is kind of follow on of this one : Buddy Box for Radiomaster TX16sI decided to write an...
-
 Radiomaster TX16s buddy box (master/trainer and more)
I wanted a wireless buddy box for my Radiomaster TX16sThis buddy box would allow to wireless link tw...
Radiomaster TX16s buddy box (master/trainer and more)
I wanted a wireless buddy box for my Radiomaster TX16sThis buddy box would allow to wireless link tw...
-
 "perpetual" motion ball
Browsing internet and youtube, I found this mind blowing "perpetual motion" device designed by Willi...
"perpetual" motion ball
Browsing internet and youtube, I found this mind blowing "perpetual motion" device designed by Willi...
-
 Freon: Freeze On Neck - 3d printed box top
Freon project is fully describbed on this project page
Freon: Freeze On Neck - 3d printed box top
Freon project is fully describbed on this project page
-
 Freon: Freeze On Neck - 3d printed box bottom
Freon project is fully described on this project page
Freon: Freeze On Neck - 3d printed box bottom
Freon project is fully described on this project page
-
 Freon: Freeze On Neck personal cooler
DescriptionAre you tired of sweltering through hot days, feeling uncomfortable and unproductive?Imag...
Freon: Freeze On Neck personal cooler
DescriptionAre you tired of sweltering through hot days, feeling uncomfortable and unproductive?Imag...
-
 ESP32_StarMotor_glow plugs heater _ V2
BackgroundMy friend bought this wonderful engine from UMS_technologiesIt's a 7 cylinders star engine...
ESP32_StarMotor_glow plugs heater _ V2
BackgroundMy friend bought this wonderful engine from UMS_technologiesIt's a 7 cylinders star engine...
-
 RC plane CoG finder
IntroductionAs an intro here is a video of the system runningand another using the LCD displayA litt...
RC plane CoG finder
IntroductionAs an intro here is a video of the system runningand another using the LCD displayA litt...
-
 JP eCatFeeder
Overview In 2017 I published the first iteration of this project. And since then, the cat feeder had...
JP eCatFeeder
Overview In 2017 I published the first iteration of this project. And since then, the cat feeder had...
-
 ESP32_RC_Motor_tester_V2
FeaturesOn an RC plane, propeller performance depends on pitch, diameter, profile, and material.Test...
ESP32_RC_Motor_tester_V2
FeaturesOn an RC plane, propeller performance depends on pitch, diameter, profile, and material.Test...
-
 ESP32_RC_Motor_tester
FeaturesOn an RC plane, propeller performance depends on pitch, diameter, profile, and material.Test...
ESP32_RC_Motor_tester
FeaturesOn an RC plane, propeller performance depends on pitch, diameter, profile, and material.Test...
-
 FluidNC foam cutter controller
A few months ago I retrofited an old foam cutter based on a MM2001 hardware.This system works quite ...
FluidNC foam cutter controller
A few months ago I retrofited an old foam cutter based on a MM2001 hardware.This system works quite ...
-
Programmable Mist Maker - XIAO / QT PY Extension
222 0 0 -
RadioHAT - Raspberry Pi radio development platform
249 0 1 -
-
-
-
-
ARPS-2 – Arduino-Compatible Robot Project Shield for Arduino UNO
2801 0 5 -
A Compact Charging Breakout Board For Waveshare ESP32-C3
3304 3 8 -
AI-driven LoRa & LLM-enabled Kiosk & Food Delivery System
3585 2 2


