


|
|
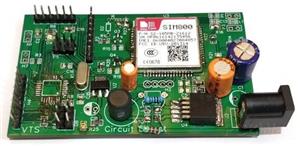
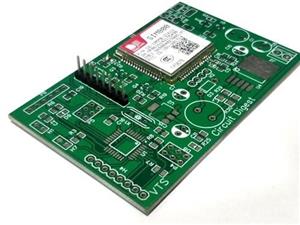
Arduino UNO R3 SHIELD |
x 1 | |
|
|
SIM800L GSM MODULE |
x 1 | |
|
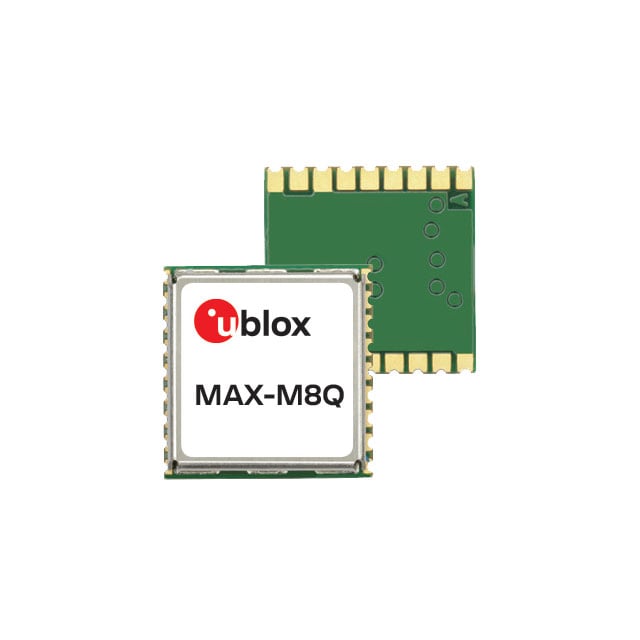
MAX-M8Qu-blox
|
x 1 | |
|
|
SIM card with SMS |
x 1 | |
|
LTC2924CGN#TRPBFAnalog Devices Inc.
|
x 1 |

|
FritzingFritzing
|
DIY GSM GPS Location Tracker with Arduino
Project Overview
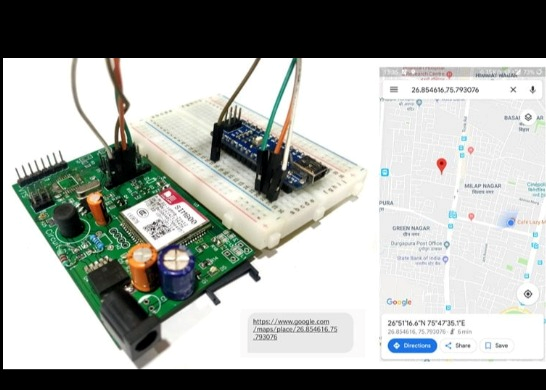
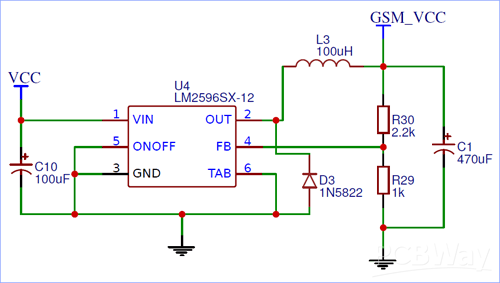
This project demonstrates how to build a simple and reliable location tracking system using an Arduino and a GSM module. The device retrieves GPS coordinates and sends them directly to your mobile phone via SMS. It’s ideal for basic tracking applications like vehicle monitoring, asset tracking, or personal safety.

How It Works
The system uses a GSM module (SIM800) to communicate over the cellular network. When triggered, it fetches location data (latitude and longitude) and sends it as a text message to a predefined phone number. The user can view the location instantly using any map service.

Key Features
- Real-time location tracking via SMS
- Works without internet connectivity
- Compact and portable design
- Low-cost and beginner-friendly
- Supports remote tracking requests
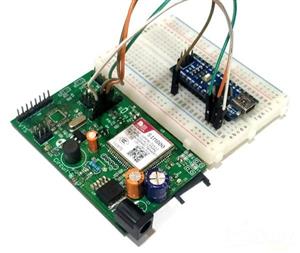
Components Required
- Arduino Uno (or compatible board)
- SIM800 GSM module
- GPS module (such as Neo-6M)
- SIM card with SMS capability
- Power supply (battery or adapter)
- Connecting wires
- Optional: enclosure for portability
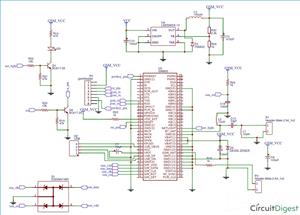
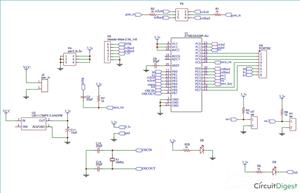
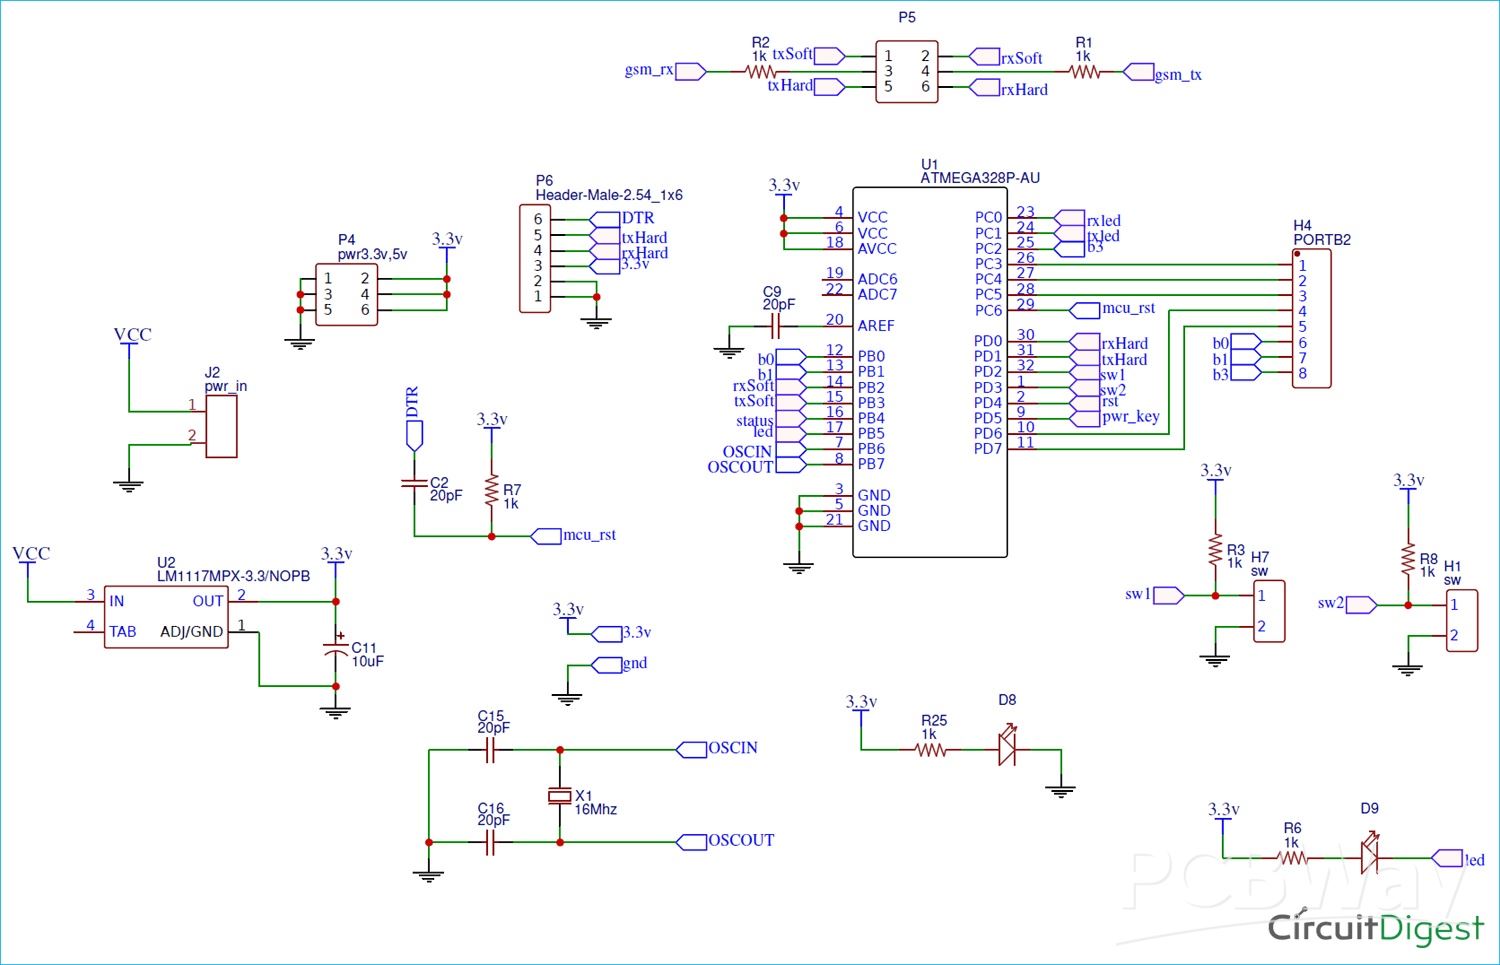
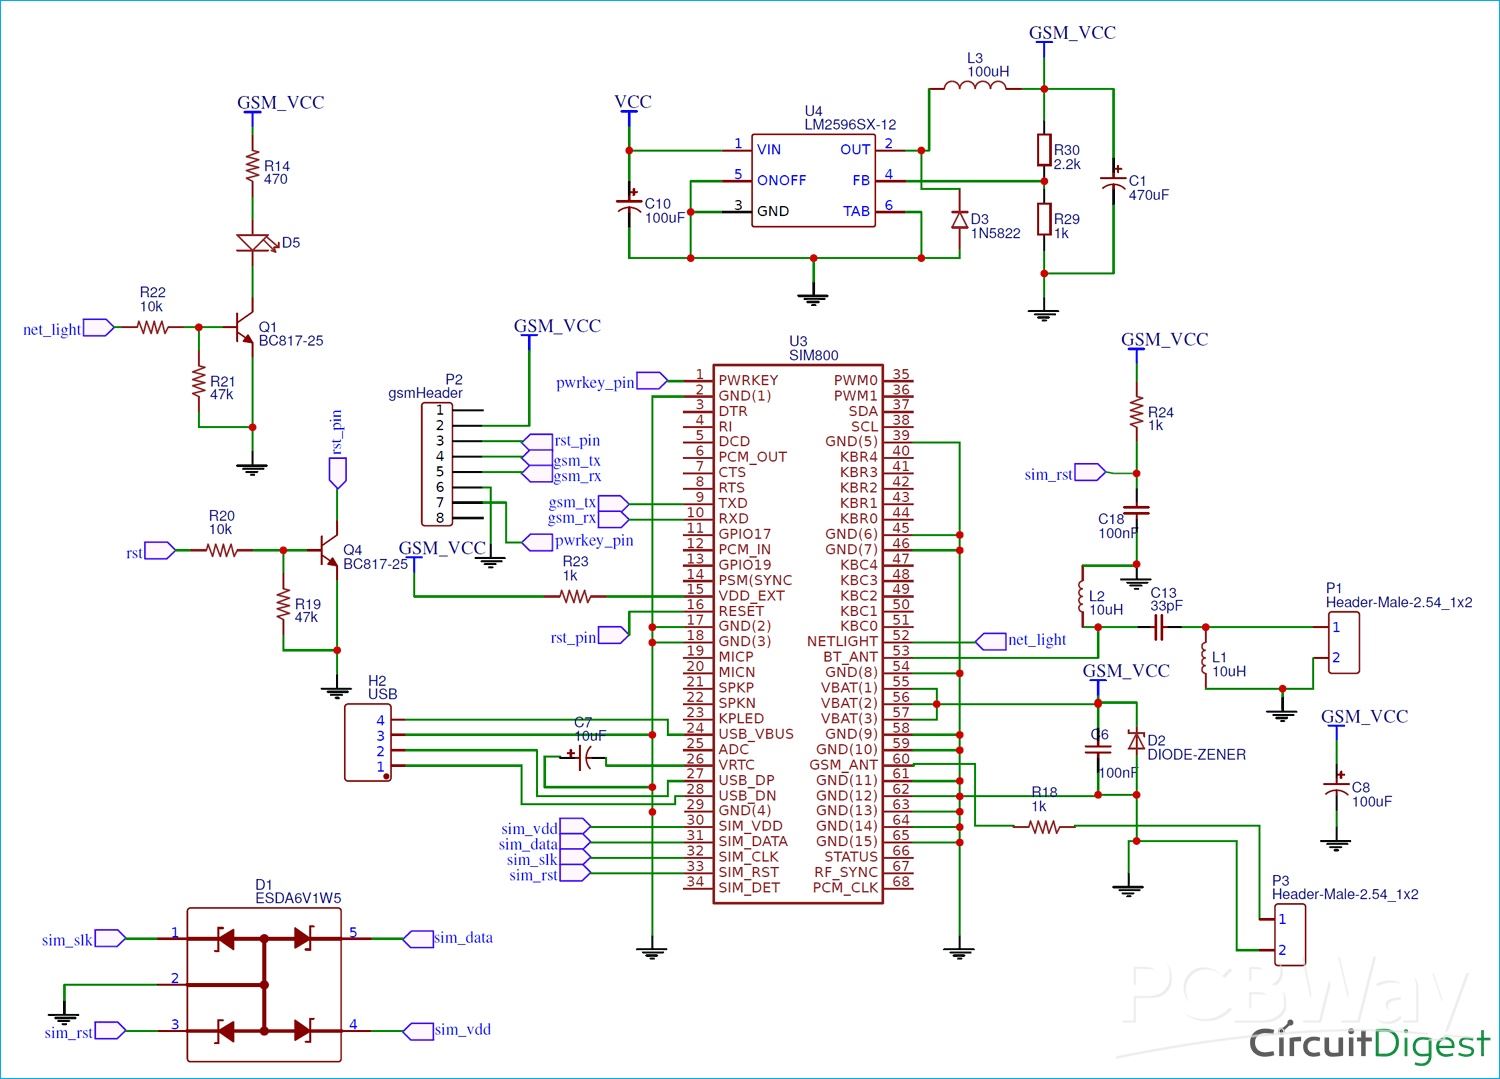
Circuit Description
- The GPS module communicates with Arduino via serial communication to provide location data.
- The SIM800 GSM module is also connected via serial pins to send SMS messages.
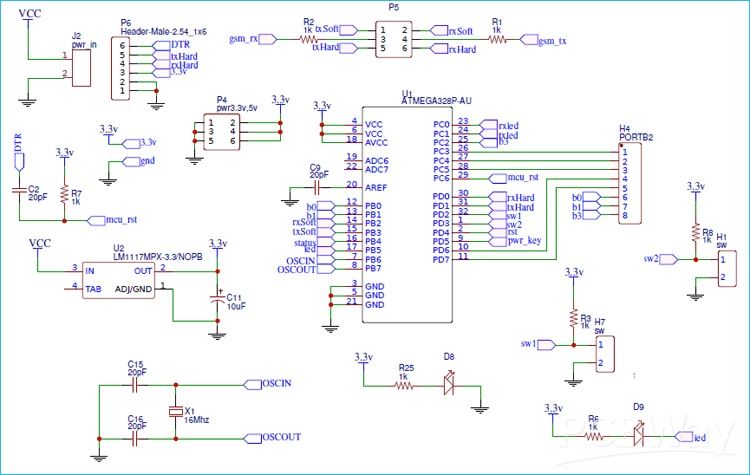
- Proper power supply is critical, as the GSM module requires stable current (typically 3.7V–4.2V with sufficient amperage).
Ensure correct TX and RX connections between modules and Arduino, and use voltage level shifting if required.
Software Setup
- Install Arduino IDE
- Include necessary libraries for GPS communication
- Configure serial communication for both GSM and GPS modules
- Define the recipient phone number in the code
- Upload the program to the Arduino
Program Logic
- Initialize GSM and GPS modules
- Wait for a trigger (button press or SMS command)
- Read GPS coordinates
- Format the location into a Google Maps link
- Send the message via the GSM module
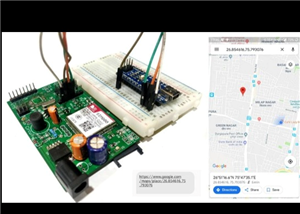
Sample Output
You will receive an SMS like:
Latitude: xx.xxxxxx, Longitude: yy.yyyyyy
Or a clickable Google Maps link for easy navigation.
Applications
- Vehicle tracking systems
- Personal safety devices
- Asset monitoring
- Fleet management basics
- Emergency location sharing
Design Tips
- Use a stable power source for the GSM module
- Add an external antenna for better signal strength
- Enclose the circuit for durability
- Optimise code for faster response time
Possible Improvements
- Add a rechargeable battery module
- Integrate with a mobile app
- Include geofencing alerts
- Enable continuous tracking instead of on-demand
- Add an OLED display for live coordinates
Conclusion
This Arduino GSM Car Tracker is a practical and cost-effective project for learning embedded systems and communication technologies. It combines GPS positioning with GSM messaging to deliver reliable tracking without internet dependency. Explore more exciting projects at CircuitDigest Arduino Projects and get inspired by innovative builds on CircuitDigest DIY PCB Projects.
/*Program to send Latitude and Logitute Information from SIM800 to Phone via SMS on call request
 * Code by: B.Aswinth Raj
 * Dated:23-04-2019
 * Sample Output for AT+CIPGSMLOC=1,1   ==> +CIPGSMLOC: 0,75.802460,26.848892,2019/04/23,08:32:35 //where 26.8488832 is Lattitude and 75.802460 is longitute
 * Link to send: https://www.google.com/maps/place/26.8488892,75.802460 ; //where 26.8488832 is Lattitude and 75.802460 is longitute
 */
#include <SoftwareSerial.h> //Software Serial header to communicate with GSM module
SoftwareSerial SIM800(10, 11); // RX, TX
String Link = "The current Location is https://www.google.com/maps/place/"; //we will append the Lattitude and longitude value later int the program
String responce = "";
String Longitude = "";
String Latitude = "";
String SIM800_send(String incoming) //Function to communicate with SIM800 module
{
    SIM800.println(incoming); delay(100); //Print what is being sent to GSM module
    String result = "";
    while (SIM800.available()) //Wait for result
    {
    char letter = SIM800.read();
    result = result + String(letter); //combine char to string to get result
    }
return result; //return the result
}
void setup() {
//PWRKY pin of GSM module has to be pulled low for 1sec to enable the module
  pinMode(12,OUTPUT);
  digitalWrite(12, LOW);   //Pull-down
  delay(1000);
  digitalWrite(12, HIGH); //Release
  Serial.begin(9600); //Serial COM for debugging
  SIM800.begin(9600); //Software serial called SIM800 to speak with SIM800 Module
  delay(1000); //wait for serial COM to get ready
  responce = SIM800_send("ATE1"); //Enable Echo if not enabled by default
  Serial.print ("Responce:"); Serial.println(responce);
  delay(1000);
  responce = SIM800_send("AT+CGATT=1"); //Set the SIM800 in GPRS mode
  Serial.print ("Responce:"); Serial.println(responce);
  delay(1000);
  responce = SIM800_send("AT+SAPBR=3,1,\"CONTYPE\",\"GPRS\" "); //Activate Bearer profile
  Serial.print ("Responce:"); Serial.println(responce);
  delay(1000);
  responce = SIM800_send("AT+SAPBR=3,1,\"APN\",\"RCMNET\" "); //Set VPN options => 'RCMNET' 'www'
  Serial.print ("Responce:"); Serial.println(responce);
  delay(2000);
  responce = SIM800_send("AT+SAPBR=1,1"); //Open bearer Profile
  Serial.print ("Responce:"); Serial.println(responce); //Open bearer Profile
  delay(2000);
  responce = SIM800_send("AT+SAPBR=2,1"); //Get the IP address of the bearer profile
  Serial.print ("Responce:"); Serial.println(responce);
  delay(1000);
}
void prepare_message()
{
  //Sample Output for AT+CIPGSMLOC=1,1   ==> +CIPGSMLOC: 0,75.802460,26.848892,2019/04/23,08:32:35 //where 26.8488832 is Lattitude and 75.802460 is longitute
  int first_comma = responce.indexOf(','); //Find the position of 1st comma
  int second_comma = responce.indexOf(',', first_comma+1); //Find the position of 2nd comma
  int third_comma = responce.indexOf(',', second_comma+1); //Find the position of 3rd comma
  for(int i=first_comma+1; i<second_comma; i++) //Values form 1st comma to 2nd comma is Longitude
    Longitude = Longitude + responce.charAt(i);
  for(int i=second_comma+1; i<third_comma; i++) //Values form 2nd comma to 3rd comma is Latitude
    Latitude = Latitude + responce.charAt(i);
  Serial.println(Latitude); Serial.println(Longitude);
  Link = Link + Latitude + "," + Longitude; //Update the Link with latitude and Logitude values
  Serial.println(Link);
}
String incoming = "";
void loop() {
  if (SIM800.available()) { //Check if the SIM800 Module is telling anything
    char a = SIM800.read();
    Serial.write(a); //print what the module tells on serial monitor
    incoming = incoming + String(a);
    if (a == 13) //check for new line
    incoming =""; //clear the string if new line is detected
    incoming.trim(); //Remove /n or /r from the incomind data
    if (incoming=="RING") //If an incoming call is detected the SIM800 module will say "RING" check for it
    {
     Serial.println ("Sending sms"); delay(1000);
     responce = SIM800_send("ATH"); //Hand up the incoming call using ATH
     delay (1000);
     responce = SIM800_send("ATE0"); //Disable Echo
     delay (1000);
     responce = ""; Latitude=""; Longitude=""; //initialise all string to null
     SIM800.println("AT+CIPGSMLOC=1,1"); delay(5000); //Request for location data
      while (SIM800.available())
      {
       char letter = SIM800.read();
       responce = responce + String(letter); //Store the location information in string responce
      }
      Serial.print("Result Obtained as:");   Serial.print(responce); Serial.println("*******");
     prepare_message(); delay(1000); //use prepare_message funtion to prepare the link with the obtained LAT and LONG co-ordinates
     SIM800.println("AT+CMGF=1"); //Set the module in SMS mode
     delay(1000);
     SIM800.println("AT+CMGS=\"9612345678\""); //Send SMS to this number
     delay(1000);
     SIM800.println(Link); // we have send the string in variable Link
     delay(1000);
     SIM800.println((char)26);// ASCII code of CTRL+Z - used to terminate the text message
     delay(1000);
    }
  }
  if (Serial.available()) { //For debugging
    SIM800.write(Serial.read());
  }
}
DIY GSM GPS Location Tracker with Arduino
*PCBWay community is a sharing platform. We are not responsible for any design issues and parameter issues (board thickness, surface finish, etc.) you choose.


Raspberry Pi 5 7 Inch Touch Screen IPS 1024x600 HD LCD HDMI-compatible Display for RPI 4B 3B+ OPI 5 AIDA64 PC Secondary Screen(Without Speaker)
BUY NOW

- Comments(1)
- Likes(2)
More by Jobit Joseph
-
 How to build a Wearable Air Quality Monitor Pendant using STM32 & SGP40 Sensor
This DIY Wearable Air Quality Monitor Pendant is a compact, battery-powered device designed to conti...
How to build a Wearable Air Quality Monitor Pendant using STM32 & SGP40 Sensor
This DIY Wearable Air Quality Monitor Pendant is a compact, battery-powered device designed to conti...
-
 Smart Digital Ludo Game Board with Multicolour PCB
Ludo, a beloved childhood game, holds a special place in our hearts with its simple and engaging gam...
Smart Digital Ludo Game Board with Multicolour PCB
Ludo, a beloved childhood game, holds a special place in our hearts with its simple and engaging gam...
-
 Electronic Dice with BLE Connectivity
Many of us fondly remember the joy of playing board games like Snakes and Ladders or Ludo during our...
Electronic Dice with BLE Connectivity
Many of us fondly remember the joy of playing board games like Snakes and Ladders or Ludo during our...
-
 3D printed Enclosure Backplate for Riden RD60xx power supplies
3D printed Enclosure for Riden RD60xx power supplies such as RD6006, RD6012, RD6018, RD6024 and RD60...
3D printed Enclosure Backplate for Riden RD60xx power supplies
3D printed Enclosure for Riden RD60xx power supplies such as RD6006, RD6012, RD6018, RD6024 and RD60...
-
 3D printed Enclosure for Riden RD60xx power supplies
 such as RD6006, RD6012, RD6018, RD6024 and RD60...
3D printed Enclosure for Riden RD60xx power supplies
3D printed Enclosure for Riden RD60xx power supplies such as RD6006, RD6012, RD6018, RD6024 and RD60...
-
 Suzuki Ignis Universal Armrest No Screw Adapter
I own a 2024 Suzuki Ignis. When I searched for an armrest for my car I couldn't find any domesticall...
Suzuki Ignis Universal Armrest No Screw Adapter
I own a 2024 Suzuki Ignis. When I searched for an armrest for my car I couldn't find any domesticall...
-
 Wireless Potentiostat for Electrochemical Analysis
This wireless potentiostat is based on the ADuCM355 SoC from Analog Devices, tailored for portable e...
Wireless Potentiostat for Electrochemical Analysis
This wireless potentiostat is based on the ADuCM355 SoC from Analog Devices, tailored for portable e...
-
 160 Channel Configurable DAC Controller
The DAC controller board features 160 individually controllable 16-bit DAC output. It can output vol...
160 Channel Configurable DAC Controller
The DAC controller board features 160 individually controllable 16-bit DAC output. It can output vol...
-
 ESP32 IoT Water Flow Meter with Real-Time Monitoring
OverviewThis project demonstrates how to build a smart water flow meter using an ESP32 microcontroll...
ESP32 IoT Water Flow Meter with Real-Time Monitoring
OverviewThis project demonstrates how to build a smart water flow meter using an ESP32 microcontroll...
-
 DIY GSM GPS Location Tracker with Arduino
Project OverviewThis project demonstrates how to build a simple and reliable location tracking syste...
DIY GSM GPS Location Tracker with Arduino
Project OverviewThis project demonstrates how to build a simple and reliable location tracking syste...
-
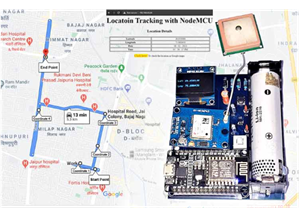 IoT GPS Tracker with NodeMCU and Google Maps
OverviewThis project demonstrates how to build an IoT-based GPS tracking system using a NodeMCU (ESP...
IoT GPS Tracker with NodeMCU and Google Maps
OverviewThis project demonstrates how to build an IoT-based GPS tracking system using a NodeMCU (ESP...
-
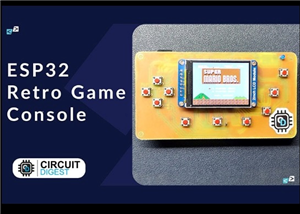 ESP32 Retro Game Console with OLED Display
OverviewThis project demonstrates how to build a compact, handheld retro gaming console using the ES...
ESP32 Retro Game Console with OLED Display
OverviewThis project demonstrates how to build a compact, handheld retro gaming console using the ES...
-
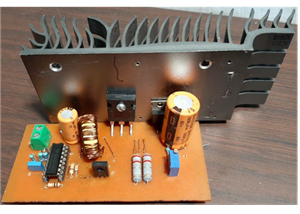 High Power Boost Converter Using TL494
OverviewThis project demonstrates the design and implementation of a high-power, high-efficiency DC-...
High Power Boost Converter Using TL494
OverviewThis project demonstrates the design and implementation of a high-power, high-efficiency DC-...
-
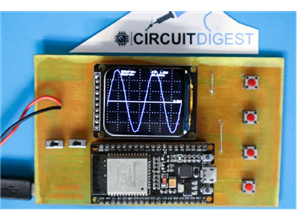 DIY ESP32 Oscilloscope Project
OverviewThis project demonstrates how to build a simple and affordable oscilloscope using an ESP32. ...
DIY ESP32 Oscilloscope Project
OverviewThis project demonstrates how to build a simple and affordable oscilloscope using an ESP32. ...
-
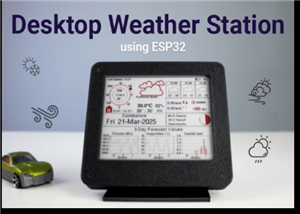 ESP32 Desktop Weather Station
Project OverviewBuild a compact desktop weather station using an ESP32 that measures temperature, hu...
ESP32 Desktop Weather Station
Project OverviewBuild a compact desktop weather station using an ESP32 that measures temperature, hu...
-
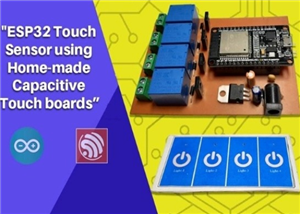 ESP32 Capacitive Touch Home Automation
OverviewMechanical switches wear out over time and can be prone to failure due to dust, moisture, or...
ESP32 Capacitive Touch Home Automation
OverviewMechanical switches wear out over time and can be prone to failure due to dust, moisture, or...
-
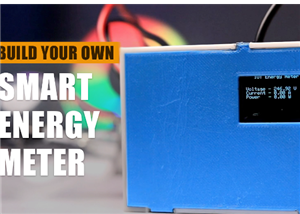 ESP32-Powered Smart Energy Meter for Real-Time Monitoring
ESP32-Powered Smart Energy Meter for Accurate Consumption TrackingIn modern electronics and IoT appl...
ESP32-Powered Smart Energy Meter for Real-Time Monitoring
ESP32-Powered Smart Energy Meter for Accurate Consumption TrackingIn modern electronics and IoT appl...
-
 Build Your Own ESP32 AI Voice Assistant with MCP Integration
Project OverviewThe ESP32 AI Voice Assistant with MCP Integration is an advanced voice-controlled sm...
Build Your Own ESP32 AI Voice Assistant with MCP Integration
Project OverviewThe ESP32 AI Voice Assistant with MCP Integration is an advanced voice-controlled sm...
-
Programmable Mist Maker - XIAO / QT PY Extension
801 1 0 -
RadioHAT - Raspberry Pi radio development platform
645 0 1 -
-
-
-
-
ARPS-2 – Arduino-Compatible Robot Project Shield for Arduino UNO
3112 0 6 -
A Compact Charging Breakout Board For Waveshare ESP32-C3
3731 3 8 -
AI-driven LoRa & LLM-enabled Kiosk & Food Delivery System
4057 2 2


