


|
EagleAutodesk
|
Small Low Cost Circuit Deveelopment Board for Prototypes
In recent years I have developed numerous prototypes with Arduino. During these creations, something always bothered me. Using an Arduino board in a prototype took up a lot of space, was expensive, and made it difficult to connect wires.
Some prototypes became too big because I was using an Arduino with shields.
You and many others will experience this problem and will likely struggle to create new product solutions and prototypes.
What is the best way to solve this problem?
I created a small development board, with few electronic components, easy to solder and with several pins to facilitate the connection of sensors and other devices in the project.
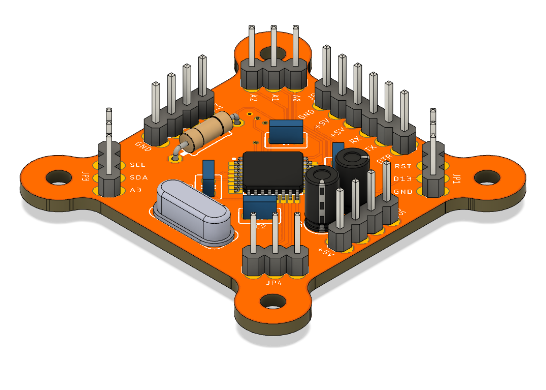
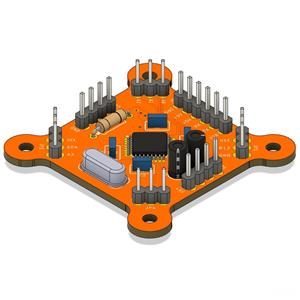
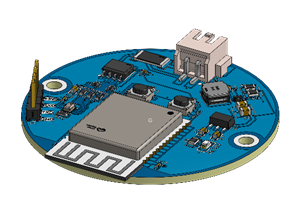
Through these points I developed this small development board, which has dimensions of 4.5cm x 4.5cm.
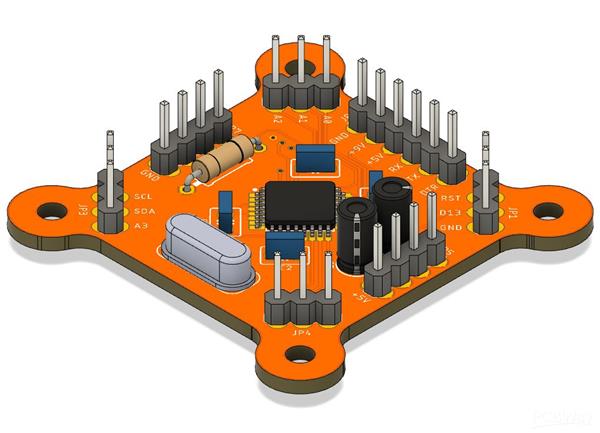
In addition to being small, it has a microcontroller widely used in many Arduino applications, the ATMEGA328P-AN. This microcontroller has a variety of digital, analog I/O pins, I2C pins, SPI pins, ICSP recording pins, and more.
This facilitates the creation and testing of different types of prototypes.
Next, we will present all the details and we'll create a complete documentation for you to use this printed circuit board. Enjoy and get 10 free PCBWay units. Sign up to the site, download the Gerber file and receive the circuit boards at your home.
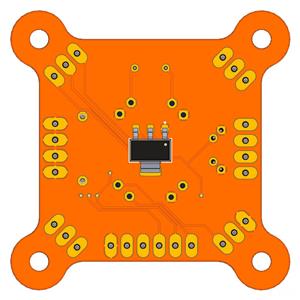
Development Board ATMEGA328P-AU
The development board was built to be applied to numerous projects. The development board has a total of 26 pins. These pins include power pins, analog inputs, digital inputs and outputs, and more. Below is the top view with an overview of all available pins.

Next, we will present the functionalities of the pins available on the board.
It has 12 digital input and output pins
The pins used as digital input and output are: TX, RX, D10, D11, D12, D13, A0 (D14), A1(D15), A2(D13), SDA(A4/D14), SCL(A5/D15) , A3(D16).
I2C Pins
The pins used for I2C connection are 2: SDA(A4/D14) and SCL(A5/D15).
Pins for data transfer: RESET, +5V, GND, TX, and RX.
6 analog input pins: A0(D14), A1(D15), A2(D13), SDA(A4/D14), SCL(A5/D15), A3(D16).
ICSP pins: D11 (MOSI), D12 (MISO), D13 (SCK), +5V, GND, and RESET.
Power pins: 4 +5V pins and 4 GND pins.
Next we will present the main benefits of this board for you to use it in your projects.
What are the main advantages of using this board in your project?
This board is very cheap because it uses few electronic components, It has only 2 SMD's integrated circuits and they are easy to apply solder to the circuit. Also, we've fixed a big issue with many prototyping boards. Many circuit boards don't provide many +5V and GND pins to power electronic devices.
To solve this problem, 4 GND pins and 4 +5V pins were inserted. This makes it easier to power electronic devices and avoids soldering several to connect to the GND and +5V pins.
The board does not use a USB port to facilitate assembly and reduce costs. However, you can transfer the Arduino bootloader via the ICSP pins. Then, use a USB-SERIAL converter and write the code to the board via the RESET, +5V, GND, TX and RX pins.
The last benefit is that PCBWay has selected this board to offer 10 units free and you will receive it at your home. To earn it you need to create an account on the PCBWay website and upload the gerbers files.
Enter all the address information and you will receive this plaque at your home.
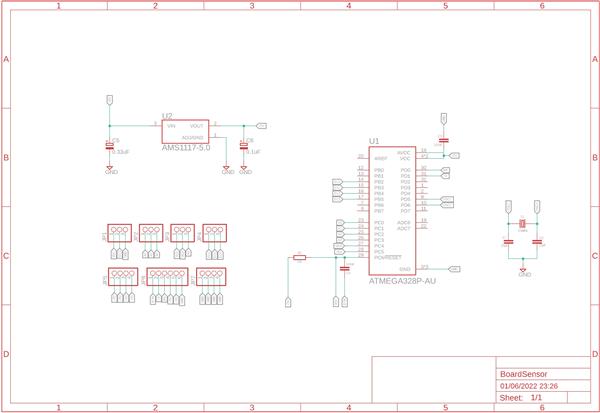
The electronic circuit diagram
The electronic schematic of this board is very simple and is presented below.
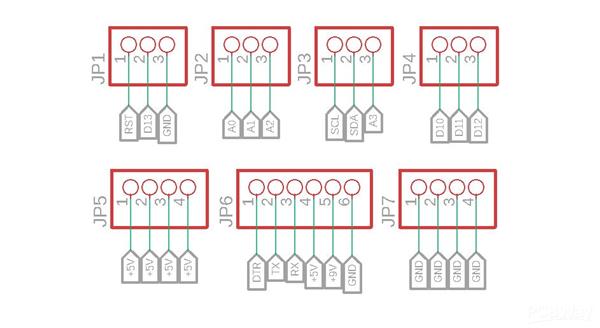
The circuit has 6 pin bars for access to all pins on the electronic board. See the figure below.
On the J7 pin bar we have the +9V and GND pins. These two pins are used to power the circuit. This voltage signal is sent to the AMS1117-5V voltage regulator input.
The regulator is intended to supply a voltage of 5V to power the ATMEGA328P and supply voltage to the +5V and GND pins of the electronic board.
Below we have the electronic schematic of the voltage regulator circuit.

Finally, we have the ATMEGA328P CHIP circuit.The electronic schematic is shown in the figure below.
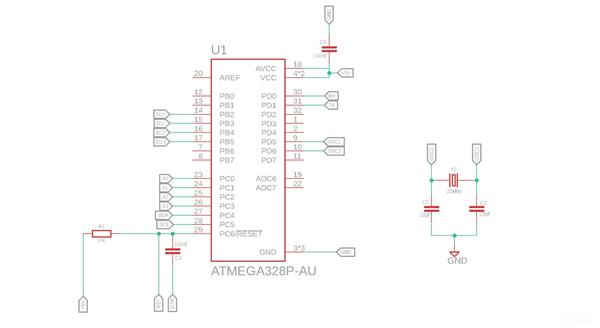
In this circuit we have the connection with all the connection pins, power supply and the oscillator circuit with a 20MHz crystal and 2 22pF capacitors.
These are the 3 main parts that form the electronic circuit of this small board, but very versatile to be applied in various projects.
Now enjoy, download the files and get 10 free PCBWay Circuit Boards.
Final thoughts
Developing prototypes is essential for presenting products and solutions to customers.
However, there is an increasing need to build fast and viable tests at a lower cost. This development board allows that and we created it with that intention: to facilitate testing and be flexible for you to use in any project.
The benefits that this card provides are many and we make it available for you.
Small Low Cost Circuit Deveelopment Board for Prototypes
*PCBWay community is a sharing platform. We are not responsible for any design issues and parameter issues (board thickness, surface finish, etc.) you choose.


Raspberry Pi 5 7 Inch Touch Screen IPS 1024x600 HD LCD HDMI-compatible Display for RPI 4B 3B+ OPI 5 AIDA64 PC Secondary Screen(Without Speaker)
BUY NOW


- Comments(1)
- Likes(1)
- 1 USER VOTES
- YOUR VOTE 0.00 0.00

-
10design
-
10usability
-
10creativity
-
10content
More by Silícios Lab silicioslab
-
 How to measure weight with Load Cell and HX711
IntroductionThe purpose of this project is to develop a printed circuit board (PCB) that allows weig...
How to measure weight with Load Cell and HX711
IntroductionThe purpose of this project is to develop a printed circuit board (PCB) that allows weig...
-
 Electronic Enclosure applied for electronic projects
IntroductionWhen designing electronics, the enclosure plays a crucial role that is often overlooked....
Electronic Enclosure applied for electronic projects
IntroductionWhen designing electronics, the enclosure plays a crucial role that is often overlooked....
-
 IoT Indoor system with ESP32 to monitor Temperature, Humidity, Pressure, and Air Quality
IntroductionAir quality, temperature, humidity and pressure are essential elements to ensure healthy...
IoT Indoor system with ESP32 to monitor Temperature, Humidity, Pressure, and Air Quality
IntroductionAir quality, temperature, humidity and pressure are essential elements to ensure healthy...
-
 WS2812B RGB LED Controller with ESP8266 via WiFi
IntroductionWS2812b addressable RGB LEDs are devices widely used in lighting projects. They are foun...
WS2812B RGB LED Controller with ESP8266 via WiFi
IntroductionWS2812b addressable RGB LEDs are devices widely used in lighting projects. They are foun...
-
 Electronic Board for Cutting Electrical Power to Devices and Machines
IntroductionAn energy saving system for cutting electrical energy in machines is a fundamental piece...
Electronic Board for Cutting Electrical Power to Devices and Machines
IntroductionAn energy saving system for cutting electrical energy in machines is a fundamental piece...
-
 PCB Board Home Automation with ESP8266
IntroductionThe incorporation of the ESP8266 module into home automation represents a significant ad...
PCB Board Home Automation with ESP8266
IntroductionThe incorporation of the ESP8266 module into home automation represents a significant ad...
-
 Dedicated Control Board for Mobile Robots with Wheels
IntroductionFor a long time we developed several prototypes and teaching kits of mobile robots and w...
Dedicated Control Board for Mobile Robots with Wheels
IntroductionFor a long time we developed several prototypes and teaching kits of mobile robots and w...
-
 Traffic turn signal for bicycles
IntroductionDoes every project with electronic logic need a Microcontroller or Arduino to be develop...
Traffic turn signal for bicycles
IntroductionDoes every project with electronic logic need a Microcontroller or Arduino to be develop...
-
 Mini Arduino with ATTINY85
Do you know the ATTINY85 microcontroller? This article has news and a gift for you. Many people deve...
Mini Arduino with ATTINY85
Do you know the ATTINY85 microcontroller? This article has news and a gift for you. Many people deve...
-
 Christmas Tree
The tree used to signal light of Christmas.
Christmas Tree
The tree used to signal light of Christmas.
-
 ESP32 BMP280 Pressure Monitor
IntroductionMonitoring environmental variables is crucial for the efficiency and safety of numerous ...
ESP32 BMP280 Pressure Monitor
IntroductionMonitoring environmental variables is crucial for the efficiency and safety of numerous ...
-
 Smart Pressure Control: The IoT Pressure Monitor
Introduction and ObjectiveThe ProblemIn the development of electronic monitoring systems, we often e...
Smart Pressure Control: The IoT Pressure Monitor
Introduction and ObjectiveThe ProblemIn the development of electronic monitoring systems, we often e...
-
 IoT Access control and communication system with Raspberry Pi/PC using ESP32
IntroductionIn the world of automation and the Internet of Things (IoT), access control systems have...
IoT Access control and communication system with Raspberry Pi/PC using ESP32
IntroductionIn the world of automation and the Internet of Things (IoT), access control systems have...
-
 Electronic Enclosure applied for electronic devices
IntroductionWhen designing electronics, the enclosure plays a crucial role that is often overlooked....
Electronic Enclosure applied for electronic devices
IntroductionWhen designing electronics, the enclosure plays a crucial role that is often overlooked....
-
 Electronic Enclosure for Programmable Logic Controller
The housing developed for programmable logic controllers is a practical and efficient solution for t...
Electronic Enclosure for Programmable Logic Controller
The housing developed for programmable logic controllers is a practical and efficient solution for t...
-
 Payment PCB for machines and services
IntroductionIn many commercial establishments, hospitals and other places, there are video game equi...
Payment PCB for machines and services
IntroductionIn many commercial establishments, hospitals and other places, there are video game equi...
-
 Relay High Power Printed Circuit Board
IntroductionEfficient management of electrical loads is essential for optimizing performance and saf...
Relay High Power Printed Circuit Board
IntroductionEfficient management of electrical loads is essential for optimizing performance and saf...
-
 Weather gadget with clock through ESP8266
IntroductionImagine a device that combines technology with an elegant design, bringing functionality...
Weather gadget with clock through ESP8266
IntroductionImagine a device that combines technology with an elegant design, bringing functionality...
-
-
ARPS-2 – Arduino-Compatible Robot Project Shield for Arduino UNO
1254 0 4 -
A Compact Charging Breakout Board For Waveshare ESP32-C3
1769 3 7 -
AI-driven LoRa & LLM-enabled Kiosk & Food Delivery System
1749 2 0 -
-
-
-
ESP32-C3 BLE Keyboard - Battery Powered with USB-C Charging
1924 0 1 -


