


|
|
Arduino Opla IoT kitArduino
|
x 1 | |

|
HC-SR04 Ultrasonic Ranging Sensor Module |
x 1 | |

|
GY-NEO6MV2 GPS module |
x 1 |

|
arduino IDEArduino
|
|
|
|
Arduino IoT CloudArduino
|
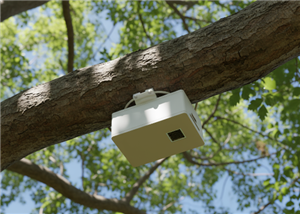
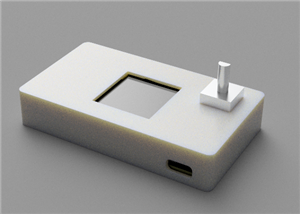
IOT Bicycle Radar
OPLA IoT Bike Radar
Use the Opla IoT Kit and a couple sensors to make a smart bike computer!
The On-board screen is used to show readings from the ultrasonic sensor, the speed and the ambient.
Button 1 displays the temperature, humidity and pressure, Button 2 displays the ultrasonic sensor readings and Button 3 displays the speed. All this data is also shown on the mobile phone.
USING THE IOT CLOUD.
First of all create a new "thing" on IoT Cloud. You will be presented to this screen:

We will start by creating some variables.
- Temperature (float) (Refresh periodically every one second)
- Humidity (float) (Refresh periodically every one second)
- Pressure (float) (Refresh periodically every one second)
- Light (int) (Refresh periodically every one second)
- Speed (int) (Refresh on change)
- Distance (int) (Refresh on change)
It should look something like this:

Now its time to attach a board. Plug in your board (for this project I'm using a MKR 1010 WiFi board) and follow the on-screen instructions.
Once the board is attached, connect it to your wifi (The wifi connection has to be a hotspot from a mobile phone).
Now, enter the sketch tab and open the code on the full editor. Then paste the code from this project.
It should look like this:
_QMpojW938e.png?auto=compress%2Cformat&w=740&h=555&fit=max)
What we are going to do now is delete the ThingPropierties.h tab because its contents are implemented into the code. Now you are ready to upload it into the board!
BUILDING THE DASHBOARD
Now that the board is programed we have to build the dashboard!
Open the Dashboard tab and build a new dashboard.
Press the add button then things and select the Thing we created.
It should look like this:
_enpZbBCKBH.png?auto=compress%2Cformat&w=740&h=555&fit=max)
Now you can change to mobile layout and rearrange the dashboard. Mine looks like this:
_QrlnoAXX9x.png?auto=compress%2Cformat&w=740&h=555&fit=max)
HARDWARE CONNECTIONS
Now that all the software is done we can move to the sensors.
The connections for the HC-SR04 Ultrasonic Sensor:
- GND TO GND
- VCC TO 5V
- TRIG TO PIN5
- ECHO TO PIN4
The connections for the GPS Module:
- GND TO GND
- VCC TO 5V
- RX TO TX
- TX TO RX
Thats all! Slide a battery in the battery slot on the IoT carrier and it should start working!
#include <ArduinoIoTCloud.h>
#include <Arduino_ConnectionHandler.h>
#include <Arduino_MKRIoTCarrier.h>
#include <TinyGPSPlus.h>
MKRIoTCarrier carrier;
TinyGPSPlus gps;
#define echoPin 4
#define trigPin 5

long duration;
bool sensor = false;

const char SSID[]     = SECRET_SSID;
const char PASS[]     = SECRET_PASS;

void onPressureChange();

float humidity;
float pressure;
float temperature;
int distance;
int light;
int speed;

void initProperties(){

  ArduinoCloud.addProperty(humidity, READ, 1 * SECONDS, NULL);
  ArduinoCloud.addProperty(pressure, READ, 1 * SECONDS, NULL);
  ArduinoCloud.addProperty(temperature, READ, 1 * SECONDS, NULL);
  ArduinoCloud.addProperty(distance, READ, ON_CHANGE, NULL);
  ArduinoCloud.addProperty(light, READ, 1 * SECONDS, NULL);
  ArduinoCloud.addProperty(speed, READ, 1 * SECONDS, NULL);

}

WiFiConnectionHandler ArduinoIoTPreferredConnection(SSID, PASS);


void setup() {
  Serial.begin(9600);
  Serial1.begin(9600);
  pinMode(trigPin, OUTPUT);
  pinMode(echoPin, INPUT);
  delay(500);
  CARRIER_CASE = false;
  carrier.begin();
  carrier.display.setRotation(0);
  delay(1500);


  initProperties();
  ArduinoCloud.addProperty(speed, READ, 1 * SECONDS, NULL);
  ArduinoCloud.begin(ArduinoIoTPreferredConnection);


  setDebugMessageLevel(4);
  ArduinoCloud.printDebugInfo();
}

void loop() {
  ArduinoCloud.update();
  carrier.Buttons.update();

  digitalWrite(trigPin, LOW);
  delayMicroseconds(2);
  digitalWrite(trigPin, HIGH);
  delayMicroseconds(10);
  digitalWrite(trigPin, LOW);
  duration = pulseIn(echoPin, HIGH);
  distance = duration * 0.034 / 2;
  Serial.print(distance);
  Serial.println(gps.speed.kmph());


  temperature = carrier.Env.readTemperature();
  humidity = carrier.Env.readHumidity();
  pressure = carrier.Pressure.readPressure();

  if (carrier.Buttons.onTouchDown(TOUCH0)) {
    carrier.display.fillScreen(ST77XX_BLACK);
    carrier.display.setTextColor(ST77XX_WHITE);
    carrier.display.setTextSize(2);

    carrier.display.setCursor(35, 90);
    carrier.display.print("TEMP: ");
    carrier.display.print(temperature);
    carrier.display.print(" C");

    carrier.display.setCursor(35, 110);
    carrier.display.print("HUMI: ");
    carrier.display.print(humidity);
    carrier.display.print(" %");

    carrier.display.setCursor(35, 130);
    carrier.display.print("PRESSURE: ");
    carrier.display.print(pressure);
    delay(10);
  }

  while (distance < 600) {
    digitalWrite(trigPin, LOW);
    delayMicroseconds(2);
    digitalWrite(trigPin, HIGH);
    delayMicroseconds(10);
    digitalWrite(trigPin, LOW);
    duration = pulseIn(echoPin, HIGH);
    distance = duration * 0.034 / 2;
    Serial.print(distance);
    carrier.display.fillScreen(ST77XX_BLACK);
    carrier.display.setTextColor(ST77XX_WHITE);
    carrier.display.setTextSize(4);
    carrier.display.setCursor(80, 100);
    carrier.display.print("D:");
    carrier.display.print(distance);
  }


  if (carrier.Buttons.onTouchDown(TOUCH1)) {
    carrier.display.fillScreen(ST77XX_BLACK);
    carrier.display.setTextColor(ST77XX_WHITE);
    carrier.display.setTextSize(4);
    carrier.display.setCursor(65, 100);
    carrier.display.print("D:");
    carrier.display.print(distance);
    delay(10);


  }

  if (carrier.Buttons.onTouchDown(TOUCH2)) {
    carrier.display.fillScreen(ST77XX_BLACK);
    carrier.display.setTextColor(ST77XX_WHITE);
    carrier.display.setTextSize(3);
    carrier.display.setCursor(50, 100);
    carrier.display.print("Sp:");
    carrier.display.print(speed);
    delay(10);


  }

}

IOT Bicycle Radar


Raspberry Pi 5 7 Inch Touch Screen IPS 1024x600 HD LCD HDMI-compatible Display for RPI 4B 3B+ OPI 5 AIDA64 PC Secondary Screen(Without Speaker)
BUY NOW


- Comments(1)
- Likes(2)
More by Inaki Iturriaga
-
 Battery-Powered ESP32-CAM Continuous Video Recorder
OverviewThis project transforms an ESP32-CAM module into a standalone, battery-powered video recordi...
Battery-Powered ESP32-CAM Continuous Video Recorder
OverviewThis project transforms an ESP32-CAM module into a standalone, battery-powered video recordi...
-
 GPS Mobile Beacon
Building a GPS Emergency Beacon: A DIY TutorialWelcome to our latest DIY project: creating a GPS Eme...
GPS Mobile Beacon
Building a GPS Emergency Beacon: A DIY TutorialWelcome to our latest DIY project: creating a GPS Eme...
-
 Wireless RFID Card Copier.
Wireless RFID Card CopierIn today's digital world, security and accessibility are of paramount impor...
Wireless RFID Card Copier.
Wireless RFID Card CopierIn today's digital world, security and accessibility are of paramount impor...
-
 Piezo Alert System.
Within the fast-evolving sphere of security tools and home automation, creativity often paves the wa...
Piezo Alert System.
Within the fast-evolving sphere of security tools and home automation, creativity often paves the wa...
-
 Wifi Weather Station - Sensors board
WiFi Weather Station - Sensor unitIn our digital era, many electronics projects integrate diverse se...
Wifi Weather Station - Sensors board
WiFi Weather Station - Sensor unitIn our digital era, many electronics projects integrate diverse se...
-
 Building a GPS Speedometer with RP2040-Zero
Build a Feature-Packed GPS Speedometer with an RP2040This project guide will walk you through buildi...
Building a GPS Speedometer with RP2040-Zero
Build a Feature-Packed GPS Speedometer with an RP2040This project guide will walk you through buildi...
-
 RC Receiver
Build Your Own RC ReceiverHarnessing advanced electronics and precise control systems, the RC Receiv...
RC Receiver
Build Your Own RC ReceiverHarnessing advanced electronics and precise control systems, the RC Receiv...
-
 Universal RC Controller
Build Your Own Universal RC RemoteHarnessing the power of custom PCBs and wireless communication, th...
Universal RC Controller
Build Your Own Universal RC RemoteHarnessing the power of custom PCBs and wireless communication, th...
-
 Continuous GPS Tracker
This compact and efficient tracker provides real-time location updates, making it ideal for surveill...
Continuous GPS Tracker
This compact and efficient tracker provides real-time location updates, making it ideal for surveill...
-
 Air Quality Monitor
Welcome to our DIY tutorial on assembling an Air Quality Monitoring Device. This project is perfect ...
Air Quality Monitor
Welcome to our DIY tutorial on assembling an Air Quality Monitoring Device. This project is perfect ...
-
 Automatic Watch Winder
In the realm of luxury timepieces and watch aficionados, an automatic watch is...
Automatic Watch Winder
Automatic Watch WinderIn the realm of luxury timepieces and watch aficionados, an automatic watch is...
-
 Handheld GPS
Within the swiftly advancing realm of portable technology and travel essentials, innovation often sh...
Handheld GPS
Within the swiftly advancing realm of portable technology and travel essentials, innovation often sh...
-
 Dual Motor Controller for Model Robotics
In the thrilling world of robotics and DIY engineering, innovation continues to soar to new heights....
Dual Motor Controller for Model Robotics
In the thrilling world of robotics and DIY engineering, innovation continues to soar to new heights....
-
 Altitude Indicator with Beeper for Rocketry
Altitude Indicator for Model RocketryIn our ever-advancing technological landscape, countless projec...
Altitude Indicator with Beeper for Rocketry
Altitude Indicator for Model RocketryIn our ever-advancing technological landscape, countless projec...
-
 Wifi Weather Station - Display unit
WiFi Weather Station - Display UnitIn this technologically advanced age, countless electronics proje...
Wifi Weather Station - Display unit
WiFi Weather Station - Display UnitIn this technologically advanced age, countless electronics proje...
-
 Positon Breakout Board
Position Sensors Breakout Board In today's era of advanced technology, many electronics projects req...
Positon Breakout Board
Position Sensors Breakout Board In today's era of advanced technology, many electronics projects req...
-
 Ambient Sensors Breakout Board
In today's world, electronics projects often require the integration of multiple sensors to collect ...
Ambient Sensors Breakout Board
In today's world, electronics projects often require the integration of multiple sensors to collect ...
-
 Infrared Launch Controller
IntroductionHave you ever wanted to remotely launch a rocket, drone or other device using infrared t...
Infrared Launch Controller
IntroductionHave you ever wanted to remotely launch a rocket, drone or other device using infrared t...
-
Programmable Mist Maker - XIAO / QT PY Extension
188 0 0 -
RadioHAT - Raspberry Pi radio development platform
205 0 1 -
-
-
-
-
ARPS-2 – Arduino-Compatible Robot Project Shield for Arduino UNO
2775 0 5 -
A Compact Charging Breakout Board For Waveshare ESP32-C3
3282 3 8 -
AI-driven LoRa & LLM-enabled Kiosk & Food Delivery System
3545 2 2


