


|
|
ESP32-CAM |
x 1 | |
|
|
TP4056-18650 Lithium Battery Charging Board TYPE CGeneric
|
x 1 | |
|
|
3.3v to 5v step up module |
x 1 | |
|
|
3.7v battery |
x 1 | |
|
|
Slide switch |
x 1 |

|
arduino IDEArduino
|
|

|
Soldering Iron Kit |
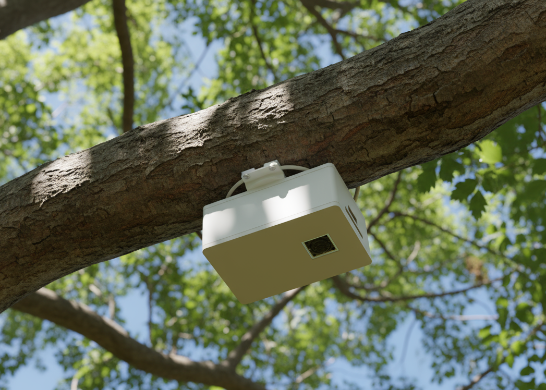
Battery-Powered ESP32-CAM Continuous Video Recorder
Overview
This project transforms an ESP32-CAM module into a standalone, battery-powered video recording system that can operate for hours without external power. Perfect for security monitoring, wildlife observation, time-lapse photography, or any application requiring autonomous video capture, this device records continuously and automatically manages storage by overwriting the oldest footage when the SD card fills up.
Why I Built This
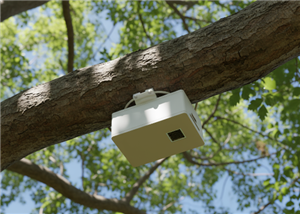
Traditional security cameras require constant power and network connectivity, limiting where they can be deployed. I wanted a solution that could be placed anywhere - mounted on a tree for wildlife monitoring, hidden for security purposes, or used as a portable dash cam. The ESP32-CAM provides an affordable platform with excellent camera quality, but needed a proper power management system and smart recording software to become truly autonomous.
How It Works
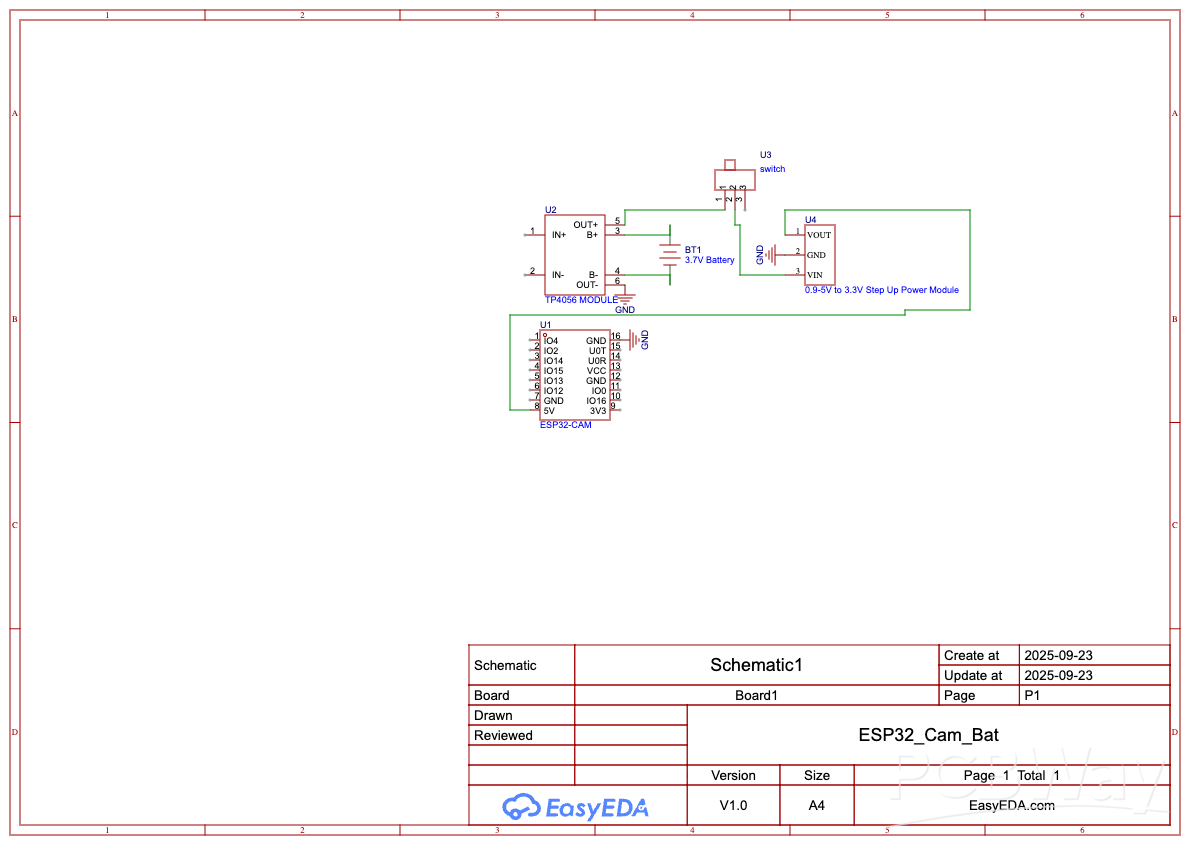
Power Management: The system uses a single 18650 lithium battery (or similar 3.7V cell) managed by a TP4056 charging module with Type-C input for easy recharging. Since the ESP32-CAM requires 5V while our battery provides 3.7V, a compact boost converter steps up the voltage to a stable 5V supply. A slide switch allows you to power the system on/off, and the TP4056 module's LED indicators show charging status and battery level.
Recording System: When powered on, the ESP32-CAM immediately begins capturing video frames at 10 FPS (configurable) in VGA resolution (640x480). Frames are saved as MJPEG format to the SD card in 5-minute segments, creating files named sequentially (video_0000.mjpeg, video_0001.mjpeg, etc.).
Circular Buffer Management: The intelligent firmware tracks up to 100 video files. When storage limits are reached, the system automatically wraps around and begins overwriting the oldest recordings - ensuring you never run out of space and always have the most recent footage available. If the SD card becomes full unexpectedly, the system detects the write failure and proactively deletes the oldest file before continuing.
Battery Life: With a 2000mAh 18650 battery, expect approximately 3-4 hours of continuous recording. Larger capacity batteries (3000-3500mAh) can extend this to 5-6 hours. The system automatically resumes recording after recharging, picking up where it left off.
Technical Specifications
Microcontroller: ESP32-CAM (AI-Thinker)
Camera: OV2640 2MP with adjustable quality
Video Format: MJPEG (Motion JPEG)
Recording Resolution: VGA (640x480) - configurable to SVGA, HD, etc.
Frame Rate: 10 FPS (adjustable)
File Duration: 5 minutes per file (configurable)
Storage: MicroSD card (recommend 32GB or larger)
Battery: Single 18650 Li-ion cell (3.7V, 2000-3500mAh)
Power Consumption: ~200-250mA during recording
Charging: USB Type-C, 1A max
Assembly Instructions
1. PCB Assembly:
Solder the TP4056 charging module to the PCB
Install the boost converter (0.9-3V to 3.3V step-up module)
Solder the slide switch for power control
Add battery connector terminals
All SMD components should be professionally assembled or hand-soldered with care
2. ESP32-CAM Preparation:
Insert a formatted microSD card (FAT32 format, 32GB recommended)
Program the ESP32-CAM with the provided Arduino sketch
Test camera functionality before final assembly
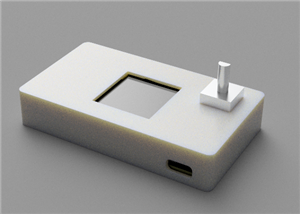
3. 3D Printed Enclosure:
Print all three parts using PLA or PETG
Part 1 (Cam1.stl): Main body housing the PCB and battery
Part 2 (Cam2.stl): Camera module holder with lens opening
Part 3 (Cam3.stl): Back cover with access to USB-C charging port
Recommended settings: 0.2mm layer height, 20% infill, supports enabled
4. Final Assembly:
Install the battery in the main body compartment
Secure the PCB with small screws or standoffs
Mount the ESP32-CAM in the camera holder
Connect all power cables carefully observing polarity
Close the enclosure and secure with screws
Charge fully before first use
Programming
Requirements:
Arduino IDE with ESP32 board support installed
FTDI programmer (3.3V!) or ESP32-CAM-MB programmer board
USB-to-Serial drivers
Steps:
Open the provided Arduino sketch in Arduino IDE
Select "AI Thinker ESP32-CAM" from Tools > Board
Set upload speed to 115200 baud
Connect ESP32-CAM to programmer (ground GPIO0 for programming mode)
Upload the sketch
Open Serial Monitor (115200 baud) to verify successful upload
Remove GPIO0 ground connection and press reset
Customization Options:
#define VIDEO_DURATION_SECONDS 300 // 5 minutes per file
#define MAX_FILES 100 // Max files before overwrite
#define FRAMES_PER_SECOND 10 // Recording frame rate
Adjust these values based on your needs:
Lower FPS = longer battery life, smaller files
Higher quality = better image, larger files, shorter battery
More MAX_FILES = longer recording history
Usage
First Time Setup:
Format SD card as FAT32
Insert into ESP32-CAM
Charge battery fully
Flip switch to ON
LED on camera module will blink during recording
Retrieving Footage:
Power off the device
Remove SD card
Copy .mjpeg files to computer
Play with VLC Media Player or convert to MP4
Converting MJPEG to MP4:
bash
ffmpeg -i video_0000.mjpeg -c:v libx264 -crf 23 output.mp4
Tips & Troubleshooting
Extending Battery Life:
Reduce frame rate to 5 FPS
Lower resolution to QVGA (320x240)
Use higher JPEG quality number (lower quality = smaller files = less SD card writes)
SD Card Recommendations:
Use Class 10 or UHS-1 cards for reliable write speeds
32GB provides ~6-8 hours of VGA footage at 10 FPS
Always format as FAT32 (not exFAT)
Common Issues:
Camera won't initialize: Check all power connections, ensure 5V supply is stable
SD card errors: Reformat card, try different brand
Files won't overwrite: Manually delete old files, check SD card health
Short battery life: Verify boost converter efficiency, consider lower frame rate
Applications
Home Security: Monitor doors, windows, or valuables when away
Wildlife Camera: Capture animals without disturbing them
Time-Lapse Projects: Document construction, plant growth, art projects
Vehicle Dash Cam: Record driving footage for safety
Baby Monitor Archive: Keep rolling footage of nursery
Package Theft Prevention: Monitor front porch deliveries
Future Enhancements
This project can be expanded with:
PIR motion sensor for trigger-based recording (save battery)
WiFi connectivity for remote viewing (reduces battery life)
Solar panel charging for indefinite outdoor operation
Larger battery pack for extended runtime
Weather-resistant enclosure for outdoor use
Real-time clock module for timestamp overlay
Credits & License
This project is released under MIT License. Feel free to modify, share, and commercialize. If you build this project, I'd love to see your results! Share photos and improvements in the comments.
Special thanks to the ESP32 and Arduino communities for the excellent libraries and examples that made this possible.
Files Included:
Complete Arduino source code with detailed comments
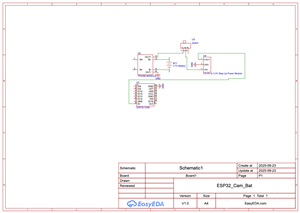
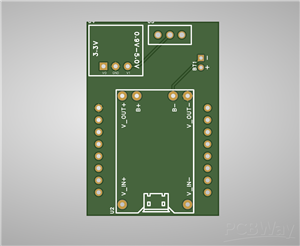
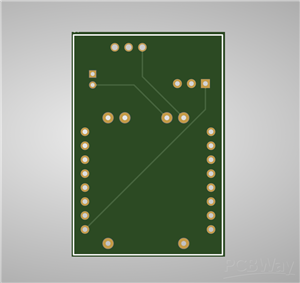
KiCAD schematic and PCB layout files
Gerber files ready for PCBWay manufacturing
Bill of Materials (BOM) with part numbers
3D printable STL files for enclosure (3 parts)
Assembly instructions and programming guide
PCB Specifications:
2-layer PCB
Dimensions: [Insert your dimensions]
Standard 1.6mm FR-4
HASL surface finish
Minimum track/spacing: 0.15mm/0.15mm
Order your PCBs from PCBWay and start building your own autonomous video recorder today! The compact design and professional PCB make assembly straightforward even for intermediate makers.
#include "esp_camera.h"
#include "FS.h"
#include "SD_MMC.h"
#include "esp_timer.h"
#include "time.h"

// Camera pin definitions for ESP32-CAM
#define PWDN_GPIO_NUM     32
#define RESET_GPIO_NUM    -1
#define XCLK_GPIO_NUM      0
#define SIOD_GPIO_NUM     26
#define SIOC_GPIO_NUM     27
#define Y9_GPIO_NUM       35
#define Y8_GPIO_NUM       34
#define Y7_GPIO_NUM       39
#define Y6_GPIO_NUM       36
#define Y5_GPIO_NUM       21
#define Y4_GPIO_NUM       19
#define Y3_GPIO_NUM       18
#define Y2_GPIO_NUM        5
#define VSYNC_GPIO_NUM    25
#define HREF_GPIO_NUM     23
#define PCLK_GPIO_NUM     22

// Recording settings
#define VIDEO_DURATION_SECONDS 300  // 5 minutes per file
#define MAX_FILES 100  // Maximum number of video files before overwriting
#define FRAMES_PER_SECOND 10  // Target FPS
#define FRAME_DELAY_MS (1000 / FRAMES_PER_SECOND)

// Global variables
int currentFileIndex = 0;
unsigned long recordingStartTime = 0;
File videoFile;
bool isRecording = false;

void setup() {
  Serial.begin(115200);
  Serial.println("\n\nESP32-CAM Video Recorder Starting...");

  // Initialize camera
  if (!initCamera()) {
    Serial.println("Camera initialization failed!");
    ESP.restart();
  }

  // Initialize SD card
  if (!initSDCard()) {
    Serial.println("SD Card initialization failed!");
    ESP.restart();
  }

  // Find the next file index (resume from last recording)
  findNextFileIndex();

  Serial.println("System ready. Starting recording...");
  delay(1000);

  startNewRecording();
}

void loop() {
  if (!isRecording) {
    startNewRecording();
  }

  // Check if current video duration exceeded
  if (millis() - recordingStartTime > VIDEO_DURATION_SECONDS * 1000) {
    stopRecording();
    currentFileIndex++;
    if (currentFileIndex >= MAX_FILES) {
      currentFileIndex = 0;  // Wrap around and overwrite old files
      Serial.println("Reached max files. Overwriting from beginning...");
    }
    startNewRecording();
  }

  // Capture and save frame
  captureFrame();

  delay(FRAME_DELAY_MS);
}

bool initCamera() {
  camera_config_t config;
  config.ledc_channel = LEDC_CHANNEL_0;
  config.ledc_timer = LEDC_TIMER_0;
  config.pin_d0 = Y2_GPIO_NUM;
  config.pin_d1 = Y3_GPIO_NUM;
  config.pin_d2 = Y4_GPIO_NUM;
  config.pin_d3 = Y5_GPIO_NUM;
  config.pin_d4 = Y6_GPIO_NUM;
  config.pin_d5 = Y7_GPIO_NUM;
  config.pin_d6 = Y8_GPIO_NUM;
  config.pin_d7 = Y9_GPIO_NUM;
  config.pin_xclk = XCLK_GPIO_NUM;
  config.pin_pclk = PCLK_GPIO_NUM;
  config.pin_vsync = VSYNC_GPIO_NUM;
  config.pin_href = HREF_GPIO_NUM;
  config.pin_sscb_sda = SIOD_GPIO_NUM;
  config.pin_sscb_scl = SIOC_GPIO_NUM;
  config.pin_pwdn = PWDN_GPIO_NUM;
  config.pin_reset = RESET_GPIO_NUM;
  config.xclk_freq_hz = 20000000;
  config.pixel_format = PIXFORMAT_JPEG;
  config.frame_size = FRAMESIZE_VGA;  // 640x480
  config.jpeg_quality = 12;  // 0-63, lower is higher quality
  config.fb_count = 2;

  // Initialize camera
  esp_err_t err = esp_camera_init(&config);
  if (err != ESP_OK) {
    Serial.printf("Camera init failed with error 0x%x\n", err);
    return false;
  }

  // Adjust camera settings for better battery life
  sensor_t *s = esp_camera_sensor_get();
  s->set_brightness(s, 0);     // -2 to 2
  s->set_contrast(s, 0);       // -2 to 2
  s->set_saturation(s, 0);     // -2 to 2

  Serial.println("Camera initialized successfully");
  return true;
}

bool initSDCard() {
  if (!SD_MMC.begin("/sdcard", true)) {  // 1-bit mode for lower power
    Serial.println("SD Card Mount Failed");
    return false;
  }

  uint8_t cardType = SD_MMC.cardType();
  if (cardType == CARD_NONE) {
    Serial.println("No SD Card attached");
    return false;
  }

  uint64_t cardSize = SD_MMC.cardSize() / (1024 * 1024);
  Serial.printf("SD Card Size: %lluMB\n", cardSize);

  uint64_t freeSpace = SD_MMC.totalBytes() - SD_MMC.usedBytes();
  Serial.printf("SD Card Free Space: %lluMB\n", freeSpace / (1024 * 1024));

  return true;
}

void findNextFileIndex() {
  // Scan directory to find existing video files and resume from last index
  File root = SD_MMC.open("/");
  if (!root || !root.isDirectory()) {
    Serial.println("Failed to open root directory");
    currentFileIndex = 0;
    return;
  }

  int maxIndex = -1;
  File file = root.openNextFile();
  while (file) {
    String fileName = String(file.name());
    if (fileName.startsWith("/video_") && fileName.endsWith(".mjpeg")) {
      // Extract index from filename
      int startPos = fileName.indexOf("_") + 1;
      int endPos = fileName.indexOf(".");
      String indexStr = fileName.substring(startPos, endPos);
      int index = indexStr.toInt();
      if (index > maxIndex) {
        maxIndex = index;
      }
    }
    file = root.openNextFile();
  }

  currentFileIndex = (maxIndex + 1) % MAX_FILES;
  Serial.printf("Next file index: %d\n", currentFileIndex);
}

void startNewRecording() {
  char filename[32];
  sprintf(filename, "/video_%04d.mjpeg", currentFileIndex);

  // Delete old file if it exists
  if (SD_MMC.exists(filename)) {
    SD_MMC.remove(filename);
    Serial.printf("Removed old file: %s\n", filename);
  }

  videoFile = SD_MMC.open(filename, FILE_WRITE);
  if (!videoFile) {
    Serial.printf("Failed to create file: %s\n", filename);
    ESP.restart();
  }

  recordingStartTime = millis();
  isRecording = true;
  Serial.printf("Started recording: %s\n", filename);
}

void stopRecording() {
  if (videoFile) {
    videoFile.close();
    Serial.println("Recording stopped");
  }
  isRecording = false;
}

void captureFrame() {
  camera_fb_t *fb = esp_camera_fb_get();
  if (!fb) {
    Serial.println("Camera capture failed");
    return;
  }

  // Write JPEG frame to file
  size_t written = videoFile.write(fb->buf, fb->len);

  if (written != fb->len) {
    Serial.println("Write error - SD card may be full");
    // If write fails, try to free space by deleting oldest file
    esp_camera_fb_return(fb);
    stopRecording();
    deleteOldestFile();
    startNewRecording();
    return;
  }

  // Return frame buffer
  esp_camera_fb_return(fb);

  // Print status every 100 frames
  static int frameCount = 0;
  frameCount++;
  if (frameCount % 100 == 0) {
    unsigned long elapsed = (millis() - recordingStartTime) / 1000;
    Serial.printf("Recording... Frames: %d, Time: %lus, File: video_%04d.mjpeg\n",
                  frameCount, elapsed, currentFileIndex);
  }
}

void deleteOldestFile() {
  // Find and delete the oldest video file
  File root = SD_MMC.open("/");
  if (!root || !root.isDirectory()) {
    return;
  }

  String oldestFile = "";
  time_t oldestTime = LONG_MAX;

  File file = root.openNextFile();
  while (file) {
    String fileName = String(file.name());
    if (fileName.startsWith("/video_") && fileName.endsWith(".mjpeg")) {
      time_t fileTime = file.getLastWrite();
      if (fileTime < oldestTime) {
        oldestTime = fileTime;
        oldestFile = fileName;
      }
    }
    file = root.openNextFile();
  }

  if (oldestFile.length() > 0) {
    SD_MMC.remove(oldestFile);
    Serial.printf("Deleted oldest file: %s\n", oldestFile.c_str());
  }
}
Battery-Powered ESP32-CAM Continuous Video Recorder
Project images are for reference only. Actual production is based on the manufacturing files on the project page.
Please review the designer's notes (e.g., PCB thickness) and select the appropriate options.
PCBWay is not responsible
for issues caused by unsuitable parameter selections.
For more important ordering information, please refer to
Read More


Raspberry Pi 5 7 Inch Touch Screen IPS 1024x600 HD LCD HDMI-compatible Display for RPI 4B 3B+ OPI 5 AIDA64 PC Secondary Screen(Without Speaker)
BUY NOW


- Comments(0)
- Likes(1)
More by Inaki Iturriaga
-
 Battery-Powered ESP32-CAM Continuous Video Recorder
OverviewThis project transforms an ESP32-CAM module into a standalone, battery-powered video recordi...
Battery-Powered ESP32-CAM Continuous Video Recorder
OverviewThis project transforms an ESP32-CAM module into a standalone, battery-powered video recordi...
-
 GPS Mobile Beacon
Building a GPS Emergency Beacon: A DIY TutorialWelcome to our latest DIY project: creating a GPS Eme...
GPS Mobile Beacon
Building a GPS Emergency Beacon: A DIY TutorialWelcome to our latest DIY project: creating a GPS Eme...
-
 Wireless RFID Card Copier.
Wireless RFID Card CopierIn today's digital world, security and accessibility are of paramount impor...
Wireless RFID Card Copier.
Wireless RFID Card CopierIn today's digital world, security and accessibility are of paramount impor...
-
 Piezo Alert System.
Within the fast-evolving sphere of security tools and home automation, creativity often paves the wa...
Piezo Alert System.
Within the fast-evolving sphere of security tools and home automation, creativity often paves the wa...
-
 Wifi Weather Station - Sensors board
WiFi Weather Station - Sensor unitIn our digital era, many electronics projects integrate diverse se...
Wifi Weather Station - Sensors board
WiFi Weather Station - Sensor unitIn our digital era, many electronics projects integrate diverse se...
-
 Building a GPS Speedometer with RP2040-Zero
Build a Feature-Packed GPS Speedometer with an RP2040This project guide will walk you through buildi...
Building a GPS Speedometer with RP2040-Zero
Build a Feature-Packed GPS Speedometer with an RP2040This project guide will walk you through buildi...
-
 RC Receiver
Build Your Own RC ReceiverHarnessing advanced electronics and precise control systems, the RC Receiv...
RC Receiver
Build Your Own RC ReceiverHarnessing advanced electronics and precise control systems, the RC Receiv...
-
 Universal RC Controller
Build Your Own Universal RC RemoteHarnessing the power of custom PCBs and wireless communication, th...
Universal RC Controller
Build Your Own Universal RC RemoteHarnessing the power of custom PCBs and wireless communication, th...
-
 Continuous GPS Tracker
This compact and efficient tracker provides real-time location updates, making it ideal for surveill...
Continuous GPS Tracker
This compact and efficient tracker provides real-time location updates, making it ideal for surveill...
-
 Air Quality Monitor
Welcome to our DIY tutorial on assembling an Air Quality Monitoring Device. This project is perfect ...
Air Quality Monitor
Welcome to our DIY tutorial on assembling an Air Quality Monitoring Device. This project is perfect ...
-
 Automatic Watch Winder
In the realm of luxury timepieces and watch aficionados, an automatic watch is...
Automatic Watch Winder
Automatic Watch WinderIn the realm of luxury timepieces and watch aficionados, an automatic watch is...
-
 Handheld GPS
Within the swiftly advancing realm of portable technology and travel essentials, innovation often sh...
Handheld GPS
Within the swiftly advancing realm of portable technology and travel essentials, innovation often sh...
-
 Dual Motor Controller for Model Robotics
In the thrilling world of robotics and DIY engineering, innovation continues to soar to new heights....
Dual Motor Controller for Model Robotics
In the thrilling world of robotics and DIY engineering, innovation continues to soar to new heights....
-
 Altitude Indicator with Beeper for Rocketry
Altitude Indicator for Model RocketryIn our ever-advancing technological landscape, countless projec...
Altitude Indicator with Beeper for Rocketry
Altitude Indicator for Model RocketryIn our ever-advancing technological landscape, countless projec...
-
 Wifi Weather Station - Display unit
WiFi Weather Station - Display UnitIn this technologically advanced age, countless electronics proje...
Wifi Weather Station - Display unit
WiFi Weather Station - Display UnitIn this technologically advanced age, countless electronics proje...
-
 Positon Breakout Board
Position Sensors Breakout Board In today's era of advanced technology, many electronics projects req...
Positon Breakout Board
Position Sensors Breakout Board In today's era of advanced technology, many electronics projects req...
-
 Ambient Sensors Breakout Board
In today's world, electronics projects often require the integration of multiple sensors to collect ...
Ambient Sensors Breakout Board
In today's world, electronics projects often require the integration of multiple sensors to collect ...
-
 Infrared Launch Controller
IntroductionHave you ever wanted to remotely launch a rocket, drone or other device using infrared t...
Infrared Launch Controller
IntroductionHave you ever wanted to remotely launch a rocket, drone or other device using infrared t...
-
Programmable Mist Maker - XIAO / QT PY Extension
1067 2 1 -
RadioHAT - Raspberry Pi radio development platform
882 0 2 -
-
-
-
-
ARPS-2 – Arduino-Compatible Robot Project Shield for Arduino UNO
3332 0 6 -
A Compact Charging Breakout Board For Waveshare ESP32-C3
3941 3 8 -
AI-driven LoRa & LLM-enabled Kiosk & Food Delivery System
4326 2 2


