PCBWay Community
Search title or content
Search
PCBWay
PCB Instant Quote
CNC | 3D Printing
Login
Sign Up
More Notifications
No notifications.
My Profile
My projects
My Likes
My Deals
My Goods for Bazaar
Settings
Sign Out
Projects
Categories
DIY Electronics
Arduino
Hardware
Audio
Computers & USB
Breakout Board Projects
Home Automation
LED Displays & Matrices
IoT
Robotics
View all categories
By Source Files
Onju Voice - AI assistant replacement to Google Nest Mini by @justLV
DIY 1kW Open Source MPPT Solar Charge Controller
LogicAnalyzer V6.0
Tad Boy Color
kv4p HT v1.7b
QuinLED-Dig-Uno
SummerCart64 - a fully open source N64 flashcart
Bike Fingerprint - PCB
Arduino RC engine sound & light controller with inertia simulation for ESP32
Solar Powered WiFi Weather Station V2.0
SIDKick pico 0.2 (SID 6581/8580-replacement for C64/C128)
Frog Boy Color
View all source files projects
Featured Projects
Onju Voice - AI assistant replacement to Google Nest Mini by @justLV
DIY 1kW Open Source MPPT Solar Charge Controller
LogicAnalyzer V6.0
Featured
Source Files
Video
View all projects
Questions
Sponsorships
Feedback
Blog
Store
PCB Design
Contest
- 8th Project Design Contest
- 7th Project Design Contest
- KiCad Design Contest
- 6th Project Design Contest
- 5th PCB Design Contest
- 4th PCB Design Contest
- Raspberry Pi Pico Contest
- PCB Design Tutorial
- 3rd PCB Design Contest
- I CAN SOLDER Kit Contest
- 2nd PCB Design Contest
- 1st PCB Design Contest
Add questions
Create a project
Please verify your email address so that you can enjoy our more comprehensive services.
Wearables
Weather
All categories
DIY Electronics
Arduino
Hardware
Audio
Computers & USB
Breakout Board Projects
Home Automation
LED Displays & Matrices
IoT
Robotics
3D Printing
Blinkenlights
Calculator
Camera
Clocks
CNC
Educational
Automotive
Electronic Games
ESP32
Fabrication Tools
Flight
Guitar
Keyboards
Misc
Music
Nixie Tube
Oscilloscope
Particle
Power Supply
Programmable Logic Projects
Raspberry Pi
Radio
Retro Stuffs
Space & Satellite
Sensors
Software
Synthesizer
Ultrasonic
Virtual Reality
Wearables
Weather
Project by top creative fields
All categories
3D Printing
Arduino
Audio
Automotive
Blinkenlights
Breakout Board Projects
Calculator
Camera
Clocks
CNC
Computers & USB
DIY Electronics
Educational
Electronic Games
ESP32
Fabrication Tools
Flight
Guitar
Hardware
Home Automation
IoT
Keyboards
LED Displays & Matrices
Misc
Music
Nixie Tube
Oscilloscope
Particle
Power Supply
Programmable Logic Projects
Radio
Raspberry Pi
Retro Stuffs
Robotics
Sensors
Software
Space & Satellite
Synthesizer
Ultrasonic
Virtual Reality
Wearables
Weather
View all categories
Share & Discover
All tags
Audio
Arduino
3D printing
Board
LED
Calculator
Create a project
Sort by : Trending
Trending
Score
Likes
Views
Discuss
Newest
Featured
Source Files
3D Design
Video
Crystal RGB Mascot DisplayA simple beginner-friendly project to create a bright, colourful and aesthetic addition to your office/home desk setup, especially with a customisable mascot of your choosing...
Crystal RGB Mascot Display
1000
0
2
Engineer
Engineer
SINGAPORE
0
0
After making a few projects with prototyping boards, I decided to make a PCB that would be able to handle a variety of projects which used the Attiny85 chip. My projects have involved directly driving...
Attiny85 Breakout for LED Projects
3027
0
2
Overclockers
Overclockers
SINGAPORE
8
2
https://martin-piper.itch.io/bomb-jack-display-hardwareModular audio and video hardware for retro machines like the Commodore 64. Designed to use 74 series TTL through hole ICs available back in the 1...
MegaWang 2000 Turbo Edition - Audio V9.2
5499
2
4
Martin Piper
Martin Piper
SINGAPORE
9
32
In my other projects, I have demonstrated the power of the Ameba RTL8720D based IoT microcontroller via using their development board. However, when come to deployment or commercialization, we need as...
Minimalist 5G WiFi & BLE microcontroller
4029
1
2
SimonX
SimonX
SINGAPORE
5
0
The Banano Board is a Arduino Nano-based universal controller board as featured in the ElectroBananas video:https://youtu.be/pLuV-ciUMUs?si=Llm2Uv8akJ_nG_YgThis universal controller board can accommod...
Banano Board - ElectroBananas Arduino Nano-based universal controller board
2232
8
9
Electro Bananas
Electro Bananas
SINGAPORE
4
0
A front panel that can be used to combine the Si4732 Mini and the ATS-20+ to create a receiver that is the best of both! No supports needed when printing. You will need 4 x M2 self-tapping screws...
Si4732 Mini & ATS-20+ Hybrid Front Panel
3041
0
2
Electro Bananas
Electro Bananas
SINGAPORE
4
0
Bunny PCB ArtworkIntroductionIn this project I will be making colorful circuit board artwork. It consists of a ESP32-S3 minimal circuit at a low price point. The circuit board also supports LEDs and a...
Colorful Bunny - Circuit Board Artwork
1648
3
2
Manzel Seet
Manzel Seet
SINGAPORE
2
0
Let's watch a demo first! ??https://www.youtube.com/shorts/7kb5SGYx1NIBackgroundRecently I got obssesed with 3D printing, and then stumbled upon this collapsing light saber design which I found r...
3D Printed Collapsing Light Saber with RGB LED
1464
0
2
SimonX
SimonX
SINGAPORE
5
0
BackgroundNow is 2022 and we are still combatting COVID and its varients, it's a long battle so we need to play it smart.How smart? There are many off-shell handheld thermometer out there and they off...
DIY Handheld Thermometer with WiFi
1809
0
2
SimonX
SimonX
SINGAPORE
5
0
IntroductionI have previously demonstrated a few other projects such as1) 5G WiFi Scanner2) WiFi Signal Analyzer3) LCD MenuNow this is the combination of all 3 previous projects, this is a "Swiss-Army...
Dual-Band Wi-Fi Toolkit | 2.4 + 5GHz | A powerful Swiss Army Knife for Wi-Fi
4260
0
4
SimonX
SimonX
SINGAPORE
5
0
Modular audio and video hardware for retro machines like the Commodore 64. Designed to use 74 series TTL through hole ICs available back in the 1980s, something you can solder at home from parts or or...
MegaWang 2000 Turbo Edition - Audio hardware with all video layers
1443
1
1
Martin Piper
Martin Piper
SINGAPORE
9
32
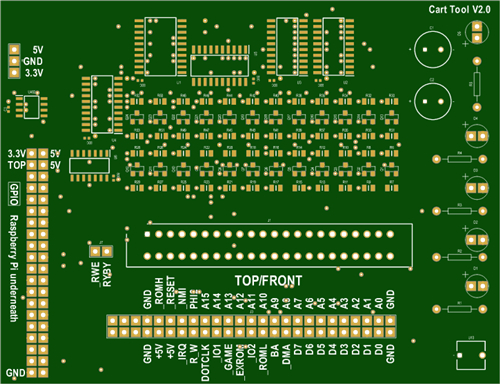
A Raspberry Pi hat that allows Commodore 64 cartridges to be quickly programmed or read. This hat provides fast, higher current, bi-directional level shifters and multiplexed inputs/outputs. Suitable ...
C64 Cartridge programming tool V2
990
2
5
Martin Piper
Martin Piper
SINGAPORE
9
32
A handy desk stand for the ATS range of handheld multiband radiosSuitable for the following models....The design features a recessed channel to accommodate an external antenna jack and cable if plugge...
ATS Radio Desk Stand
732
1
0
Electro Bananas
Electro Bananas
SINGAPORE
4
0
IntroductionWanna slack off abit but scared to be busted? Here is the all-in-one wireless tripwire that help you automatically switch your computor program when motion is detected! Best of all, it use...
Machine Vision Trip WIre | Switch App when Motion Detected
1311
0
1
SimonX
SimonX
SINGAPORE
5
0
LED + OpenCV + MicroPython + AMB23 IoT Microcontrollers = Wireless Hand Control LEDLaziness is one of the biggest drives for engineer to innovate ways to simplify their lives. For me, I am too "lazy" ...
Hand Controlled LED | OpenCV | MicroPython | IoT
2647
0
3
SimonX
SimonX
SINGAPORE
5
0
Demo 1:Demo 2:Want the best of 5G WiFi connectivity while still maintain super compact form factor? Then this is for you!The super compact design allows for easy deployment on any kind of DIY platform...
BW16 Stamp - Tiny 5GHz WiFi Dev. Board
4716
0
3
SimonX
SimonX
SINGAPORE
5
0
1
2
3