PCBWay Community
Search title or content
Search
PCBWay
PCB Instant Quote
CNC | 3D Printing
Login
Sign Up
More Notifications
No notifications.
My Profile
My projects
My Likes
My Deals
My Goods for Bazaar
Settings
Sign Out
Projects
Categories
DIY Electronics
Arduino
Hardware
Audio
Computers & USB
Breakout Board Projects
Home Automation
LED Displays & Matrices
IoT
Robotics
View all categories
By Source Files
Onju Voice - AI assistant replacement to Google Nest Mini by @justLV
LogicAnalyzer V6.0
DIY 1kW Open Source MPPT Solar Charge Controller
Tad Boy Color
SummerCart64 - a fully open source N64 flashcart
kv4p HT v1.7b
QuinLED-Dig-Uno
Bike Fingerprint - PCB
Arduino RC engine sound & light controller with inertia simulation for ESP32
Solar Powered WiFi Weather Station V2.0
SIDKick pico 0.2 (SID 6581/8580-replacement for C64/C128)
Frog Boy Color
View all source files projects
Featured Projects
Onju Voice - AI assistant replacement to Google Nest Mini by @justLV
LogicAnalyzer V6.0
DIY 1kW Open Source MPPT Solar Charge Controller
Featured
Source Files
Video
View all projects
Questions
Sponsorships
Feedback
Blog
Store
PCB Design
Contest
- 2026 KiCad PCB Design Contest
- 8th Project Design Contest
- 7th Project Design Contest
- KiCad Design Contest
- 6th Project Design Contest
- 5th PCB Design Contest
- 4th PCB Design Contest
- Raspberry Pi Pico Contest
- PCB Design Tutorial
- 3rd PCB Design Contest
- I CAN SOLDER Kit Contest
- 2nd PCB Design Contest
- 1st PCB Design Contest
Add questions
Create a project
Please verify your email address so that you can enjoy our more comprehensive services.
Wearables
Weather
All categories
DIY Electronics
Arduino
Hardware
Audio
Computers & USB
Breakout Board Projects
Home Automation
LED Displays & Matrices
IoT
Robotics
3D Printing
Blinkenlights
Calculator
Camera
Clocks
CNC
Educational
Automotive
Electronic Games
ESP32
Fabrication Tools
Flight
Guitar
Keyboards
Misc
Music
Nixie Tube
Oscilloscope
Particle
Power Supply
Programmable Logic Projects
Raspberry Pi
Radio
Retro Stuffs
Space & Satellite
Sensors
Software
Synthesizer
Ultrasonic
Virtual Reality
Wearables
Weather
Project by top creative fields
All categories
3D Printing
Arduino
Audio
Automotive
Blinkenlights
Breakout Board Projects
Calculator
Camera
Clocks
CNC
Computers & USB
DIY Electronics
Educational
Electronic Games
ESP32
Fabrication Tools
Flight
Guitar
Hardware
Home Automation
IoT
Keyboards
LED Displays & Matrices
Misc
Music
Nixie Tube
Oscilloscope
Particle
Power Supply
Programmable Logic Projects
Radio
Raspberry Pi
Retro Stuffs
Robotics
Sensors
Software
Space & Satellite
Synthesizer
Ultrasonic
Virtual Reality
Wearables
Weather
View all categories
Programmable Logic Projects
Projects need program.
All tags
Commodore
FPGA
Atari 800XE
ATtiny
Atmega
Create a project
Sort by : Trending
Trending
Score
Likes
Views
Discuss
Newest
Featured
Source Files
3D Design
Video
This project is about a Commodore PLA replacement.PLA replacements for the Commodore 64 are available for quite a number of years and have grown increasingly sophisticated. Therefore you may ask why t...
Commodore 64 PLA replacement
30246
13
112
Daniël Mantione
Daniël Mantione
NETHERLANDS, THE
107
5
COMMODORE C64 CHARACTER GENERATOR ROMREPLACEMENT ADAPTER (FOR REPLACING 901225-01)Gerbers updated as REV2 on 22.10.2020. Please update your unpaid orders.Hello,This ROM adapter is suitable for replaci...
C64 CHARACTER GEN. ROM REPLACEMENT ADAPTER (COMMODORE)
15918
28
58
(DIY) C64iSTANBUL
(DIY) C64iSTANBUL
TURKEY
743
825
(DIY) THE FINAL CARTRIDGE III+ FOR COMMODORE 64This is a tested and working project.This The Final Cartridge 3 Plus PCB is an Easy DIY project, all components are through hole and marked on the PCB, i...
(DIY) THE FINAL CARTRIDGE III+ FOR COMMODORE 64
22992
41
77
(DIY) C64iSTANBUL
(DIY) C64iSTANBUL
TURKEY
743
825
SD2iEC & EPYX FAST LOAD CARTRIDGE V2 (TQFP)This, SD2iEC & Epyx Fast Load Cartridge V2 PCB is also available for TQFP package ATMEGA644P and ATMEGA1284, if you like, you may prefer to use TQFP ...
SD2iEC & EPYX FAST LOAD CARTRIDGE V2 (TQFP) FOR COMMODORE 64
11376
17
37
(DIY) C64iSTANBUL
(DIY) C64iSTANBUL
TURKEY
743
825
AMIGA PS/2 MOUSE CONVERTER (ADAPTER) - PIC16F628(A)Hello,This is a tested and working circuit board .If you have a PIC16F628(A) and a PIC-Programmer, you can make your own Amiga PS/2 mouse converter a...
AMIGA PS/2 MOUSE CONVERTER (ADAPTER) - PIC16F628(A)
17803
52
37
(DIY) C64iSTANBUL
(DIY) C64iSTANBUL
TURKEY
743
825
C64 EPROM PROGRAMMER (DELA EPROMMER II - REDRAWN)DELA EPROMMER II is an eprom programmer for Commodore 64This is a tested and working circuit board.This is an Easy DIY circuit board, all components ar...
C64 EPROM PROGRAMMER (DELA EPROMMER II - REDRAWN)
18561
44
65
(DIY) C64iSTANBUL
(DIY) C64iSTANBUL
TURKEY
743
825
(DIY) SD2iEC & EPYX FAST LOAD CARTRIDGE FOR COMMODORE 64This is a tested and working project.This is an Easy DIY project, all components are through hole, marked on the PCB, Easy to solder, Easy t...
(DIY) SD2iEC & EPYX FAST LOAD CARTRIDGE FOR COMMODORE 64
22706
48
45
(DIY) C64iSTANBUL
(DIY) C64iSTANBUL
TURKEY
743
825
COMMODORE 64 SD2iEC & KERNAL CART COMBOThis is a tested and working project. I think, SD2iEC (Commodore disk drive emulator) and Kernal Cart is a very good combination. They come togeth...
C64 SD2iEC & KERNAL CART COMBO
12120
17
38
(DIY) C64iSTANBUL
(DIY) C64iSTANBUL
TURKEY
743
825
Note from PCBWay: Since many customers request Pico 2 for this project, we will add Pico 2 (PN:SC1631) to the quotation BOM and install it by default. If it is not needed, please inform your sales-rep...
LogicAnalyzer V6.0
56244
29
173
El Dr. Gusman
El Dr. Gusman
SPAIN
98
2
IMPOSSIBLE MISSION GAME CARTRIDGE for COMMODORE 64Hello, This is a tested and working circuit board.This PCB is prepared for making Commodore 64 Epyx Impossible Mission game cartridge. All components ...
IMPOSSIBLE MISSION GAME CARTRIDGE for COMMODORE 64
11469
9
20
(DIY) C64iSTANBUL
(DIY) C64iSTANBUL
TURKEY
743
825
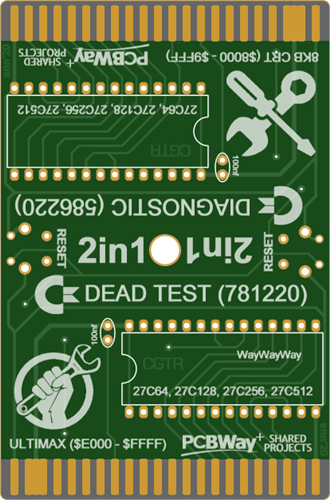
COMMODORE 64 DEAD-TEST 781220 & DIAGNOSTIC 586220 CARTRIDGEThis is a tested and working circuit board.DEAD TEST 781220 and DIAGNOSTIC 586220 Cartridges are two different cartridges for testing com...
C64 DEAD-TEST & DIAGNOSTIC CARTRIDGE TOGETHER
19666
37
71
(DIY) C64iSTANBUL
(DIY) C64iSTANBUL
TURKEY
743
825
COMMODORE 64 - BASIC ROM & KERNAL ROM REPLACEMENT ADAPTER REV.3DESIGNED FOR 901226-01 BASIC ROM and 901227-03 KERNAL ROM REPLACEMENT.Hello,This is a tested and working circuit board.This adapter i...
BASIC ROM & KERNAL ROM REPLACEMENT ADAPTER REV.3 , FOR COMMODORE 64
18093
50
58
(DIY) C64iSTANBUL
(DIY) C64iSTANBUL
TURKEY
743
825
(DIY) ATARI 2600 MULTI GAME CARTRIDGE You can make your own custom Atari 2600 Multi Game Cartridge. Hello, This is a simple,DIY multi game Atari 2600 cartridge. It has 16 games capacity...
(DIY) ATARI 2600 MULTI GAME CARTRIDGE
25369
53
62
(DIY) C64iSTANBUL
(DIY) C64iSTANBUL
TURKEY
743
825
I have used these PCBs in an ISP programmer Shield for ‘Arduino UNO’. This programmer is compatible with the microcontrollers: ATmega 48/88/168 / 328P with 28 pins, and ATtiny 25/45/85 with 8 pins.&nb...
ISP Shield programmer for ATmega / ATtiny
9041
6
16
José Ramón PUEYO MUÑOZ
José Ramón PUEYO MUÑOZ
SPAIN
29
4
COMMODORE 64 - EPYX FASTLOAD CARTRIDGEA lot of experienced Commodore 1541, SD2iEC, Pi1541 users prefer EPYX FASTLOAD, because of its high compatibility with Commodore hardware and software.Every momen...
C64 EPYX FASTLOAD CARTRIDGE
16124
25
48
(DIY) C64iSTANBUL
(DIY) C64iSTANBUL
TURKEY
743
825
captain-amygdala/pistorm is licensed under theMIT LicensePermissions Commercial use Modification Distribution Private use pistorm by captain-amygdala(A 68000 CPU replacement) 4 lay...
PISTORM for COMMODORE AMIGA (A 68000 CPU replacement)
16700
8
28
Alex Soyovan
Alex Soyovan
UKRAINE
93
87
1
2
3
4
5
6
7
8
9
10
11
...