


|
KiCad 8.0KiCad
|
|

|
arduino IDEArduino
|
|

|
Shapr3D |
Radio Frequency Emitter and Reciever Remote with Attiny
My project is about making a remote for devices which works on Radio Frequencies. I decided to make this because there is a remote controlled shutter in my workshop, that works on radiofrequency remote. I earlier have two remotes for it (one extra as comes with it). But unfortunately my second remote malfunctioned, and there is no way to purchase a external remote without purchasing the complete set of the shutter, so i decided to make this remote with attiny which work same as that remote.
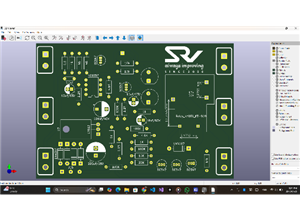
What i did is all that firstly i noted the radio frequencies of each buttons in the remote with the help of RF reciever, then i did experimented on a breadboard as shown in the pictures. It worked, then i thought to make pcb and a complete woeking remote for my shutter. Then i completed making a pcb design for the shutter remote with the help of Kicad. The remote works with the microchip Attiny 45 20su. It have 8 pins (6 in use + 2 power). Then i have used 433 Mhz emiiter and reciever modules (Mainly emitter is placed but i have desgined reciever also as optional). The frequency on which shutter works comes below 433 Mhz.
*Note - I have also provided the code for the Microcontroller, but its not aplliable yet because that code is the code which was implemented during the testing of the idea on breadboard. ( The lcd part neads to be removed in code ). The frequencies assinged in the code are sample binary numbers and are not the exact for my shutter, as i cant provide my private shutter codes.
For uplaoding the codes into attiny microcontroller, I directly used the xtal pins to a usb connector as shown in picture below.

 After designing a pcb for , i thought also to design a 3D body for my remote. So simply i used Shap3d to prepare a 3D model of the remote as shown in the picture.This is a very simple remote design.
Radio Frequency Emitter and Reciever Remote with Attiny
*PCBWay community is a sharing platform. We are not responsible for any design issues and parameter issues (board thickness, surface finish, etc.) you choose.


Raspberry Pi 5 7 Inch Touch Screen IPS 1024x600 HD LCD HDMI-compatible Display for RPI 4B 3B+ OPI 5 AIDA64 PC Secondary Screen(Without Speaker)
BUY NOW


- Comments(4)
- Likes(4)
- 1 USER VOTES
- YOUR VOTE 0.00 0.00
-
10design
-
10usability
-
10creativity
-
10content
More by Sahilpreet Singh Virdi
-
 Efficient Frequency Controler
I have designed a Frequency Control PCB that is both versatile and efficient. This PCB is primarily ...
Efficient Frequency Controler
I have designed a Frequency Control PCB that is both versatile and efficient. This PCB is primarily ...
-
 Arduino UNO R4 WIFI With USB C
This project is of arduino UNO R4 Wifi but with usb c 2.0 for better connectivity and easy of use. I...
Arduino UNO R4 WIFI With USB C
This project is of arduino UNO R4 Wifi but with usb c 2.0 for better connectivity and easy of use. I...
-
 Arduino Mega with Usb C
Hello,everybody. I was waiting for a long time for the official release of arduino mega with usb c,...
Arduino Mega with Usb C
Hello,everybody. I was waiting for a long time for the official release of arduino mega with usb c,...
-
 Radio Frequency Emitter and Reciever Remote with Attiny
My project is about making a remote for devices which works on Radio Frequencies. I decided to make ...
Radio Frequency Emitter and Reciever Remote with Attiny
My project is about making a remote for devices which works on Radio Frequencies. I decided to make ...
-
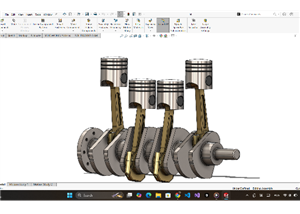 Inline 4 Cylinder Engine
Inline-4 (I4) Engine – Internal Mechanism (SolidWorks Model)I designed an Inline-4 (I4) engine inter...
Inline 4 Cylinder Engine
Inline-4 (I4) Engine – Internal Mechanism (SolidWorks Model)I designed an Inline-4 (I4) engine inter...
-
 X16 Engine
What is my project?This project is a 3D CAD model of an X16 engine designed by me in SolidWorks. The...
X16 Engine
What is my project?This project is a 3D CAD model of an X16 engine designed by me in SolidWorks. The...
-
 Water Level Controller
 (PCB-Based Project)This project is a Water Level Controller designed and impl...
Water Level Controller
Water Level Controller (PCB-Based Project)This project is a Water Level Controller designed and impl...
-
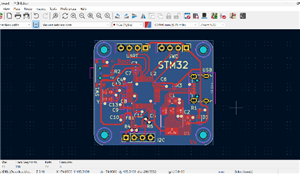 Stm32 DEV board
The STM32 is a powerful family of 32-bit microcontrollers based on the ARM Cortex architecture, desi...
Stm32 DEV board
The STM32 is a powerful family of 32-bit microcontrollers based on the ARM Cortex architecture, desi...
-
 Simple security with Reed switch.
This project is a simple project in which i have used reed switch which can be used as alerter durin...
Simple security with Reed switch.
This project is a simple project in which i have used reed switch which can be used as alerter durin...
-
 Voltage booster with Pushbutton
This project is of a voltage booster controlled with pushbutton, when we press the pushbutton, the o...
Voltage booster with Pushbutton
This project is of a voltage booster controlled with pushbutton, when we press the pushbutton, the o...
-
 Short Circuit protector and alerter
IntroductionShort circuit is a common problem in every circuit and it may occur any time during oper...
Short Circuit protector and alerter
IntroductionShort circuit is a common problem in every circuit and it may occur any time during oper...
-
 Led Chaser with help of NE555P Timer chip
This project utilizes the NE555P timer chip to create an LED chaser. The circuit is designed with th...
Led Chaser with help of NE555P Timer chip
This project utilizes the NE555P timer chip to create an LED chaser. The circuit is designed with th...
-
 Arduino Minima with USB c 2.0
Arduino Minima with usb c 2.0 for better connectivity and more space availability.
Arduino Minima with USB c 2.0
Arduino Minima with usb c 2.0 for better connectivity and more space availability.
-
 Arduino SMD with USB C 2.0
This project is of arduino SMD with USB c 2.0 for better connectivity and more available space more ...
Arduino SMD with USB C 2.0
This project is of arduino SMD with USB c 2.0 for better connectivity and more available space more ...
-
 Arduino Micro with USB 2.0 C
THIS project is a the design of arduino micro with usb C 2.0 , Resulting in a better connectivity wi...
Arduino Micro with USB 2.0 C
THIS project is a the design of arduino micro with usb C 2.0 , Resulting in a better connectivity wi...
-
 Arduino Leonardo With USB C
This project is a design of Arduino Leonardo but with easy connectivity, i means i have replaced the...
Arduino Leonardo With USB C
This project is a design of Arduino Leonardo but with easy connectivity, i means i have replaced the...
-
 Arduino Nano with USB C
This project is about arduino nano with USB C 2.0 resulting easy efficient connectivity
Arduino Nano with USB C
This project is about arduino nano with USB C 2.0 resulting easy efficient connectivity
-
 Arduino Uno with USB C
This project is of arduino uno but with USB C 2.0 , resulting in better and easy connectivity, Just ...
Arduino Uno with USB C
This project is of arduino uno but with USB C 2.0 , resulting in better and easy connectivity, Just ...
-
Programmable Mist Maker - XIAO / QT PY Extension
274 0 0 -
RadioHAT - Raspberry Pi radio development platform
275 0 1 -
-
-
-
-
ARPS-2 – Arduino-Compatible Robot Project Shield for Arduino UNO
2834 0 6 -
A Compact Charging Breakout Board For Waveshare ESP32-C3
3337 3 8 -
AI-driven LoRa & LLM-enabled Kiosk & Food Delivery System
3638 2 2


