


Inaki Iturriaga
ARGENTINA • + Follow


Components
|
|
Arduino_UNO_R3 |
x 1 | |
|
|
16x2 Display |
x 1 | |
|
|
16x2 Display to I2C Converter. |
x 1 | |
|
|
BMP280 |
x 1 | |
|
|
SPI SD Card Reader |
x 1 |
Tools, APP Software Used etc.

|
arduino IDEArduino
|
|
|
|
SD Card |
|

|
Soldering Iron Kit |
Description
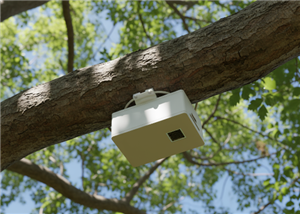
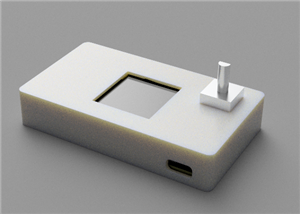
Altimeter Datalogger with Display.
Building Tutorial
Altimeter Datalogger with Display.
Components needed:
- BMP280 sensor
- I2C to 16x2 display converter
- Pre-made PCB board
- Arduino UNO
- Jumper wires
- Soldering iron and solder
- SD Card Reader.
Step 1: Preparing and Soldering the PCB board
- Place the BMP280 and I2C to 16x2 display converter on the designated areas on the pre-made PCB board.
- Heat up the soldering iron to the recommended temperature.
- Apply a small amount of solder to the tip of the soldering iron to ensure a good connection.
- Starting with the BMP280 sensor, apply heat to one of the pins and add solder until it melts and adheres to the pad on the pre-made PCB board.
- Continue soldering the remaining pins of the BMP280 sensor, making sure to keep the sensor flat and aligned with the pads on the pre-made PCB board.
- Repeat the same process for the I2C to 16x2 display converter and the SD Card Reader, making sure to align the pins with the pads on the pre-made PCB board.
Step 3: Coding the project using Arduino IDE
- Connect the Arduino UNO to your computer using a USB cable.
- Open the Arduino IDE on your computer and create a new sketch.
- Copy and paste the code given on the project page into the Arduino IDE.
- Compile the code and upload it to the Arduino UNO.
- Once uploaded, open the Serial Monitor to see the altitude readings from the BMP280 sensor and the display will show the altitude reading as well.
That's it! You have successfully soldered the BMP280 sensor and I2C to 16x2 display converter to a pre-made PCB for an Arduino UNO and coded it using the Arduino IDE.
Code
Code
Arduino
#include <Wire.h>
#include <Adafruit_Sensor.h>
#include <Adafruit_BMP280.h>
#include <LiquidCrystal_I2C.h>
#include <SD.h>

#define LCD_COLUMNS 16
#define LCD_ROWS 2

#define LOG_FILE_NAME "altitude.log"
#define LOG_INTERVAL 300 // Log interval in milliseconds

Adafruit_BMP280 bmp; // Create BMP280 object
LiquidCrystal_I2C lcd(0x27, LCD_COLUMNS, LCD_ROWS); // Initialize LCD
File logFile; // Create log file object

float maxAltitude = 0.0; // Initialize maximum altitude variable


void setup() {
  Serial.begin(9600); // Start serial communication
  lcd.init(); // Initialize LCD
  lcd.backlight(); // Turn on LCD backlight
  if (!bmp.begin(0x76)) { // Initialize BMP280 with I2C address 0x76
    Serial.println("Could not find a valid BMP280 sensor, check wiring!");
    while (1);
  }
  if (!SD.begin(10)) { // Initialize microSD card with pin 10
    Serial.println("Could not initialize SD card, check wiring!");

  }
  logFile = SD.open(LOG_FILE_NAME, FILE_WRITE); // Open log file for writing
  logFile.println("Time,Altitude"); // Write header to log file
  logFile.close();


}

void loop() {
  static unsigned long lastLogTime = 0; // Initialize last log time variable
  unsigned long currentTime = millis(); // Get current time in milliseconds
  float temperature = bmp.readTemperature(); // Read temperature in Celsius
  float pressure = bmp.readPressure() / 100.0; // Read pressure in hPa
  float altitude = bmp.readAltitude(1012.7); // Read altitude in meters relative to sea level

  // Update maximum altitude
  if (altitude > maxAltitude) {
    maxAltitude = altitude;
  }

  // Print readings to serial monitor


  Serial.print("Temperature = ");
  Serial.print(temperature);
  Serial.println(" °C");

  Serial.print("Pressure = ");
  Serial.print(pressure);
  Serial.println(" hPa");

  Serial.print("Altitude = ");
  Serial.print(altitude);
  Serial.println(" meters");

  // Update LCD display
  lcd.clear();
  lcd.setCursor(0, 0);
  lcd.print("Max Altitude:");
  lcd.setCursor(0, 1);
  lcd.print(maxAltitude);
  lcd.print(" meters");

  // Log altitude every 0.3 seconds
  if (currentTime - lastLogTime >= LOG_INTERVAL) {
    logFile = SD.open(LOG_FILE_NAME, FILE_WRITE); // Open log file for writing
    logFile.print(currentTime / 1000.0); // Write time in seconds
    logFile.print(",");
    logFile.println(altitude); // Write altitude
    logFile.close();
    lastLogTime = currentTime; // Update last log time
  }

  delay(100); // Wait for 0.1 second before reading again
}
CAD-Custom parts and enclosures
Case_Bottom
Flight_Computer1.stl
Case_Top
Flight_Computer2.stl
Mar 24,2023
1,677 views
Altimeter Datalogger with Display.
Make a Datalogging Altimeter with a Display!
1677
0
0
Published: Mar 24,2023
Standard PCB
Download Gerber file 7
BOM(Bill of materials)
PCBWay Donate 10% cost To Author
Only PCB
PCB+Assembly
*PCBWay community is a sharing platform. We are not responsible for any design issues and parameter issues (board thickness, surface finish, etc.) you choose.


Under the
Attribution-NonCommercial-NoDerivs (CC BY-NC-ND)
License.


Raspberry Pi 5 7 Inch Touch Screen IPS 1024x600 HD LCD HDMI-compatible Display for RPI 4B 3B+ OPI 5 AIDA64 PC Secondary Screen(Without Speaker)
BUY NOW


- Comments(0)
- Likes(0)
Upload photo
You can only upload 5 files in total. Each file cannot exceed 2MB. Supports JPG, JPEG, GIF, PNG, BMP
0 / 10000
More by Inaki Iturriaga
-
 Battery-Powered ESP32-CAM Continuous Video Recorder
OverviewThis project transforms an ESP32-CAM module into a standalone, battery-powered video recordi...
Battery-Powered ESP32-CAM Continuous Video Recorder
OverviewThis project transforms an ESP32-CAM module into a standalone, battery-powered video recordi...
-
 GPS Mobile Beacon
Building a GPS Emergency Beacon: A DIY TutorialWelcome to our latest DIY project: creating a GPS Eme...
GPS Mobile Beacon
Building a GPS Emergency Beacon: A DIY TutorialWelcome to our latest DIY project: creating a GPS Eme...
-
 Wireless RFID Card Copier.
Wireless RFID Card CopierIn today's digital world, security and accessibility are of paramount impor...
Wireless RFID Card Copier.
Wireless RFID Card CopierIn today's digital world, security and accessibility are of paramount impor...
-
 Piezo Alert System.
Within the fast-evolving sphere of security tools and home automation, creativity often paves the wa...
Piezo Alert System.
Within the fast-evolving sphere of security tools and home automation, creativity often paves the wa...
-
 Wifi Weather Station - Sensors board
WiFi Weather Station - Sensor unitIn our digital era, many electronics projects integrate diverse se...
Wifi Weather Station - Sensors board
WiFi Weather Station - Sensor unitIn our digital era, many electronics projects integrate diverse se...
-
 Building a GPS Speedometer with RP2040-Zero
Build a Feature-Packed GPS Speedometer with an RP2040This project guide will walk you through buildi...
Building a GPS Speedometer with RP2040-Zero
Build a Feature-Packed GPS Speedometer with an RP2040This project guide will walk you through buildi...
-
 RC Receiver
Build Your Own RC ReceiverHarnessing advanced electronics and precise control systems, the RC Receiv...
RC Receiver
Build Your Own RC ReceiverHarnessing advanced electronics and precise control systems, the RC Receiv...
-
 Universal RC Controller
Build Your Own Universal RC RemoteHarnessing the power of custom PCBs and wireless communication, th...
Universal RC Controller
Build Your Own Universal RC RemoteHarnessing the power of custom PCBs and wireless communication, th...
-
 Continuous GPS Tracker
This compact and efficient tracker provides real-time location updates, making it ideal for surveill...
Continuous GPS Tracker
This compact and efficient tracker provides real-time location updates, making it ideal for surveill...
-
 Air Quality Monitor
Welcome to our DIY tutorial on assembling an Air Quality Monitoring Device. This project is perfect ...
Air Quality Monitor
Welcome to our DIY tutorial on assembling an Air Quality Monitoring Device. This project is perfect ...
-
 Automatic Watch Winder
In the realm of luxury timepieces and watch aficionados, an automatic watch is...
Automatic Watch Winder
Automatic Watch WinderIn the realm of luxury timepieces and watch aficionados, an automatic watch is...
-
 Handheld GPS
Within the swiftly advancing realm of portable technology and travel essentials, innovation often sh...
Handheld GPS
Within the swiftly advancing realm of portable technology and travel essentials, innovation often sh...
-
 Dual Motor Controller for Model Robotics
In the thrilling world of robotics and DIY engineering, innovation continues to soar to new heights....
Dual Motor Controller for Model Robotics
In the thrilling world of robotics and DIY engineering, innovation continues to soar to new heights....
-
 Altitude Indicator with Beeper for Rocketry
Altitude Indicator for Model RocketryIn our ever-advancing technological landscape, countless projec...
Altitude Indicator with Beeper for Rocketry
Altitude Indicator for Model RocketryIn our ever-advancing technological landscape, countless projec...
-
 Wifi Weather Station - Display unit
WiFi Weather Station - Display UnitIn this technologically advanced age, countless electronics proje...
Wifi Weather Station - Display unit
WiFi Weather Station - Display UnitIn this technologically advanced age, countless electronics proje...
-
 Positon Breakout Board
Position Sensors Breakout Board In today's era of advanced technology, many electronics projects req...
Positon Breakout Board
Position Sensors Breakout Board In today's era of advanced technology, many electronics projects req...
-
 Ambient Sensors Breakout Board
In today's world, electronics projects often require the integration of multiple sensors to collect ...
Ambient Sensors Breakout Board
In today's world, electronics projects often require the integration of multiple sensors to collect ...
-
 Infrared Launch Controller
IntroductionHave you ever wanted to remotely launch a rocket, drone or other device using infrared t...
Infrared Launch Controller
IntroductionHave you ever wanted to remotely launch a rocket, drone or other device using infrared t...
You may also like
-
Programmable Mist Maker - XIAO / QT PY Extension
191 0 0 -
RadioHAT - Raspberry Pi radio development platform
209 0 1 -
-
-
-
-
ARPS-2 – Arduino-Compatible Robot Project Shield for Arduino UNO
2779 0 5 -
A Compact Charging Breakout Board For Waveshare ESP32-C3
3284 3 8 -
AI-driven LoRa & LLM-enabled Kiosk & Food Delivery System
3549 2 2


