Water pump control for irrigation via telegram and esp32
Water Pump Control by Telegram and ESP32 is an automated system that allows you to remotely control a water pump by using an ESP32 microcontroller and the Telegram messaging platform.
The ESP32 is a low-cost, low-power microcontroller that can connect to the Internet using Wi-Fi, making it ideal for IoT projects. On the other hand, Telegram is an instant messaging platform that can be used to send and receive messages, photos, videos, and other types of files.
The ESP32 is responsible for receiving the commands sent by Telegram through a BOT and processing them to control the relay that activates the water pump. The user can send commands to turn the pump on or off.
In short, water pump control via Telegram and ESP32 allows for efficient and easy management of water supply in real time, with the possibility of controlling the water pump from anywhere with Internet access.
An Esp32

Female pins

Submersible water pump

Cables dupont

Module ky-004

Relay Module

TECHNICAL SPECIFICATIONS
Operating Voltage: 5V DC
Control Signal: TTL (3.3V or 5V)
Number of Relays (channels): 1 CH
Max capacity: 10A/250VAC, 10A/30VDC
Max current: 10A (NO), 5A (NC)
Action time: 10 ms / 5 ms
To activate output NO: 0 Volts
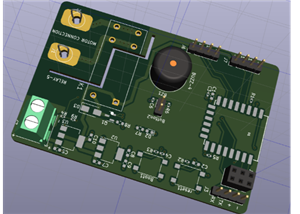
PCB
📷 📷
Download gerber file –> Gerber_esp32
Un protoboard

One source for the esp32 and another for the water pump


#include <WiFi.h>
#include <WiFiClientSecure.h>
#include <UniversalTelegramBot.h>
// Reemplazar con los datos de tu red wifi
#define WIFI_SSID "Mi_red_wifi"
#define WIFI_PASSWORD "Mi_clave"
//Token de Telegram BOT se obtenienen desde Botfather en telegram
#define BOT_TOKEN "Mi_token"
#define ID_Chat "Mi_ID_Chat"//ID_Chat se obtiene de telegram
const unsigned long tiempo = 1000; //tiempo medio entre escaneo de mensajes
String datos;
String chat_id;
WiFiClientSecure secured_client;
UniversalTelegramBot bot(BOT_TOKEN, secured_client);
unsigned long tiempoAnterior; //última vez que se realizó el análisis de mensajes
const int pin22 = 22;//Pin de la bomba de agua
const int pin23 = 23;//Pin del pulsador
int bombaStatus = 0;
int estadoM = 1;
int inicio = 1;
void mensajesNuevos(int numerosMensajes)
{
  for (int i = 0; i < numerosMensajes; i++)
  {
    chat_id = bot.messages[i].chat_id;
    String text = bot.messages[i].text;
//////////Activa la Bomba de agua activada indefinidamente //////
    if (text == "/Activar")
    {
      digitalWrite(pin22, HIGH);
      bombaStatus = 1;
      bot.sendMessage(chat_id, "Bomba de agua activada indefinidamente", "");
    }
//////////Activa la Bomba de agua activada x 1 segundo//////
    if (text == "/Activar1")
    {
      digitalWrite(pin22, HIGH);
      bombaStatus = 1;
      bot.sendMessage(chat_id, "Bomba de agua activada x 1 segundo", "");
      delay(1000);
      digitalWrite(pin22, LOW);
      bombaStatus = 0;
      bot.sendMessage(chat_id, "Bomba de agua desactivada después de 1 Segundos", "");
    }
//////////Activa la Bomba de agua activada x 2 segundos//////
    if (text == "/Activar2")
    {
      digitalWrite(pin22, HIGH);
      bombaStatus = 1;
      bot.sendMessage(chat_id, "Bomba de agua activada x 2 segundos", "");
      delay(2000);
      digitalWrite(pin22, LOW);
      bombaStatus = 0;
      bot.sendMessage(chat_id, "Bomba de agua desactivada después de 2 Segundos", "");
    }
//////////Activa la Bomba de agua activada x 3 segundos//////
    if (text == "/Activar3")
    {
      digitalWrite(pin22, HIGH);
      bombaStatus = 1;
      bot.sendMessage(chat_id, "Bomba de agua activada x 3 segundos", "");
      delay(3000);
      digitalWrite(pin22, LOW);
      bombaStatus = 0;
      bot.sendMessage(chat_id, "Bomba de agua desactivada automaticamente después de 3 Segundos", "");
    }
//////////Activa la Bomba de agua activada x 4 segundos//////
    if (text == "/Activar4")
    {
      digitalWrite(pin22, HIGH);
      bombaStatus = 1;
      bot.sendMessage(chat_id, "Bomba de agua activada x 4 segundos", "");
      delay(4000);
      digitalWrite(pin22, LOW);
      bombaStatus = 0;
      bot.sendMessage(chat_id, "Bomba de agua desactivada automaticamente después de 4 Segundos", "");
    }
//////////Activa la Bomba de agua activada x 5 segundos//////
    if (text == "/Activar5")
    {
      digitalWrite(pin22, HIGH);
      bombaStatus = 1;
      bot.sendMessage(chat_id, "Bomba de agua activada x 5 segundos", "");
      delay(5000);
      digitalWrite(pin22, LOW);
      bombaStatus = 0;
      bot.sendMessage(chat_id, "Bomba de agua desactivada automaticamente después de 5 Segundos", "");
    }

///////////Desactiva la bomba de agua///////////////////////////

    if (text == "/Apagar")
    {
      digitalWrite(pin22, LOW);
      bombaStatus = 0;
      bot.sendMessage(chat_id, "Bomba de agua apagada", "");
    }

////////Estado de la bomba de agua/////////

    if (text == "/Estado")
    {
      if (bombaStatus)
      {
        bot.sendMessage(chat_id, "Estado actual: Bomba de agua encendida", "");
      }
      else
      {
        bot.sendMessage(chat_id, "Estado actual: Bomba de agua apagada", "");
      }
    }
////////Imprime el menú de ayuda//////////
    if (text == "/Ayuda")
    {
      String ayuda = "Bienvenido al sistema de Internet de las cosas, con ESP32 " ".\n";
      ayuda += "Estas son tus opciones.\n\n";
      ayuda += "/Activar: Activa el la bomba de agua en forma indefinida \n";
      ayuda += "/Apagar: Desactiva el la bomba de agua \n";
      ayuda += "/Activar1: Activa el la bomba de agua durante 1 segundo \n";
      ayuda += "/Activar2: Activa el la bomba de agua durante 2 segundos \n";
      ayuda += "/Activar3: Activa el la bomba de agua durante 3 segundos \n";
      ayuda += "/Activar4: Activa el la bomba de agua durante 4 segundos \n";
      ayuda += "/Activar5: Activa el la bomba de agua durante 5 segundos \n";
      ayuda += "/Estado : devuelve el estado actual si la bomba de agua está encendidad o apagada\n";
      ayuda += "/Ayuda: Imprime este menú \n";
      ayuda += "Recuerda el sistema distingue entre mayuculas y minusculas \n";
      bot.sendMessage(chat_id, ayuda, "");
    }
  }
}

void setup()
{
  Serial.begin(115200);
//  dht.begin();//Inicializar el sensor DHT
  pinMode(pin22, OUTPUT); //Inicializar pin 22 como salida para en control de la bomba de agua.
  pinMode(pin23, INPUT); //Se configura como entrada para el pulsador
  digitalWrite(pin22, LOW);// La colocamos en estado bajo
  // Intenta conectarse a la red wifi
  Serial.print("Conectando a la red ");
  Serial.print(WIFI_SSID);
  WiFi.begin(WIFI_SSID, WIFI_PASSWORD);
  secured_client.setCACert(TELEGRAM_CERTIFICATE_ROOT); //Agregar certificado raíz para api.telegram.org
  while (WiFi.status() != WL_CONNECTED)
  {
    Serial.print(".");
    delay(500);
  }
  Serial.print("\nConectado a la red wifi. Dirección IP: ");
  Serial.println(WiFi.localIP());
   if(inicio == 1){
    Serial.println("Sistema preparado");
    bot.sendMessage(ID_Chat, "Sistema preparado!!!, escribe /Ayuda para ver las opciones", "");//Enviamos un mensaje a telegram para informar que el sistema está listo
    inicio = 0;
    }
}

void loop()
{
  //Lectura del pulsador
 int lecturaPin23 = digitalRead(pin23);
 if(lecturaPin23 == LOW){
  Serial.println("Botón activado");
  bombaManual();
 }
  //Verifica si hay datos nuevos en telegram cada 1 segundo
  if (millis() - tiempoAnterior > tiempo)
  {
    int numerosMensajes = bot.getUpdates(bot.last_message_received + 1);

    while (numerosMensajes)
    {
      Serial.println("Comando recibido");
      mensajesNuevos(numerosMensajes);
      numerosMensajes = bot.getUpdates(bot.last_message_received + 1);
    }

    tiempoAnterior = millis();
  }

}

void bombaManual(){
  int lecturaPin22 = digitalRead(pin22);//Leemos el estado del pin de la bomba de agua
  if(lecturaPin22 == LOW ){
    digitalWrite(pin22, HIGH);//Activamos la bomba de agua
    bombaStatus = 1;
    delay(200);
    bot.sendMessage(ID_Chat, "Bomba de agua activada manualmente", "");
    }

 if(lecturaPin22 == HIGH ){
      digitalWrite(pin22, LOW);//Desactiva la bomba de agua
      bombaStatus = 0;
      delay(200);
      bot.sendMessage(ID_Chat, "Bomba de agua desactivada manualmente", "");
}
}
Water pump control for irrigation via telegram and esp32
*PCBWay community is a sharing platform. We are not responsible for any design issues and parameter issues (board thickness, surface finish, etc.) you choose.

Raspberry Pi 5 7 Inch Touch Screen IPS 1024x600 HD LCD HDMI-compatible Display for RPI 4B 3B+ OPI 5 AIDA64 PC Secondary Screen(Without Speaker)
BUY NOW- Comments(0)
- Likes(0)
- 0 USER VOTES
- YOUR VOTE 0.00 0.00
- 1
- 2
- 3
- 4
- 5
- 6
- 7
- 8
- 9
- 10
- 1
- 2
- 3
- 4
- 5
- 6
- 7
- 8
- 9
- 10
- 1
- 2
- 3
- 4
- 5
- 6
- 7
- 8
- 9
- 10
- 1
- 2
- 3
- 4
- 5
- 6
- 7
- 8
- 9
- 10
 More by CarlosVolt Tutoriales
-
 Infrared stepper motor control with speed control
More info and updates https://rogerbit.com/wprb/2024/09/motor-paso-a-paso-x-infrarrojo/In this proje...
-
 Uploading BME280 Sensor Data to ThingSpeak Using ESP32
In this tutorial, we will show you how to connect a BME280 sensor to an ESP32 to read temperature, h...
-
 Water pump control for irrigation via telegram and esp32
Water Pump Control by Telegram and ESP32 is an automated system that allows you to remotely control ...
-
 Air conditioning on/off control via telegram and esp32
In this tutorial we will see how to control an air conditioner, with an esp32 and the telegram appli...
-
 35 watt stereo amplifier
In this video we will see how to build an audio amplifier, with the TDA7377 integrated circuit, and ...
-
 Laser alarm with RFID module
More info and updates in https://rogerbit.com/wprb/2024/08/alarma-laser-rfid/In this project, we bui...
-
 Control lights by voice commands and keys
In this tutorial we will see how to create a device to control lights by voice commands, with a modu...
-
 Stepper motor control x bluetooth and app
In this tutorial we will see a circuit, which controls a stepper motor, with an application made in ...
-
 DFplayermini x bluetooth mp3 player control
More info and updates in https://rogerbit.com/wprb/2022/12/dfplayermini-x-bluetooth/In this tutorial...
-
 Robot with WiFi control and servos driven by ESP32
More info and updates in https://rogerbit.com/wprb/2023/07/robot-wifi/A robot controlled by Wi-Fi, s...
-
 How to make a water level meter with uln2803
In this tutorial we will see how to make a water level meter circuit with the built-in uln2803.The p...
-
 Color Detector with Arduino and OLED display
In this tutorial we will show you how to build a color detector using the TCS3200 sensor and an SH11...
-
 DTMF decoder for handy with arduino, control over several kilometers
In this tutorial we will see how to make a circuit to connect to our handy, in this case a Baofeng U...
-
 Turn on light from thindspeak with esp32
In this tutorial, we will show you how to control lights over the Internet using an ESP32 and the Th...
-
 MP3 player control with webserver using ESP32 WIFI
In this tutorial, you will learn how to build a web server using the ESP32 to control the YX5300 mod...
-
 Time clock with fingerprint IoT module, uploading data to thingspeak
More info in and updates in https://rogerbit.com/wprb/2022/07/reloj-de-control-fingerprint/In this t...
-
 Make your own logic tip (includes printed circuit board)
In this video tutorial we will see how to make a logic tip, on a printed circuit, with the integrate...
-
 Coil or inductor meter with Arduino and OLED display
More info and updates in https://rogerbit.com/wprb/2022/06/medidor-inductores/In this tutorial we wi...
-
A Compact Charging Breakout Board For Waveshare ESP32-C3
461 3 4 -
AI-driven LoRa & LLM-enabled Kiosk & Food Delivery System
474 2 0 -
-
-
-
ESP32-C3 BLE Keyboard - Battery Powered with USB-C Charging
677 0 1 -
-
mammoth-3D SLM Voron Toolhead – Manual Drill & Tap Edition
664 0 1 -
-
AEL-2011 Power Supply Module
1339 0 2 -
AEL-2011 50W Power Amplifier
1217 0 2


