


Color Detector with Arduino and OLED display
In this tutorial we will show you how to build a color detector using the TCS3200 sensor and an SH1106 OLED display , all controlled by an Arduino board . This system can recognize colors and display them clearly on the OLED screen, ideal for robotics projects, object classification, or any creative idea you have!
What will you learn?
Configuring the TCS3200 Color Sensor : Learn how to interpret the RGB information detected by this sensor.
Integrating an SH1106 OLED display : Discover how to display results in a readable and attractive format.
Processing Color Data with Arduino : Master converting readings into useful values for your projects.
Why This Project?
This project is not only fun to build, but also very useful for learning about sensors and data processing. Plus, you can expand it with new functionalities, such as classifying objects or making more precise color measurements.
Read on to discover the step-by-step instructions, the materials you need, and the code to take your color detector to the next level. Let's get started!
Electronic components of the project

A socket for arduino

Female pins

Dupont cables female male

Display oled sh1106

This is a 128x64 dot monochrome OLED display module with I2C interface. It has several advantages over LCD displays, such as high brightness, very good contrast, a wider viewing angle, and low power consumption. It is compatible with Arduino Rasberry Pi and PIC microcontrollers among others. It works with logic levels from 3.3V to 5V and has a viewing angle greater than 160 degrees. The screen size is 1.3 inches. It is powered by a voltage of 3.3V to 5V. It can be used in applications such as smart watches, MP3, thermometers, instruments, and various projects, etc.
Features
Interface: I2C(3.3V / 5V logic level)
Resolution: 128 x 64
Angle of view: >160 degree
Display color: Blue
Display size: 1.3 inch
Driver IC: SH1106
Power supply: DC 3.3V~5V
Operating temperature: -20~70’C
Application: smart watch, MP3, thermometer, instruments, DIY projects, etc.
A TCS3200 Sensor
The TCS3200 is a full featured RGB color sensor with 4 built-in LEDs and can detect an almost infinite range of colors. Its applications are various such as measuring ambient light, color classification etc. Internally the sensor has an array of small phototransistors each with several color filters, allowing it to be quite accurate and sensitive. The sensor output returns a pulse of duration proportional to the intensity of the detected color.
Features:
Power: 2.7V to 5.5V
Salida digital TTL
Programmable scale and filters
Power down function
Size: 28.4×28.4mm

Manual–> TCS3200 TCS3210
PCB


Download the PCB
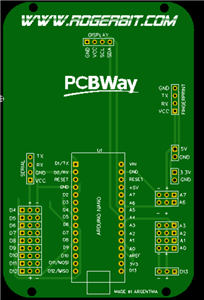
Electronic pcb diagram

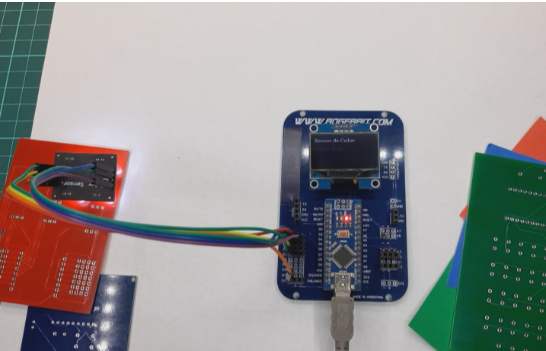
Circuit with PCB

#include <U8g2lib.h> // Librería para manejar el display OLED
// Pines de control del sensor de color TCS3200
#define S0 4
#define S1 5
#define S2 6
#define S3 7
#define sensorOut 12 // Pin de salida del sensor de color

// Configuración del display OLED (modelo SH1106, 128x64, I2C)
U8G2_SH1106_128X64_NONAME_F_HW_I2C oled(U8G2_R0, /* reset=*/ U8X8_PIN_NONE);

int frequency = 0; // Variable para almacenar la frecuencia leída del sensor

void setup() {
  // Configuración de los pines del sensor como entradas/salidas
  pinMode(S0, OUTPUT);
  pinMode(S1, OUTPUT);
  pinMode(S2, OUTPUT);
  pinMode(S3, OUTPUT);
  pinMode(sensorOut, INPUT);

  // Configuración de la escala de frecuencia del sensor
  digitalWrite(S0, HIGH); // Escala del 20% de frecuencia
  digitalWrite(S1, LOW);

  // Inicializar el OLED
  oled.begin();
  oled.clearBuffer();
  oled.setFont(u8g2_font_ncenB08_tr); // Fuente básica para el OLED
  oled.drawStr(0, 12, "Sensor de Color"); // Mensaje inicial
  oled.sendBuffer();

  // Inicializar la comunicación Serial
  Serial.begin(9600);
}

void loop() {
  int red, green, blue; // Variables para almacenar las mediciones RGB

  // Leer componente rojo
  digitalWrite(S2, LOW);  // Configuración del filtro rojo
  digitalWrite(S3, LOW);
  frequency = pulseIn(sensorOut, LOW); // Medir frecuencia del pulso
  red = frequency;

  // Leer componente verde
  digitalWrite(S2, HIGH); // Configuración del filtro verde
  digitalWrite(S3, HIGH);
  frequency = pulseIn(sensorOut, LOW); // Medir frecuencia del pulso
  green = frequency;

  // Leer componente azul
  digitalWrite(S2, LOW);  // Configuración del filtro azul
  digitalWrite(S3, HIGH);
  frequency = pulseIn(sensorOut, LOW); // Medir frecuencia del pulso
  blue = frequency;

  // Mostrar valores RGB en el monitor serial
  Serial.print("R: ");
  Serial.print(red);
  Serial.print(" G: ");
  Serial.print(green);
  Serial.print(" B: ");
  Serial.println(blue);

  // Determinar el color dominante basado en las mediciones RGB
  String colorDetectado;
 if(red < 20 || green < 20|| blue < 20){
    colorDetectado = "Indefinido";
    }else
  if (red < green && red < blue) {
    colorDetectado = "Rojo";
  } else if (green < red && green < blue) {
    colorDetectado = "Verde";
  } else if (blue < red && blue < green) {
    colorDetectado = "Azul";
  }

  Serial.println(colorDetectado);

  // Mostrar el color detectado en el dosplay OLED
  oled.clearBuffer(); // Limpiar el buffer del OLED
  oled.setFont(u8g2_font_ncenB08_tr); // Establecer la fuente
  oled.drawStr(0, 12, "Sensor de Color"); // Mensaje principal
  oled.setCursor(0, 30); // Posición para el texto
  oled.print("Color: ");
  oled.print(colorDetectado); // Escribir el color detectado
  oled.sendBuffer(); // Enviar datos al OLED

  delay(1000); // Esperar antes de la próxima medición
}
Color Detector with Arduino and OLED display
*PCBWay community is a sharing platform. We are not responsible for any design issues and parameter issues (board thickness, surface finish, etc.) you choose.


Raspberry Pi 5 7 Inch Touch Screen IPS 1024x600 HD LCD HDMI-compatible Display for RPI 4B 3B+ OPI 5 AIDA64 PC Secondary Screen(Without Speaker)
BUY NOW


- Comments(0)
- Likes(0)
More by CarlosVolt Tutoriales
-
 Infrared stepper motor control with speed control
More info and updates https://rogerbit.com/wprb/2024/09/motor-paso-a-paso-x-infrarrojo/In this proje...
Infrared stepper motor control with speed control
More info and updates https://rogerbit.com/wprb/2024/09/motor-paso-a-paso-x-infrarrojo/In this proje...
-
 Uploading BME280 Sensor Data to ThingSpeak Using ESP32
In this tutorial, we will show you how to connect a BME280 sensor to an ESP32 to read temperature, h...
Uploading BME280 Sensor Data to ThingSpeak Using ESP32
In this tutorial, we will show you how to connect a BME280 sensor to an ESP32 to read temperature, h...
-
 Water pump control for irrigation via telegram and esp32
Water Pump Control by Telegram and ESP32 is an automated system that allows you to remotely control ...
Water pump control for irrigation via telegram and esp32
Water Pump Control by Telegram and ESP32 is an automated system that allows you to remotely control ...
-
 Air conditioning on/off control via telegram and esp32
In this tutorial we will see how to control an air conditioner, with an esp32 and the telegram appli...
Air conditioning on/off control via telegram and esp32
In this tutorial we will see how to control an air conditioner, with an esp32 and the telegram appli...
-
 35 watt stereo amplifier
In this video we will see how to build an audio amplifier, with the TDA7377 integrated circuit, and ...
35 watt stereo amplifier
In this video we will see how to build an audio amplifier, with the TDA7377 integrated circuit, and ...
-
 Laser alarm with RFID module
More info and updates in https://rogerbit.com/wprb/2024/08/alarma-laser-rfid/In this project, we bui...
Laser alarm with RFID module
More info and updates in https://rogerbit.com/wprb/2024/08/alarma-laser-rfid/In this project, we bui...
-
 Control lights by voice commands and keys
In this tutorial we will see how to create a device to control lights by voice commands, with a modu...
Control lights by voice commands and keys
In this tutorial we will see how to create a device to control lights by voice commands, with a modu...
-
 Stepper motor control x bluetooth and app
In this tutorial we will see a circuit, which controls a stepper motor, with an application made in ...
Stepper motor control x bluetooth and app
In this tutorial we will see a circuit, which controls a stepper motor, with an application made in ...
-
 DFplayermini x bluetooth mp3 player control
More info and updates in https://rogerbit.com/wprb/2022/12/dfplayermini-x-bluetooth/In this tutorial...
DFplayermini x bluetooth mp3 player control
More info and updates in https://rogerbit.com/wprb/2022/12/dfplayermini-x-bluetooth/In this tutorial...
-
 Robot with WiFi control and servos driven by ESP32
More info and updates in https://rogerbit.com/wprb/2023/07/robot-wifi/A robot controlled by Wi-Fi, s...
Robot with WiFi control and servos driven by ESP32
More info and updates in https://rogerbit.com/wprb/2023/07/robot-wifi/A robot controlled by Wi-Fi, s...
-
 How to make a water level meter with uln2803
In this tutorial we will see how to make a water level meter circuit with the built-in uln2803.The p...
How to make a water level meter with uln2803
In this tutorial we will see how to make a water level meter circuit with the built-in uln2803.The p...
-
 Color Detector with Arduino and OLED display
In this tutorial we will show you how to build a color detector using the TCS3200 sensor and an SH11...
Color Detector with Arduino and OLED display
In this tutorial we will show you how to build a color detector using the TCS3200 sensor and an SH11...
-
 DTMF decoder for handy with arduino, control over several kilometers
In this tutorial we will see how to make a circuit to connect to our handy, in this case a Baofeng U...
DTMF decoder for handy with arduino, control over several kilometers
In this tutorial we will see how to make a circuit to connect to our handy, in this case a Baofeng U...
-
 Turn on light from thindspeak with esp32
In this tutorial, we will show you how to control lights over the Internet using an ESP32 and the Th...
Turn on light from thindspeak with esp32
In this tutorial, we will show you how to control lights over the Internet using an ESP32 and the Th...
-
 MP3 player control with webserver using ESP32 WIFI
In this tutorial, you will learn how to build a web server using the ESP32 to control the YX5300 mod...
MP3 player control with webserver using ESP32 WIFI
In this tutorial, you will learn how to build a web server using the ESP32 to control the YX5300 mod...
-
 Time clock with fingerprint IoT module, uploading data to thingspeak
More info in and updates in https://rogerbit.com/wprb/2022/07/reloj-de-control-fingerprint/In this t...
Time clock with fingerprint IoT module, uploading data to thingspeak
More info in and updates in https://rogerbit.com/wprb/2022/07/reloj-de-control-fingerprint/In this t...
-
 Make your own logic tip (includes printed circuit board)
In this video tutorial we will see how to make a logic tip, on a printed circuit, with the integrate...
Make your own logic tip (includes printed circuit board)
In this video tutorial we will see how to make a logic tip, on a printed circuit, with the integrate...
-
 Coil or inductor meter with Arduino and OLED display
More info and updates in https://rogerbit.com/wprb/2022/06/medidor-inductores/In this tutorial we wi...
Coil or inductor meter with Arduino and OLED display
More info and updates in https://rogerbit.com/wprb/2022/06/medidor-inductores/In this tutorial we wi...
-
-
ARPS-2 – Arduino-Compatible Robot Project Shield for Arduino UNO
1708 0 5 -
A Compact Charging Breakout Board For Waveshare ESP32-C3
2251 3 7 -
AI-driven LoRa & LLM-enabled Kiosk & Food Delivery System
2271 2 0 -
-
-
-
ESP32-C3 BLE Keyboard - Battery Powered with USB-C Charging
2437 0 2 -


