


|
arduino IDEArduino
|
|

|
Autodesk InventorAutodesk
|
|

|
Bambu Lab A1 mini 3D printerBambu Lab
|
|

|
Soldering iron (generic) |
|

|
Solder Wire, Lead Free |
Precision MK.1
What is Precision MK.1?
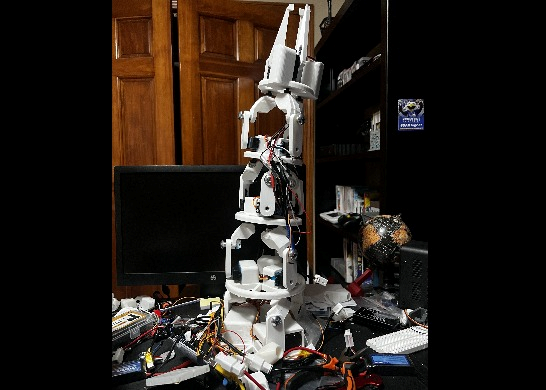
Precision MK.1 reimagines the standard robotic arm. While serial manipulators are effective, they lack the visual appeal of more experimental designs. Inspired by James Bruton’s Doc Ock tentacle that used stacked Stewart platforms, we wanted to push the concept further, but with less (and more?).
About our Design
Our design is intended to withstand a maximum load of 5 lbs (more testing is needed), prioritizing maneuverability and range of motion over payload capacity. To achieve our goals without breaking the bank (at least not entirely), we decided to use a design dependent on servos and a dual-limb system. Each parallel manipulator has three legs, each with two segments. The bottom segment connects the servo and the hinge, and the top segment connects the hinge and ball joint to the bottom of the parallel manipulator's platform. When a servo is pointed to the right (or left, we alternate on each platform to balance the weight), the linkage will come down. When a servo is pointed upwards, the linkage will go up, maxing out its height (within reason) and, in some cases, making the arm taller. With three of these on each platform for our design of four platforms and a top base for the claw, the arm can move in any direction, make awesome poses, and pick up light objects with ease. Despite the complexity of the platforms at first sight, the tentacle is very simple to understand, as it uses one mechanism and merely stacks it.
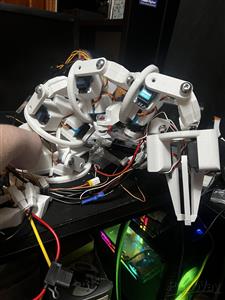
What’s the Hardware?
Each platform needs 3 servo motors, with a combined total of 15. To cut costs, we decided to taper the torque of the servos on each platform, with the torque ratings in order from bottom to top being 80 kg · cm, 45 kg · cm, 45 kg · cm, 35 kg · cm, and 20 kg · cm. 15 servo motors, of course, requires a lot of power, an important problem we had to face. To solve it, we wanted to use one large 10000 mAh 11V battery for the entire build, but we learned not only would we need a buck converter (which we later realized wasn't possible itself due to the amount of current for it to handle), but also that the servos pull so many amps that such high current in one place could be dangerous. As a result, we moved to five 2200 mAh 7.4V 50C+ discharge rate batteries.
Material Issues
Our first prototype was made out of 3D-printed PLA plastic parts and M10 bolts and locknuts, though we quickly found that PLA alone would not be enough. We moved to using PETG, though with some complications due to PETG's complexity to print with strength and time constraints. We tried to use threaded steel rod, but we simply need more time to test the steel with the linkages, as, surprisingly to us, it posed a lot of maneuverability issues.
Honesty from Our Team
Due to the time constraints presented by a long delay to receive the parts we needed, this project was honestly made in haste, as several issues came up with little time to manage them. This project will be thoroughly updated after this event, but for now, what is seen is what there is. There are a lot of things I want to change. For example, the direction the servos go in, as well as better cable management, and, honestly, overall better planning of the project. Anyone building this project will notice inconsistencies with certain parts, and we will hastily try to refine them for better efficiency and safety. Eventually, we will design Precision MK.2 to address these issues and make a more functional robotic arm. Bear with us, please.
TL;DR:
Doc Ock-inspired mechanical arm made out of 3D-printed PLA and PETG plastic with a projected max payload of 5 lbs, a modest range of motion, and advanced maneuverability. Requires five 2200 mAh 7.4 50C+ discharge rate batteries to power safely.
BATTERY SAFETY WARNING
This project, in its current form, requires modification of the wiring of the listed LiPo batteries, meaning soldering and hot air reworking (for heatshrink) will be required. Take EXTREME caution when modifying the battery's wires, as too much heat on the wires or accidentally touching a soldering iron or blowing hot air at a battery can cause dangerous thermal runaway, potentially becoming a dangerous lithium fire hazard or worse. Thank you.
Precision MK.1
*PCBWay community is a sharing platform. We are not responsible for any design issues and parameter issues (board thickness, surface finish, etc.) you choose.


Raspberry Pi 5 7 Inch Touch Screen IPS 1024x600 HD LCD HDMI-compatible Display for RPI 4B 3B+ OPI 5 AIDA64 PC Secondary Screen(Without Speaker)
BUY NOW


- Comments(0)
- Likes(0)
More by Noah Jarvis
-
Programmable Mist Maker - XIAO / QT PY Extension
188 0 0 -
RadioHAT - Raspberry Pi radio development platform
205 0 1 -
-
-
-
-
ARPS-2 – Arduino-Compatible Robot Project Shield for Arduino UNO
2775 0 5 -
A Compact Charging Breakout Board For Waveshare ESP32-C3
3282 3 8 -
AI-driven LoRa & LLM-enabled Kiosk & Food Delivery System
3545 2 2


