


Gas leak detector alarm system with arduino nano
In this tutorial we will see how to assemble a gas leak detector alarm system with arduino nano. We will see a list of the electronic components to be used, the assembly of the circuit, the source code, and finally we will test the operation of the system. This project is ideal for use in sources near our home, where there is gas, such as a kitchen, stove or thermotanque
Electronic components
mq2 gas sensor

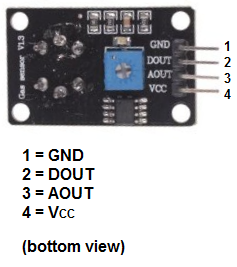
Pin-Out sensor de gas Mq-2
Datasheet sensor MQ-2
Download–> MQ-2
Gas sensor (MQ2) is useful for gas leak detection (in home and industry). It can detect LPG, i-butane, methane, alcohol, hydrogen, smoke, etc. Based on its fast response time. measures can be taken as soon as possible. In addition, the sensitivity can be adjusted using a potentiometer (digital pin).
TECHNICAL SPECIFICATIONS
Operating Voltage: 5V DC
Fast
response and high sensitivity Detection range: 300 to 10000
ppm
Characteristic gas: 1000ppm, Isobutane Sensing resistance:
1KΩ 50ppm Toluene at 20KΩ in Response Time: ≤ 10s
Recovery time: ≤ 30s
Working temperature: -20°C~+55°C
Humidity: ≤ 95% RH
Ambient oxygen content: 21%
Consumes less than 150mA at 5V.
APPLICATIONS
Gas
Leak Detector Industrial Gas Detector
Arduino nano

The Arduino Nano is a small, complete and compatible board based on the ATmega328 (Arduino Nano 3.x). It has more or less the same functionality as the Arduino Duemilanove, but in a different package. It only lacks a DC power connector and works with a Mini-B USB cable instead of a standard one.
Pin diagram

Six 5 mm LED diodes of different colors

Six resistors of 1 Kohm

A 5-volt buzeer

Female pins (4 pins in total)

Male pins (In total 2)

Socket for the arduino nano

PCB

Circuit

int sensorMQ2=0;
void setup(){
Serial.begin(9600);//Configuración de la velocidad del puerto serial de arduino a 9600
//Se configuraran los pines 2,3,4,5,6 y 7 como salidas
//Del pin 2 al 6 van conectados a diodos led con su respectiva resistencia
 pinMode(2, OUTPUT);
 pinMode(3, OUTPUT);
 pinMode(4, OUTPUT);
 pinMode(5, OUTPUT);
 pinMode(6, OUTPUT);
 //Va conectado al Buzzer
 pinMode(7, OUTPUT);
 sensorMQ2=analogRead(A0);//Se lee el valor de la entrada analógica  A0 donde está conectado el sensor MQ2
while(sensorMQ2>80){
  Serial.print("Esperando a que se estabilice el sensor MQ2 (valor menor a 80): ");//Se imprime su valor por el terminal serial
  sensorMQ2=analogRead(A0);//Se lee el valor de la entrada analógica  A0
  Serial.println(sensorMQ2);//Se imprime su valor por el terminal serial
  digitalWrite(2, HIGH);
  digitalWrite(3, HIGH);
  digitalWrite(4, HIGH);
  digitalWrite(5, HIGH);
  digitalWrite(6, HIGH);
  delay(500);
  digitalWrite(2, LOW);
  digitalWrite(3, LOW);
  digitalWrite(4, LOW);
  digitalWrite(5, LOW);
  digitalWrite(6, LOW);
  delay(500);
 }
}
void loop(){
sensorMQ2=analogRead(A0);//Se lee el valor de la entrada analógica  A0
Serial.print("Valor del sensor MQ2: ");
Serial.println(sensorMQ2);//Se imprime su valor por el terminal serial
//Se compara el valor de la variable sensorMQ2 si se cumple apagará todos los led
if(sensorMQ2<79){
  digitalWrite(2, LOW);
  digitalWrite(3, LOW);
  digitalWrite(4, LOW);
  digitalWrite(5, LOW);
  digitalWrite(6, LOW);
  digitalWrite(7, LOW);

  }
//Se compara el valor de la variable sensorMQ2 si se cumple encenderá el led en el pin 2
if(sensorMQ2>80){
  digitalWrite(2, HIGH);
  digitalWrite(3, LOW);
  digitalWrite(4, LOW);
  digitalWrite(5, LOW);
  digitalWrite(6, LOW);
  digitalWrite(7, LOW);

  }
//Se compara el valor de la variable sensorMQ2 si se cumple encenderá el led en el pin 2 y 3
if(sensorMQ2>120){
  digitalWrite(2, HIGH);
  digitalWrite(3, HIGH);
  digitalWrite(4, LOW);
  digitalWrite(5, LOW);
  digitalWrite(6, LOW);
  digitalWrite(7, LOW);

  }
//Se compara el valor de la variable sensorMQ2 si se cumple encenderá el led en el pin 2, 3 y 4
if(sensorMQ2>160){
  digitalWrite(2, HIGH);
  digitalWrite(3, HIGH);
  digitalWrite(4, HIGH);
  digitalWrite(5, LOW);
  digitalWrite(6, LOW);
  digitalWrite(7, LOW);

  }
//Se compara el valor de la variable sensorMQ2 si se cumple encenderá el led en el pin 2, 3, 4, y 5
if(sensorMQ2>200){
  digitalWrite(2, HIGH);
  digitalWrite(3, HIGH);
  digitalWrite(4, HIGH);
  digitalWrite(5, HIGH);
  digitalWrite(6, LOW);
  digitalWrite(7, LOW);

  }
//Se compara el valor de la variable sensorMQ2 si se cumple encenderá el led en el pin 2, 3 ,4 ,5, 6 y el buzzer
if(sensorMQ2>240){
  digitalWrite(2, HIGH);
  digitalWrite(3, HIGH);
  digitalWrite(4, HIGH);
  digitalWrite(5, HIGH);
  digitalWrite(6, HIGH);
  digitalWrite(7, HIGH);//Se actica el buzzer

  }
delay(100);// retardo antes de comenzar de vuelta
}
Gas leak detector alarm system with arduino nano
*PCBWay community is a sharing platform. We are not responsible for any design issues and parameter issues (board thickness, surface finish, etc.) you choose.


Raspberry Pi 5 7 Inch Touch Screen IPS 1024x600 HD LCD HDMI-compatible Display for RPI 4B 3B+ OPI 5 AIDA64 PC Secondary Screen(Without Speaker)
BUY NOW


- Comments(0)
- Likes(2)
More by CarlosVolt Tutoriales
-
 Infrared stepper motor control with speed control
More info and updates https://rogerbit.com/wprb/2024/09/motor-paso-a-paso-x-infrarrojo/In this proje...
Infrared stepper motor control with speed control
More info and updates https://rogerbit.com/wprb/2024/09/motor-paso-a-paso-x-infrarrojo/In this proje...
-
 Uploading BME280 Sensor Data to ThingSpeak Using ESP32
In this tutorial, we will show you how to connect a BME280 sensor to an ESP32 to read temperature, h...
Uploading BME280 Sensor Data to ThingSpeak Using ESP32
In this tutorial, we will show you how to connect a BME280 sensor to an ESP32 to read temperature, h...
-
 Water pump control for irrigation via telegram and esp32
Water Pump Control by Telegram and ESP32 is an automated system that allows you to remotely control ...
Water pump control for irrigation via telegram and esp32
Water Pump Control by Telegram and ESP32 is an automated system that allows you to remotely control ...
-
 Air conditioning on/off control via telegram and esp32
In this tutorial we will see how to control an air conditioner, with an esp32 and the telegram appli...
Air conditioning on/off control via telegram and esp32
In this tutorial we will see how to control an air conditioner, with an esp32 and the telegram appli...
-
 35 watt stereo amplifier
In this video we will see how to build an audio amplifier, with the TDA7377 integrated circuit, and ...
35 watt stereo amplifier
In this video we will see how to build an audio amplifier, with the TDA7377 integrated circuit, and ...
-
 Laser alarm with RFID module
More info and updates in https://rogerbit.com/wprb/2024/08/alarma-laser-rfid/In this project, we bui...
Laser alarm with RFID module
More info and updates in https://rogerbit.com/wprb/2024/08/alarma-laser-rfid/In this project, we bui...
-
 Control lights by voice commands and keys
In this tutorial we will see how to create a device to control lights by voice commands, with a modu...
Control lights by voice commands and keys
In this tutorial we will see how to create a device to control lights by voice commands, with a modu...
-
 Stepper motor control x bluetooth and app
In this tutorial we will see a circuit, which controls a stepper motor, with an application made in ...
Stepper motor control x bluetooth and app
In this tutorial we will see a circuit, which controls a stepper motor, with an application made in ...
-
 DFplayermini x bluetooth mp3 player control
More info and updates in https://rogerbit.com/wprb/2022/12/dfplayermini-x-bluetooth/In this tutorial...
DFplayermini x bluetooth mp3 player control
More info and updates in https://rogerbit.com/wprb/2022/12/dfplayermini-x-bluetooth/In this tutorial...
-
 Robot with WiFi control and servos driven by ESP32
More info and updates in https://rogerbit.com/wprb/2023/07/robot-wifi/A robot controlled by Wi-Fi, s...
Robot with WiFi control and servos driven by ESP32
More info and updates in https://rogerbit.com/wprb/2023/07/robot-wifi/A robot controlled by Wi-Fi, s...
-
 How to make a water level meter with uln2803
In this tutorial we will see how to make a water level meter circuit with the built-in uln2803.The p...
How to make a water level meter with uln2803
In this tutorial we will see how to make a water level meter circuit with the built-in uln2803.The p...
-
 Color Detector with Arduino and OLED display
In this tutorial we will show you how to build a color detector using the TCS3200 sensor and an SH11...
Color Detector with Arduino and OLED display
In this tutorial we will show you how to build a color detector using the TCS3200 sensor and an SH11...
-
 DTMF decoder for handy with arduino, control over several kilometers
In this tutorial we will see how to make a circuit to connect to our handy, in this case a Baofeng U...
DTMF decoder for handy with arduino, control over several kilometers
In this tutorial we will see how to make a circuit to connect to our handy, in this case a Baofeng U...
-
 Turn on light from thindspeak with esp32
In this tutorial, we will show you how to control lights over the Internet using an ESP32 and the Th...
Turn on light from thindspeak with esp32
In this tutorial, we will show you how to control lights over the Internet using an ESP32 and the Th...
-
 MP3 player control with webserver using ESP32 WIFI
In this tutorial, you will learn how to build a web server using the ESP32 to control the YX5300 mod...
MP3 player control with webserver using ESP32 WIFI
In this tutorial, you will learn how to build a web server using the ESP32 to control the YX5300 mod...
-
 Time clock with fingerprint IoT module, uploading data to thingspeak
More info in and updates in https://rogerbit.com/wprb/2022/07/reloj-de-control-fingerprint/In this t...
Time clock with fingerprint IoT module, uploading data to thingspeak
More info in and updates in https://rogerbit.com/wprb/2022/07/reloj-de-control-fingerprint/In this t...
-
 Make your own logic tip (includes printed circuit board)
In this video tutorial we will see how to make a logic tip, on a printed circuit, with the integrate...
Make your own logic tip (includes printed circuit board)
In this video tutorial we will see how to make a logic tip, on a printed circuit, with the integrate...
-
 Coil or inductor meter with Arduino and OLED display
More info and updates in https://rogerbit.com/wprb/2022/06/medidor-inductores/In this tutorial we wi...
Coil or inductor meter with Arduino and OLED display
More info and updates in https://rogerbit.com/wprb/2022/06/medidor-inductores/In this tutorial we wi...
-
Programmable Mist Maker - XIAO / QT PY Extension
72 0 0 -
-
-
-
-
-
ARPS-2 – Arduino-Compatible Robot Project Shield for Arduino UNO
2719 0 5 -
A Compact Charging Breakout Board For Waveshare ESP32-C3
3215 3 8 -
AI-driven LoRa & LLM-enabled Kiosk & Food Delivery System
3469 2 2


