


|
|
Arduino Nanıo |
x 1 | |
|
|
ULN2003AN Driver |
x 3 | |
|
|
28BYJ-48 Stepper Motor |
x 3 |

|
Soldering iron |
|

|
Soldering Iron Wire |
|

|
arduino IDEArduino
|
|
|
|
Inkscape 1.0.1 |
|
|
|
UGS Platform |
|
|
|
JScut |
Build a simple 3D Arduino Mini CNC Plotter
Hi friends, we will see how to make a simple and awesome mini CNC plotter machine in this project. I saw this project on Thingiverse a few days ago and found it very interesting, so I decided to make a video with all the steps.
The project is based on Arduino and includes GRBL code. It contains three hobby stepping motors and 3D parts that provide movement in three axes. I start the first step of the project by assembling the 3D parts and stepping motors that make up the main structure of the project. 3D models are printed in medium quality without support and the required screw types vary, you can use the compatible size in your workshop.


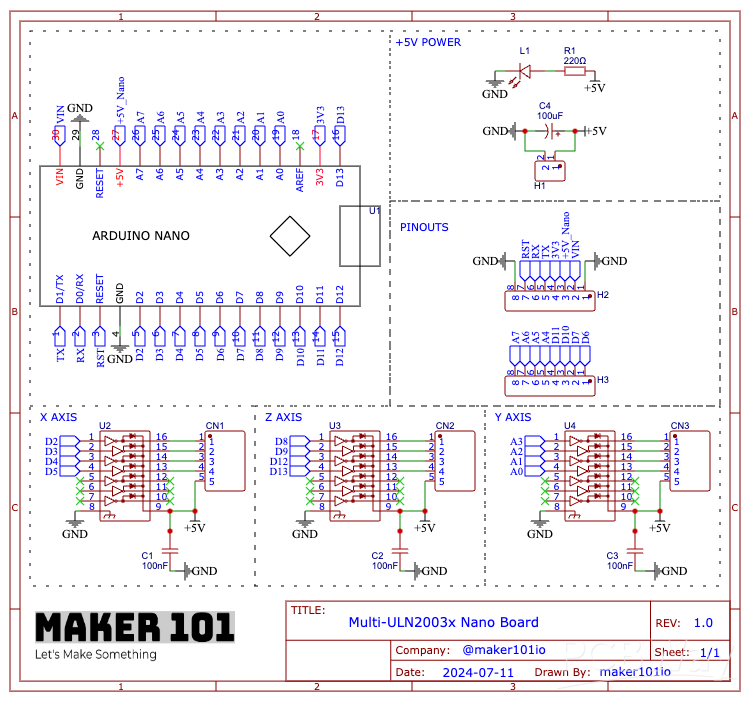
The circuit part of the project requires one Arduino Nano and three stepper motor drivers. You can build the project on a breadboard by following the shared circuit diagram,

but as you know, I prefer to design and use a printed circuit board for a more professional prototype. I share my printed circuit board designs as open-source on the PCBWay project sharing page. You can also choose PCBWay for low-price and high-quality printed circuit boards.


Let's continue by assembling and soldering the components used in the printed circuit board.


After soldering, let's assemble the circuit board to the project. Each axis input is marked on the circuit board, make the connections and plug in the Arduino board.

The circuit must be supplied with external five volts, make the power connections and then attach the pen and paper to the project. Finally make the USB connection and start the power.

The programming part is very simple, download the GRBL library from the shared GitHub link.

Open the Arduino editor and include the downloaded library.


Then open the code named GRBL Upload from the examples section, you do not need to make any changes here, just upload the code by selecting the board and port.

At this stage, we will create a vector image using Inkscape. Download the required version from the shared link, install it and open Inkscape.

Then go to the document properties and enter the page size dimensions.


Import any image of your choice, adjust the image size accordingly and place it on the page.


Then convert the image to vector and delete the previous inserted image. Now the vector image is ready for drawing, save the created image.


We will use the JS-Cut web tool to convert the vector file to G-code.

The interface opens with predefined settings, upload the file containing the project settings shared in the descriptions.


Then, mark it to return to the zero point at the end, and adjust the pen tip width.


Load the vector file, and select it, choose create operation, there are several types of conversion options, choose the one that works for you, and click generate. Finally save and download the g-code.


In this section, download and launch G-code Sender, the main software that allows you to configure and control the plotter.


First, open the setup wizard, select GRBL as firmware, select the connected port and serial communication and click connect. The plotter will connect without any problems.


In the motor wiring section you can check if the motors are moving in the opposite direction and make changes. In this plotter the Y axis will move in reverse.

The calibration section allows you to set the initial position of all axes by moving them precisely. Update the calibration section millimeter values for this plotter with the values on the screen.

You can then move the plotter axes and complete the update with the 'Reset to Zero' button when you reach the optimal positioning. Then press the Finish button and the plotter start position will now be defined.


Import the generated g-code and update the values in the bottom left corner by entering the values on the screen. These values are the default values that are compatible with the stepper motors used in the plotter.

If everything is ready, you can start the printing process by simply pressing the Send command. I hope this was useful, thanks for reading.


Build a simple 3D Arduino Mini CNC Plotter
Project images are for reference only. Actual production is based on the manufacturing files on the project page.
Please review the designer's notes (e.g., PCB thickness) and select the appropriate options.
PCBWay is not responsible
for issues caused by unsuitable parameter selections.
For more important ordering information, please refer to
Read More


Raspberry Pi 5 7 Inch Touch Screen IPS 1024x600 HD LCD HDMI-compatible Display for RPI 4B 3B+ OPI 5 AIDA64 PC Secondary Screen(Without Speaker)
BUY NOW


- Comments(4)
- Likes(27)
- 5 USER VOTES
- YOUR VOTE 0.00 0.00

-
8design
-
6usability
-
7creativity
-
10content
-
10design
-
10usability
-
10creativity
-
10content
-
10design
-
10usability
-
10creativity
-
10content
-
10design
-
10usability
-
10creativity
-
10content

-
10design
-
10usability
-
10creativity
-
10content
More by MERT KILIC
-
 3D Printed Theo Jansen Style Octopod Robot (Arduino Based)
Hi everyone! In this project, I will show you an amazing eight-legged robot in the Octopod style! It...
3D Printed Theo Jansen Style Octopod Robot (Arduino Based)
Hi everyone! In this project, I will show you an amazing eight-legged robot in the Octopod style! It...
-
 Creative Modular LED Lighting with Magnetic Pogo Pins & Wi-Fi Control
Hi everyone! Welcome to my latest project: a modular, plug-in LED lighting system that is as fun as ...
Creative Modular LED Lighting with Magnetic Pogo Pins & Wi-Fi Control
Hi everyone! Welcome to my latest project: a modular, plug-in LED lighting system that is as fun as ...
-
 Build a simple 3D printed CNC plotter machine
Hi friends, do you remember this Mini CNC Plotter machine that uses hobby stepper motors and a few 3...
Build a simple 3D printed CNC plotter machine
Hi friends, do you remember this Mini CNC Plotter machine that uses hobby stepper motors and a few 3...
-
 Circuit Activity Board - Educational Electronics
Circuit Activity Board – A Hands-On Project to Learn Basic ElectronicsIn this project, we're going t...
Circuit Activity Board - Educational Electronics
Circuit Activity Board – A Hands-On Project to Learn Basic ElectronicsIn this project, we're going t...
-
 Build a Simple 3D Wall Lighting
Hi friends, this project shows how to make and control 3D hexagonal LED lighting panels. The project...
Build a Simple 3D Wall Lighting
Hi friends, this project shows how to make and control 3D hexagonal LED lighting panels. The project...
-
 Robot Sumo Board
Robot-sumo, or pepe-sumo, is a sport in which two robots attempt to push each other out of a circle ...
Robot Sumo Board
Robot-sumo, or pepe-sumo, is a sport in which two robots attempt to push each other out of a circle ...
-
 ESP32 Mecanum Wheels Robot and Bluetooth Gamepad Controller
In this project we will see how to make an ESP32 Mecanum Wheels Robot which is capable of moving in ...
ESP32 Mecanum Wheels Robot and Bluetooth Gamepad Controller
In this project we will see how to make an ESP32 Mecanum Wheels Robot which is capable of moving in ...
-
 DIY Motorized WiFi Roller Blind - ESP8266 & Blynk
In this project we will see how to control a roller blind via a smartphone application. The reason w...
DIY Motorized WiFi Roller Blind - ESP8266 & Blynk
In this project we will see how to control a roller blind via a smartphone application. The reason w...
-
 Pet Feeder Controlled Via WiFi - ESP8266
How It Works?As you can see, a 3D design was used for the pet feeder. ESP8266-based Wemos D1 Mini bo...
Pet Feeder Controlled Via WiFi - ESP8266
How It Works?As you can see, a 3D design was used for the pet feeder. ESP8266-based Wemos D1 Mini bo...
-
 ESP8266 Two Wheel Robot (NodeMCU and Stepper Motor)
Generally, robot cars are built on a chassis with 2 DC motor wheels and a bovine wheel. While surfin...
ESP8266 Two Wheel Robot (NodeMCU and Stepper Motor)
Generally, robot cars are built on a chassis with 2 DC motor wheels and a bovine wheel. While surfin...
-
 3D Printed Rotating Table Board with Arduino Nano and 28BYJ-48 Stepper Motor
This project shows how to make a 3D printed Rotating Table using Arduino and a hobby stepper motor. ...
3D Printed Rotating Table Board with Arduino Nano and 28BYJ-48 Stepper Motor
This project shows how to make a 3D printed Rotating Table using Arduino and a hobby stepper motor. ...
-
 Hand Gesture Controller for Robotic
The hand gesture controller makes it possible to control applicat...
Hand Gesture Controller for Robotic
Hand Gesture Controller for RoboticThe hand gesture controller makes it possible to control applicat...
-
 How To Make DIY Remote Control Hoverboat at Home
In this video, I showed you how to make your own hoverboat from materials available at home and chea...
How To Make DIY Remote Control Hoverboat at Home
In this video, I showed you how to make your own hoverboat from materials available at home and chea...
-
 How to Make DIY Arduino Gesture Control Robot at Home
Parts Required for Receiver (Tank):1) Robot Tank Chassis - https://bit.ly/3j8y2Q52) Arduino Nano V3 ...
How to Make DIY Arduino Gesture Control Robot at Home
Parts Required for Receiver (Tank):1) Robot Tank Chassis - https://bit.ly/3j8y2Q52) Arduino Nano V3 ...
-
 DIY Circuit Activty Board with Paperclips | MAKER | STEM
You can be creative and design your own circuit and add different sensors (other LEDs...). The idea ...
DIY Circuit Activty Board with Paperclips | MAKER | STEM
You can be creative and design your own circuit and add different sensors (other LEDs...). The idea ...
-
 ATtiny85 Wearable Activity Tracking Watch
How to make the wearable activity tracking watch? This is a wearable gadget designed to vibrate when...
ATtiny85 Wearable Activity Tracking Watch
How to make the wearable activity tracking watch? This is a wearable gadget designed to vibrate when...
-
 DIY Motorized Roller Blind with ESP32-S3 | WiFi Control, 3D Printed Gear & Blynk Cloud
This project is an updated version of my previous Motorized Roller Blind, which reached nearly 300,0...
DIY Motorized Roller Blind with ESP32-S3 | WiFi Control, 3D Printed Gear & Blynk Cloud
This project is an updated version of my previous Motorized Roller Blind, which reached nearly 300,0...
-
 How to Build a Motorized 3D Scanning Turntable for Your Phone
In this project, I’ll show you how to make a simple motorized turntable for 3D scanning. It has thre...
How to Build a Motorized 3D Scanning Turntable for Your Phone
In this project, I’ll show you how to make a simple motorized turntable for 3D scanning. It has thre...
-
Programmable Mist Maker - XIAO / QT PY Extension
1097 2 1 -
RadioHAT - Raspberry Pi radio development platform
913 0 2 -
-
-
-
-
ARPS-2 – Arduino-Compatible Robot Project Shield for Arduino UNO
3345 0 6 -
A Compact Charging Breakout Board For Waveshare ESP32-C3
3961 3 8 -
AI-driven LoRa & LLM-enabled Kiosk & Food Delivery System
4347 2 2


