


esp32 bassed transmitter and reciever
ESP32 BASSED TRANSMETER AND RECEIVER
// TRANSMETER CODE
#include <esp_now.h>
#include <WiFi.h>

// REPLACE WITH YOUR RECEIVER MAC Address
uint8_t receiverMacAddress[] = {0xAC,0x67,0xB2,0x36,0x7F,0x28};  //AC:67:B2:36:7F:28

struct PacketData
{
  byte lxAxisValue;
  byte lyAxisValue;
  byte rxAxisValue;
  byte ryAxisValue;

  byte switch1Value;
  byte switch2Value;
  byte switch3Value;
  byte switch4Value;
  byte switch5Value;
  byte switch6Value;
  byte switch7Value;
  byte switch8Value;
};
PacketData data;

//This function is used to map 0-4095 joystick value to 0-254. hence 127 is the center value which we send.
//It also adjust the deadband in joystick.
//Jotstick values range from 0-4095. But its center value is not always 2047. It is little different.
//So we need to add some deadband to center value. in our case 1800-2200. Any value in this deadband range is mapped to center 127.
int mapAndAdjustJoystickDeadBandValues(int value, bool reverse)
{
  if (value >= 2200)
  {
    value = map(value, 2200, 4095, 127, 254);
  }
  else if (value <= 1800)
  {
    value = (value == 0 ? 0 : map(value, 1800, 0, 127, 0));
  }
  else
  {
    value = 127;
  }

  if (reverse)
  {
    value = 254 - value;
  }
  Serial.println(value);
  return value;
}

// callback when data is sent
void OnDataSent(const uint8_t *mac_addr, esp_now_send_status_t status)
{
  Serial.print("\r\nLast Packet Send Status:\t ");
  Serial.println(status);
  Serial.println(status == ESP_NOW_SEND_SUCCESS ? "Message sent" : "Message failed");
}

void setup()
{
  Serial.begin(115200);
  WiFi.mode(WIFI_STA);

  // Init ESP-NOW
  if (esp_now_init() != ESP_OK)
  {
    Serial.println("Error initializing ESP-NOW");
    return;
  }
  else
  {
    Serial.println("Succes: Initialized ESP-NOW");
  }

  esp_now_register_send_cb(OnDataSent);

  // Register peer
  esp_now_peer_info_t peerInfo;
  memcpy(peerInfo.peer_addr, receiverMacAddress, 6);
  peerInfo.channel = 0;
  peerInfo.encrypt = false;

  // Add peer
  if (esp_now_add_peer(&peerInfo) != ESP_OK)
  {
    Serial.println("Failed to add peer");
    return;
  }
  else
  {
    Serial.println("Succes: Added peer");
  }

  pinMode(15,INPUT_PULLUP);
  pinMode(16,INPUT_PULLUP);
  pinMode(17,INPUT_PULLUP);
  pinMode(18,INPUT_PULLUP);
  pinMode(19,INPUT_PULLUP);
  pinMode(21,INPUT_PULLUP);
  pinMode(22,INPUT_PULLUP);
  pinMode(23,INPUT_PULLUP);

}

void loop()
{
  data.lxAxisValue    = mapAndAdjustJoystickDeadBandValues(analogRead(32), false);
  data.lyAxisValue    = mapAndAdjustJoystickDeadBandValues(analogRead(33), false);
  data.rxAxisValue    = mapAndAdjustJoystickDeadBandValues(analogRead(34), false);
  data.ryAxisValue    = mapAndAdjustJoystickDeadBandValues(analogRead(35), false);
  data.switch1Value   = !digitalRead(15);
  data.switch2Value   = !digitalRead(16);
  data.switch3Value   = !digitalRead(17);
  data.switch4Value   = !digitalRead(18);
  data.switch5Value   = !digitalRead(19);
  data.switch6Value   = !digitalRead(21);
  data.switch7Value   = !digitalRead(22);
  data.switch8Value   = !digitalRead(23);

  esp_err_t result = esp_now_send(receiverMacAddress, (uint8_t *) &data, sizeof(data));
  if (result == ESP_OK)
  {
    Serial.println("Sent with success");
  }
  else
  {
    Serial.println("Error sending the data");
  }

  delay(50);
}


// RECEIVER CODE

#include <esp_now.h>
#include <WiFi.h>
#include <ESP32Servo.h>

#define SIGNAL_TIMEOUT 1000  // This is signal timeout in milli seconds. We will reset the data if no signal

unsigned long lastRecvTime = 0;

struct PacketData
{
  byte lxAxisValue;
  byte lyAxisValue;
  byte rxAxisValue;
  byte ryAxisValue;

  byte switch1Value;
  byte switch2Value;
  byte switch3Value;
  byte switch4Value;
  byte switch5Value;
  byte switch6Value;
  byte switch7Value;
  byte switch8Value;

};
PacketData receiverData;

Servo servo1;
Servo servo2;
Servo servo3;
Servo servo4;

int   led1 = 15;
int   led2 = 16;
int   led3 = 17;
int   led4 = 18;
int   led5 = 19;
int   led6 = 21;
int   led7 = 22;
int   led8 = 23;

//Assign default input received values
void setInputDefaultValues()
{
  // The middle position for joystick. (254/2=127)
  receiverData.lxAxisValue = 127;
  receiverData.lyAxisValue = 127;
  receiverData.rxAxisValue = 127;
  receiverData.ryAxisValue = 127;

  receiverData.switch1Value = LOW;
  receiverData.switch2Value = LOW;
  receiverData.switch3Value = LOW;
  receiverData.switch4Value = LOW;

  receiverData.switch5Value = LOW;
  receiverData.switch6Value = LOW;
  receiverData.switch7Value = LOW;
  receiverData.switch8Value = LOW;
}

void mapAndWriteValues()
{
  servo1.write(map(receiverData.lxAxisValue, 0, 254, 0, 180));
  servo2.write(map(receiverData.lyAxisValue, 0, 254, 0, 180));
  servo3.write(map(receiverData.rxAxisValue, 0, 254, 0, 180));
  servo4.write(map(receiverData.ryAxisValue, 0, 254, 0, 180));

  digitalWrite(led1, receiverData.switch1Value);
  digitalWrite(led2, receiverData.switch2Value);
  digitalWrite(led3, receiverData.switch3Value);
  digitalWrite(led4, receiverData.switch4Value);

  digitalWrite(led5, receiverData.switch5Value);
  digitalWrite(led6, receiverData.switch6Value);
  digitalWrite(led7, receiverData.switch7Value);
  digitalWrite(led8, receiverData.switch8Value);
}

// callback function that will be executed when data is received
void OnDataRecv(const esp_now_recv_info* info, const uint8_t* incomingData, int len)
{
  if (len == 0)
  {
    return;
  }
  memcpy(&receiverData, incomingData, sizeof(receiverData));
  mapAndWriteValues();
  lastRecvTime = millis();
}

void setUpPinModes()
{
  servo1.attach(14);
  servo2.attach(26);
  servo3.attach(25);
  servo4.attach(33);

  pinMode(led1, OUTPUT);
  pinMode(led2, OUTPUT);
  pinMode(led3, OUTPUT);
  pinMode(led4, OUTPUT);

  pinMode(led5, OUTPUT);
  pinMode(led6, OUTPUT);
  pinMode(led7, OUTPUT);
  pinMode(led8, OUTPUT);

  setInputDefaultValues();
  mapAndWriteValues();
}

void setup()
{
  setUpPinModes();

  Serial.begin(115200);
  WiFi.mode(WIFI_STA);

  // Init ESP-NOW
  if (esp_now_init() != ESP_OK)
  {
    Serial.println("Error initializing ESP-NOW");
    return;
  }

  esp_now_register_recv_cb(OnDataRecv);
}


void loop()
{
  //Check Signal lost.
  unsigned long now = millis();
  if ( now - lastRecvTime > SIGNAL_TIMEOUT )
  {
    setInputDefaultValues();
    mapAndWriteValues();
  }
}
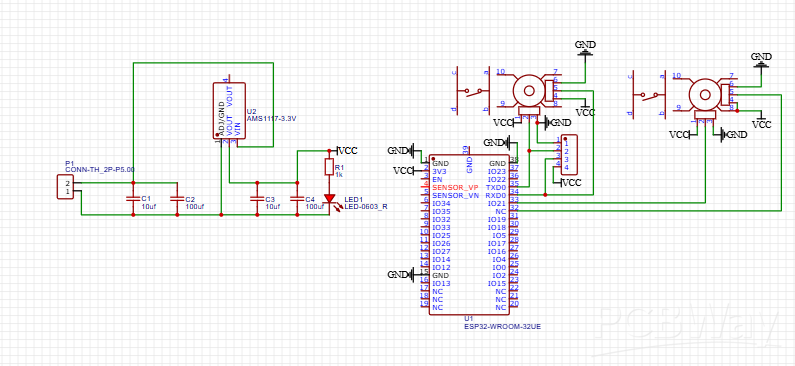
esp32 bassed transmitter and reciever
Project images are for reference only. Actual production is based on the manufacturing files on the project page.
Please review the designer's notes (e.g., PCB thickness) and select the appropriate options.
PCBWay is not responsible
for issues caused by unsuitable parameter selections.
For more important ordering information, please refer to
Read More









Raspberry Pi 5 7 Inch Touch Screen IPS 1024x600 HD LCD HDMI-compatible Display for RPI 4B 3B+ OPI 5 AIDA64 PC Secondary Screen(Without Speaker)
BUY NOW


- Comments(0)
- Likes(1)
-
Programmable Mist Maker - XIAO / QT PY Extension
2190 2 2 -
RadioHAT - Raspberry Pi radio development platform
1881 0 4 -
-
-
-
ARPS-2 – Arduino-Compatible Robot Project Shield for Arduino UNO
4069 0 6 -
A Compact Charging Breakout Board For Waveshare ESP32-C3
4825 3 8 -
AI-driven LoRa & LLM-enabled Kiosk & Food Delivery System
5625 2 2 -





















