


Xbox Controller with ESP32
Greetings everyone and welcome back. here’s something I’ve been really excited to share.


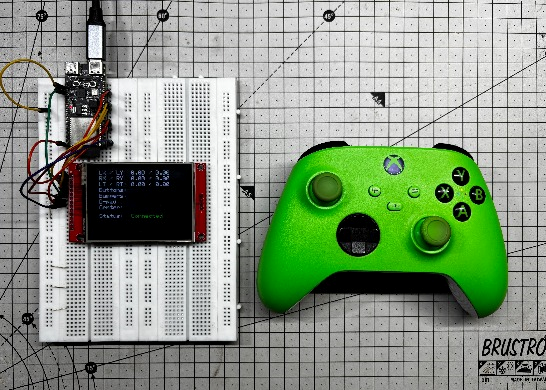
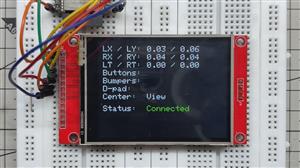
I’ve been working on a simple but powerful setup that connects an Xbox controller to an ESP32-C6 DevKit over BLE and displays all the input data live on an ILI9341 SPI screen. It started as a way to visualize controller input—buttons, triggers, and analog sticks—in real time. But once I saw how responsive it was, I realized this could be much more than just a visualizer.
The real reason behind this build is a project I’ve been developing: a clock-based Snake Game Console. It looks like a regular clock, but when you press a hidden button, it transforms into a playable Snake game powered by the ESP32-C6 and controlled wirelessly via an Xbox controller. Instead of cramming all the technical details into the main article, I created this separate walkthrough to cover the full build process, from BLE pairing to display logic and game control.
The ESP32-C6 handles BLE input and display rendering smoothly, and the whole thing runs without lag or flicker. It’s clean, compact, and ready to be extended into robotics, gesture control, or any interactive project you can imagine.
This article walks you through the entire build process from start to finish and takes a deep dive into the code that powers it all. So let’s jump right in and get this project started
MATERIALS REQUIRED
These are the materials used in this small build
- ESP32-C6 Dev Kit
- ILI9341 Display (provided by PCBWAY)
- Jumper leads
- Breadboard
- Xbox controller
HARDWARE- ESP32 C6 DEVKIT and ILI9341 DISPLAY
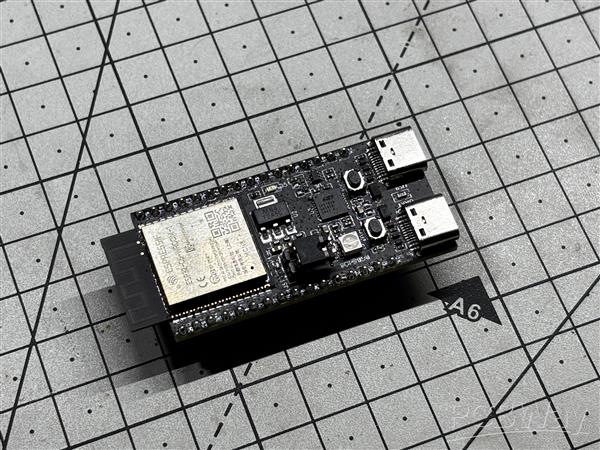
For the hardware, we’re using the ESP32-C6 DevKit, a compact and powerful microcontroller designed for modern wireless applications. It features a RISC-V single-core processor running at up to 160 MHz and supports both Bluetooth Low Energy (BLE) 5.0 and Wi-Fi 6.
Its Key technical specs include:
• CPU: 32-bit RISC-V core @ 160 MHz
• RAM: 512 KB SRAM
• Flash: 4 MB (external SPI flash)
• Wireless: BLE 5.0 + Wi-Fi 6 (dual-mode)
• GPIO: 30+ configurable pins with support for SPI, I2C, UART, PWM, ADC
• Power: Ultra-low power modes with deep sleep support
• Security: Hardware AES, SHA, RSA, ECC, and secure boot
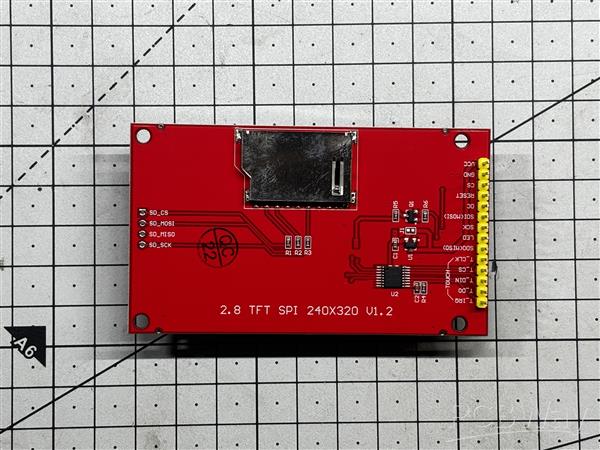
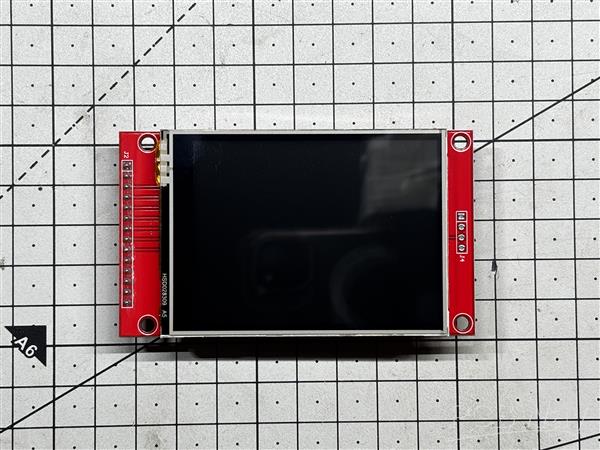
To display the controller’s input readings, we used a 320x240 ILI9341 TFT display, which communicates over SPI and is well-supported by libraries like Adafruit_GFX and Adafruit_ILI9341. It’s a vibrant, full-color screen with fast refresh rates, making it ideal for real-time feedback like button presses, analog stick positions, and trigger values.
PCBWAY GIFTSHOP

As for sourcing the display we used in this project, we got it from PCBWAY Giftshop.
PCBWAY gift shop is an online marketplace where you can get a variety of electronics modules and boards for their genuine price, or you could use the PCBWAY currency, which is called beans.
You get beans after ordering something from PCBWAY as reward points, or you can also get them by posting any project in the PCBWAY community.
Over the past ten years, PCBWay has distinguished themselves by providing outstanding PCB manufacturing and assembly services, becoming a trusted partner for countless engineers and designers worldwide.
Also, PCBWay is organizing the PCBWay 8th Project Design Contest, a global event that invites makers, engineers, and innovators to showcase their most creative builds. With categories in Electronics, Mechanical, and AIoT, it’s a great opportunity to share your work, connect with the community, and compete for exciting prizes.
You guys can check out PCBWAY if you want great PCB service at an affordable rate.
BREADBOARD SETUP

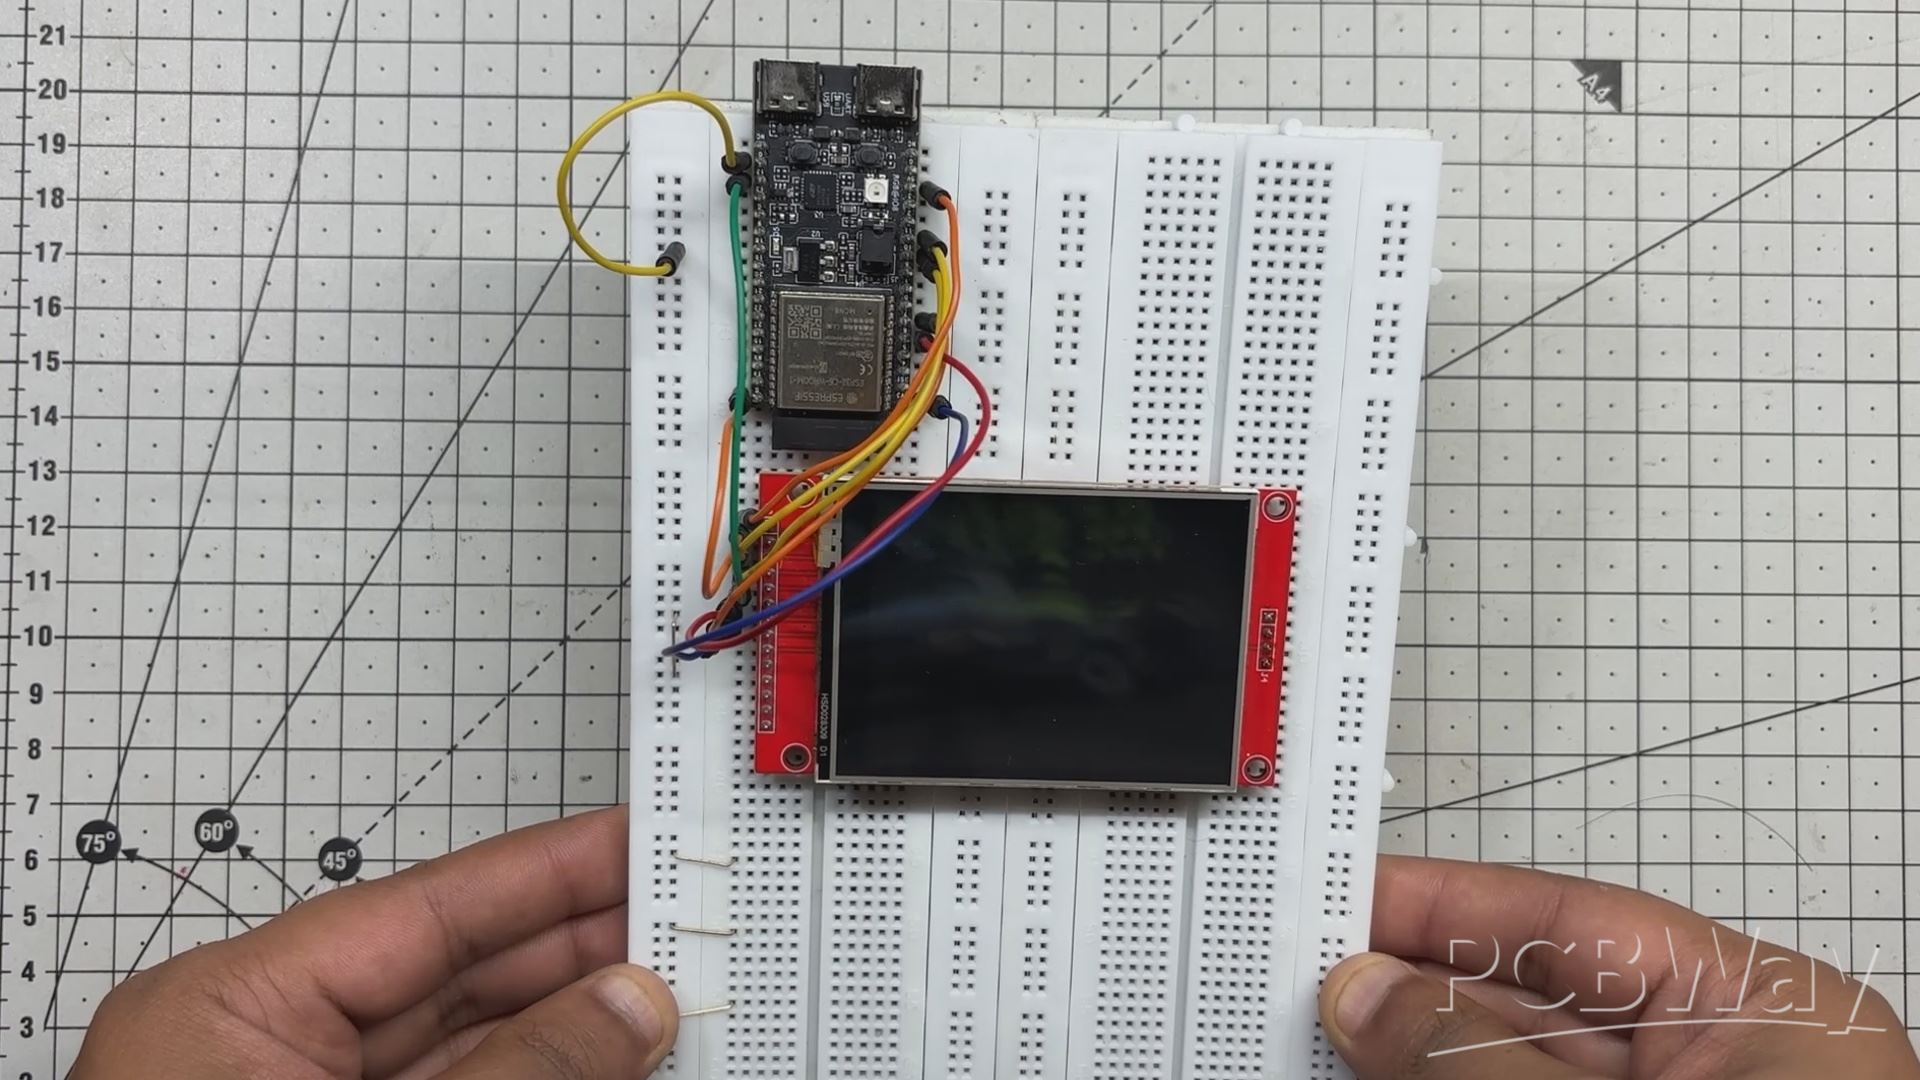
We get started with the project by setting up a simple breadboard setup using the ESP32-C6 DevKit connected to a 320×240 ILI9341 display.
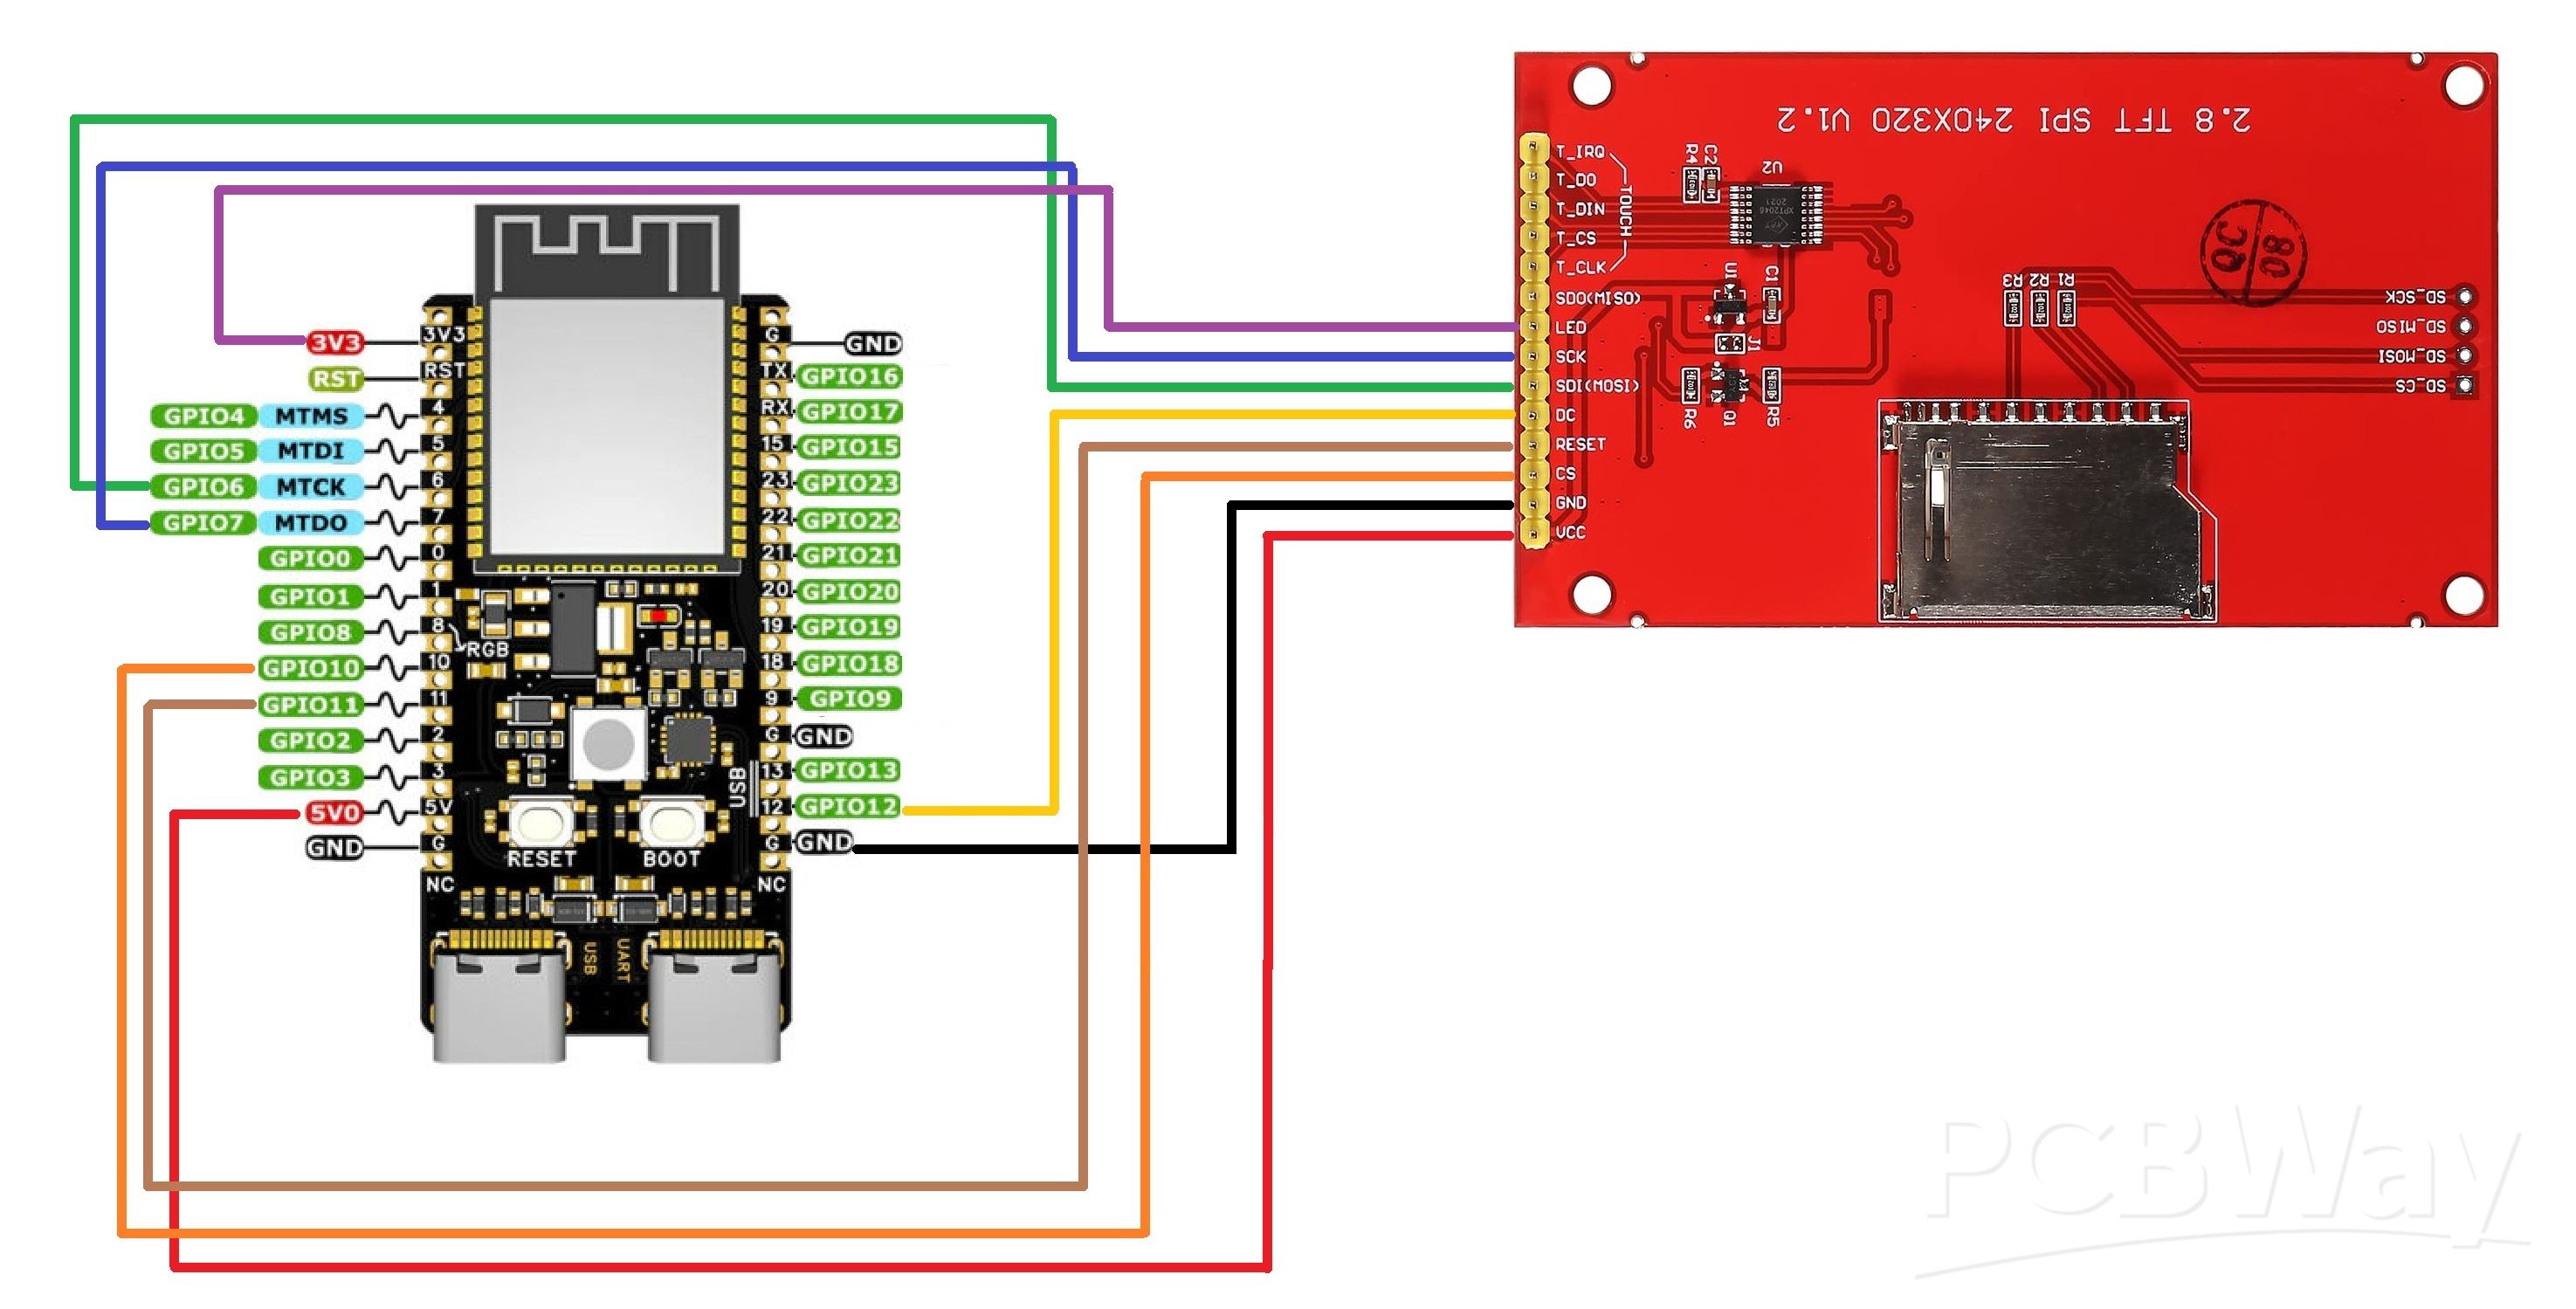
Using Jumper wires, we use the following wiring order for connecting ESP32 with our display.
- DISPLAY's MOSI to GPIO6
- SCK to GPIO7
- Chip Select to GPIO10
- Reset to GPIO11
- DC to GPIO12
- The LED Pin of Display goes to 3.3V of the DevKit.
- VCC goes to 5V
- GND to GND
CODE
This was the code we used in this project and it's a simple one.
#include <Arduino.h>
#include <BLEGamepadClient.h>
#include <Adafruit_GFX.h>
#include <Adafruit_ILI9341.h>
#include <SPI.h>
// Display pin mapping
#define TFT_CS 10
#define TFT_DC 12
#define TFT_RST 11
#define TFT_MOSI 6
#define TFT_SCLK 7
Adafruit_ILI9341 tft = Adafruit_ILI9341(TFT_CS, TFT_DC, TFT_RST);
XboxController controller;
bool wasConnected = false;
void setup() {
Serial.begin(115200);
SPI.begin(TFT_SCLK, -1, TFT_MOSI);
tft.begin();
tft.setRotation(3);  // Landscape, flipped
tft.fillScreen(ILI9341_BLACK);
tft.setTextSize(2);
tft.setTextColor(ILI9341_WHITE);
// Static labels
tft.setCursor(10, 10);  tft.print("LX / LY:");
tft.setCursor(10, 30);  tft.print("RX / RY:");
tft.setCursor(10, 50);  tft.print("LT / RT:");
tft.setCursor(10, 70);  tft.print("Buttons:");
tft.setCursor(10, 90);  tft.print("Bumpers:");
tft.setCursor(10, 110); tft.print("D-pad:");
tft.setCursor(10, 130); tft.print("Center:");
tft.setCursor(10, 160); tft.print("Status:");
controller.begin();
}
void loop() {
if (controller.isConnected()) {
XboxControlsEvent e;
controller.read(e);
// Update connection status only if changed
if (!wasConnected) {
tft.fillRect(120, 160, 180, 20, ILI9341_BLACK);
tft.setCursor(120, 160);
tft.setTextColor(ILI9341_GREEN);
tft.print("Connected");
wasConnected = true;
}
// Update analog stick values
tft.fillRect(120, 10, 180, 20, ILI9341_BLACK);
tft.setCursor(120, 10);
tft.setTextColor(ILI9341_WHITE);
tft.printf("%.2f / %.2f", e.leftStickX, e.leftStickY);
tft.fillRect(120, 30, 180, 20, ILI9341_BLACK);
tft.setCursor(120, 30);
tft.printf("%.2f / %.2f", e.rightStickX, e.rightStickY);
// Triggers
tft.fillRect(120, 50, 180, 20, ILI9341_BLACK);
tft.setCursor(120, 50);
tft.printf("%.2f / %.2f", e.leftTrigger, e.rightTrigger);
// Face buttons
tft.fillRect(120, 70, 180, 20, ILI9341_BLACK);
tft.setCursor(120, 70);
if (e.buttonA) tft.print("A ");
if (e.buttonB) tft.print("B ");
if (e.buttonX) tft.print("X ");
if (e.buttonY) tft.print("Y ");
// Bumpers and stick buttons
tft.fillRect(120, 90, 180, 20, ILI9341_BLACK);
tft.setCursor(120, 90);
if (e.leftBumper)      tft.print("LB ");
if (e.rightBumper)     tft.print("RB ");
if (e.leftStickButton) tft.print("LSB ");
if (e.rightStickButton)tft.print("RSB ");
// D-pad
tft.fillRect(120, 110, 180, 20, ILI9341_BLACK);
tft.setCursor(120, 110);
if (e.dpadUp)    tft.print("Up ");
if (e.dpadDown)  tft.print("Down ");
if (e.dpadLeft)  tft.print("Left ");
if (e.dpadRight) tft.print("Right ");
// Center buttons
tft.fillRect(120, 130, 180, 20, ILI9341_BLACK);
tft.setCursor(120, 130);
if (e.shareButton) tft.print("Share ");
if (e.menuButton)  tft.print("Menu ");
if (e.viewButton)  tft.print("View ");
if (e.xboxButton)  tft.print("Xbox ");
} else {
if (wasConnected) {
tft.fillRect(120, 160, 180, 20, ILI9341_BLACK);
tft.setCursor(120, 160);
tft.setTextColor(ILI9341_RED);
tft.print("Controller not connected");
wasConnected = false;
}
}
delay(100);
}
To begin, we include the essential libraries that handle the core functionality of the project. This includes the BLEGamepadClient library, which is the heart of the setup. it enables the ESP32-C6 to connect with and interpret input from an Xbox controller over BLE.
For Driving our display, we used the Adafruit_GFX Library along with the Adafruit_ILI9341 Library that handles graphic rendering.
#include <Arduino.h>
#include <BLEGamepadClient.h>
#include <Adafruit_GFX.h>
#include <Adafruit_ILI9341.h>
#include <SPI.h>
Next comes the display’s pin mapping, where we define which GPIO pins on the ESP32-C6 are used to drive the ILI9341 screen. These definitions ensure that the SPI communication between the microcontroller and the display is correctly routed.
#define TFT_CS   10  // Chip Select
#define TFT_DC   12  // Data/Command
#define TFT_RST  11  // Reset
#define TFT_MOSI 6   // SPI MOSI (data out)
#define TFT_SCLK 7   // SPI Clock
RESULT
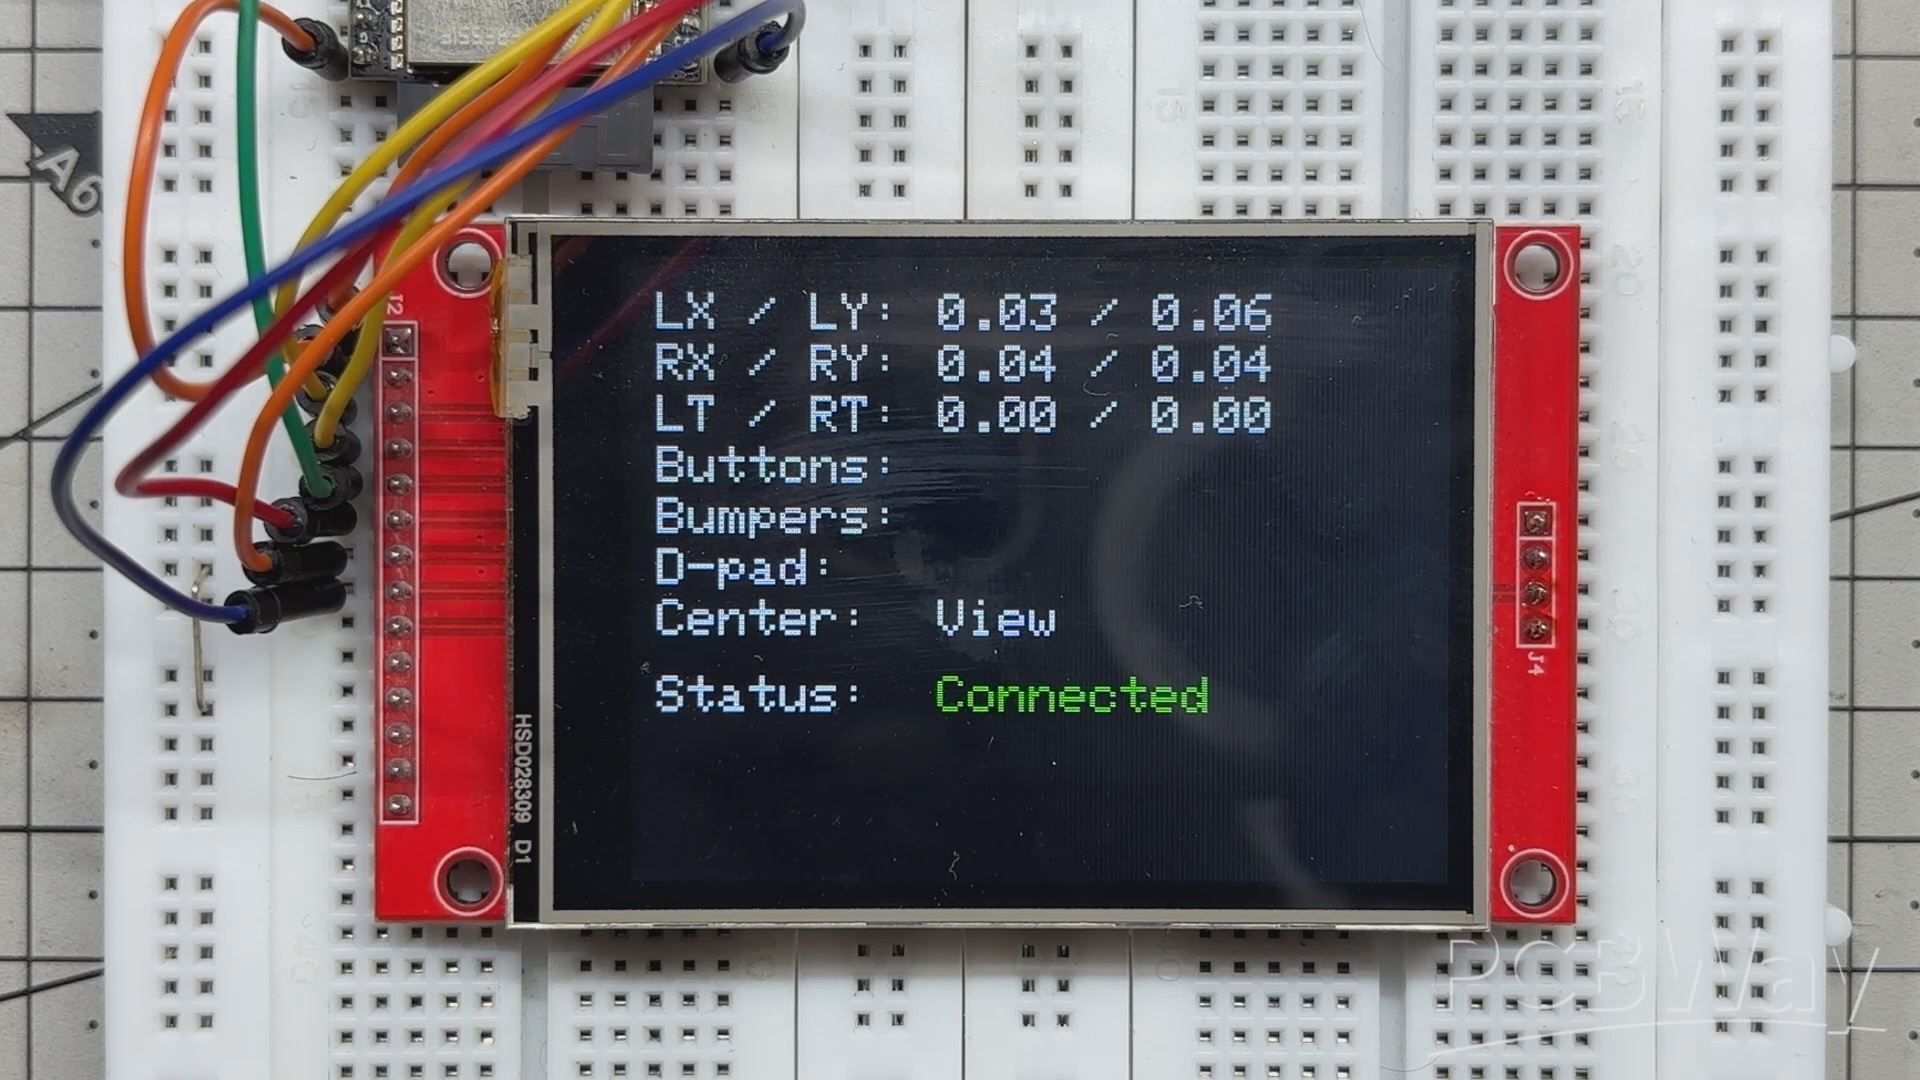
And here’s the final result of this surprisingly simple yet powerful build:
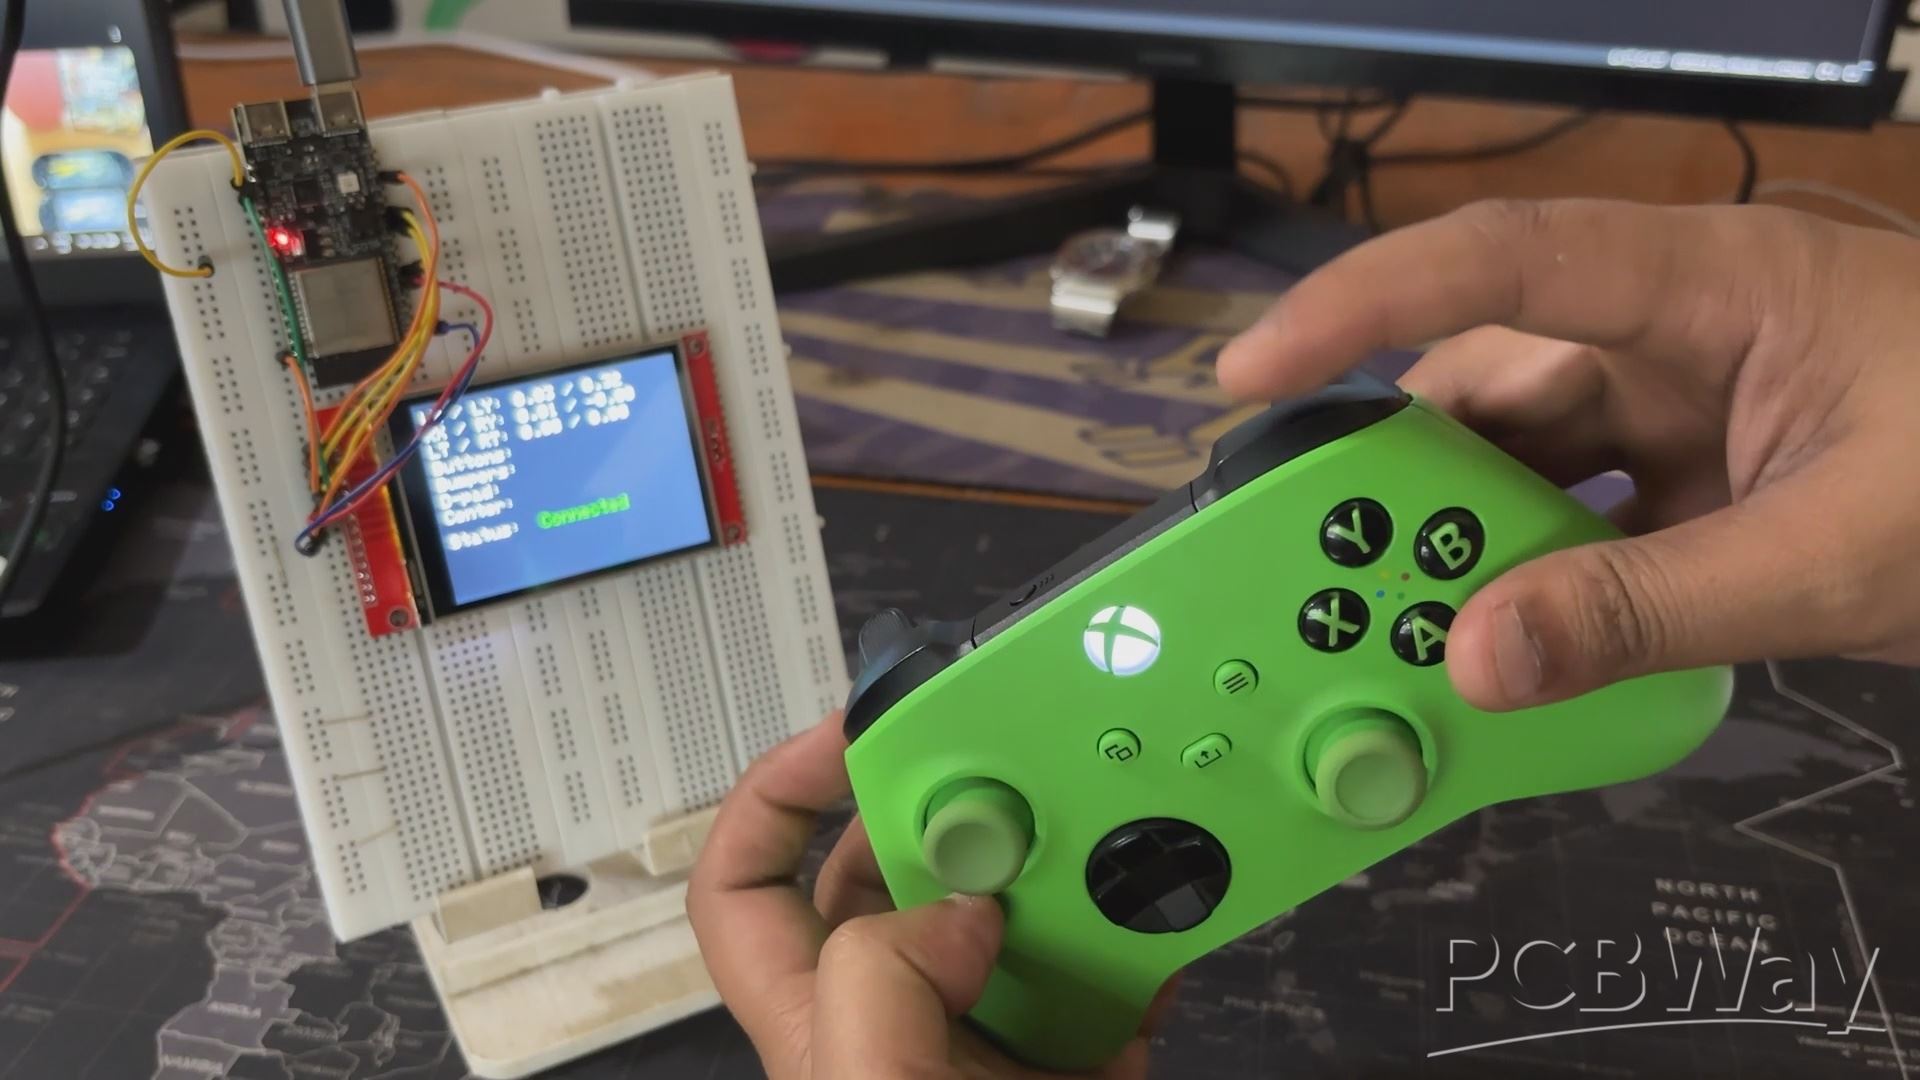
We’ve successfully paired our Xbox controller with the ESP32-C6 DevKit and connected it to an ILI9341 SPI display. Thanks to the BLEGamepadClient library, we’re able to capture and decode all controller input. Every button press is registered instantly, and every trigger value is tracked in real time, which opens up a whole range of possibilities beyond just display.
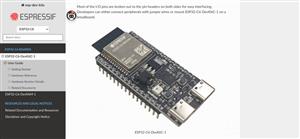
To connect the Xbox controller to the ESP32-C6 setup, simply hold down the Pair button on the controller until it enters pairing mode. The ESP32, running the BLEGamepadClient library, will automatically detect and establish a Bluetooth Low Energy connection
This setup can be used to build a gamepad visualizer, an input logger, or even a custom UI for embedded games, all running directly on the ESP32-C6 with live feedback on the ILI9341 display.
But here’s where it gets even more exciting: you can use this exact controller input to control a robot wirelessly.
By mapping the analog stick values to motor speed and direction and assigning button presses to trigger actions like arm movement, gripper control, or mode switching, you can build a fully responsive robot interface with no wires, no latency, and no external receiver modules.
The ESP32-C6 handles BLE input, display rendering, and control logic all in one compact board, making it ideal for DIY robotics and RC vehicles, from analog stick positions to button presses—and display them live on screen with zero lag.
Every button press is captured instantly, and trigger values are tracked in real time, giving this setup far more potential than just visualizing inputs. It’s a flexible foundation for building a gamepad visualizer, an input logger, or even a custom UI for embedded games.
That’s exactly why I built it: to control my Snake Game Console using an Xbox controller. With the ESP32-C6 handling BLE input and the ILI9341 display rendering live feedback, I now have a responsive, wireless interface that’s ready for gameplay, debugging, or even robotics.
I will be posting a follow-up project about the snake game console paired with XBOX controller in the future, so stay tuned for that.
For now this project has been completed.
In addition, we appreciate PCBWAY's support of this project. Visit them for a variety of PCB-related services, such as stencil and PCB assembly services, as well as 3D printing services
Thanks for reaching this far, and I will be back with a new project pretty soon.
Peace.
#include <Arduino.h>
#include <BLEGamepadClient.h>
#include <Adafruit_GFX.h>
#include <Adafruit_ILI9341.h>
#include <SPI.h>
// Display pin mapping
#define TFT_CS 10
#define TFT_DC 12
#define TFT_RST 11
#define TFT_MOSI 6
#define TFT_SCLK 7
Adafruit_ILI9341 tft = Adafruit_ILI9341(TFT_CS, TFT_DC, TFT_RST);
XboxController controller;
bool wasConnected = false;
void setup() {
Serial.begin(115200);
SPI.begin(TFT_SCLK, -1, TFT_MOSI);
tft.begin();
tft.setRotation(3);  // Landscape, flipped
tft.fillScreen(ILI9341_BLACK);
tft.setTextSize(2);
tft.setTextColor(ILI9341_WHITE);
// Static labels
tft.setCursor(10, 10);  tft.print("LX / LY:");
tft.setCursor(10, 30);  tft.print("RX / RY:");
tft.setCursor(10, 50);  tft.print("LT / RT:");
tft.setCursor(10, 70);  tft.print("Buttons:");
tft.setCursor(10, 90);  tft.print("Bumpers:");
tft.setCursor(10, 110); tft.print("D-pad:");
tft.setCursor(10, 130); tft.print("Center:");
tft.setCursor(10, 160); tft.print("Status:");
controller.begin();
}
void loop() {
if (controller.isConnected()) {
XboxControlsEvent e;
controller.read(e);
// Update connection status only if changed
if (!wasConnected) {
tft.fillRect(120, 160, 180, 20, ILI9341_BLACK);
tft.setCursor(120, 160);
tft.setTextColor(ILI9341_GREEN);
tft.print("Connected");
wasConnected = true;
}
// Update analog stick values
tft.fillRect(120, 10, 180, 20, ILI9341_BLACK);
tft.setCursor(120, 10);
tft.setTextColor(ILI9341_WHITE);
tft.printf("%.2f / %.2f", e.leftStickX, e.leftStickY);
tft.fillRect(120, 30, 180, 20, ILI9341_BLACK);
tft.setCursor(120, 30);
tft.printf("%.2f / %.2f", e.rightStickX, e.rightStickY);
// Triggers
tft.fillRect(120, 50, 180, 20, ILI9341_BLACK);
tft.setCursor(120, 50);
tft.printf("%.2f / %.2f", e.leftTrigger, e.rightTrigger);
// Face buttons
tft.fillRect(120, 70, 180, 20, ILI9341_BLACK);
tft.setCursor(120, 70);
if (e.buttonA) tft.print("A ");
if (e.buttonB) tft.print("B ");
if (e.buttonX) tft.print("X ");
if (e.buttonY) tft.print("Y ");
// Bumpers and stick buttons
tft.fillRect(120, 90, 180, 20, ILI9341_BLACK);
tft.setCursor(120, 90);
if (e.leftBumper)      tft.print("LB ");
if (e.rightBumper)     tft.print("RB ");
if (e.leftStickButton) tft.print("LSB ");
if (e.rightStickButton)tft.print("RSB ");
// D-pad
tft.fillRect(120, 110, 180, 20, ILI9341_BLACK);
tft.setCursor(120, 110);
if (e.dpadUp)    tft.print("Up ");
if (e.dpadDown)  tft.print("Down ");
if (e.dpadLeft)  tft.print("Left ");
if (e.dpadRight) tft.print("Right ");
// Center buttons
tft.fillRect(120, 130, 180, 20, ILI9341_BLACK);
tft.setCursor(120, 130);
if (e.shareButton) tft.print("Share ");
if (e.menuButton)  tft.print("Menu ");
if (e.viewButton)  tft.print("View ");
if (e.xboxButton)  tft.print("Xbox ");
} else {
if (wasConnected) {
tft.fillRect(120, 160, 180, 20, ILI9341_BLACK);
tft.setCursor(120, 160);
tft.setTextColor(ILI9341_RED);
tft.print("Controller not connected");
wasConnected = false;
}
}
delay(100);
}
Xbox Controller with ESP32


Raspberry Pi 5 7 Inch Touch Screen IPS 1024x600 HD LCD HDMI-compatible Display for RPI 4B 3B+ OPI 5 AIDA64 PC Secondary Screen(Without Speaker)
BUY NOW


- Comments(1)
- Likes(0)
More by Arnov Arnov sharma
-
 DIY XBOX Controller
Greetings everyone, and welcome back. Here's something fun and custom.This is my version of an Xbox ...
DIY XBOX Controller
Greetings everyone, and welcome back. Here's something fun and custom.This is my version of an Xbox ...
-
 Pocket SNES
Greetings everyone, and welcome back! Today, I’ve got something fun and tiny to share—the Pocket SNE...
Pocket SNES
Greetings everyone, and welcome back! Today, I’ve got something fun and tiny to share—the Pocket SNE...
-
 Batocera Arcade Box
Greetings everyone and welcome back, Here's something. Fun and nostalgic. Right now, we are using ou...
Batocera Arcade Box
Greetings everyone and welcome back, Here's something. Fun and nostalgic. Right now, we are using ou...
-
 64x32 Matrix Panel Setup with PICO 2
Greetings everyone and welcome back.So here's something fun and useful: a Raspberry Pi Pico 2-powere...
64x32 Matrix Panel Setup with PICO 2
Greetings everyone and welcome back.So here's something fun and useful: a Raspberry Pi Pico 2-powere...
-
 Portable Air Quality Meter
Hello everyone, and welcome back! Today, I have something incredibly useful for you—a Portable Air Q...
Portable Air Quality Meter
Hello everyone, and welcome back! Today, I have something incredibly useful for you—a Portable Air Q...
-
 WALKPi PCB Version
Greetings everyone and welcome back, This is the WalkPi, a homebrew audio player that plays music fr...
WALKPi PCB Version
Greetings everyone and welcome back, This is the WalkPi, a homebrew audio player that plays music fr...
-
 Delete Button XL
Greetings everyone and welcome back, and here's something fun and useful.In essence, the Delete Butt...
Delete Button XL
Greetings everyone and welcome back, and here's something fun and useful.In essence, the Delete Butt...
-
 Arduino Retro Game Controller
Greetings everyone and welcome back. Here's something fun.The Arduino Retro Game Controller was buil...
Arduino Retro Game Controller
Greetings everyone and welcome back. Here's something fun.The Arduino Retro Game Controller was buil...
-
 Super Power Buck Converter
Greetings everyone and welcome back!Here's something powerful, The SUPER POWER BUCK CONVERTER BOARD ...
Super Power Buck Converter
Greetings everyone and welcome back!Here's something powerful, The SUPER POWER BUCK CONVERTER BOARD ...
-
 Pocket Temp Meter
Greetings and welcome back.So here's something portable and useful: the Pocket TEMP Meter project.As...
Pocket Temp Meter
Greetings and welcome back.So here's something portable and useful: the Pocket TEMP Meter project.As...
-
 Pico Powered DC Fan Driver
Hello everyone and welcome back.So here's something cool: a 5V to 12V DC motor driver based around a...
Pico Powered DC Fan Driver
Hello everyone and welcome back.So here's something cool: a 5V to 12V DC motor driver based around a...
-
 Mini Solar Light Project with a Twist
Greetings.This is the Cube Light, a Small and compact cube-shaped emergency solar light that boasts ...
Mini Solar Light Project with a Twist
Greetings.This is the Cube Light, a Small and compact cube-shaped emergency solar light that boasts ...
-
 PALPi V5 Handheld Retro Game Console
Hey, Guys what's up?So this is PALPi which is a Raspberry Pi Zero W Based Handheld Retro Game Consol...
PALPi V5 Handheld Retro Game Console
Hey, Guys what's up?So this is PALPi which is a Raspberry Pi Zero W Based Handheld Retro Game Consol...
-
 DIY Thermometer with TTGO T Display and DS18B20
Greetings.So this is the DIY Thermometer made entirely from scratch using a TTGO T display board and...
DIY Thermometer with TTGO T Display and DS18B20
Greetings.So this is the DIY Thermometer made entirely from scratch using a TTGO T display board and...
-
 Motion Trigger Circuit with and without Microcontroller
GreetingsHere's a tutorial on how to use an HC-SR505 PIR Module with and without a microcontroller t...
Motion Trigger Circuit with and without Microcontroller
GreetingsHere's a tutorial on how to use an HC-SR505 PIR Module with and without a microcontroller t...
-
 Motor Driver Board Atmega328PU and HC01
Hey, what's up folks here's something super cool and useful if you're making a basic Robot Setup, A ...
Motor Driver Board Atmega328PU and HC01
Hey, what's up folks here's something super cool and useful if you're making a basic Robot Setup, A ...
-
 Power Block
Hey Everyone what's up!So this is Power block, a DIY UPS that can be used to power a bunch of 5V Ope...
Power Block
Hey Everyone what's up!So this is Power block, a DIY UPS that can be used to power a bunch of 5V Ope...
-
 Goku PCB Badge V2
Hey everyone what's up!So here's something SUPER cool, A PCB Board themed after Goku from Dragon Bal...
Goku PCB Badge V2
Hey everyone what's up!So here's something SUPER cool, A PCB Board themed after Goku from Dragon Bal...
-
Programmable Mist Maker - XIAO / QT PY Extension
1061 2 1 -
RadioHAT - Raspberry Pi radio development platform
867 0 2 -
-
-
-
-
ARPS-2 – Arduino-Compatible Robot Project Shield for Arduino UNO
3323 0 6 -
A Compact Charging Breakout Board For Waveshare ESP32-C3
3933 3 8 -
AI-driven LoRa & LLM-enabled Kiosk & Food Delivery System
4320 2 2


