


|
PlatformIOPlatformIO Labs
|
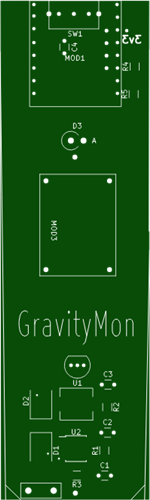
GravityMon-
pcb to utilise the gravitymon software from https://github.com/mp-se/gravitymon.git on an ESP32C3 super mini module for a floating hydrometer based on ispindel design.
software built on platformIO/visualstudiocode. The archive attachment gives details of the required changes to the current GitHub repository code in PlatformIO, basically there needs to be 2 additional files added and another section added to platformio.ini file to add the new device.
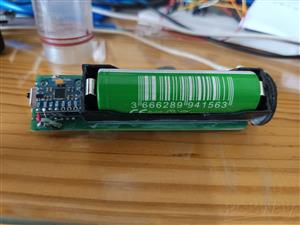
the design includes a magnetic charger system and the board should fit into either an Ispindel housing or a rapt-pill housing from kegland with trimming to fit. only tested with Kegland rapt pill housing.
The design is based on the Ispindel floating hydrometer with the gravitymon software from gravitymon.com which adds support for ESP32 devices. this project adds hardware support for the ESP32 C3 super mini module.
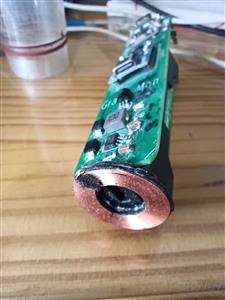
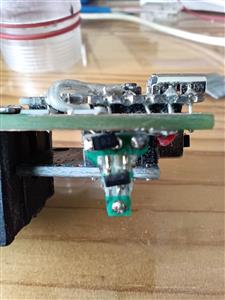
in addition support is added for wireless charging which allows for seal and forget which is helpful with the rapt pill housing. it requires a charger based on the XKT family of wireless charging devices. The receiving coil has too small a centre hole when brought as it needs to fit over the centre boss at the base of the Rapt Pill housing, the three inside turns of the coil must be removed and the wire shortened, the coil works fine with the reduced turns, the magnetic backing for the coil needs trimming to the shape of the coil with the centre cut out and stuck to the board side of the coil, two pieces of M3 double sided pads need to be cut to the same shape as the coil such that they can also pass over the centre boss of the housing and act as spacers for the coil so that the PCB presses the coil over the centre boss when in place.
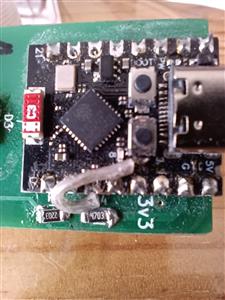
the part D3 is optional but included to protect the battery and ESP32 C3 super mini module (should be shorted if not required), it does interfere with the the battery supply voltage and if left out care must be taken to ensure the supply switch SW1 is off when programming the ESP32 C3 super mini module. If left out and the switch is on during programming the battery current surge may damage the module.
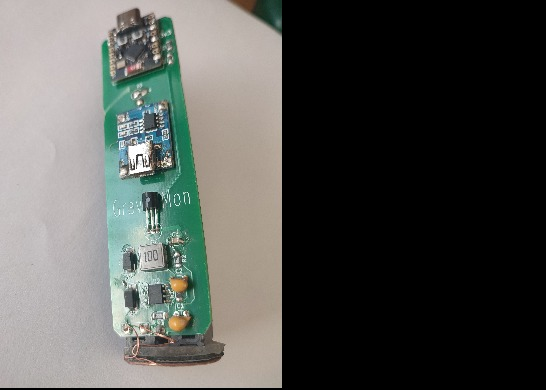
The Gravitymon software is based on the Ispindel floating hydrometer and operates in a similar manner, an un-calibrated device will automatically enter Wi-Fi setup, once the Wi-Fi has been setup a restart is necessary. A double reset will put the device into setup mode at any time and the device can be then calibrated through a number of menu's via Wi-Fi on a phone or computer. The double reset will require the separation of the rapt pill housing if used and this is prevented by the use of a magnetic switch, either a small reed switch or an alternative is the DRV5032 low power hall effect switch, either device needs directly soldering to the reset button on board the ESP32C3 super-mini board as it is
not available on a pin.
The photo is of the device I made for the DRV5032 and includes a mbr0520 diode to prevent shorting the DRV5032 output to ground via the reset button on the super-mini board.

In calibration mode the device needs setting up, keep the device horizontal during setup and go to the device/hardware section and calibrate the voltage to the measured value.
The fully assembled device needs the position calibrating, firstly the device needs putting into setup mode and on the device/hardware page the device needs the gyro to be calibrated on the horizontal plane, once the calibration is complete return to the home page and set the switch to keep it in force gravity mode, check the angle changes from horizontal (+-90 degrees) to within 5 degrees at the vertical (repeat the gyro calibration if not). The device now needs the balance setting, with the device floating in water check the angle, it needs to be between 25 and 30 degrees to get the best resolution. to trim this use weights, usually the device will be at a greater than 30 degrees and will require additional weight at the bottom end of the battery, a couple of grams is usually adequate and can be moved up the battery if too much. once the balance is correct the gravity can be setup, this is done on the gravity/formula page by floating the device in various sugar wash levels and recording the angle and gravity, there is space for up to 20 samples, the more used the better the accuracy leave unused cells blank. once complete save the results and do a create formula and save again, at the top of the page select the formula you prefer i.e. 1st 2nd or 3rd order polynomial and save again.
this is the main calibration, there are a number of other setups to complete the devices settings:
a) optional are to use storage sleep or battery saving modes, also the gyro can be disabled and used only as a temperature monitor.
b) the device can be temperature adjusted with the settings on the gravity/settings page
c) push targets need to be setup, this will depend on your preferred target although there are a number of presets available (see the main documetation on the gravitymon web site).
GravityMon-
*PCBWay community is a sharing platform. We are not responsible for any design issues and parameter issues (board thickness, surface finish, etc.) you choose.


Raspberry Pi 5 7 Inch Touch Screen IPS 1024x600 HD LCD HDMI-compatible Display for RPI 4B 3B+ OPI 5 AIDA64 PC Secondary Screen(Without Speaker)
BUY NOW

- Comments(0)
- Likes(0)
More by David Ashmore

-
Programmable Mist Maker - XIAO / QT PY Extension
716 1 0 -
RadioHAT - Raspberry Pi radio development platform
552 0 1 -
-
-
-
-
ARPS-2 – Arduino-Compatible Robot Project Shield for Arduino UNO
3053 0 6 -
A Compact Charging Breakout Board For Waveshare ESP32-C3
3667 3 8 -
AI-driven LoRa & LLM-enabled Kiosk & Food Delivery System
3943 2 2


