


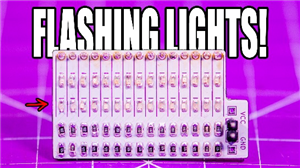
USB Macro Pad
A super easy USB Macro pad using the Arduino pro micro (or compatible) board. This uses 16 Cherry MX style switches with keycaps that have spaces for printed labels in them. The sky is the limit!
If this isn't for you, check out Dustin Watts' ESP32 Touchdown!:
https://www.tindie.com/products/dustinwattsnl/esp32-touchdown/
https://www.youtube.com/watch?v=TJTbuOdeoFw
For this build you will need:
1n4007 Diodes:
World - https://s.click.aliexpress.com/e/_DdRbCyT
Canada - https://amzn.to/3PT0dlQ
USA & World - https://amzn.to/3PUxFsr
Arduino pro micro:
World - https://s.click.aliexpress.com/e/_DlKXO2X
Canada - https://amzn.to/3Oxa93m
USA & World - https://amzn.to/3OApXCu
Cherry MX-style Switches: (Outemu Black used here):
World - https://s.click.aliexpress.com/e/_DDg3zBH
Canada - https://amzn.to/3b9jW1X
USA & World - https://amzn.to/3osKzCk
Clear (labelable) Keycaps (for Cherry-MX style keys):
World - https://s.click.aliexpress.com/e/_DEVJ6D5
Canada - https://amzn.to/3aXVlxj
USA & World - https://amzn.to/3cGN7Kp
Thanks for watching!
Check out my website: https://www.simpleelectronics.ca
If you feel like supporting the channel, please consider supporting on Patreon:
https://www.patreon.com/SimpleElectronics
or get some cool merch!
https://teespring.com/stores/electronics-r-us
or buy anything from USA Amazon using my affiliate link:
https://amzn.to/3Iki6q7
or buy anything from Canadian Amazon using my affiliate link:
https://amzn.to/3FNxPfI
or buy anything on Banggood's site using my affiliate link:
https://www.banggood.com/custlink/mGvGJL5Qm1
or buy anything using my Aliexpress affiliate link:
https://s.click.aliexpress.com/e/_9u07X6
and if you feel so inclined, here is my Amazon wish list!
https://www.amazon.ca/hz/wishlist/ls/2BMH2EFGY31V1?ref_=wl_share
I have other channels!:
Dan Fixes Cars:
https://www.youtube.com/channel/UC8gQZ_5-DOb0oQVm66oTl6A
SE Con Dairy:
https://www.youtube.com/channel/UCL1jXgPQjCI0gWFLltq2bzg
#include <Keyboard.h>
#include <SimpleKeypad.h>

const byte nb_rows = 4;                         // four rows
const byte nb_cols = 4;                         // four columns
char key_chars[nb_rows][nb_cols] = {            // The symbols of the keys
  {'1', '2', '3', 'A'},
  {'4', '5', '6', 'B'},
  {'7', '8', '9', 'C'},
  {'*', '0', '#', 'D'}
};
byte rowPins[nb_rows] = {9, 8, 7, 6};           // The pins where the rows are connected
byte colPins[nb_cols] = {5, 4, 3, 2};           // The pins where the columns are connected

SimpleKeypad kp1((char*)key_chars, rowPins, colPins, nb_rows, nb_cols);   // New keypad called kp1

void setup() {
  Serial.begin(9600);
  Serial.println("Press any key on the keypad and it will show up here :");
}

void loop() {
  char key = kp1.getKey();                      // The getKey function scans the keypad every 10 ms and returns a key only one time, when you start pressing it
  if (key) {                                    // If getKey returned any key
    Serial.println(key);                        // it is printed on the serial monitor
  }
  if (key == 'D') {
    Keyboard.press(KEY_F13);
    Keyboard.releaseAll();
  }
  if (key == '#') {
    Keyboard.press(KEY_F14);
    Keyboard.releaseAll();
  }
  if (key == '0') {
    Keyboard.press(KEY_F15);
    Keyboard.releaseAll();
  }
  if (key == '*') {
    Keyboard.press(KEY_F16);
    Keyboard.releaseAll();
  }
  if (key == 'C') {
    Keyboard.press(KEY_F17);
    Keyboard.releaseAll();
  }
  if (key == '9') {
    Keyboard.press(KEY_F18);
    Keyboard.releaseAll();
  }
  if (key == '8') {
    Keyboard.press(KEY_F19);
    Keyboard.releaseAll();
  }
  if (key == '7') {
    Keyboard.press(KEY_F20);
    Keyboard.releaseAll();
  }
  if (key == 'B') {
    Keyboard.press(KEY_F21);
    Keyboard.releaseAll();
  }
  if (key == '6') {
    Keyboard.press(KEY_F22);
    Keyboard.releaseAll();
  }
  if (key == '5') {
    Keyboard.press(KEY_F23);
    Keyboard.releaseAll();
  }
  if (key == '4') {
    Keyboard.press(KEY_F24);
    Keyboard.releaseAll();
  }
  if (key == 'A') {
    Keyboard.press(KEY_LEFT_SHIFT);
    delay(250);
    Keyboard.press(KEY_F13);
    delay(250);
    Keyboard.release(KEY_F13);
    delay(250);
    Keyboard.release(KEY_LEFT_SHIFT);
  }
    if (key == '3') {
    Keyboard.press(KEY_LEFT_SHIFT);
    delay(250);
    Keyboard.press(KEY_F14);
    delay(250);
    Keyboard.release(KEY_F14);
    delay(250);
    Keyboard.release(KEY_LEFT_SHIFT);
  }
    if (key == '2') {
    Keyboard.press(KEY_LEFT_SHIFT);
    delay(250);
    Keyboard.press(KEY_F15);
    delay(250);
    Keyboard.release(KEY_F15);
    delay(250);
    Keyboard.release(KEY_LEFT_SHIFT);
  }
    if (key == '1') {
    Keyboard.press(KEY_LEFT_SHIFT);
    delay(250);
    Keyboard.press(KEY_F16);
    delay(250);
    Keyboard.release(KEY_F16);
    delay(250);
    Keyboard.release(KEY_LEFT_SHIFT);
  }
}
USB Macro Pad
Project images are for reference only. Actual production is based on the manufacturing files on the project page.
Please review the designer's notes (e.g., PCB thickness) and select the appropriate options.
PCBWay is not responsible
for issues caused by unsuitable parameter selections.
For more important ordering information, please refer to
Read More


Raspberry Pi 5 7 Inch Touch Screen IPS 1024x600 HD LCD HDMI-compatible Display for RPI 4B 3B+ OPI 5 AIDA64 PC Secondary Screen(Without Speaker)
BUY NOW


- Comments(0)
- Likes(2)
More by Simple Electronics
-
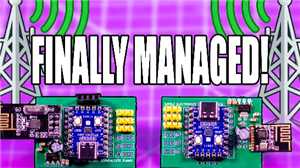 RP2040 and NRF24L01 Transmitter and Receiver
After years of losing to the NRF24L01, I finally won. I designed an RP2040-Zero PCB that uses bitban...
RP2040 and NRF24L01 Transmitter and Receiver
After years of losing to the NRF24L01, I finally won. I designed an RP2040-Zero PCB that uses bitban...
-
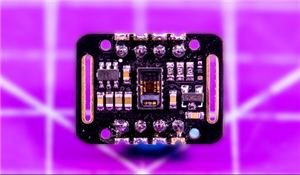 MAX30102 Heart Rate Sensor
A combiner board to put together a RP2040-Zero, a SSD1306 OLED and a MAX30102 sensor board - enjoy!h...
MAX30102 Heart Rate Sensor
A combiner board to put together a RP2040-Zero, a SSD1306 OLED and a MAX30102 sensor board - enjoy!h...
-
 Semi-Universal Temperature Board
I made an excuse for you to use your DHT-11, DHT-22, BMP280 and 12B20 and have a nice tool to keep o...
Semi-Universal Temperature Board
I made an excuse for you to use your DHT-11, DHT-22, BMP280 and 12B20 and have a nice tool to keep o...
-
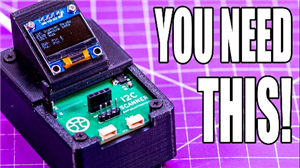 RP2040 i2c Scanner
https://youtu.be/NPpPVw-4qi8For the most information, the CODE and more, check out the website artic...
RP2040 i2c Scanner
https://youtu.be/NPpPVw-4qi8For the most information, the CODE and more, check out the website artic...
-
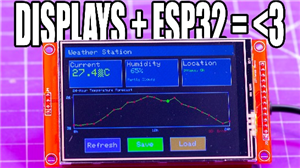 ESP32 DEVKIT V1 + TFT Touch Combiner
In this project, I showcase a custom PCB that combines an ESP32-DevKit-V1 (30 pin) with a 3.5" TFT L...
ESP32 DEVKIT V1 + TFT Touch Combiner
In this project, I showcase a custom PCB that combines an ESP32-DevKit-V1 (30 pin) with a 3.5" TFT L...
-
 Tiny Microcontroller Tester
A simple board to test out GPIO of your microcontrollers, using two rows of 0603 LEDs (one row for H...
Tiny Microcontroller Tester
A simple board to test out GPIO of your microcontrollers, using two rows of 0603 LEDs (one row for H...
-
 30-pin DIP to SIL
I created this for the WeAct Studio RP2350B board (the huge one with 48 GPIO) but works for all sort...
30-pin DIP to SIL
I created this for the WeAct Studio RP2350B board (the huge one with 48 GPIO) but works for all sort...
-
 Servo Tester
If you have servos at home and are looking for an excuse to dust them off or even if you just need t...
Servo Tester
If you have servos at home and are looking for an excuse to dust them off or even if you just need t...
-
 RP2040-Zero adapter (mega)
https://youtu.be/8vQdalhTISYYou will likely want the "mini" unless you are a psycho like me - since ...
RP2040-Zero adapter (mega)
https://youtu.be/8vQdalhTISYYou will likely want the "mini" unless you are a psycho like me - since ...
-
 RP2040-Zero adapter (mini)
https://youtu.be/8vQdalhTISYYou will likely want the "mini" unless you are a psycho like me - since ...
RP2040-Zero adapter (mini)
https://youtu.be/8vQdalhTISYYou will likely want the "mini" unless you are a psycho like me - since ...
-
 ESP32-Relay-Control
ESP32 PCB with a DC-DC converter and 8 outputs and 6 inputs.Please note that switch 7 and 8 are acci...
ESP32-Relay-Control
ESP32 PCB with a DC-DC converter and 8 outputs and 6 inputs.Please note that switch 7 and 8 are acci...
-
 0-60V Analog Load
Build your own analog load to load up power supplies, drain batteries, limit current, all sorts of t...
0-60V Analog Load
Build your own analog load to load up power supplies, drain batteries, limit current, all sorts of t...
-
 0-30V Analog Load
Build your own analog load to load up power supplies, drain batteries, limit current, all sorts of t...
0-30V Analog Load
Build your own analog load to load up power supplies, drain batteries, limit current, all sorts of t...
-
 0-15V Analog Load
Build your own analog load to load up power supplies, drain batteries, limit current, all sorts of t...
0-15V Analog Load
Build your own analog load to load up power supplies, drain batteries, limit current, all sorts of t...
-
 Relay Board
I was unsatisfied with the generic relay PCBs on the market - so I made my own!You will also need th...
Relay Board
I was unsatisfied with the generic relay PCBs on the market - so I made my own!You will also need th...
-
 A 12-Device USB Charging Station
I have a lot of devices that need relatively low current charging and I don't really have that many ...
A 12-Device USB Charging Station
I have a lot of devices that need relatively low current charging and I don't really have that many ...
-
 Holiday Wreath
This Holiday Season, PCBWay sponsored me to make a holiday decoration! The inspiration for this one ...
Holiday Wreath
This Holiday Season, PCBWay sponsored me to make a holiday decoration! The inspiration for this one ...
-
 Another Macro Pad!
Yup! I made another one, this time with lights! Cherry MX (and equivalent) mechanical keyboard switc...
Another Macro Pad!
Yup! I made another one, this time with lights! Cherry MX (and equivalent) mechanical keyboard switc...
-
Programmable Mist Maker - XIAO / QT PY Extension
1150 2 1 -
RadioHAT - Raspberry Pi radio development platform
958 0 2 -
-
-
-
-
ARPS-2 – Arduino-Compatible Robot Project Shield for Arduino UNO
3382 0 6 -
A Compact Charging Breakout Board For Waveshare ESP32-C3
3999 3 8 -
AI-driven LoRa & LLM-enabled Kiosk & Food Delivery System
4389 2 2


