


|
arduino IDEArduino
|
|

|
KiCad 9.0 |
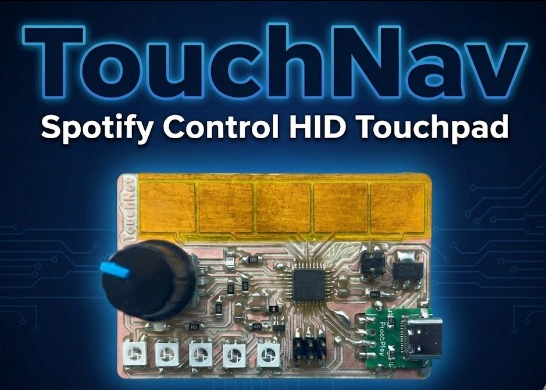
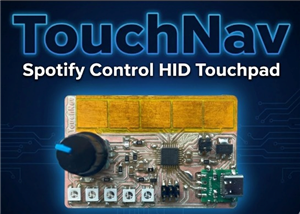
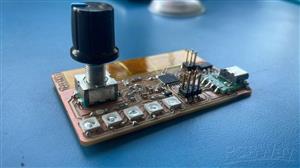
TouchNav - Spotify Control HID Touchpad
TouchNav is a minimalist USB HID touch controller built using a custom SAMD21 board.It lets you control Spotify playback - play/pause, next/previous track, and volume using capacitive touch pads and a rotary encoder.
The goal was to build a sleek, touch-based interface that feels futuristic yet practical, allowing intuitive control of Spotify directly from your desk without touching your keyboard or mouse.

Features
- Capacitive touch pads for Play/Pause, Next, and Previous
- Rotary encoder for Volume control
- HID-based media key emulation (no software needed on PC)
- Automatic Spotify open/close via keyboard shortcuts
- Works as a plug-and-play USB device
- Built on a custom SAMD21 board
Hardware Overview
At its core, TouchNav is built around a custom SAMD21 board designed for Fab Academy. The SAMD21E17A chip provides full-speed USB capability, which allows it to act as a HID (Human Interface Device) similar to a keyboard or mouse.
Atmel SAMD21E17A
The Atmel SAMD21E17A is a powerful yet compact ARM Cortex-M0+ based microcontroller running at up to 48 MHz. It’s the same family of chips used in the Arduino Zero and many modern development boards, making it ideal for USB-connected, low-power, and interactive projects like TouchNav.
- Processor: 32-bit ARM Cortex-M0+ core, running up to 48 MHz
- Memory: 128 KB Flash and 16 KB SRAM (for program and data storage)
- USB Support: Full-speed USB 2.0 interface, allowing native USB HID, keyboard, and serial functionality
Peripherals:
- Up to 6 configurable serial interfaces (SERCOM) — usable as UART, SPI, or I²C
- 12-bit ADC (Analog-to-Digital Converter) for reading sensors and touch inputs
- 10-bit DAC for analog output
- Timer/Counters (TC/TCC) for PWM, event timing, or signal generation
- Peripheral Touch Controller (PTC) for capacitive touch sensing
- Power Management: Low-power modes, SleepWalking peripherals, and brown-out detection.
- Debugging: Two-pin SWD (Serial Wire Debug) for programming and debugging
- Operating Voltage: 3.3 V logic
- I/O Pins: Up to 32 available GPIO pins (depending on package)
Why It’s Great for TouchNav
The SAMD21E17A’s native USB capability makes it ideal for projects that emulate keyboards, mice, or multimedia controllers - without extra hardware.Its touch sensing support and multiple serial interfaces also make it perfect for integrating sensors, LEDs, and rotary encoders.
The main input components include:
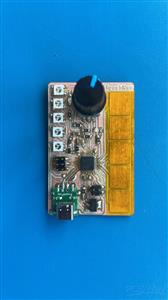
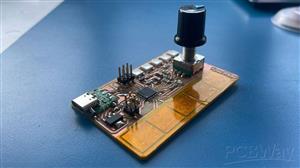
- Capacitive Touch Pads: Three metal or copper pads act as touch sensors. Each pad is assigned a function — Play/Pause, Next Track, and Previous Track.
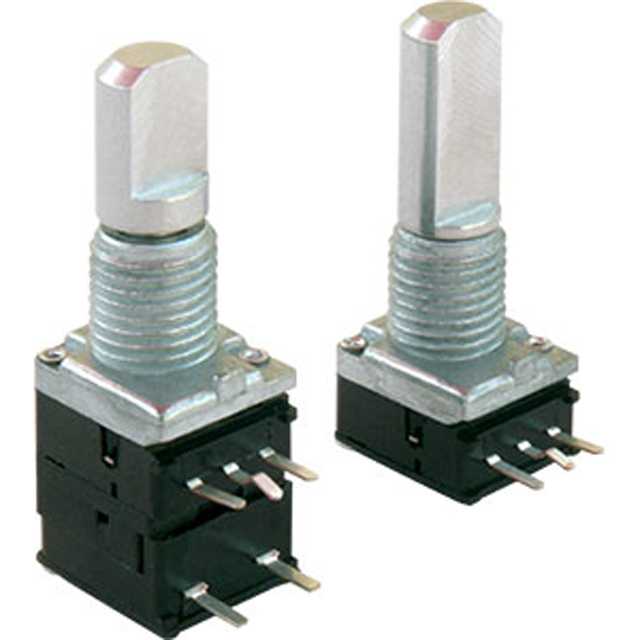
- Rotary Encoder: A small knob used to increase or decrease system volume. It also includes an optional push button.
- Micro USB Interface: For both power and data, allowing the board to function as a USB HID device.
The capacitive touch pads are connected to the analog-capable pins on the SAMD21. The rotary encoder is connected to two digital pins configured to detect state transitions for clockwise and counter-clockwise rotation.
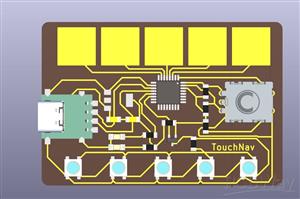
PCB Design - KiCAD
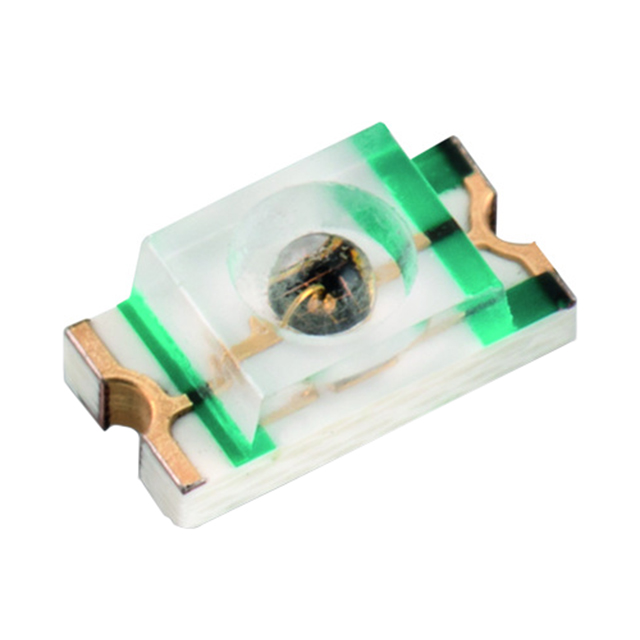
The entire board was custom-designed in KiCad, an open-source PCB design tool. The schematic, layout, and pin mappings were tailored to fit the SAMD21E17A’s capabilities integrating touch pads, a rotary encoder, WS2812B LEDs, and USB connectivity in a compact, minimal design.
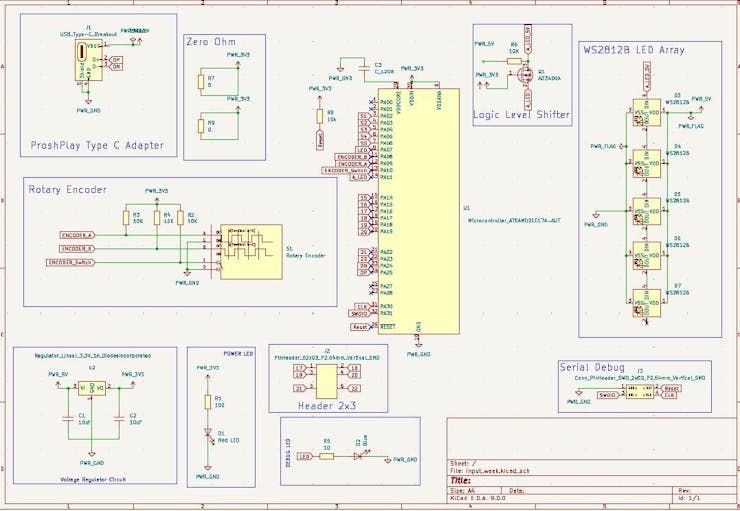

This allowed full control over the hardware design from component placement to routing USB differential pairs making TouchNav a purpose-built, professional-grade HID controller rather than a generic development board hack.

The Serial Debug inerface is used to burn the bootloader onto the board. I am using a SAMD DAP Programmer Board developed by my Fab Academy Instructor Saheen.

Adding the FAB SAMD Board to Arduino
To program the SAMD21 Board using Arduino IDE, we need to add the FAB SAMD Board to the Board Manager
To install, simply add the following URL to "Additional Boards Manager URLs" in the Arduino IDE: https://raw.githubusercontent.com/qbolsee/ArduinoCore-fab-sam/master/json/package_Fab_SAM_index.json
Install the board using the Board Manager

After burning the bootloader, I can program my board using the type C USB Interface.
Blink
After burning the bootloader the first step was to test the builtin example 'Blink'Initially I tested all my input and output functionalities by using some example codes.
SAMD21 Serial Demo
The next test was serial communication. After research, I realised the usual arduino command Serial.print doesn't work for the SAMD21, therefore we have to use SerialUSB.print. The below code is taken from my Fab Academy Embedded Programming class. SAMD21 Echo Code
Capacitive Touch
The Capcitive touch can be tested by using the test code provided by Professor Neil in the Fab Academy Input Devices Class. The required library for this is Adafruit FreeTouch library.
HID
I used the HID Project and HID Settings Library which is available in the Library Manager of Arduino by default. We just have to install it to use the library from the library manager. The main function that I used was the Consumer function whih allows to control Media Playback and some functions. There are two things happening mainly: Control the Media Playback and opening and closing Spotify on the Windows Device.
// This is the code for running the TouchNav Board with the Rotary Encoder and the Capacitive Touch to control Media features in the connected PC using the HID Libraries
//You can control volume using the Encoder and pause/play with the button
//You can use the 5 Capacitive Touch Pads to: Rewind - Previous - Play/Pause - Next - Fast Forward

#include <HID-Project.h>
#include <HID-Settings.h>
#include "Adafruit_FreeTouch.h"


Adafruit_FreeTouch t0 = Adafruit_FreeTouch(2, OVERSAMPLE_64, RESISTOR_0, FREQ_MODE_NONE);
Adafruit_FreeTouch t1 = Adafruit_FreeTouch(3, OVERSAMPLE_64, RESISTOR_0, FREQ_MODE_NONE);
Adafruit_FreeTouch t2 = Adafruit_FreeTouch(4, OVERSAMPLE_64, RESISTOR_0, FREQ_MODE_NONE);
Adafruit_FreeTouch t3 = Adafruit_FreeTouch(5, OVERSAMPLE_64, RESISTOR_0, FREQ_MODE_NONE);
Adafruit_FreeTouch t4 = Adafruit_FreeTouch(6, OVERSAMPLE_64, RESISTOR_0, FREQ_MODE_NONE);

// Rotary Encoder Inputs
#define CLK 9
#define DT 8
#define SW 10

int counter = 0;
int currentStateCLK;
int lastStateCLK;
unsigned long lastButtonPress = 0;

int baseline[5] = {1e6, 1e6, 1e6, 1e6, 1e6};

void setup() {
    // Set encoder pins as inputs
    pinMode(CLK, INPUT);
    pinMode(DT, INPUT);
    pinMode(SW, INPUT_PULLUP);

    // Start USB HID (Keyboard & Consumer Control)
    Consumer.begin();
    Keyboard.begin();

    // Setup Serial Monitor
    SerialUSB.begin(9600);


  // Initialize FreeTouch sensors
  t0.begin(); t1.begin(); t2.begin(); t3.begin(); t4.begin();

  // Calibrate baseline
  for (int i = 0; i < 100; i++) {
    baseline[0] = min(baseline[0], t0.measure());
    baseline[1] = min(baseline[1], t1.measure());
    baseline[2] = min(baseline[2], t2.measure());
    baseline[3] = min(baseline[3], t3.measure());
    baseline[4] = min(baseline[4], t4.measure());
    delay(10);
  }
    // Read the initial state of CLK
    lastStateCLK = digitalRead(CLK);
}

void loop() {
    // Read the current state of CLK
    currentStateCLK = digitalRead(CLK);

    // Detect rotation
    if (currentStateCLK != lastStateCLK && currentStateCLK == 1) {
        if (digitalRead(DT) != currentStateCLK) {
            // Clockwise Rotation (Increase Volume)
            counter++;
            Consumer.write(MEDIA_VOLUME_UP);
            SerialUSB.println("Volume UP");
        } else {
            // Counterclockwise Rotation (Decrease Volume)
            counter--;
            Consumer.write(MEDIA_VOLUME_DOWN);
            SerialUSB.println("Volume DOWN");
        }
    }

    // Remember last CLK state
    lastStateCLK = currentStateCLK;

    // Read the button state
    int btnState = digitalRead(SW);

    // Detect button press (Play/Pause)
    if (btnState == LOW) {
        if (millis() - lastButtonPress > 200) {  // Debounce button
            SerialUSB.println("Play/Pause");
            Consumer.write(MEDIA_PLAY_PAUSE);
        }
        lastButtonPress = millis();
    }

    int touchValues[5] = {
    t0.measure() - baseline[0],
    t1.measure() - baseline[1],
    t2.measure() - baseline[2],
    t3.measure() - baseline[3],
    t4.measure() - baseline[4]
  };

  int total = 0, weightedSum = 0;
  for (int i = 0; i < 5; i++) {
    if (touchValues[i] > 10) {  // Ignore noise
      total += touchValues[i];
      weightedSum += touchValues[i] * i;

    }

  }

if(touchValues[2]>9){
  Consumer.write(MEDIA_PLAY_PAUSE);
  SerialUSB.println("Play/Pause");
  // SerialUSB.print(touchValues[2]);
  delay(1000);
}

if(touchValues[1]>9){
  Consumer.write(MEDIA_PREVIOUS);
  SerialUSB.println("Previous");
  // SerialUSB.print(touchValues[1]);
  delay(1000);
}

if(touchValues[3]>9){
  Consumer.write(MEDIA_NEXT);
  SerialUSB.println("Next");
  // SerialUSB.print(touchValues[3]);
  delay(1000);
}

if(touchValues[4]>9){
  Consumer.write(MEDIA_FAST_FORWARD);
  SerialUSB.println("Calculator");
  // SerialUSB.print(touchValues[4]);
  delay(500);
  if(touchValues[4]>9)
  {
    Consumer.write(MEDIA_FAST_FORWARD);
  }
}

if(touchValues[0]>9){
  Consumer.write(MEDIA_REWIND);
  SerialUSB.println("Browser");
  // SerialUSB.print(touchValues[0]);
  delay(1000);
}


    delay(5);  // Small delay to stabilize readings
}
TouchNav - Spotify Control HID Touchpad
*PCBWay community is a sharing platform. We are not responsible for any design issues and parameter issues (board thickness, surface finish, etc.) you choose.


Raspberry Pi 5 7 Inch Touch Screen IPS 1024x600 HD LCD HDMI-compatible Display for RPI 4B 3B+ OPI 5 AIDA64 PC Secondary Screen(Without Speaker)
BUY NOW


- Comments(0)
- Likes(0)
 More by Engineer
-
Programmable Mist Maker - XIAO / QT PY Extension
172 0 0 -
RadioHAT - Raspberry Pi radio development platform
182 0 1 -
-
-
-
-
ARPS-2 – Arduino-Compatible Robot Project Shield for Arduino UNO
2767 0 5 -
A Compact Charging Breakout Board For Waveshare ESP32-C3
3275 3 8 -
AI-driven LoRa & LLM-enabled Kiosk & Food Delivery System
3529 2 2


