
|
KiCADKicad
|
SmartMatrix: networked parallel printer interface
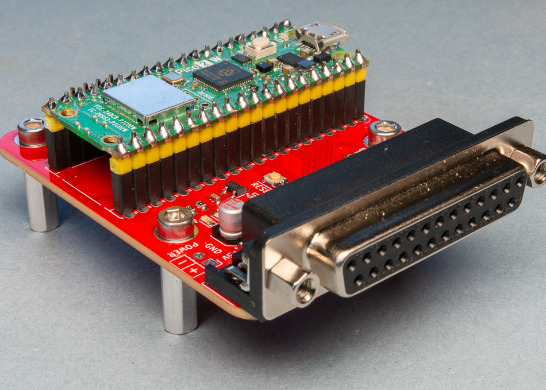
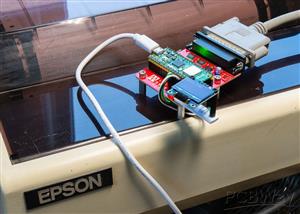
The Raspberry Pi Pico 2W-based SmartMatrix adapter uses the microcontroller to convert serial or network input to parallel output for printing to a dot matrix printer - in my case an Epson MX-80 F/T III.
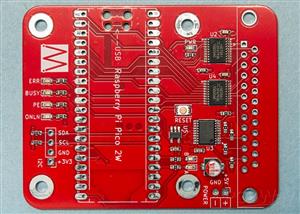
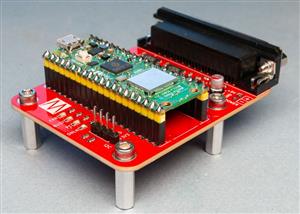
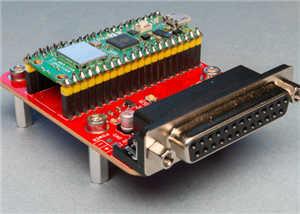
The BOM provided for this project includes all the surface-mount parts. You will need to add a Raspberry Pi Pico 2W, a right-angle 25-pin D-sub connector and header pins for the I2C interface.
Network interface: The Pico connects to your wifi and runs a socket server on port :9100 (chosen to be compatible with HP JetDirect devices). Any byte sent to the device's IP address on that port gets sent to the printer. All you need on your computer is a printer driver based on the JetDirect protocol and configured to output to the SmartMatrix's IP address. This is very simple to set up on Linux using lpadmin. Then, from that Linux box, assuming you've named the driver something like 'mx80' and you want to printer a file called 'myfile.txt', you enter on the command line:
lp myfile.txt -d mx80
Your text will appear on the printer as if by magic, transported over the aether by wifi. No wires needed.
You can also access this interface from any programs you write that want to, say, log data. I have a Go-based program running on my home server that handles printing files and I've written a front end to this on the home intranet server.
Serial interface: Connect the Pico to your computer via a standard USB cable and it appears as a serial interface. If you fire up a terminal program such as Minicom, Coolterm or whatever, and set it to 115,200 baud, 8N1, you'll find yourself talking to the command line interface (CLI) of the SmartMatrix. There's more information below.
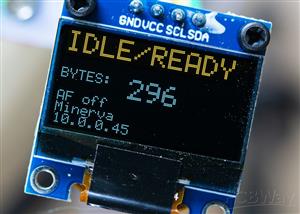
There's also an I2C port for a small OLED screen (SSD1306).
SERIAL PORT
When you attach the Pico to your computer via a USB cable it presents itself as a serial port. You can use any serial terminal program to connect to the SmartMatrix with settings of 115200 baud, 8N1.
Via this terminal, you can issue a number of commands. Currently we have:
- HELP : to get this list of commands.
- STAT : to get a printer status report.
- RESET : to reset the printer (not the SmartMatrix).
- SSID : to configure the SSID setting for the wifi.
- PASSWD : to configure the password for the wifi.
- CONN : to initiate a wifi connection.
- AF_ON : to turn on the Autofeed setting (the default is off).
- AF_OFF : to turn off the Autofeed setting.
- PRT : to enter serial printing mode (see below).
Serial Printing Mode
If you send the string PRT down the serial connection, any further bytes sent to the SmartMatrix over the serial connection will get forwarded directly to the printer until you send an ASCII 0x04 character (End of Transmission, EOT).
This function is mostly meant for use with programs, but you can probably configure your terminal software to send an EOT (I did this using macros in Coolterm).
As soon as the SmartMatrix gets the EOT, the serial connection switches back into the normal command line interface mode.
WIFI CONFIG
The SmartMatrix needs your wifi credentials. It stores these (unencrypted) at the top of flash memory so that they are available even after rebooting or re-powering the device.
You have two ways of configuring the device.
Edit the lib/wifi_creds.h file: By default, this has empty strings for the SSID and password settings. Enter your credentials here (paying attention to capitalisation and keeping the quote marks) and your configuration will be written automatically to the SmartMatrix when you compile and flash the program.
The contents of the file will look something like this:
#define WIFI_SSID "my_SSID" #define WIFI_PASSWORD "my_password"
Enter the credentials via the serial interface: There is a command like interface available over serial, through the USB port on the Pico (see above).
From this interface type the following commands:
SSID to set the SSID (not complicated, is it?).
PASSWD to enter the password.
CONN to get the Pico to connected to your wifi.
The credentials are stored in non-volatile memory, so you need to do this only when connecting to a different network.
THE HARDWARE
The SmartMatrix hardware device largely consists of the Raspberry Pi Pico 2W, some ICs used as level shifters and buffers/drivers, a 25-pin D-sub socket for the printer cable, a reset button and a few blinkenlights.
This project is the culmination of a number of projects all based around making good use of the Epson MX80 F/T-III dot matric printer I bought in the early 1980s and which is still working. I've documented these projects in a number of articles on Machina Speculatrix (Medium subscription required):
- Getting to grips with the parallel interface : Putting an old printer back into use meant talking the language of its now (mostly) obsolete interface.
- Life with a dot matrix printer : There’s something charming about old technology, especially if you can find a use for it.
- Networking a dot matrix printer : Nothing adds more value to resources like printers than being able to share them.
- SmartMatrix: A Raspberry Pi Pico parallel printer interface : This simple board makes an ancient dot matrix printer available to modern devices across the whole network.
- A simple OLED driver in C for the Raspberry Pi Pico : OLED panels are cute, crisp and very versatile. And they are surprisingly easy to program yourself, if your aims are modest.
- SmartMatrix finale: a wifi-enabled RPi Pico parallel printer server with OLED : My odyssey to find the perfect solution for using an old dot matrix printer has reached its destination. (coming soon).
SmartMatrix: networked parallel printer interface
Project images are for reference only. Actual production is based on the manufacturing files on the project page.
Please review the designer's notes (e.g., PCB thickness) and select the appropriate options.
PCBWay is not responsible
for issues caused by unsuitable parameter selections.
For more important ordering information, please refer to
Read More









Raspberry Pi 5 7 Inch Touch Screen IPS 1024x600 HD LCD HDMI-compatible Display for RPI 4B 3B+ OPI 5 AIDA64 PC Secondary Screen(Without Speaker)
BUY NOW


- Comments(0)
- Likes(1)
More by Steve Mansfield-Devine
-
 SmartMatrix: networked parallel printer interface
The Raspberry Pi Pico 2W-based SmartMatrix adapter uses the microcontroller to convert serial or net...
SmartMatrix: networked parallel printer interface
The Raspberry Pi Pico 2W-based SmartMatrix adapter uses the microcontroller to convert serial or net...
-
 ATmega4809-A Breakout Board
A breakout board that allows you to easily work with the AVR 0-series ATmega4809-A microcontroller. ...
ATmega4809-A Breakout Board
A breakout board that allows you to easily work with the AVR 0-series ATmega4809-A microcontroller. ...
-
 Infrared IoT hub for home automation - ESP32 version
I created this as a way of experimenting with using IR signals to communicate with Internet of Thing...
Infrared IoT hub for home automation - ESP32 version
I created this as a way of experimenting with using IR signals to communicate with Internet of Thing...
-
Émetteur Récepteur Optique Expérimental (communication UART ATtiny + fibre optique)
132 0 1 -
SmallOLED - Live PC Stats, Animated Clocks & Audio Visualizer
969 0 3 -
"Talking Multimeter": Arduino-Based Speech Add-on for Multimeters with SCPI Protocol
556 0 1 -
Programmable Mist Maker - XIAO / QT PY Extension
3026 2 3 -
RadioHAT - Raspberry Pi radio development platform
2575 0 4 -
-
-