


PULPY - ESC 40A AM32

🛠️ I’ve developed my second official ESC, the Pulpy G40A, fully compatible with AM32 firmware. This ESC was designed from the ground up to be reliable, robust, and clean, combining precise engineering with hands-on experience in power electronics ⚡.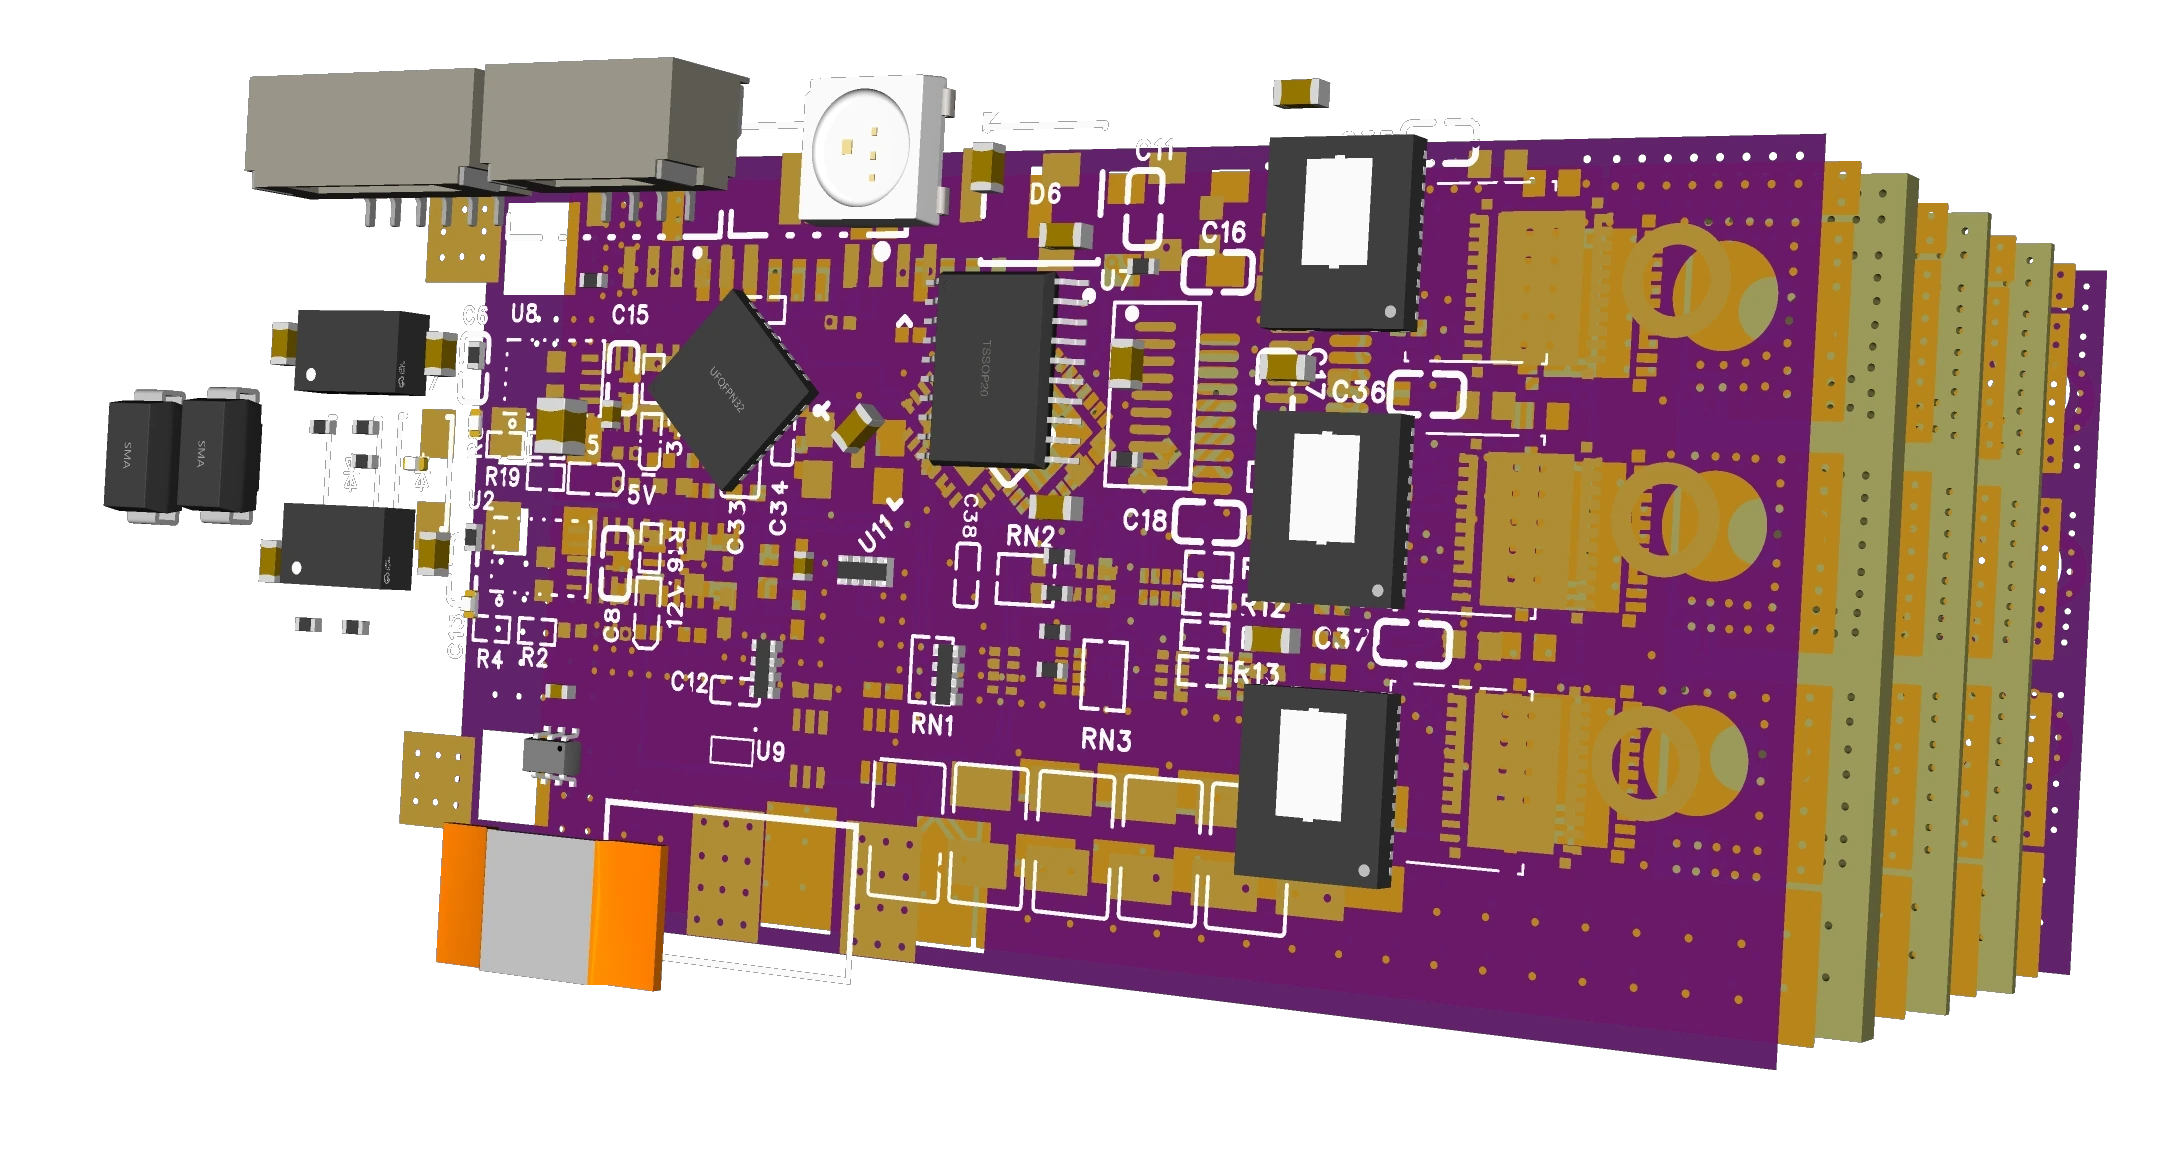 At its heart ❤️, it’s powered by an STM32G071 microcontroller 🧠, chosen for performance and ease of use for students 🎓. Here is the technical infos:
DRV8300 gate driver 🔌
CSD88584Q5DC MOSFETs 🌉 (40 A continuous, 50 A peak)
Dual-buck power supply: 12 V for the driver, 3.3 V for the MCU 🔋
5 V LDO for the onboard addressable LED 💡
Key Features:
Telemetry output 📡 — real-time voltage, current, and temperature reporting to the flight controller
Power indicators 💡 — LEDs for 5 V, 3.3 V, and 12 V rails for quick diagnostics
High-side TVS diode ⚡ — protects against voltage spikes above 26V
Optimized PCB layout 💻 — 4-layer design with improved capacitor network for lower noise and better thermal balance
Balanced motor phase routing 🌉 — ensures uniform current sharing and cleaner performance
FOC compatibility 🎛️ — supported via SimpleFOC Arduino library (to be tested under AM32)
*Optionnal more ceramic caps can be added to the back of the esc.
Validation and Testing of the Custom ESC Firmware and Hardware
Before performing motor tests, a custom firmware was developed under AM32, specifically adapted to the designed ESC board. This firmware included several modifications and enhancements:
Integration of the addresable LED, a feature available in some AM32 targets, allowing visual indication of the controller’s state (initialization, arming, fault, etc.).
Adjustment of the shunt resistor parameters to ensure accurate current measurement according to the actual shunt value used on the board.
Modification of the battery voltage divider parameters, allowing correct battery voltage reading within the firmware.
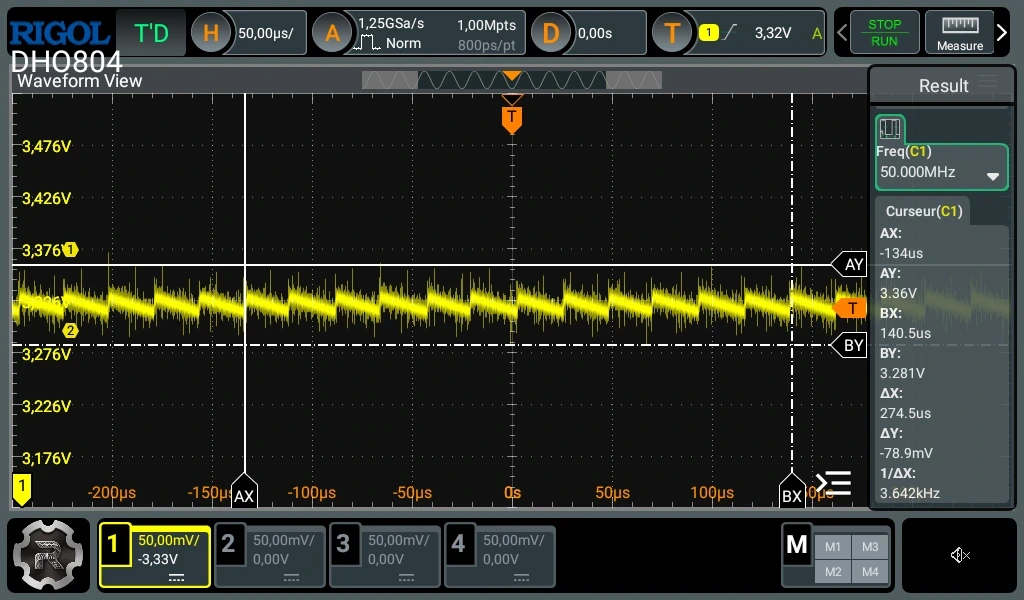
Once these configurations were applied, power rail quality measurements were carried out on the three main voltage levels: 5 V, 12 V, and 3.3 V.
A ×10 oscilloscope probe was used in AC coupling mode, with the oscilloscope set to display Peak-to-Peak (Pk-Pk) measurements.
The probe was connected directly across the output terminals of each power supply, ensuring proper grounding to capture both AC and DC components.
The results showed a ripple of around 60–80 mV, which is excellent performance for an ESC power stage. This can be observed on the following waveform screenshot showing the 3.3 V rail. on the following sscreenshot I used the alligator clip for the gnd wich is not a good idea since it can create an antenna, I did both the test with the paper clip and the alligator clip and mesure around 60-70mv using the paper clip.
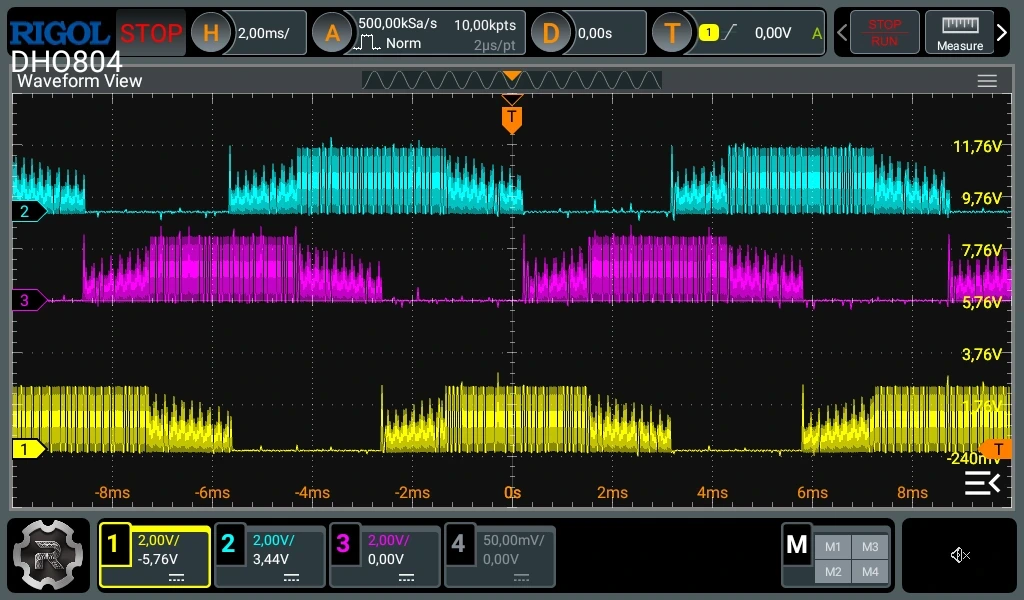
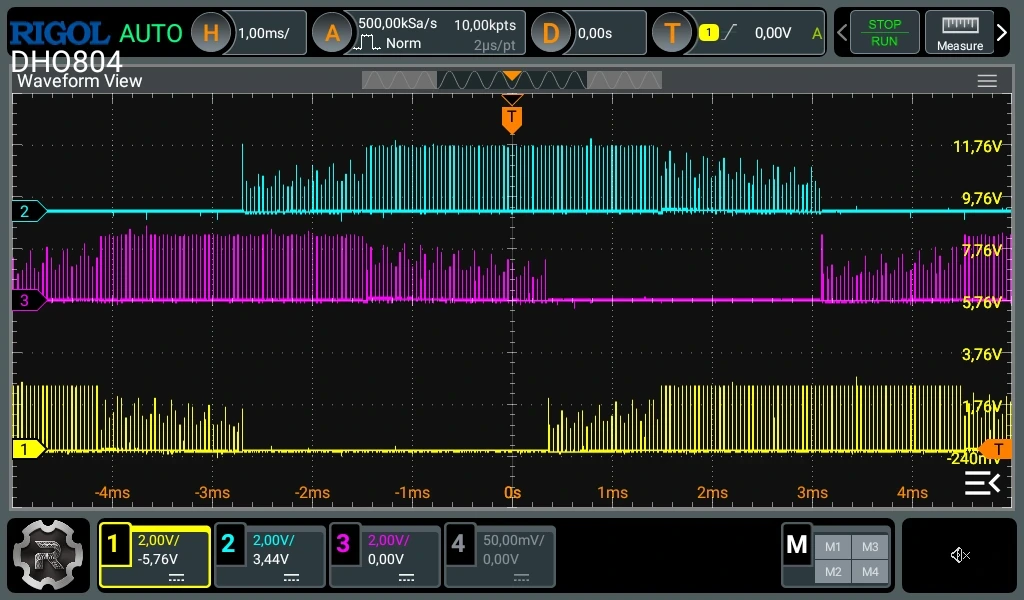
Finally, the motor phase signals were measured to observe the trapezoidal commutation waveform generated by the ESC. As seen in the captured waveform, the signal shape is clean and stable, confirming that both the firmware and power stage are functioning correctly and efficiently.
Programming the Custom ESC with AM32 Firmware
There are two ways to program an AM32 ESC: online (using the web configurator) or offline.
In this case, we will use the offline method, which allows full control of the flashing process.
1. Downloading the Required Tools
Go to the AM32 official website.
In the search bar, type “AM32” and navigate to the Download section.
Download the configuration tool for your operating system:
esc_config_tool_1.82_WIN.zip for Windows, or
esc_config_tool_1.82_LIN.zip for Linux.
While the tool is downloading, proceed with flashing the bootloader.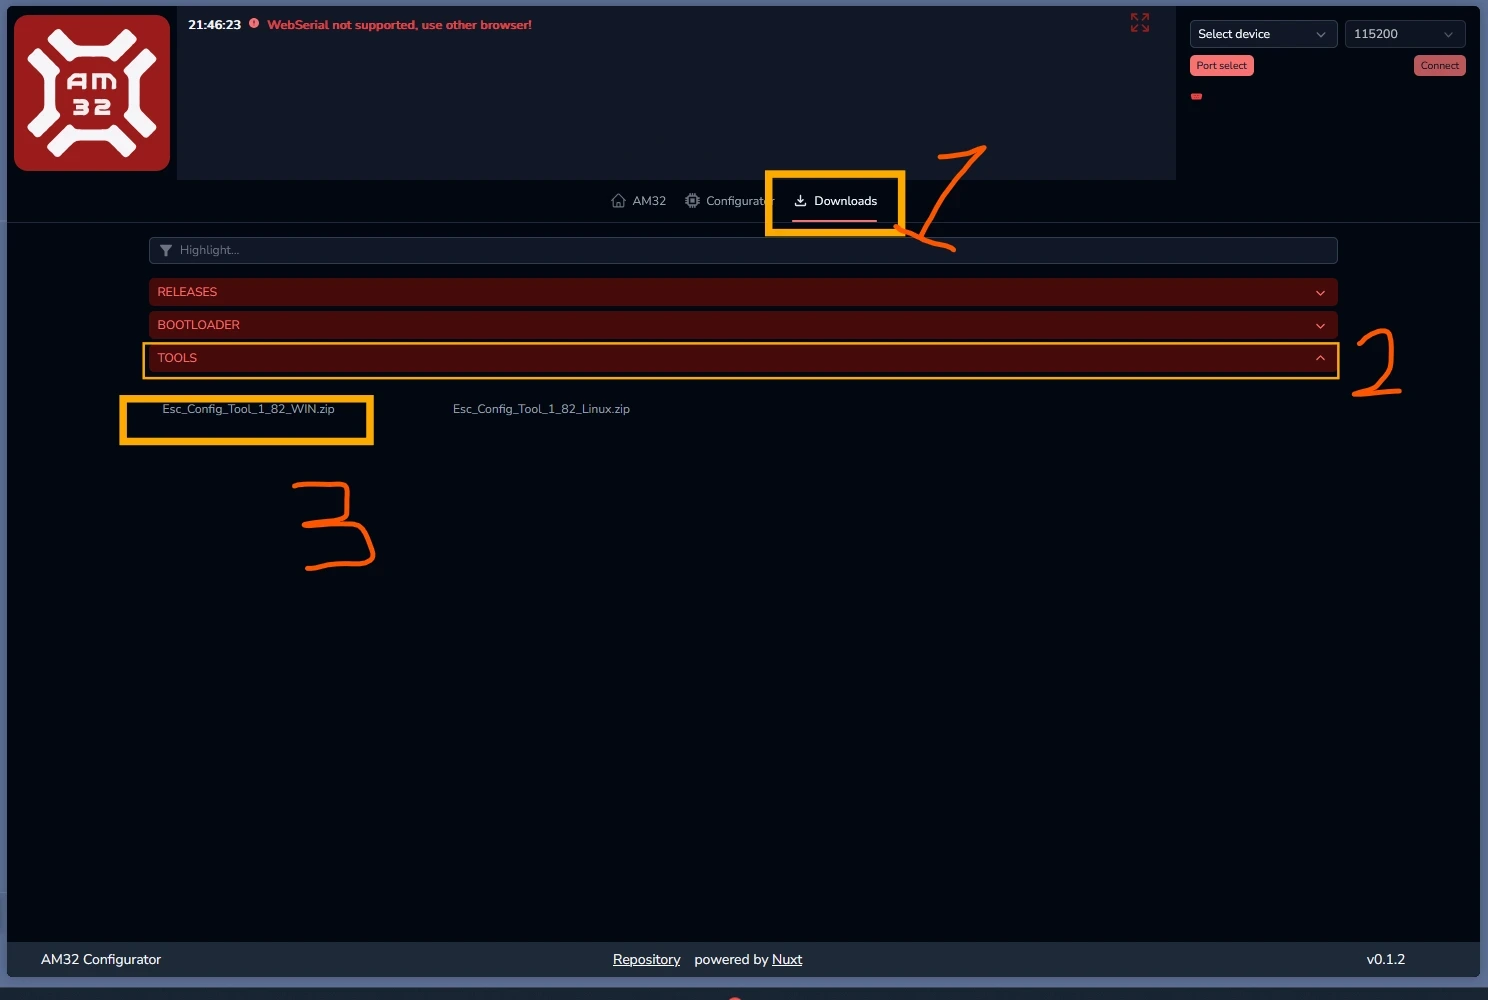
2. Flashing the Bootloader
Still on the AM32 website, go to the Download → Bootloader section.
Find and download the following file for your ESC:
AM32_G071_BOOTLOADER_PB4_V13.hex.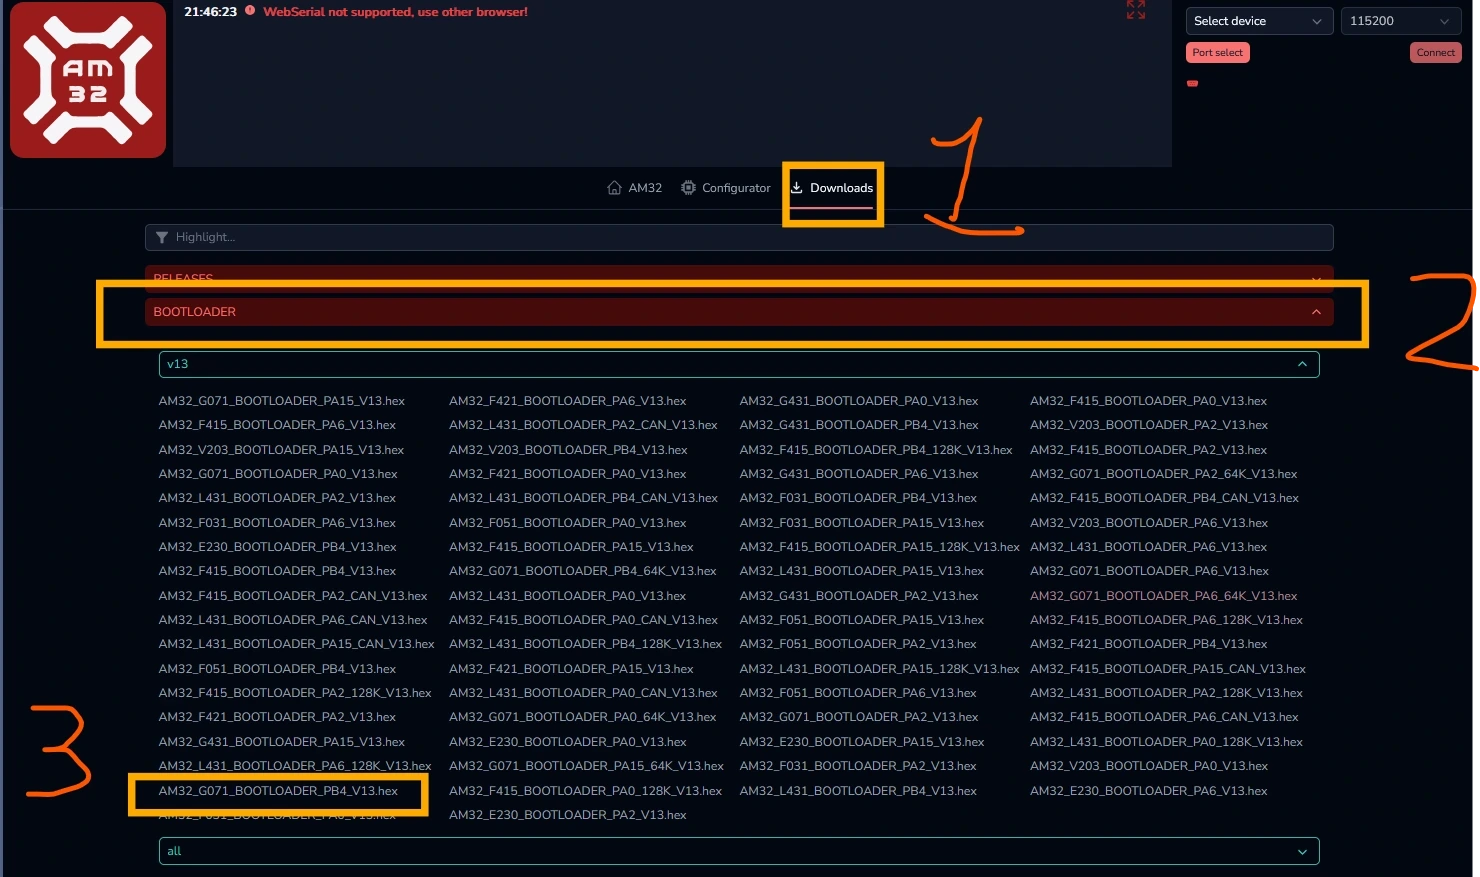
Download and install STM32CubeProgrammer from the STMicroelectronics website.
Open STM32CubeProgrammer and go to the Erasing & Programming tab.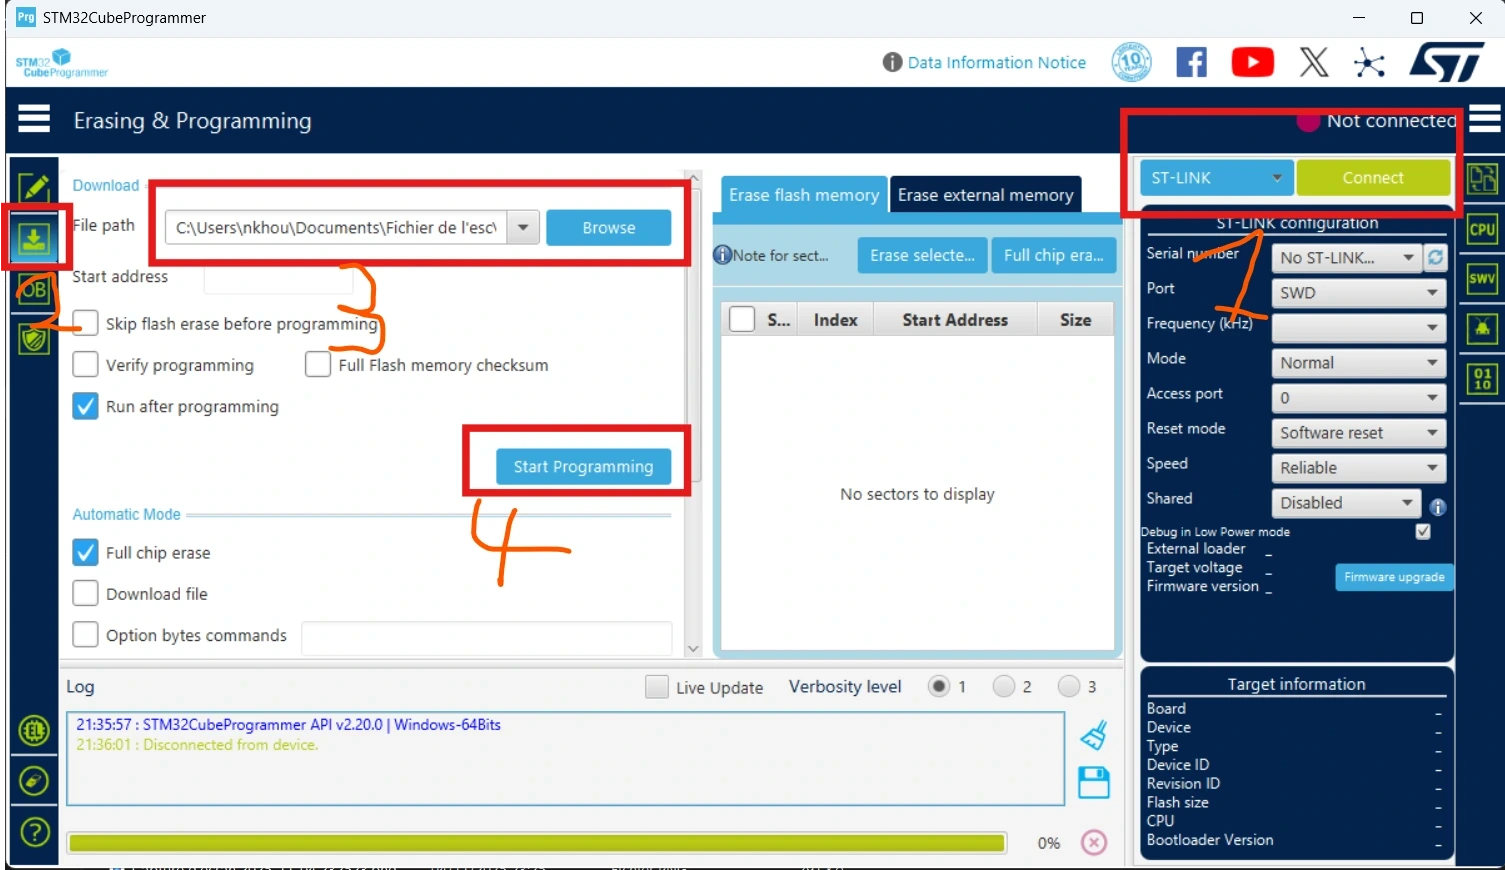
Connect your ST-Link programmer to the ESC as follows:
SWDIO → SWD
SWCLK → SWCLK
3.3V → 3.3V
GND → GND
Connect the ST-Link to your PC.
In STM32CubeProgrammer, select the bootloader file you downloaded and click “Start Programming” to flash it to the ESC.
Once the bootloader is successfully flashed, you can disconnect the ST-Link.
3. Flashing the AM32 Firmware
Connect the AM32 Link adapter to the ESC:
Signal pin → ESC PWM input pin
GND → ESC GND
Extract the downloaded ESC Config Tool archive and open the folder.
Launch the software named “Serial Port Connector” (included in the tool folder).
In the tool interface:
Go to the Flash tab.
Select the correct COM port.
Click “Direct Connect.”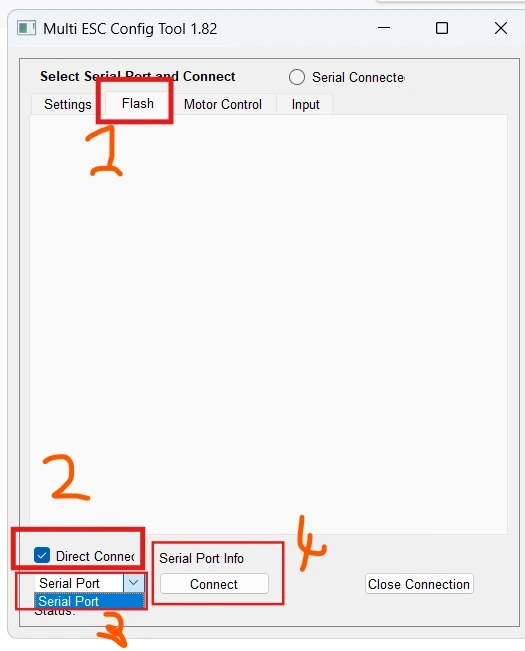
Choose the firmware file:
AM32_PULPY_G40A_G071_2.19.bin
Click “Flash” to start programming.
During the process, the ESC should emit an audible startup tone, and the RGB LED will turn red, confirming that the firmware has been successfully installed.
This project is an amazing way to learn about PCB design, electronics, and motor control 💪. It’s challenging but super exciting 🚀.
The esc can work up to 30V max and 12V minimum🔋. I’ll also be releasing a video walkthrough and demonstration later on my YouTube channel, Nayel KHOUATRA. Stay tuned! 🎥
PULPY - ESC 40A AM32
*PCBWay community is a sharing platform. We are not responsible for any design issues and parameter issues (board thickness, surface finish, etc.) you choose.


Raspberry Pi 5 7 Inch Touch Screen IPS 1024x600 HD LCD HDMI-compatible Display for RPI 4B 3B+ OPI 5 AIDA64 PC Secondary Screen(Without Speaker)
BUY NOW


- Comments(2)
- Likes(1)
More by Nayel Khouatra
-
 PULPY - ESC 40A AM32
️ I’ve developed my second official ESC, the Pulpy G40A, fully compatible with AM32 firmware. This ...
PULPY - ESC 40A AM32
️ I’ve developed my second official ESC, the Pulpy G40A, fully compatible with AM32 firmware. This ...
-
 PULPY - FLIGHT CONTROLLER
️ Custom Flight Controller for INAV This FC (Flight Controller) was developed as an open-source p...
PULPY - FLIGHT CONTROLLER
️ Custom Flight Controller for INAV This FC (Flight Controller) was developed as an open-source p...
-
 Life happens. IVYPOTS takes cares of the plants while you are away
//Project under developpement.// IntroductionIvypots is a solution for people who want to grow indo...
Life happens. IVYPOTS takes cares of the plants while you are away
//Project under developpement.// IntroductionIvypots is a solution for people who want to grow indo...
-
Programmable Mist Maker - XIAO / QT PY Extension
423 0 0 -
RadioHAT - Raspberry Pi radio development platform
329 0 1 -
-
-
-
-
ARPS-2 – Arduino-Compatible Robot Project Shield for Arduino UNO
2883 0 6 -
A Compact Charging Breakout Board For Waveshare ESP32-C3
3383 3 8 -
AI-driven LoRa & LLM-enabled Kiosk & Food Delivery System
3707 2 2


