


LIGHT BLOCK- Smart Lamp
This is the Light Block—a DIY RGB LED lamp I made by repurposing a glass brick. I designed and 3D printed a custom base for it, turning the brick into a functional lamp for my living room.
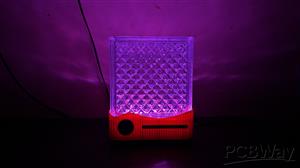
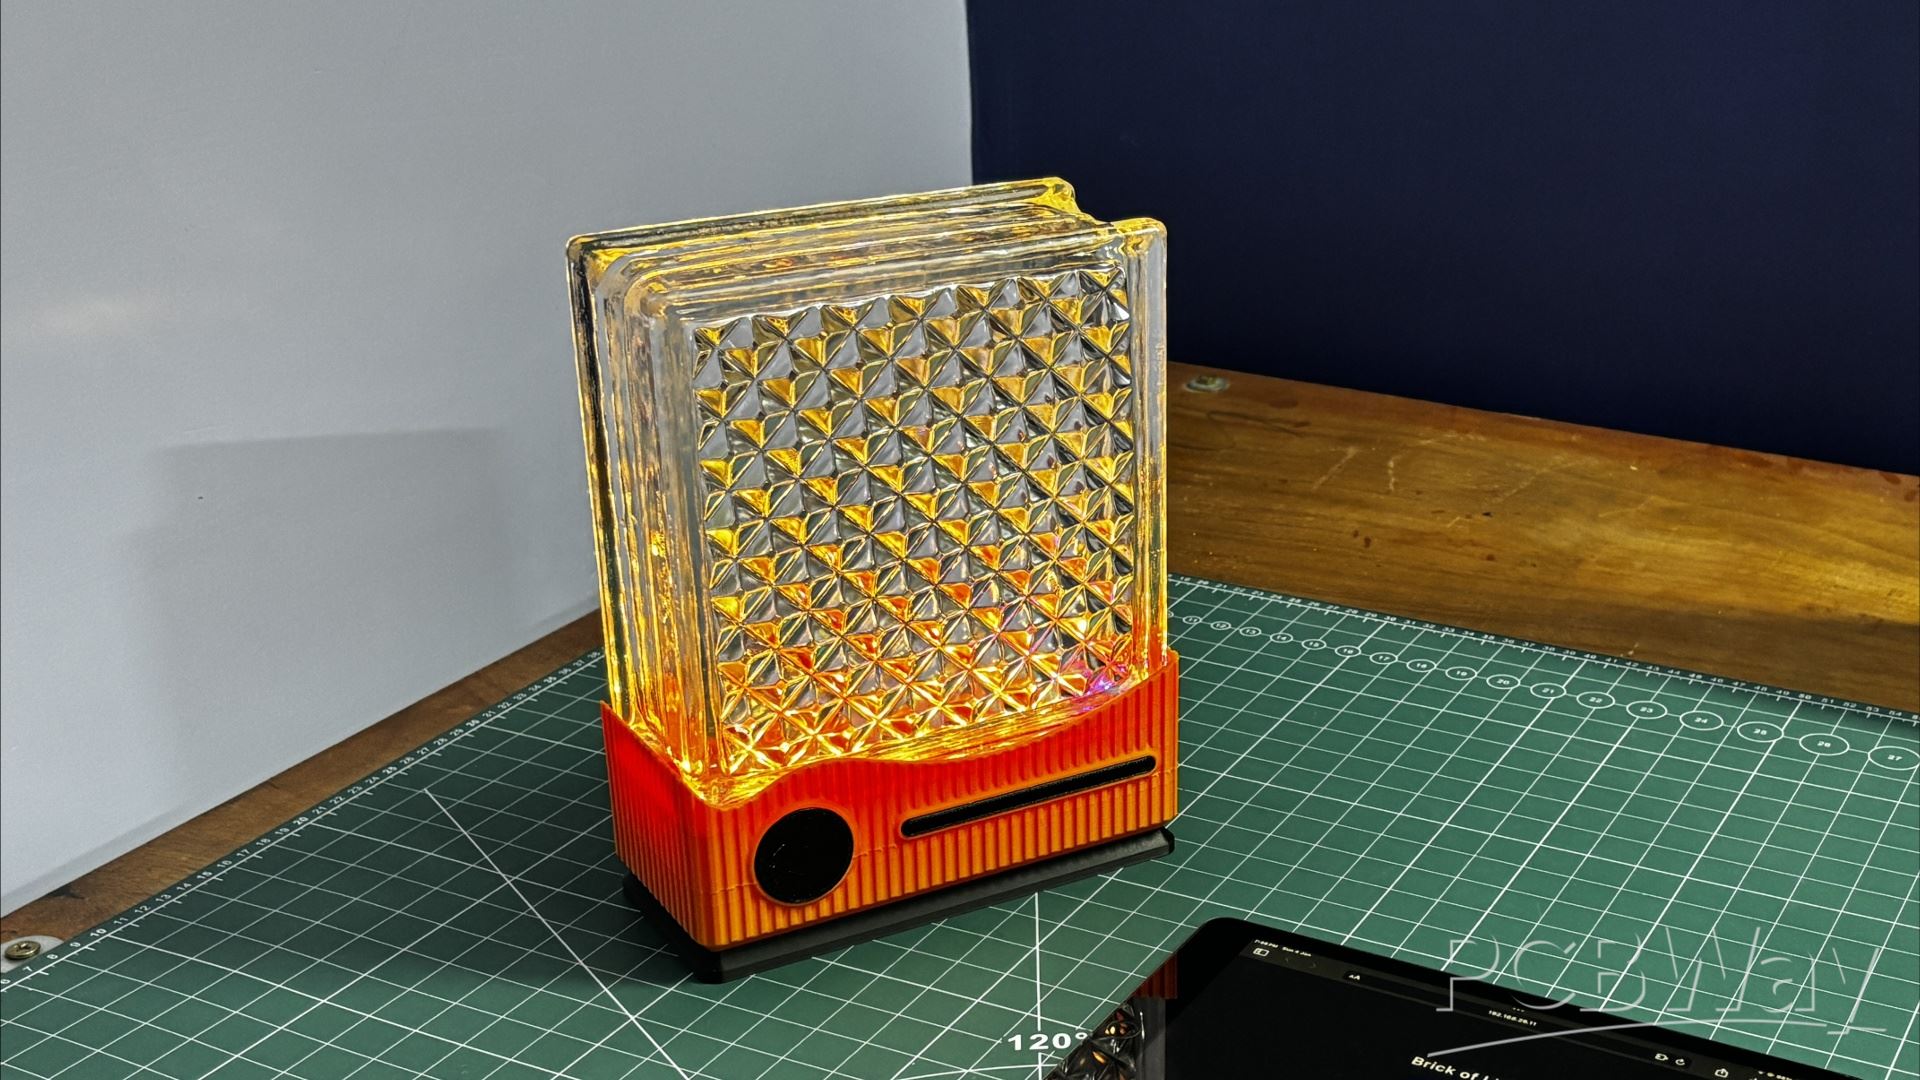
By placing an RGB LED PCB beneath the glass, the light shines upward and diffuses evenly through the entire block, transforming a solid glass brick into a soft, ambient light source that adds a subtle glow to the space.
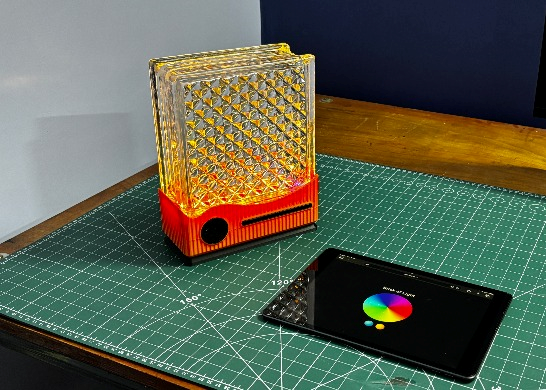
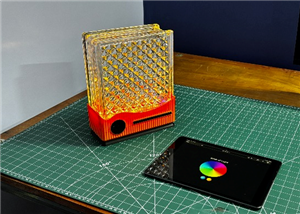
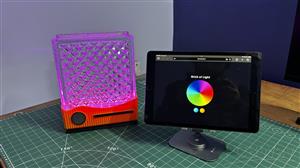
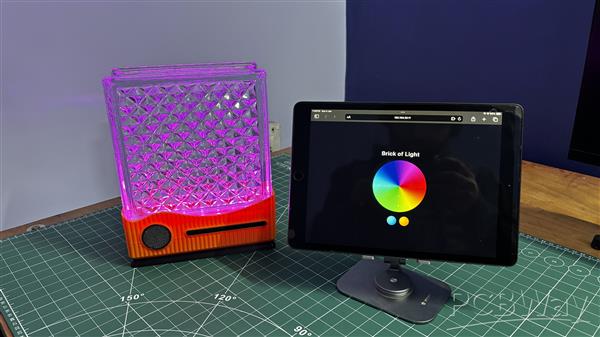
The lamp is controlled wirelessly through a web app hosted on an ESP32, allowing colors and lighting modes to be adjusted directly from a phone or browser.
This article covers the complete build process of the lamp, so let’s get started with the build.
MATERIALS REQUIRED
These were the components used in this project:
- Glass Brick size: 190 mm x 190mm x 81mm
- Custom PCBs (provided by PCBWAY)
- Medic Mini Mainboard
- Dodecagon Portal Project LED PCB
- 3D-printed parts
- Lithium cell 3.7V 2600mAh
- M2 screws
GLASS BRICK
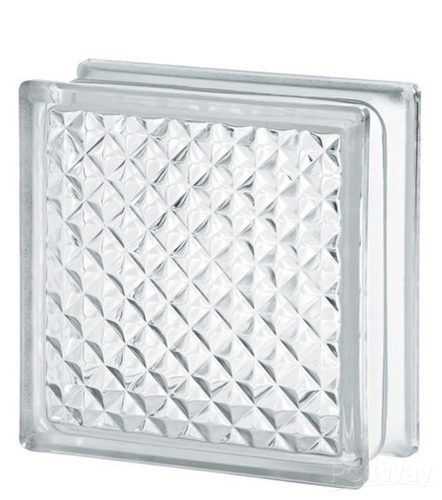

This was the star of our project, a glass brick, which is a hollow or solid block made of two pieces of glass that are fused together.
Because the inside is sealed, it diffuses light beautifully while still remaining strong and durable. Glass bricks are known for their ability to let light pass through while still maintaining privacy, thanks to their frosted or patterned surfaces. Because of this, they are commonly used in partitions, windows, shower areas, and many other architectural applications.
This glass brick was actually a leftover from a renovation project in my home.
Since it was an extra piece, I kept it aside—and after seeing glass brick lamps on Pinterest several times, I thought, why not make my own version? That simple idea is what started the entire project.
DESIGN
For the design process of this project, we began by creating a 3D model of the glass brick.
Once that was in place, we imported the remaining components into the design that included the lithium cell, the Medic Mini mainboard, and the RGB LED PCB. We arranged and rearranged these components in different configurations until we found a layout that balanced both functionality and space efficiency.
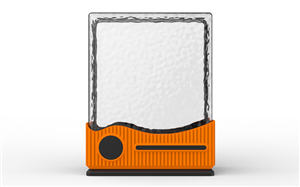
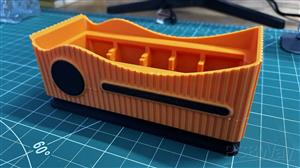
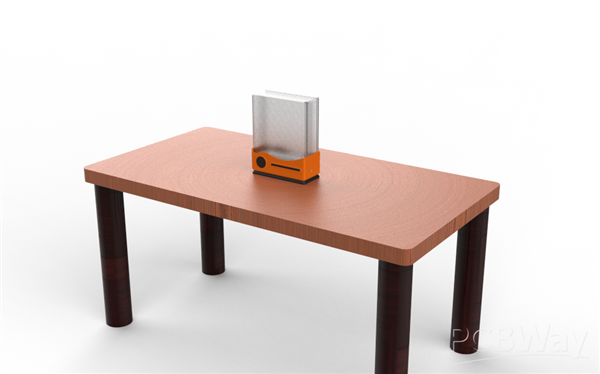
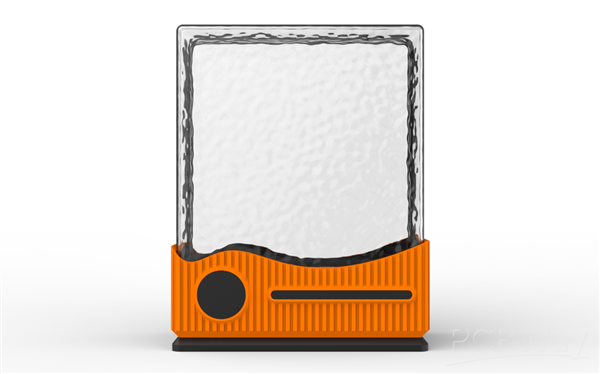
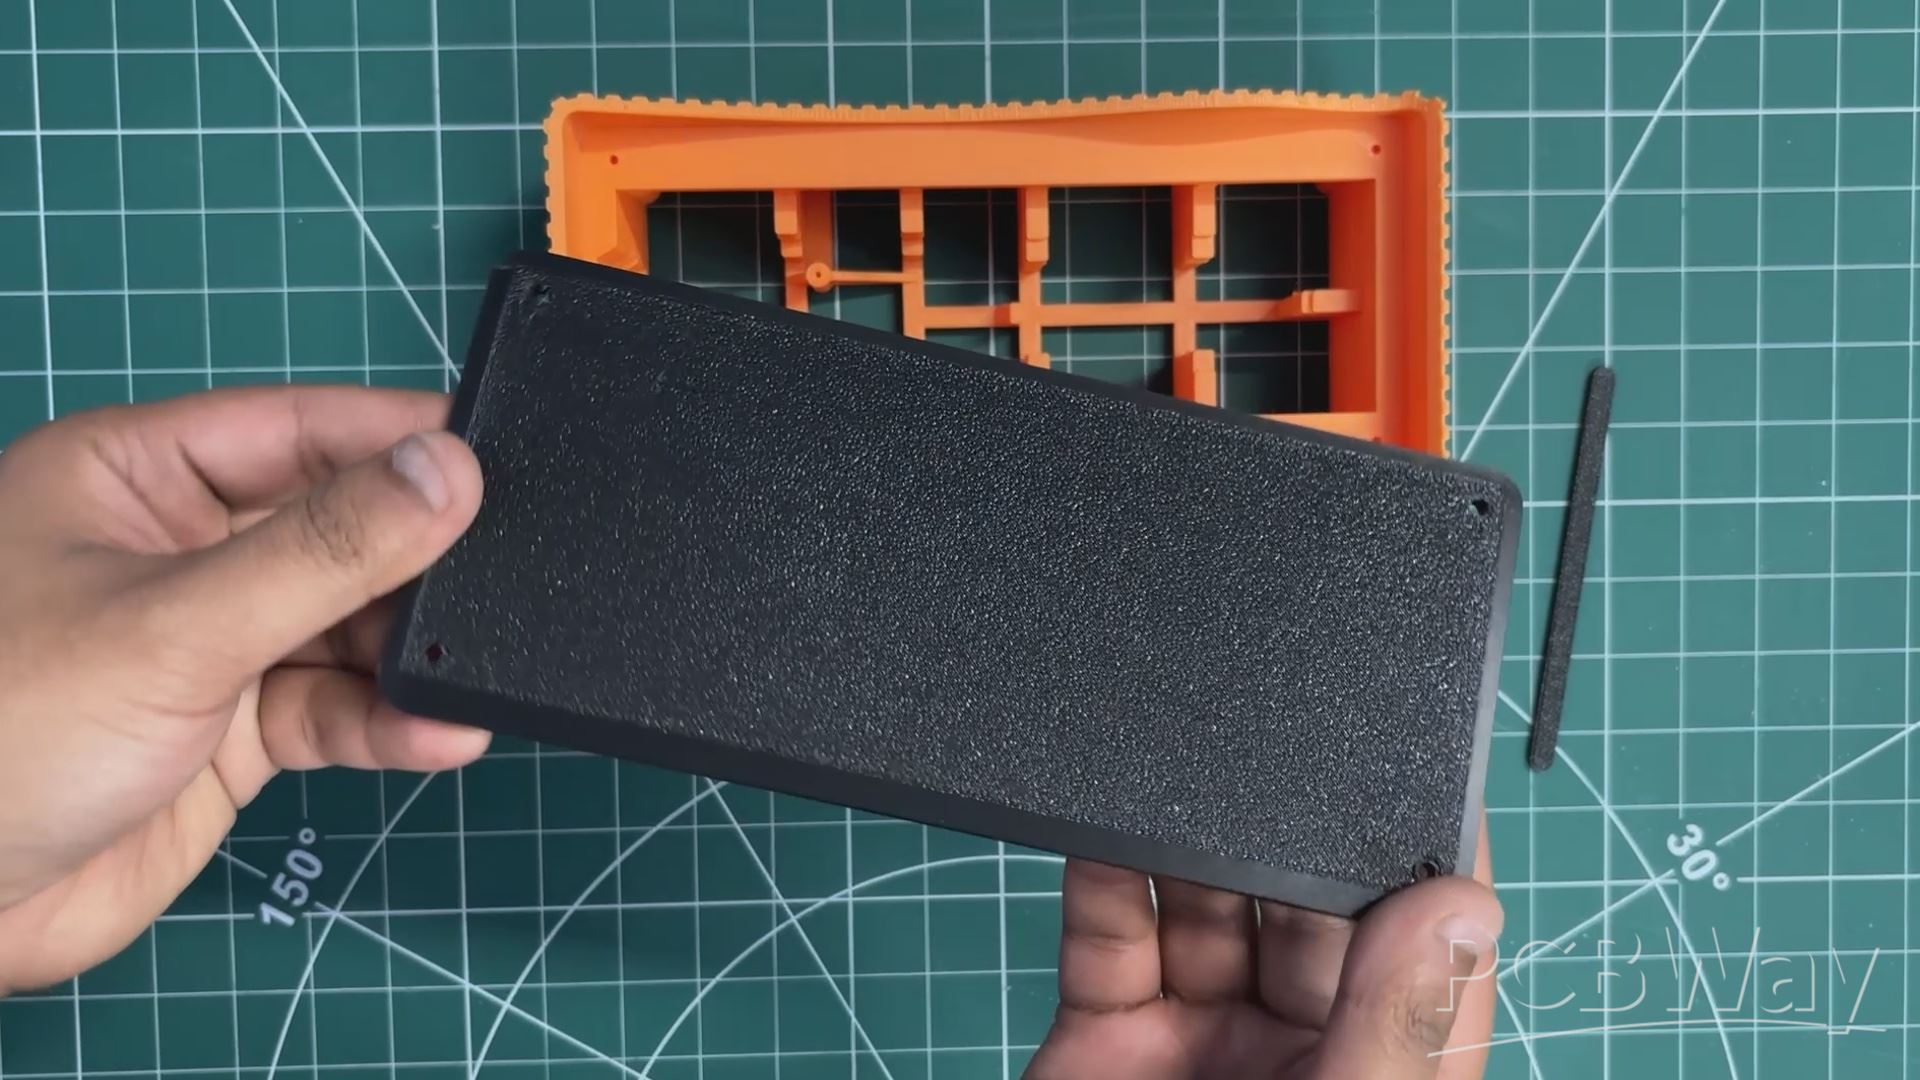
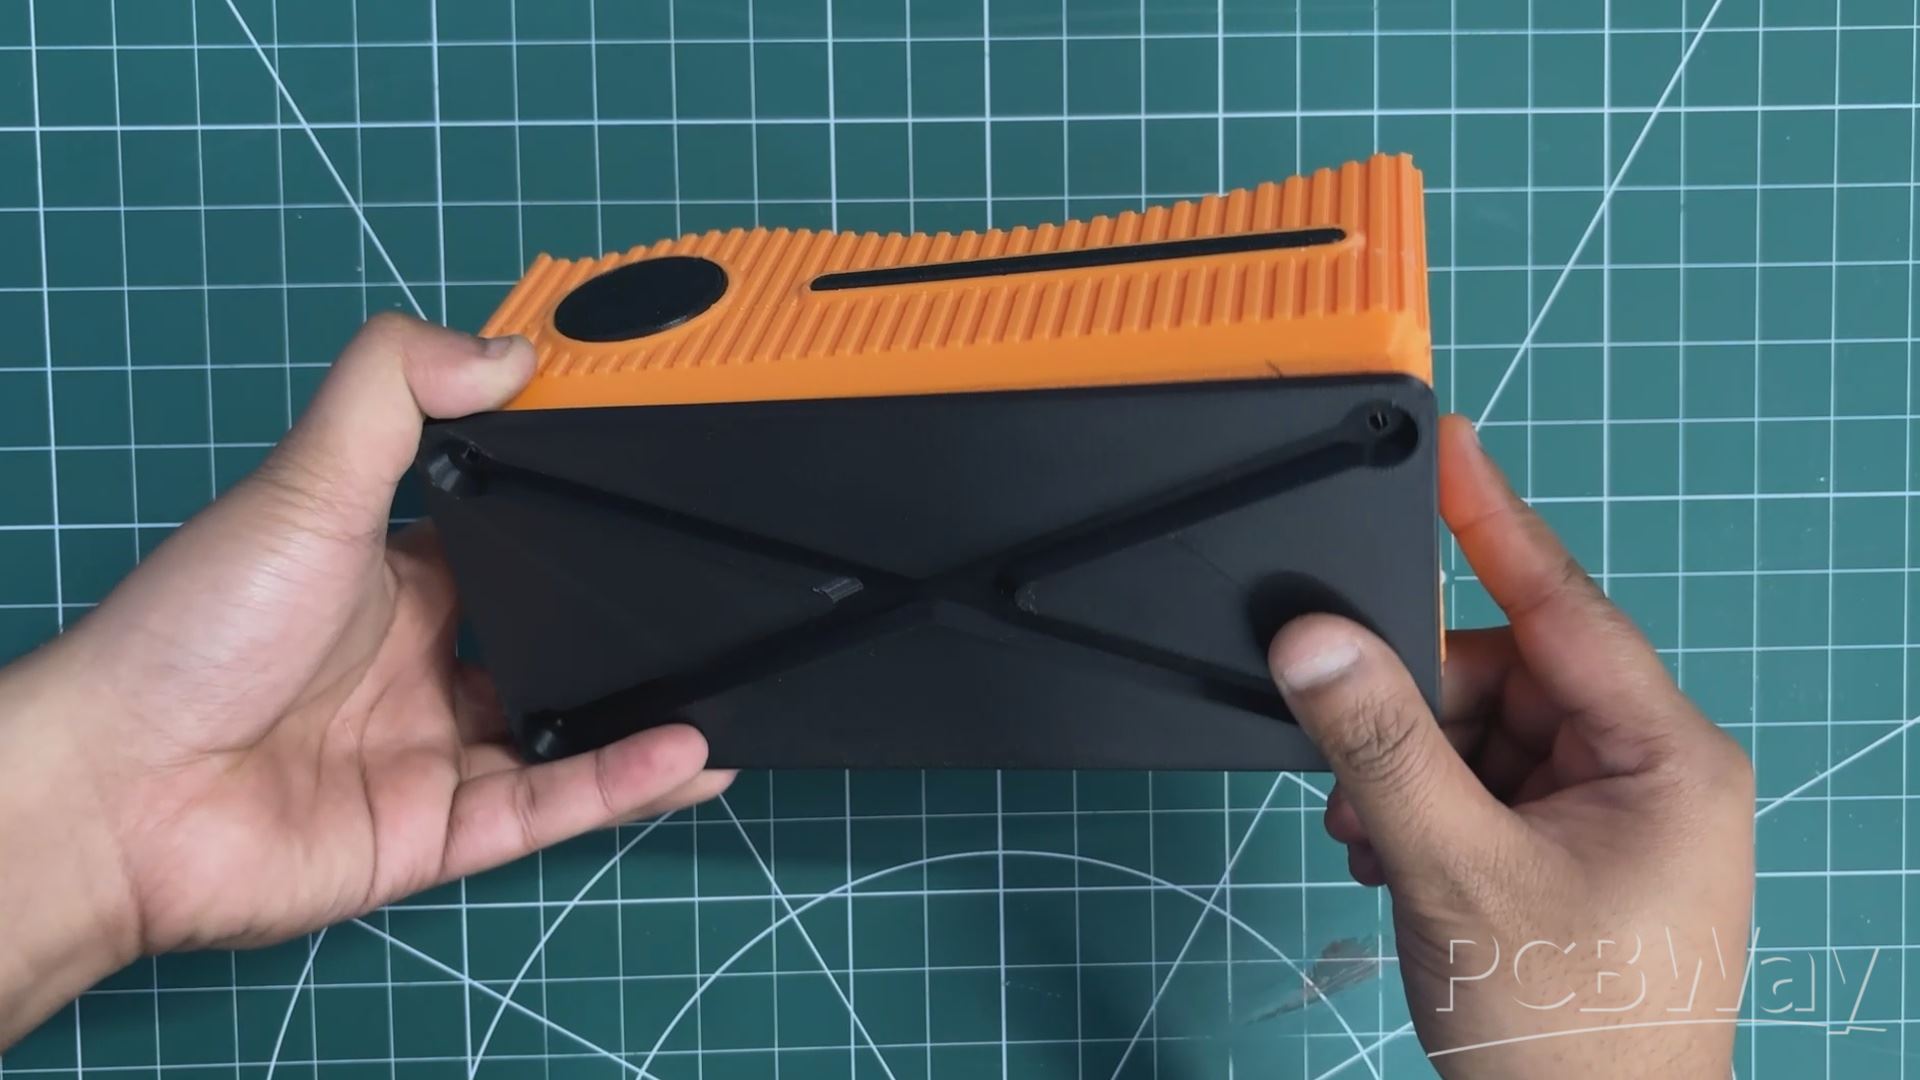
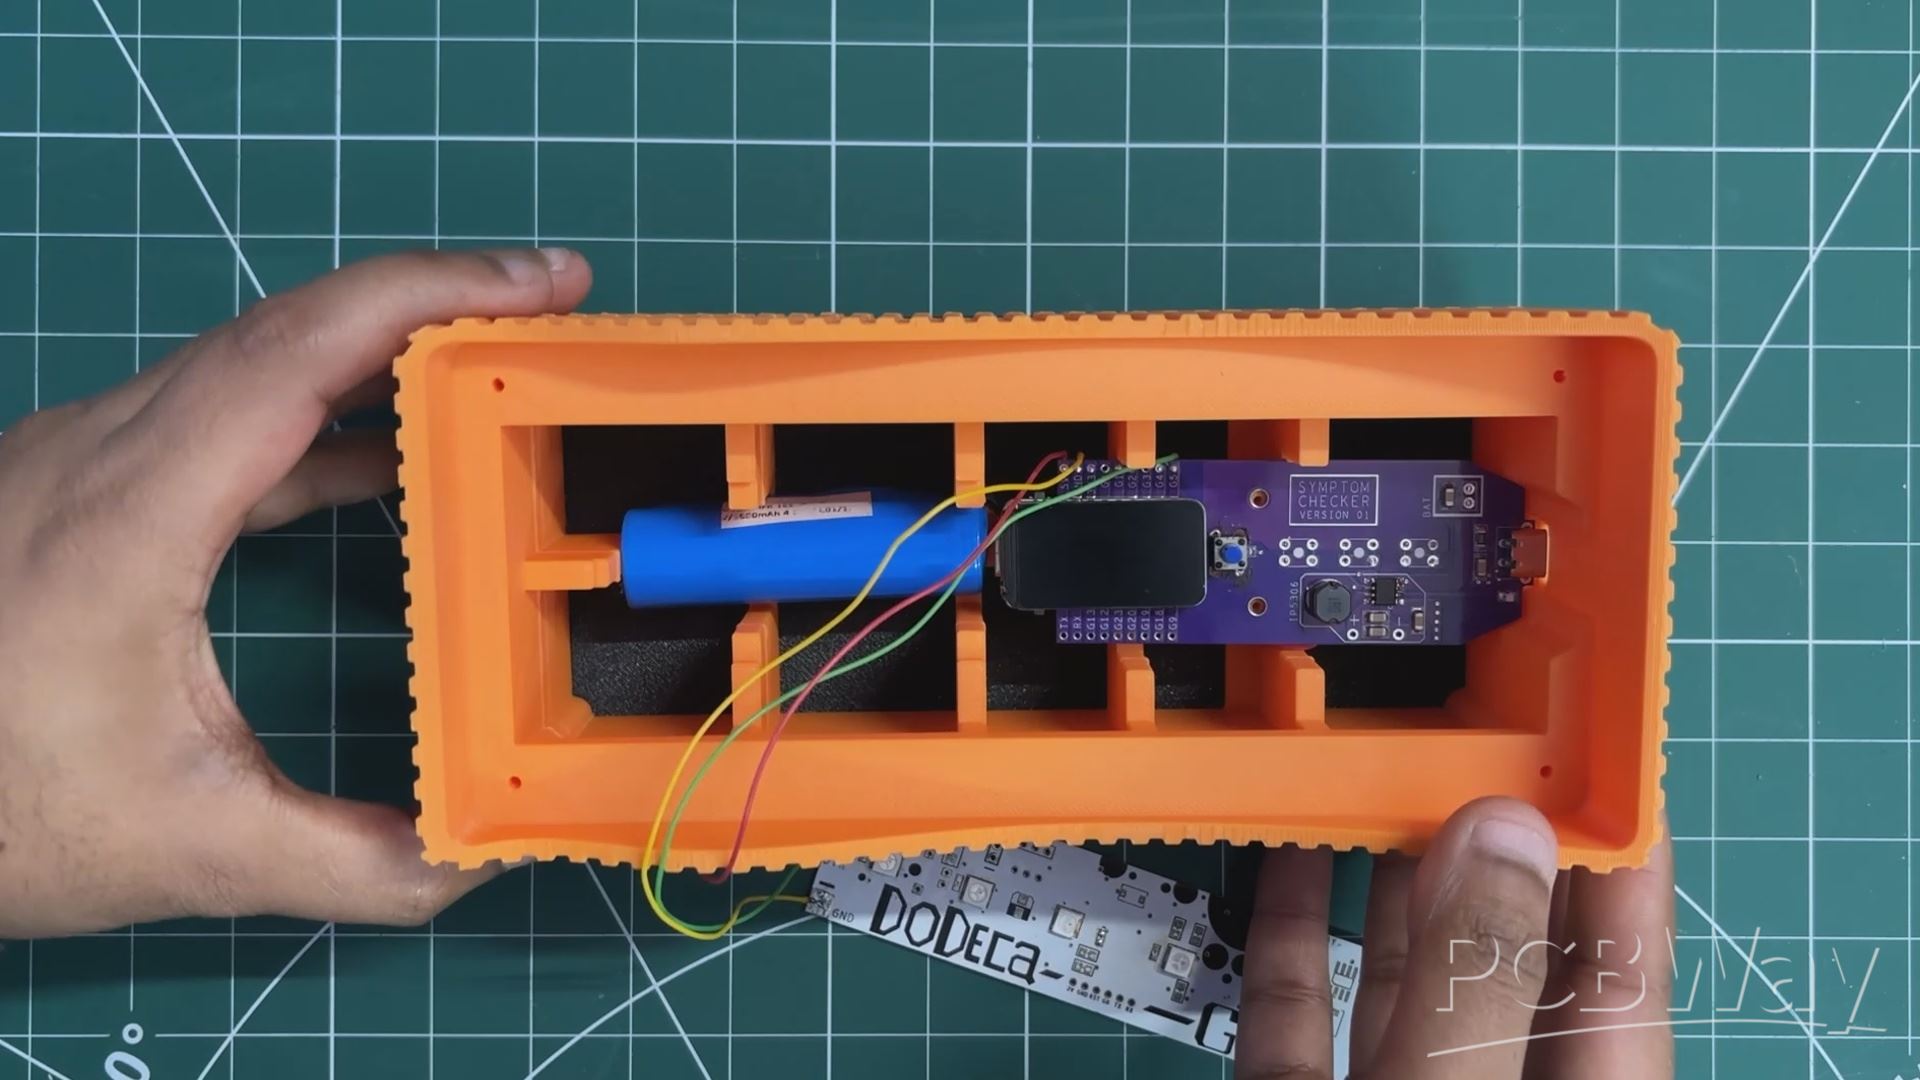
After finalizing the internal arrangement, we designed an enclosure around the components.
Our enclosure is essentially a box-like housing that securely holds the glass brick at the top. Directly beneath the brick sits the RGB LED PCB, which illuminates the glass from below and makes the entire block glow. Below the LED PCB, we positioned the lithium cell and the Medic Mini board. Since the Medic Mini’s charging port needs to remain accessible, we incorporated a side slot into the enclosure for easy access.
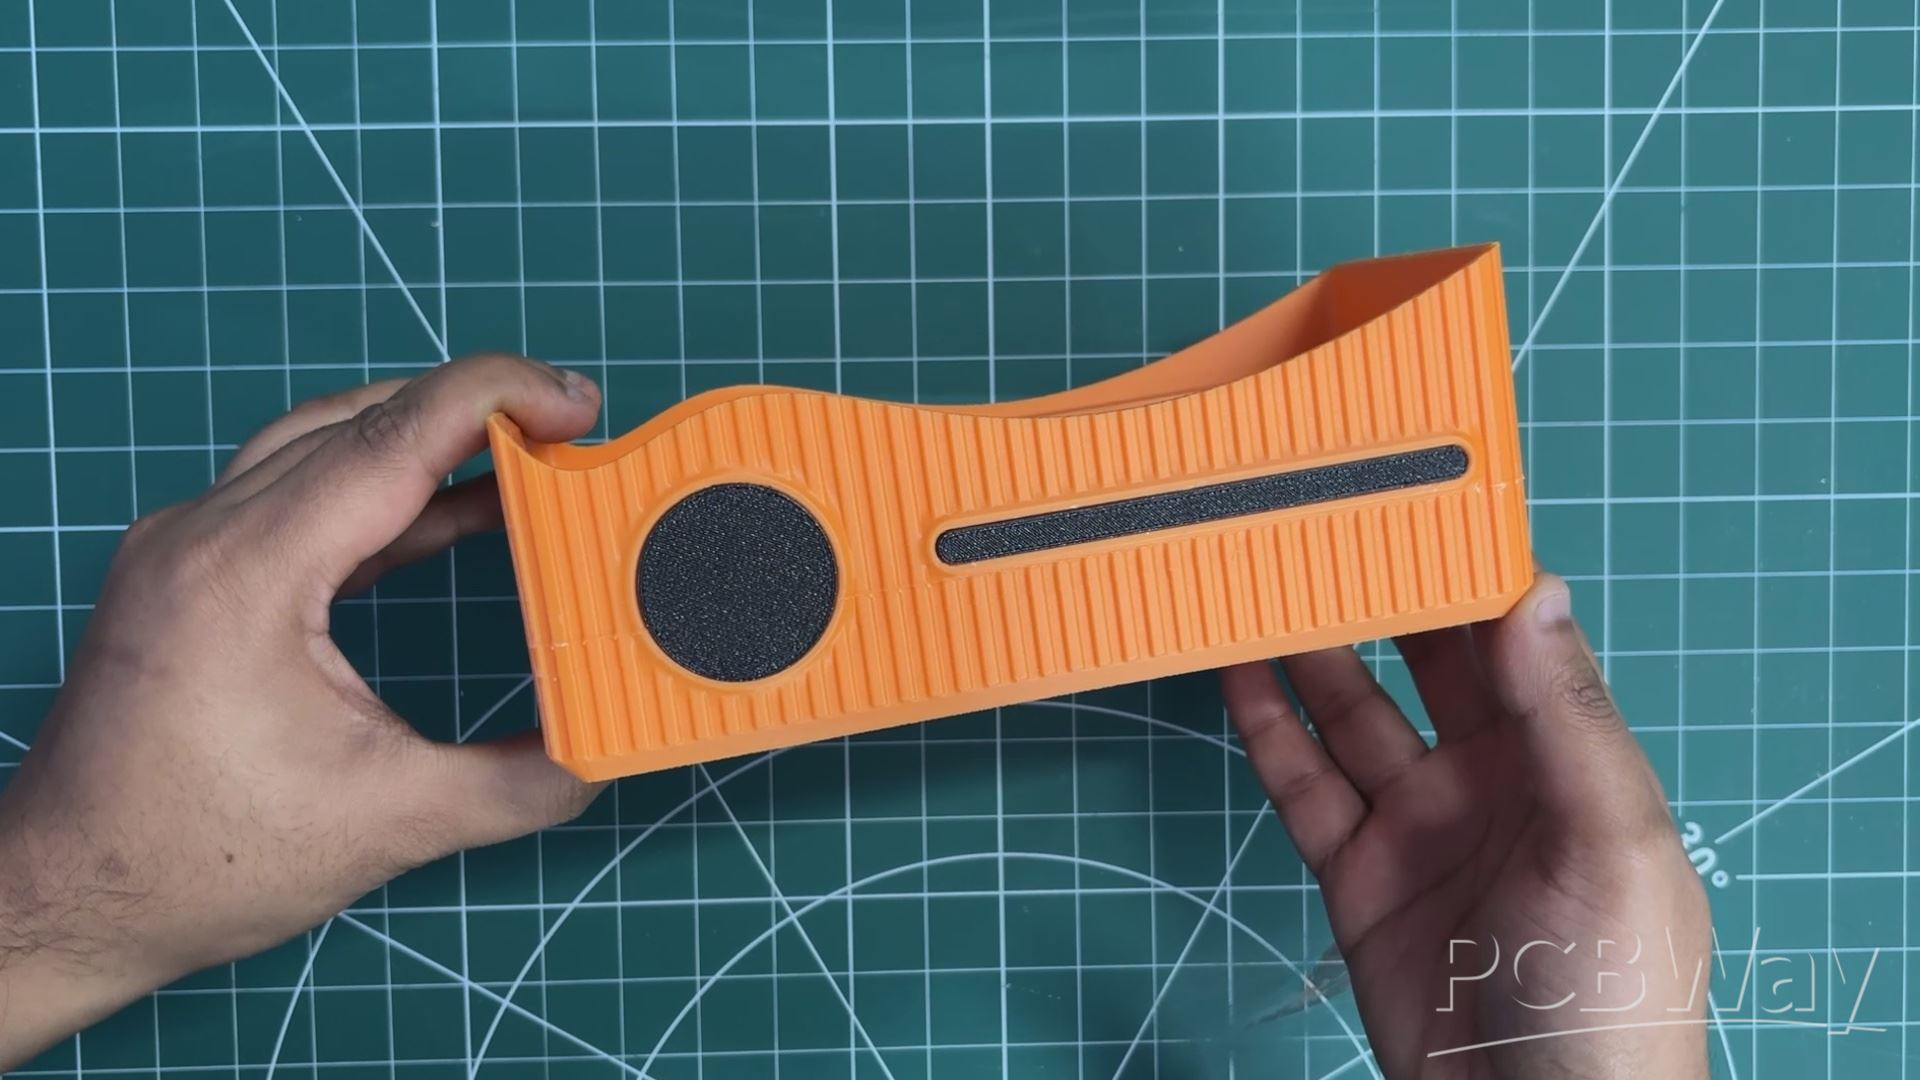
On the front, we added two extra parts purely for aesthetics—these “accent parts” create a clean two-tone effect and are pressure-fitted into place. Finally, we designed a separate base piece that attaches from the bottom and locks onto the main enclosure, which we refer to as the main body.
3D FILES
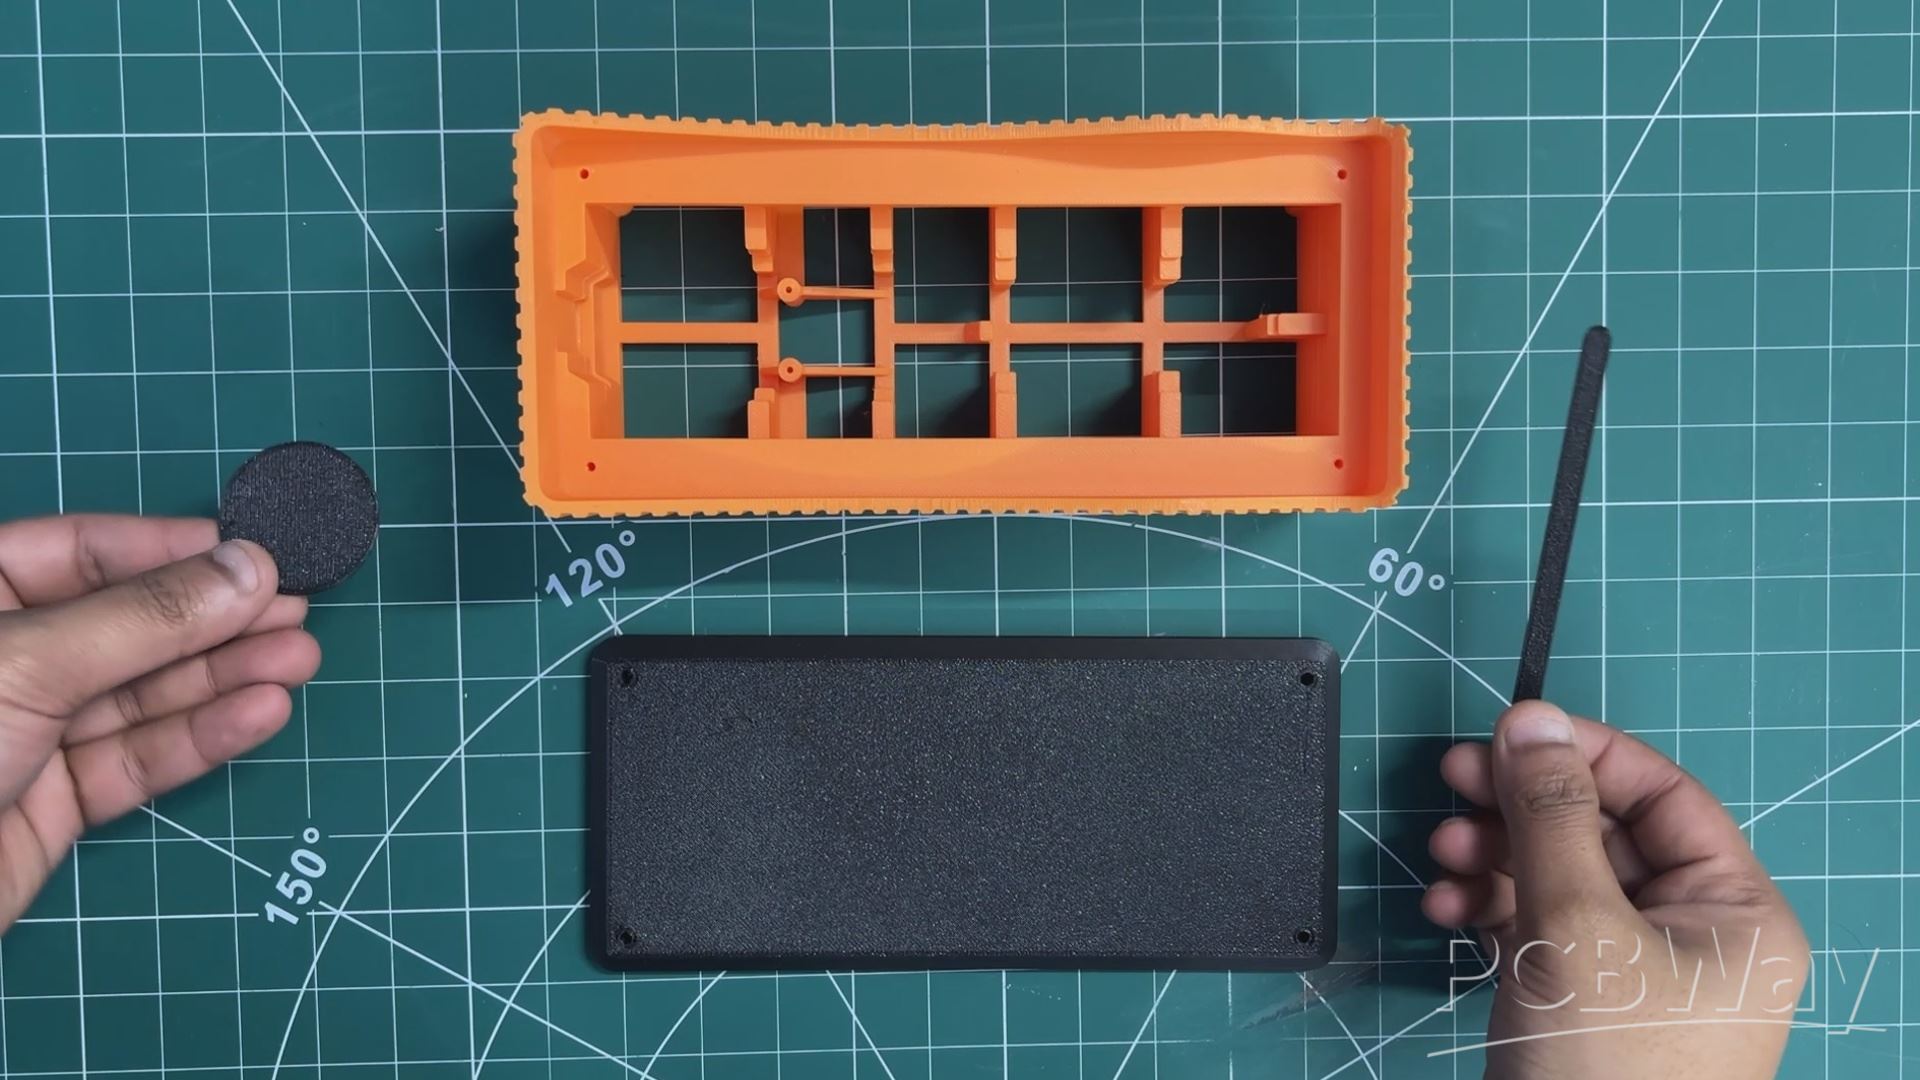
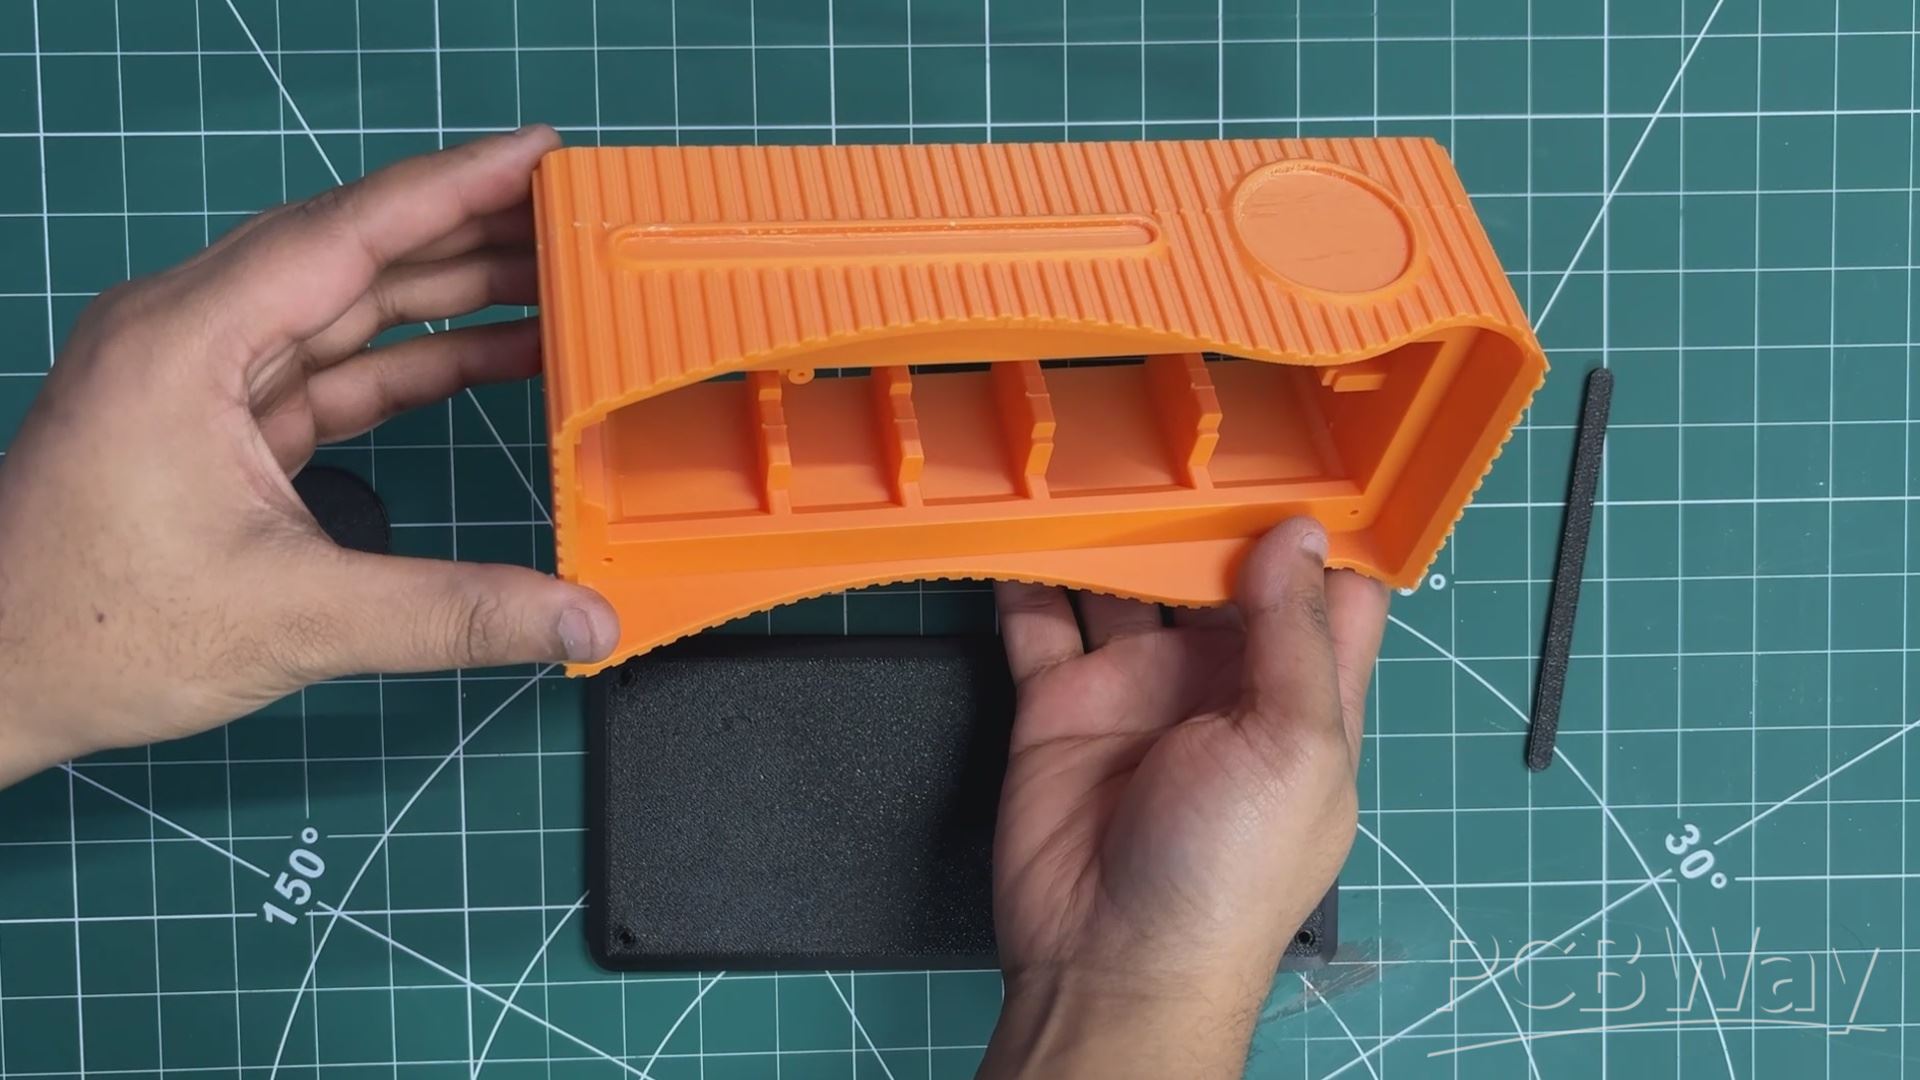
After finalizing the design, we exported three primary parts: the main body that houses the glass block, the base that supports the entire structure, and two accent pieces designed to enhance the overall aesthetic. These accent parts are mounted on the front side of the main body to add visual detail.
All components were exported as mesh files and then 3D printed on our Anycubic K10 printer. The main body was printed using orange PLA, while black PLA was used for the base and accent pieces to create a subtle contrast. We used Hyper PLA with a 0.4 mm nozzle, set the infill to 30%, and printed all parts without requiring any supports.
ELECTRONICS
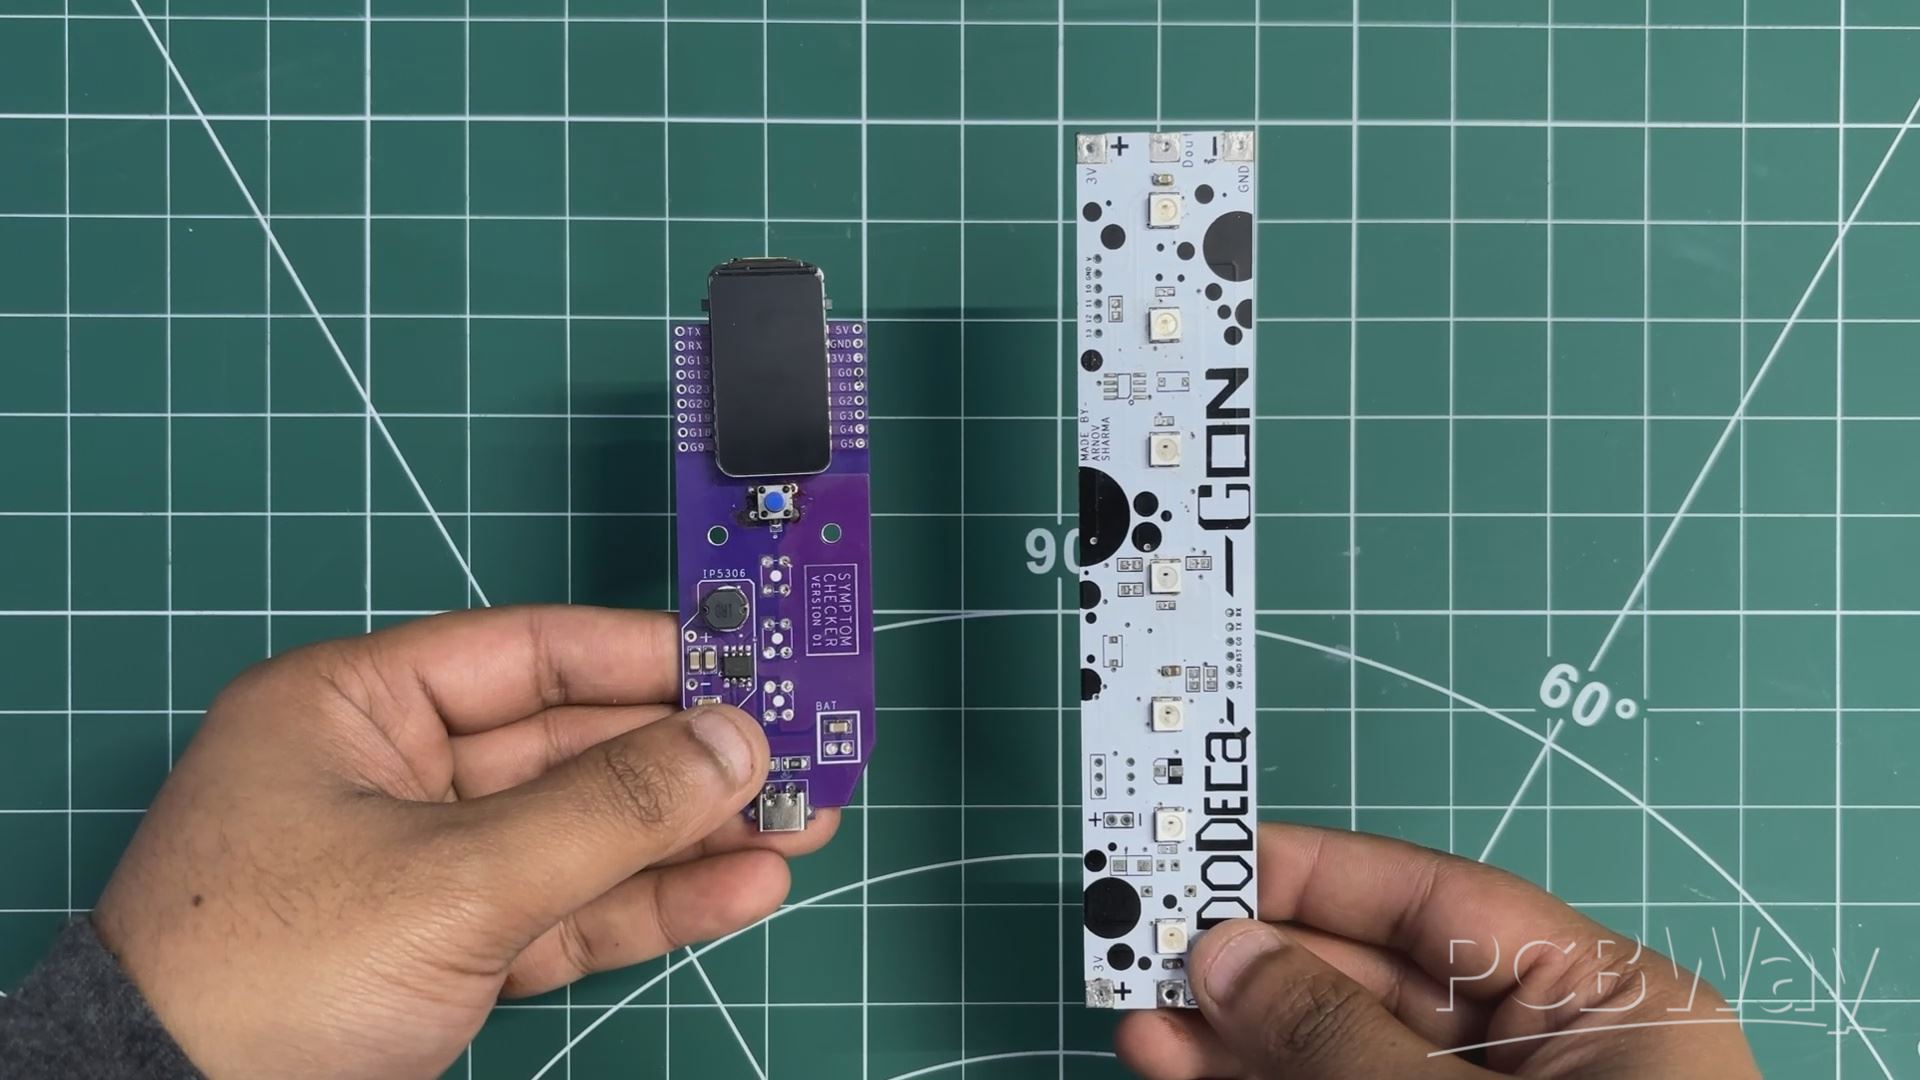
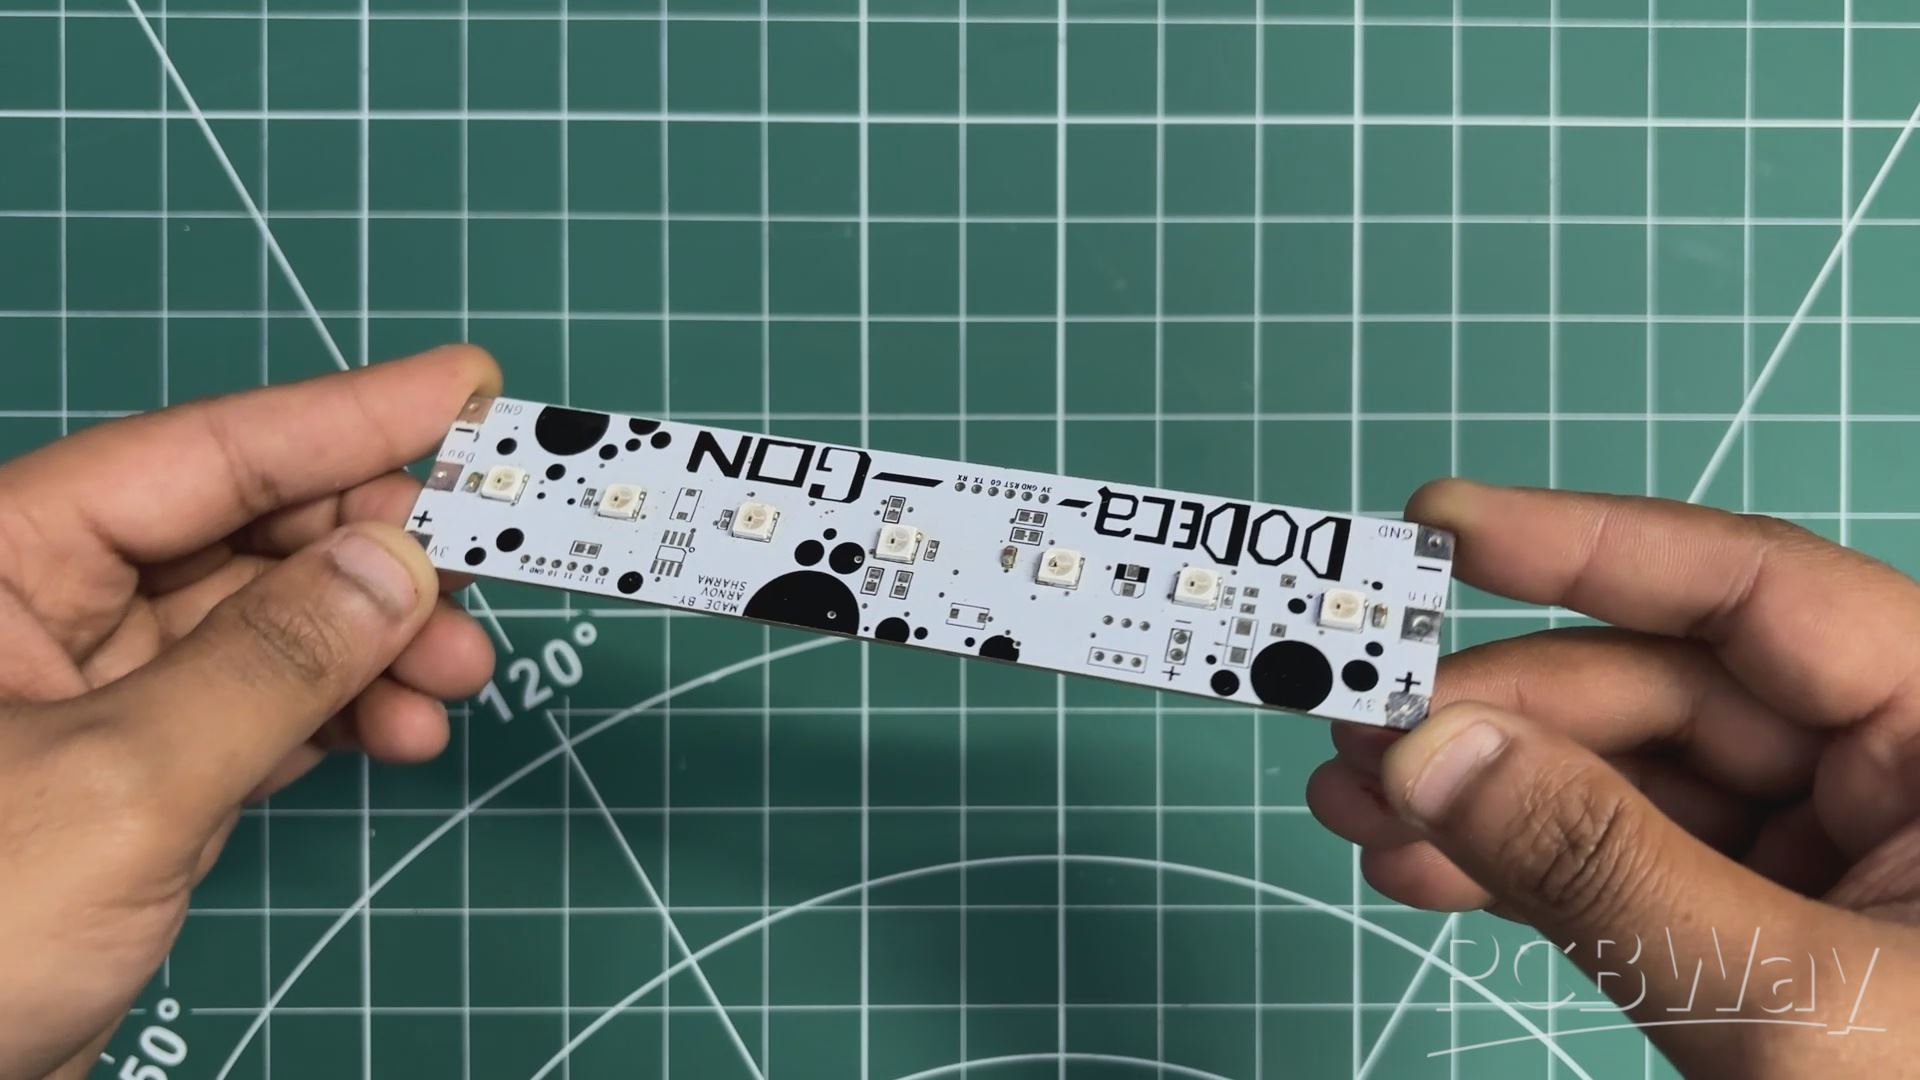
For the electronics, we reused PCBs from two of our previously built projects: the Medic Mini mainboard and the Dodecagon RGB LED PCB.
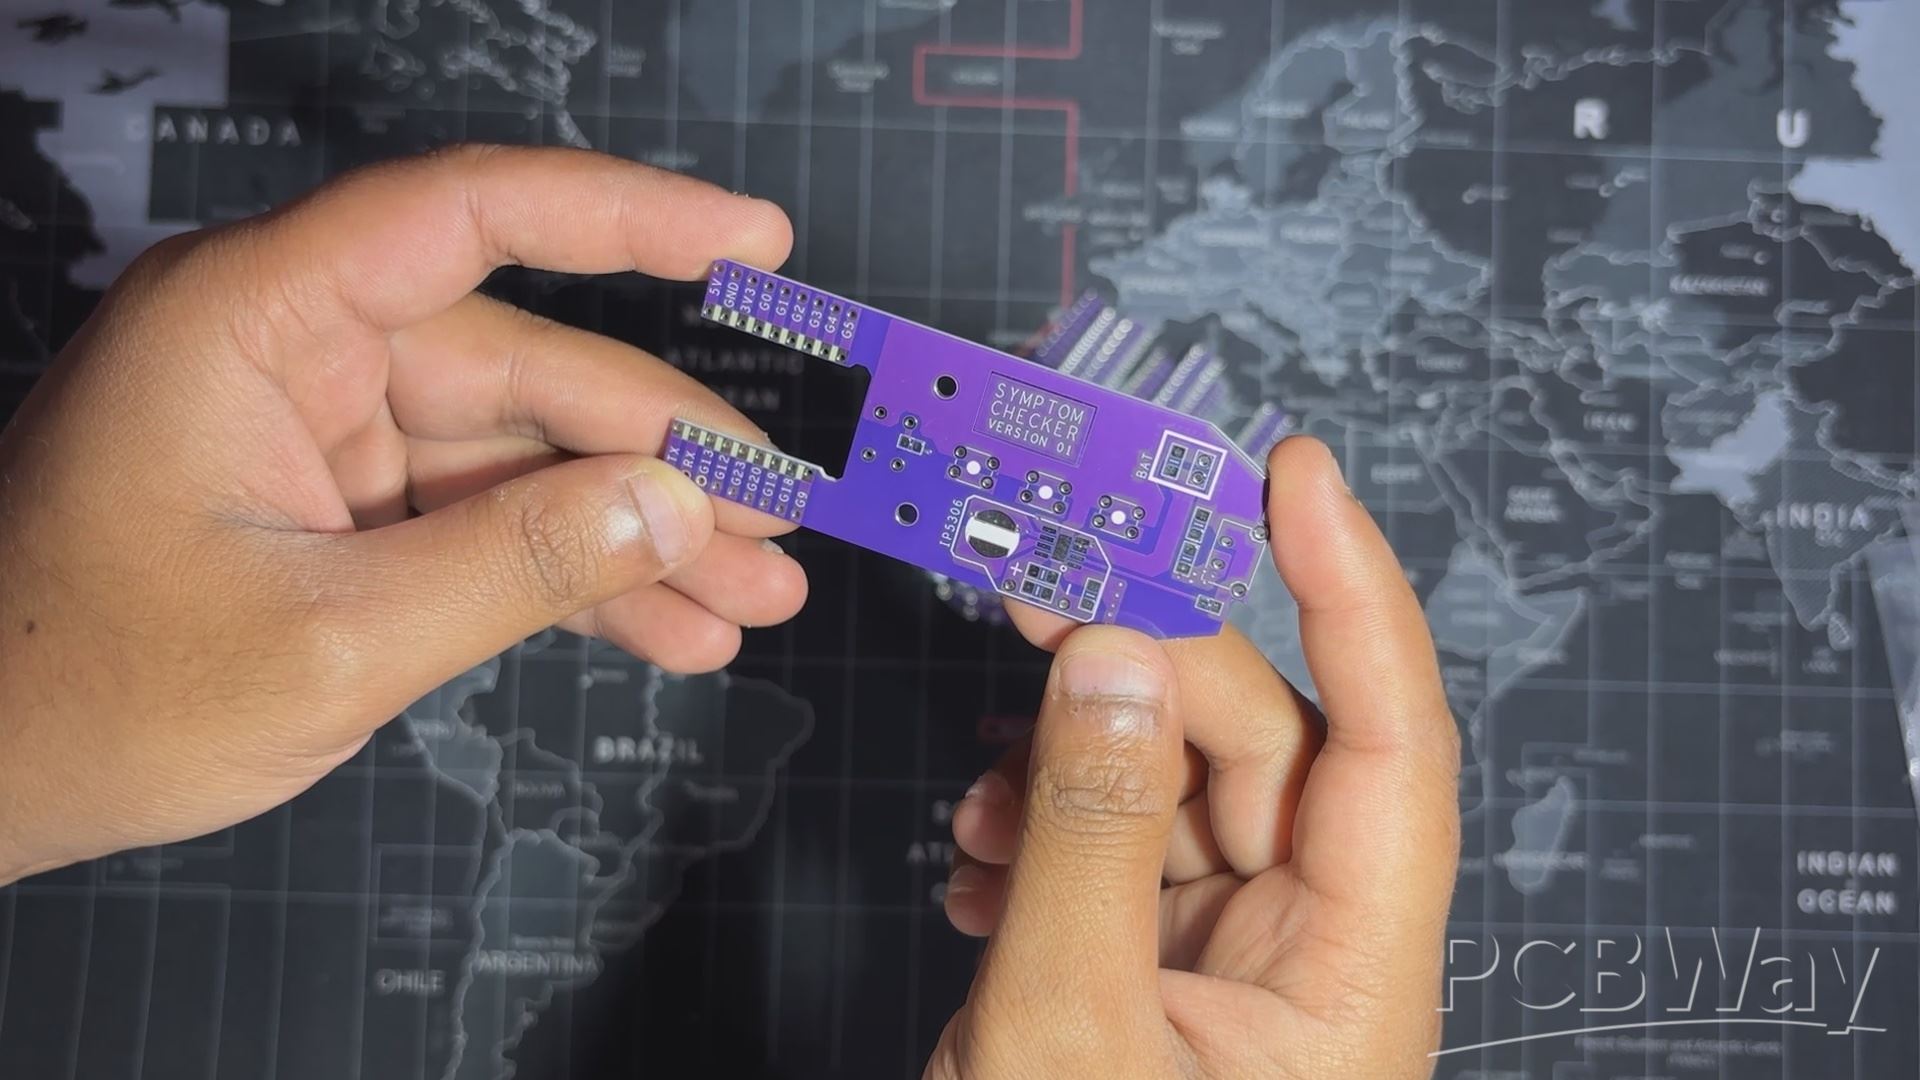
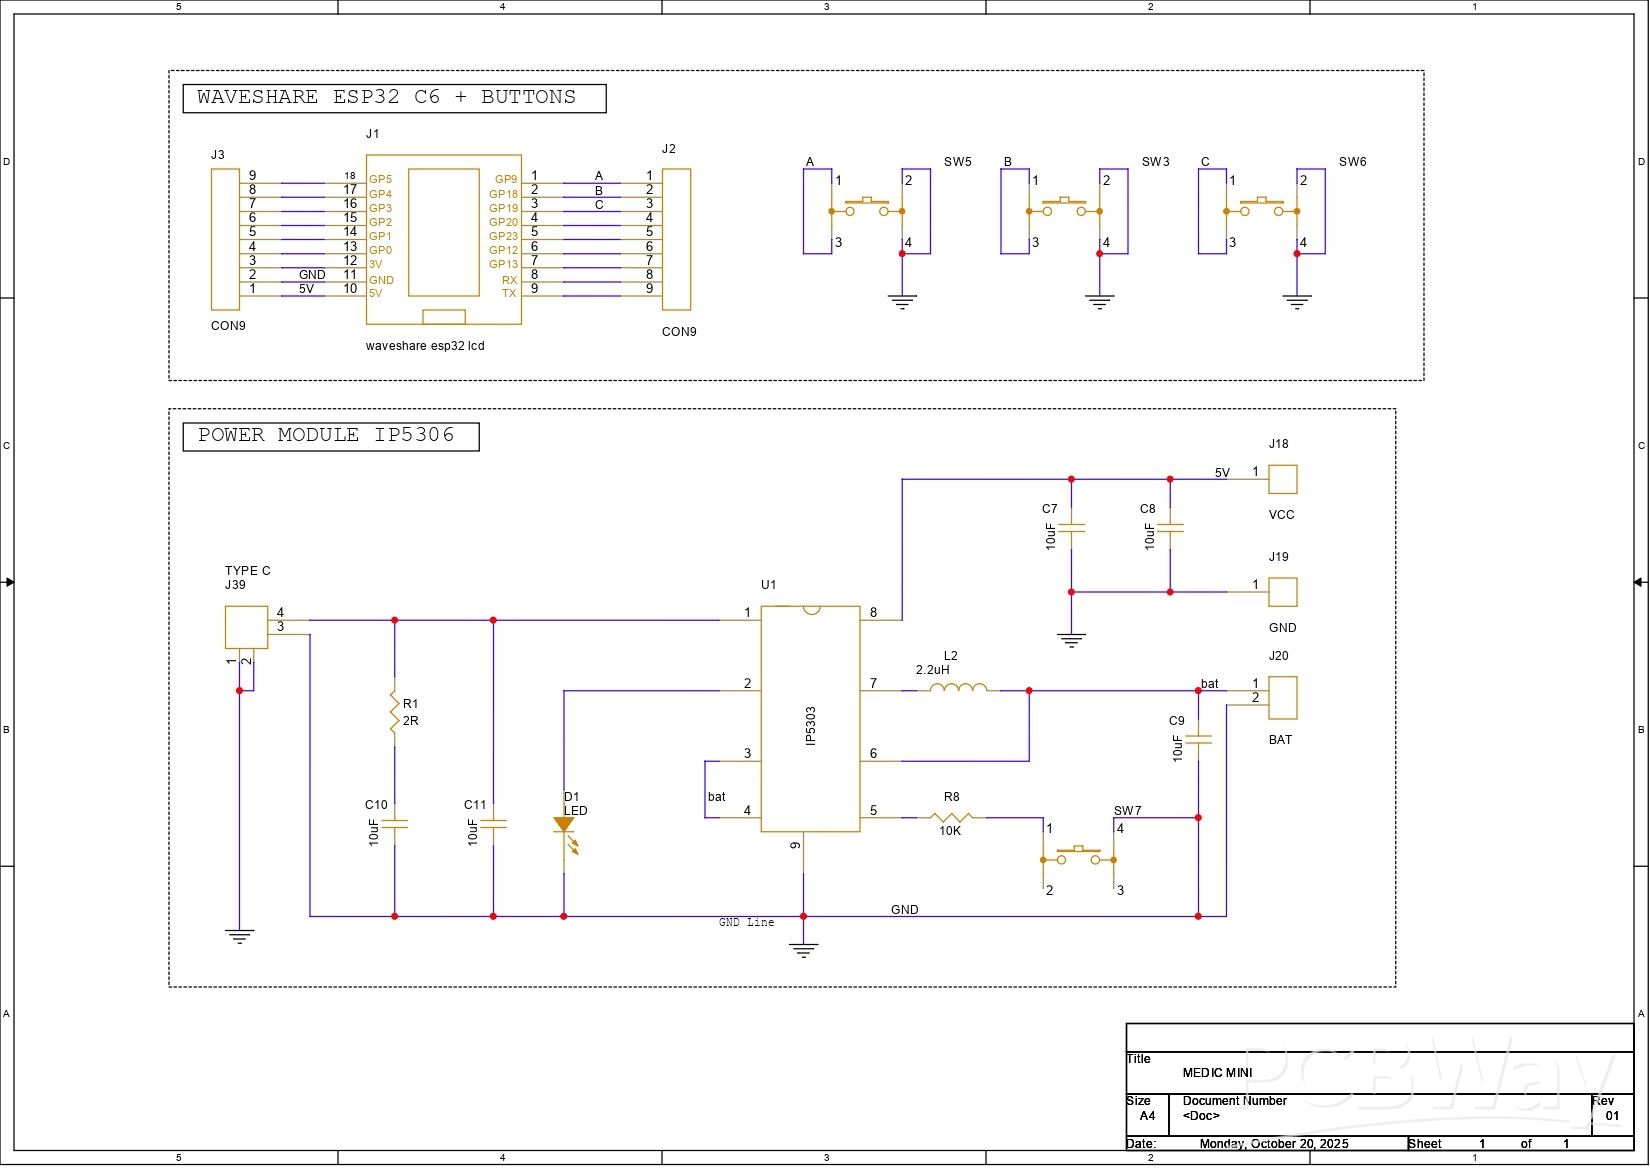
We’ll start with the Medic Mini mainboard. This board was reused because it already includes a reliable onboard power-management system that serves as the primary power source for the lamp. It features the IP5306 power-management IC, which operates from a single 3.7 V Li-ion cell and provides a stable 5 V output capable of delivering up to 2 A.
The board also integrates an ESP32-C6 development board, which acts as the main microcontroller for the project. Using the ESP32-C6 allows us to host a web application directly on the device, enabling the lamp to be controlled over a local network through a simple IP address.
The second reused board is the Dodecagon RGB LED PCB. This PCB contains seven WS2812B RGB LEDs connected in series. It originally came from a project I built back in 2021, and we decided to repurpose it here as the primary lighting element. In this build, a glass brick is placed directly above the LED PCB, allowing the diffused light from the LEDs to illuminate the glass block evenly and create the lamp’s signature glow.
PCBWAY
For the project’s PCBs—the Dodecagon LED board and the Medic Mini mainboard—we got both manufactured by PCBWay, the sponsor of this video.
Over the past ten years, PCBWay has really set themselves apart by offering high-quality PCB fabrication and assembly services, becoming a trusted partner for thousands of engineers, makers, and designers around the world.
Also, PCBWay is organizing the PCBWay 8th Project Design Contest, a global event that invites makers, engineers, and innovators to showcase their most creative builds. With categories in electronics, mechanical, and AIoT, it’s a great opportunity to share your work, connect with the community, and compete for exciting prizes.
You guys can check out PCBWAY if you want great PCB service at an affordable rate.
LED PCB ASSEMBLY
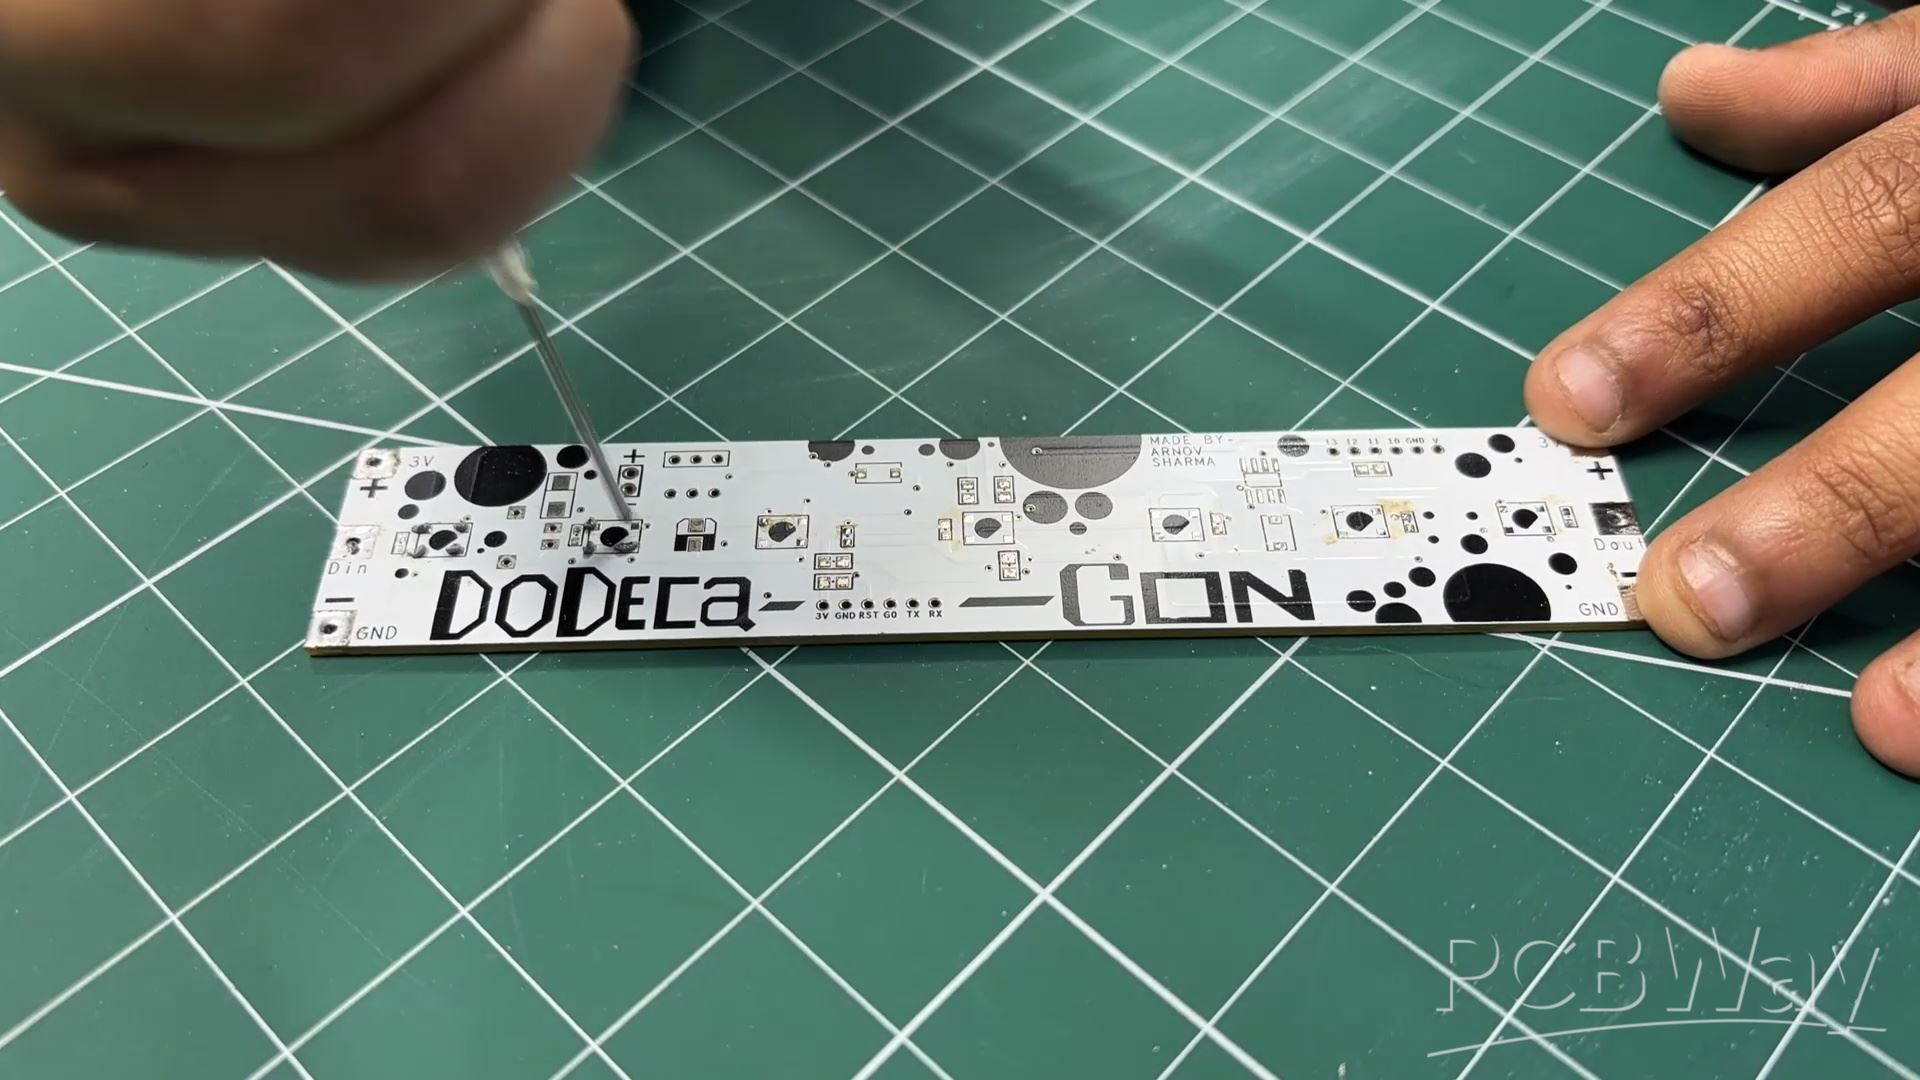
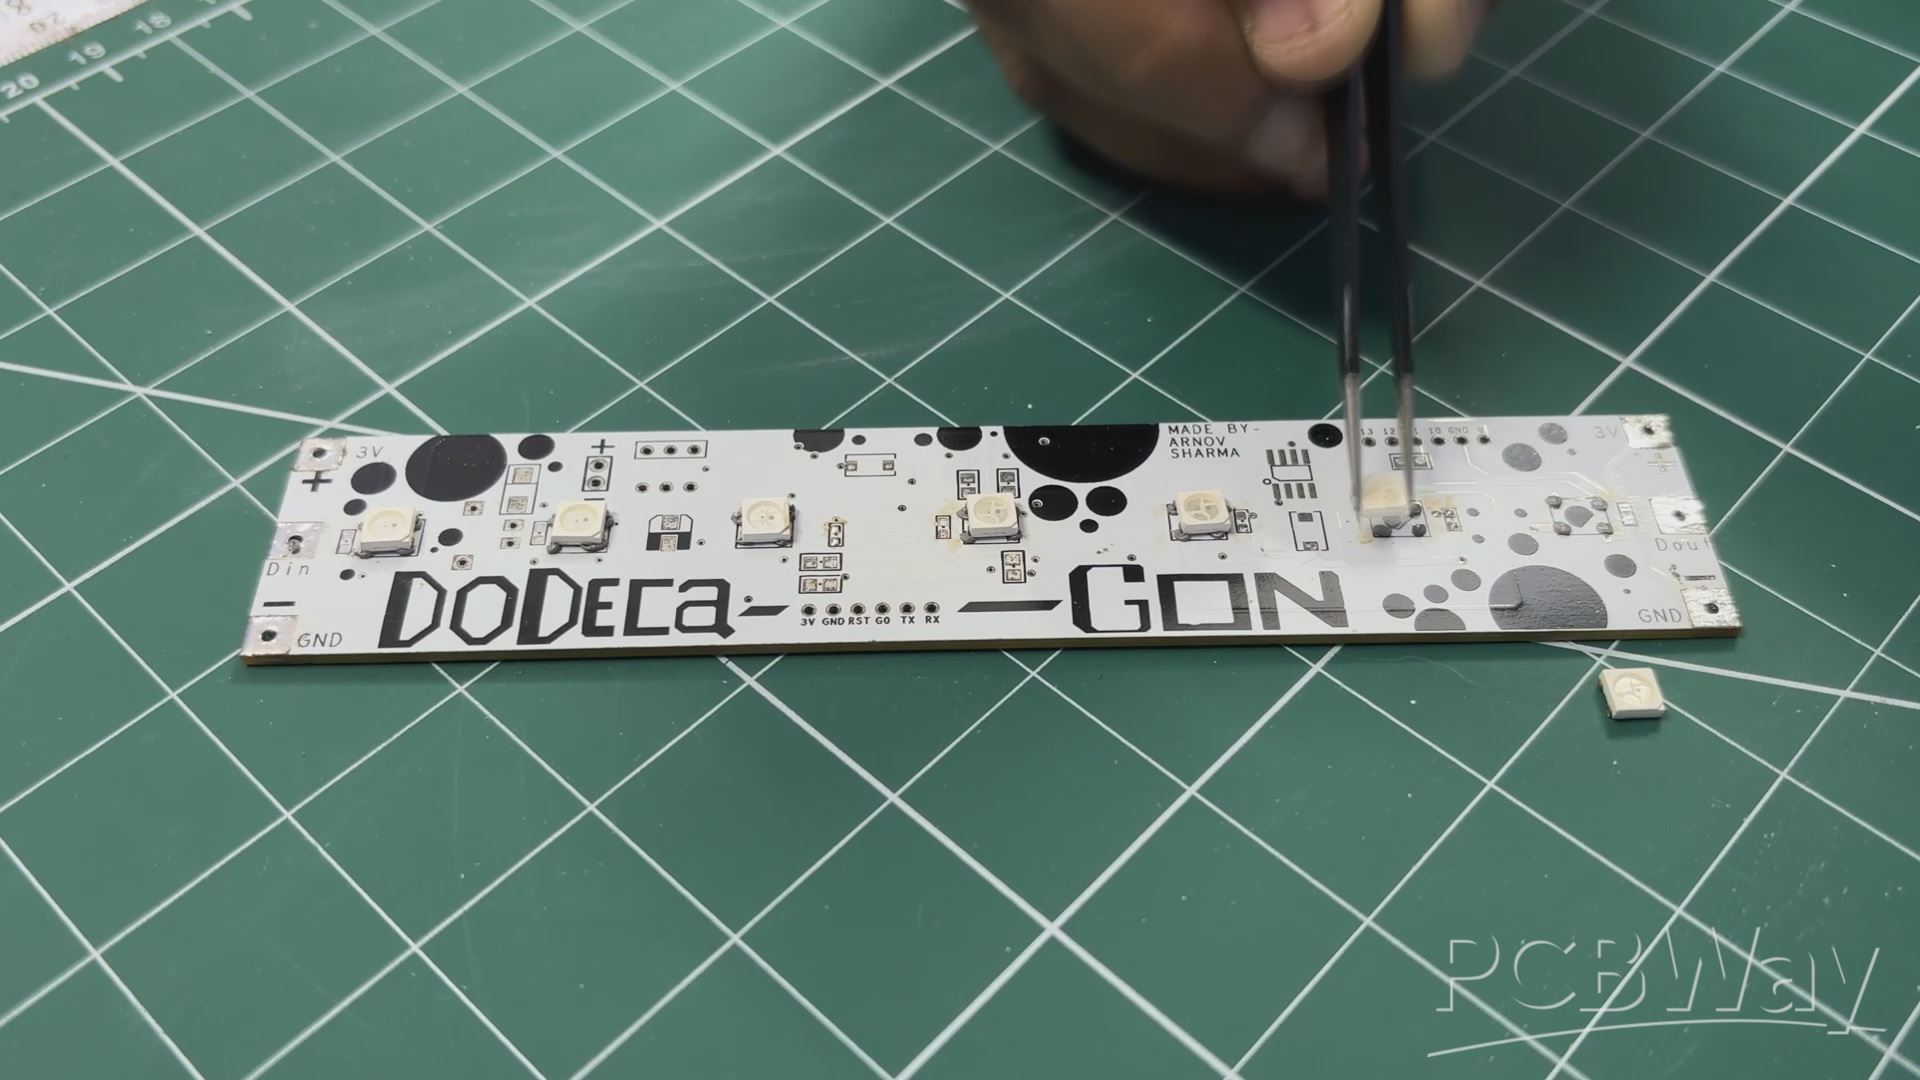
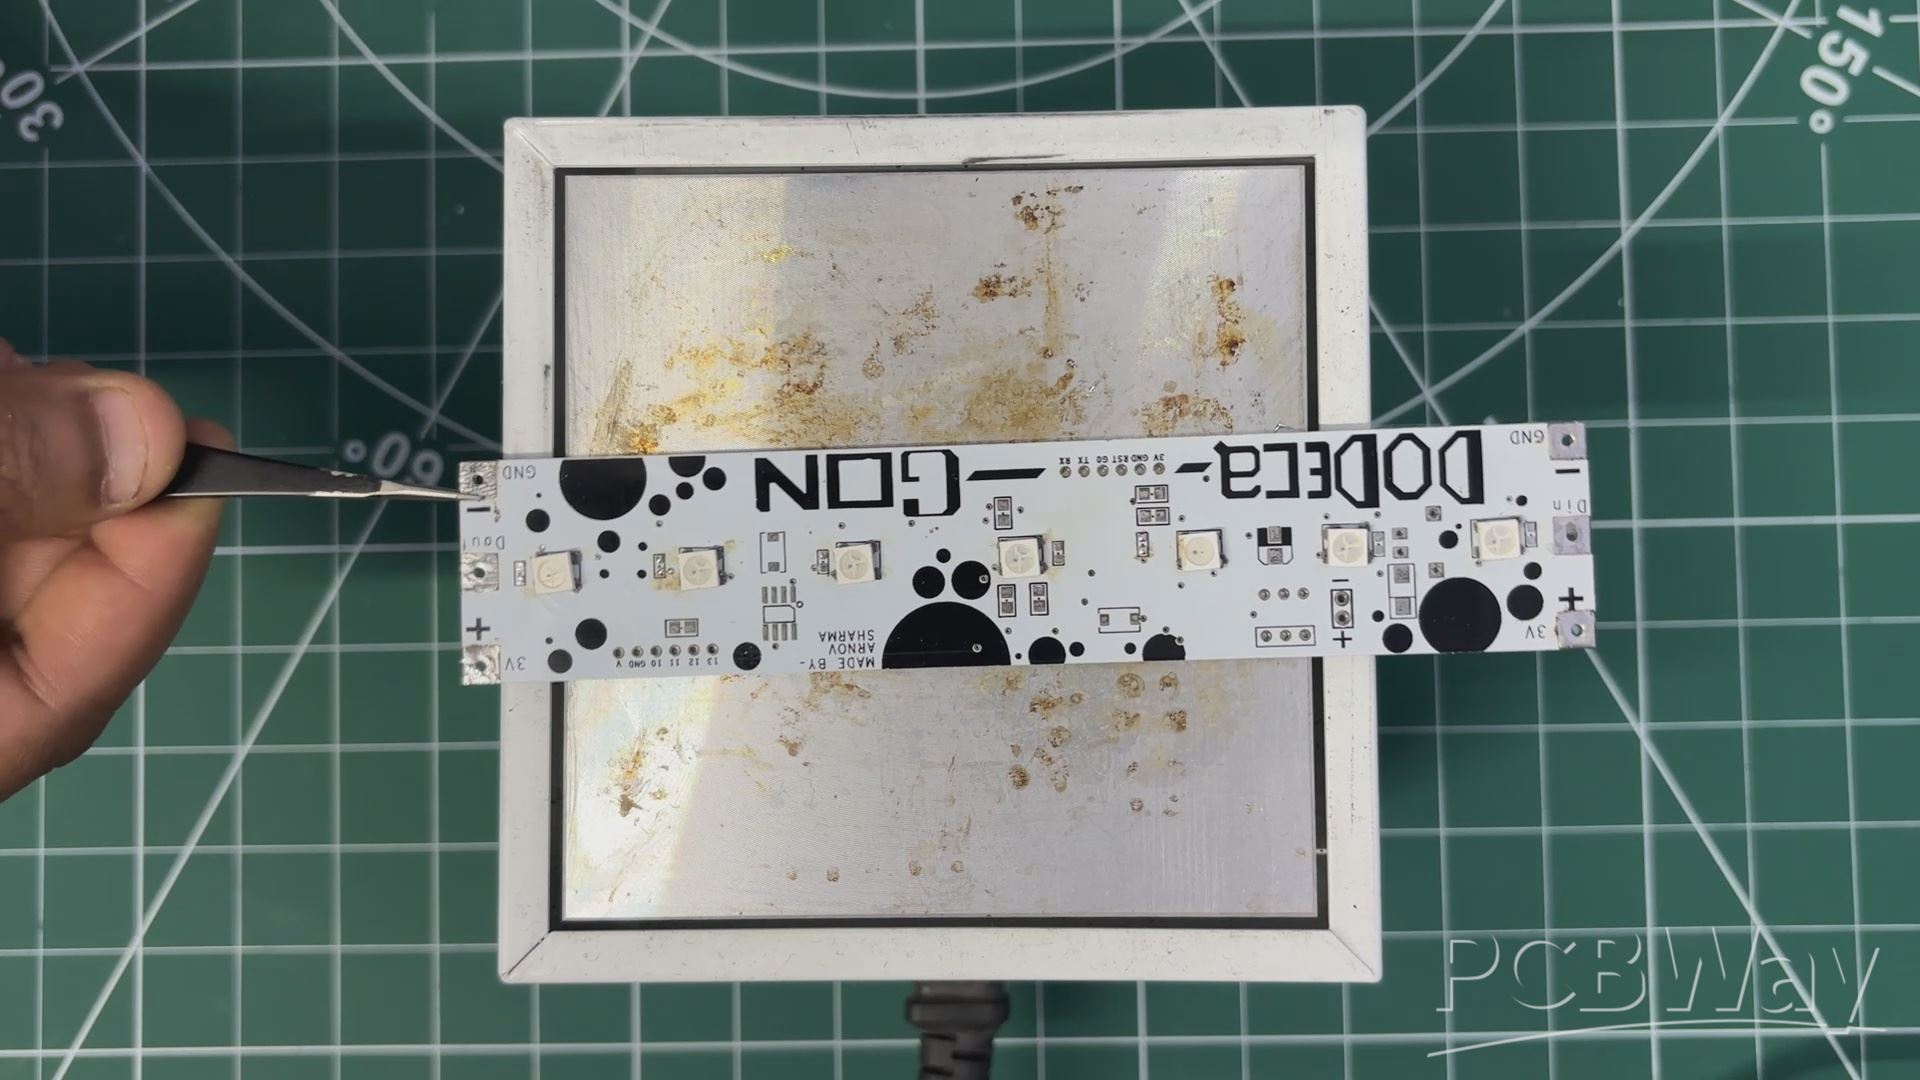
- We begin by applying solder paste to all the SMD LED pads using a solder-paste dispensing syringe.
- Next, each RGB LED is carefully picked and placed onto its footprint, making sure the orientation is correct.
- The PCB is then placed on a hot plate, which heats the board from below until the solder paste reaches its reflow temperature (around 200°C). This process causes the solder to melt and securely bond all components in place.
The MEDIC MINI main board assembly is covered in detail in a separate Instructables guide, which you can follow for the complete build process.
WIRING

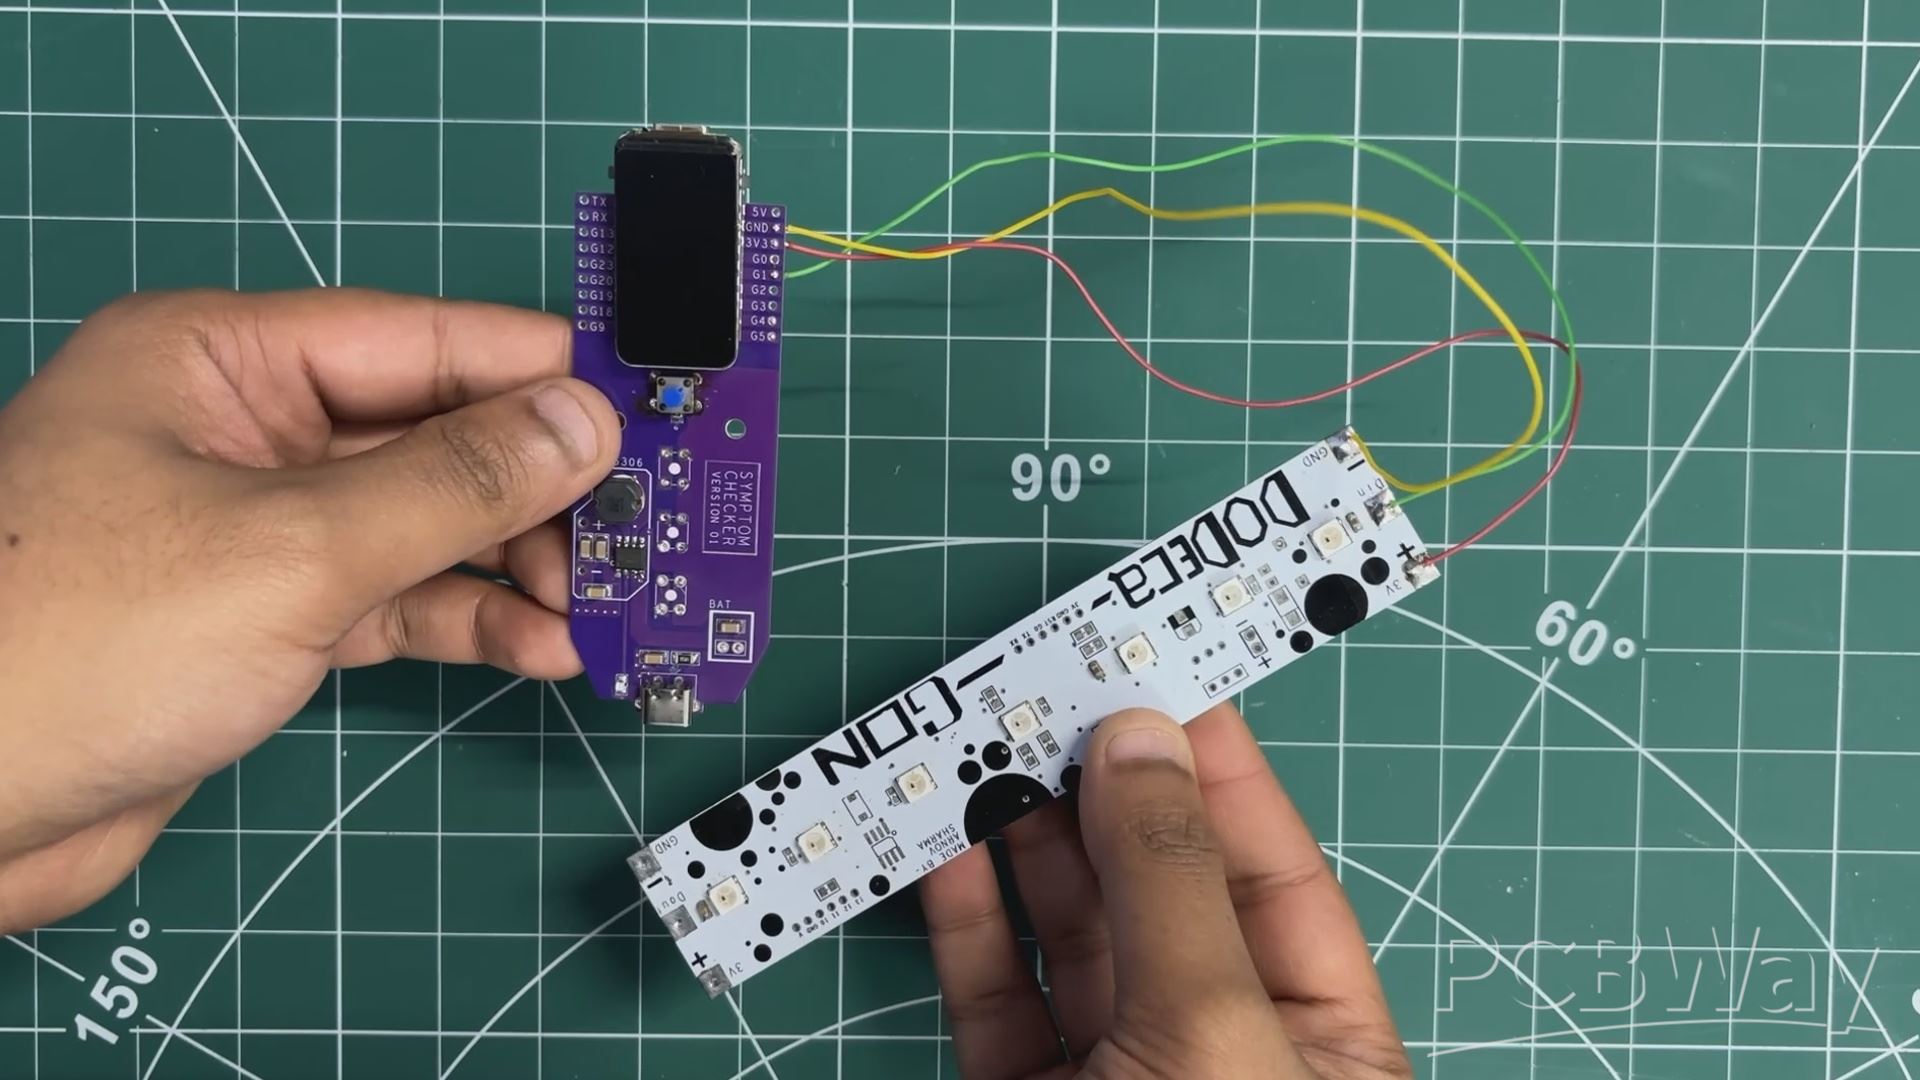

We began the wiring process by soldering wires to the LED board’s VCC, GND, and DIN pads. Once the wires were attached, we connected the LED board to the Medic Mini’s ESP32 module:
- VCC from the LED board goes to the 5V pin
- GND connects to GND
- DIN is connected to GPIO 5
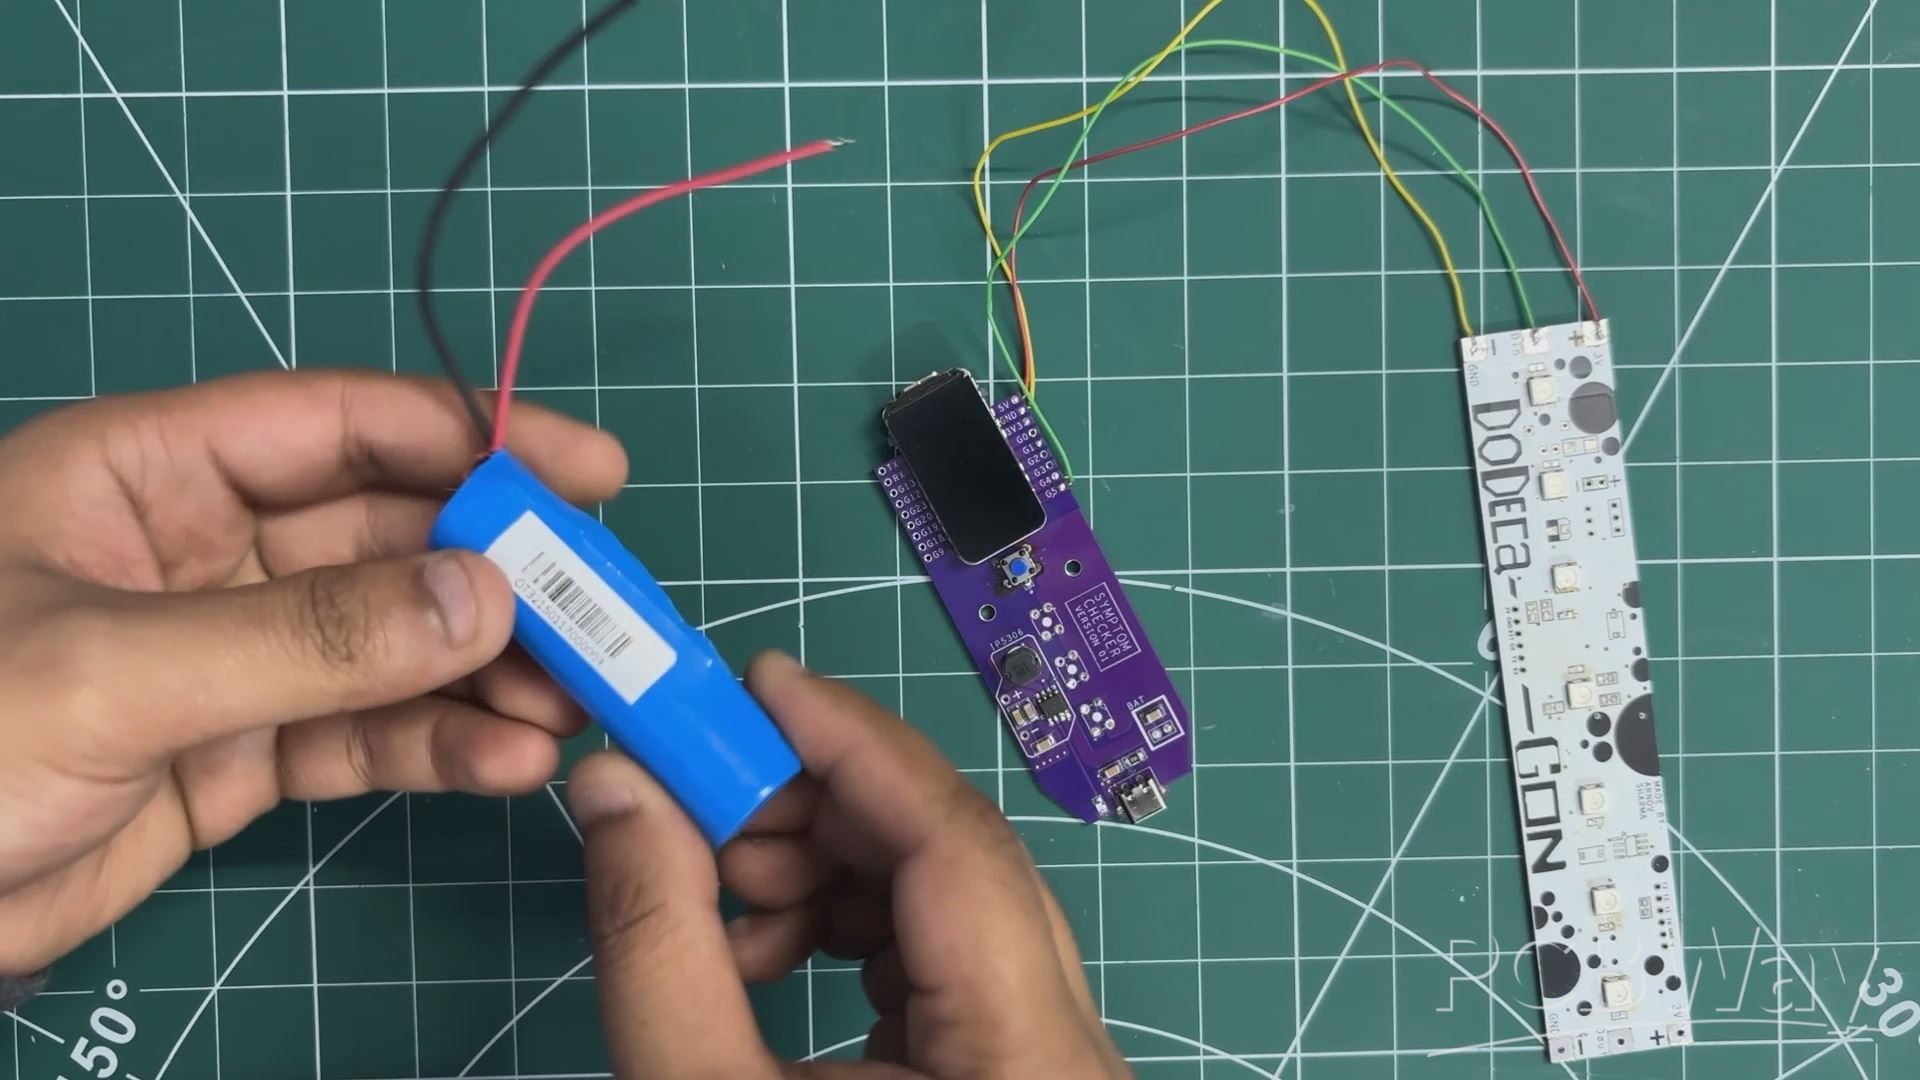
To power the entire setup, we added a 3.7V 2600 mAh Li-ion battery pack. The battery’s positive terminal is connected to the battery positive pad on the Medic Mini board, and the negative terminal goes to battery negative.
The Medic Mini’s onboard power-management circuitry then boosts the 3.7V from the Li-ion cell to a stable 5V output, which is used to run both the ESP32 microcontroller and the RGB LED board.
BODY ASSEMBLY
- We now begin the body assembly process. We placed the circular accent part in its place, applied a little bit of pressure, and it fit into its place. We did the same for the other accent part.
- From the bottom side, we placed the base part by aligning the base part with the main body mounting holes.
- Using four M2 screws, both are secured together.
ELECTRONICS & BODY ASSEMBLY
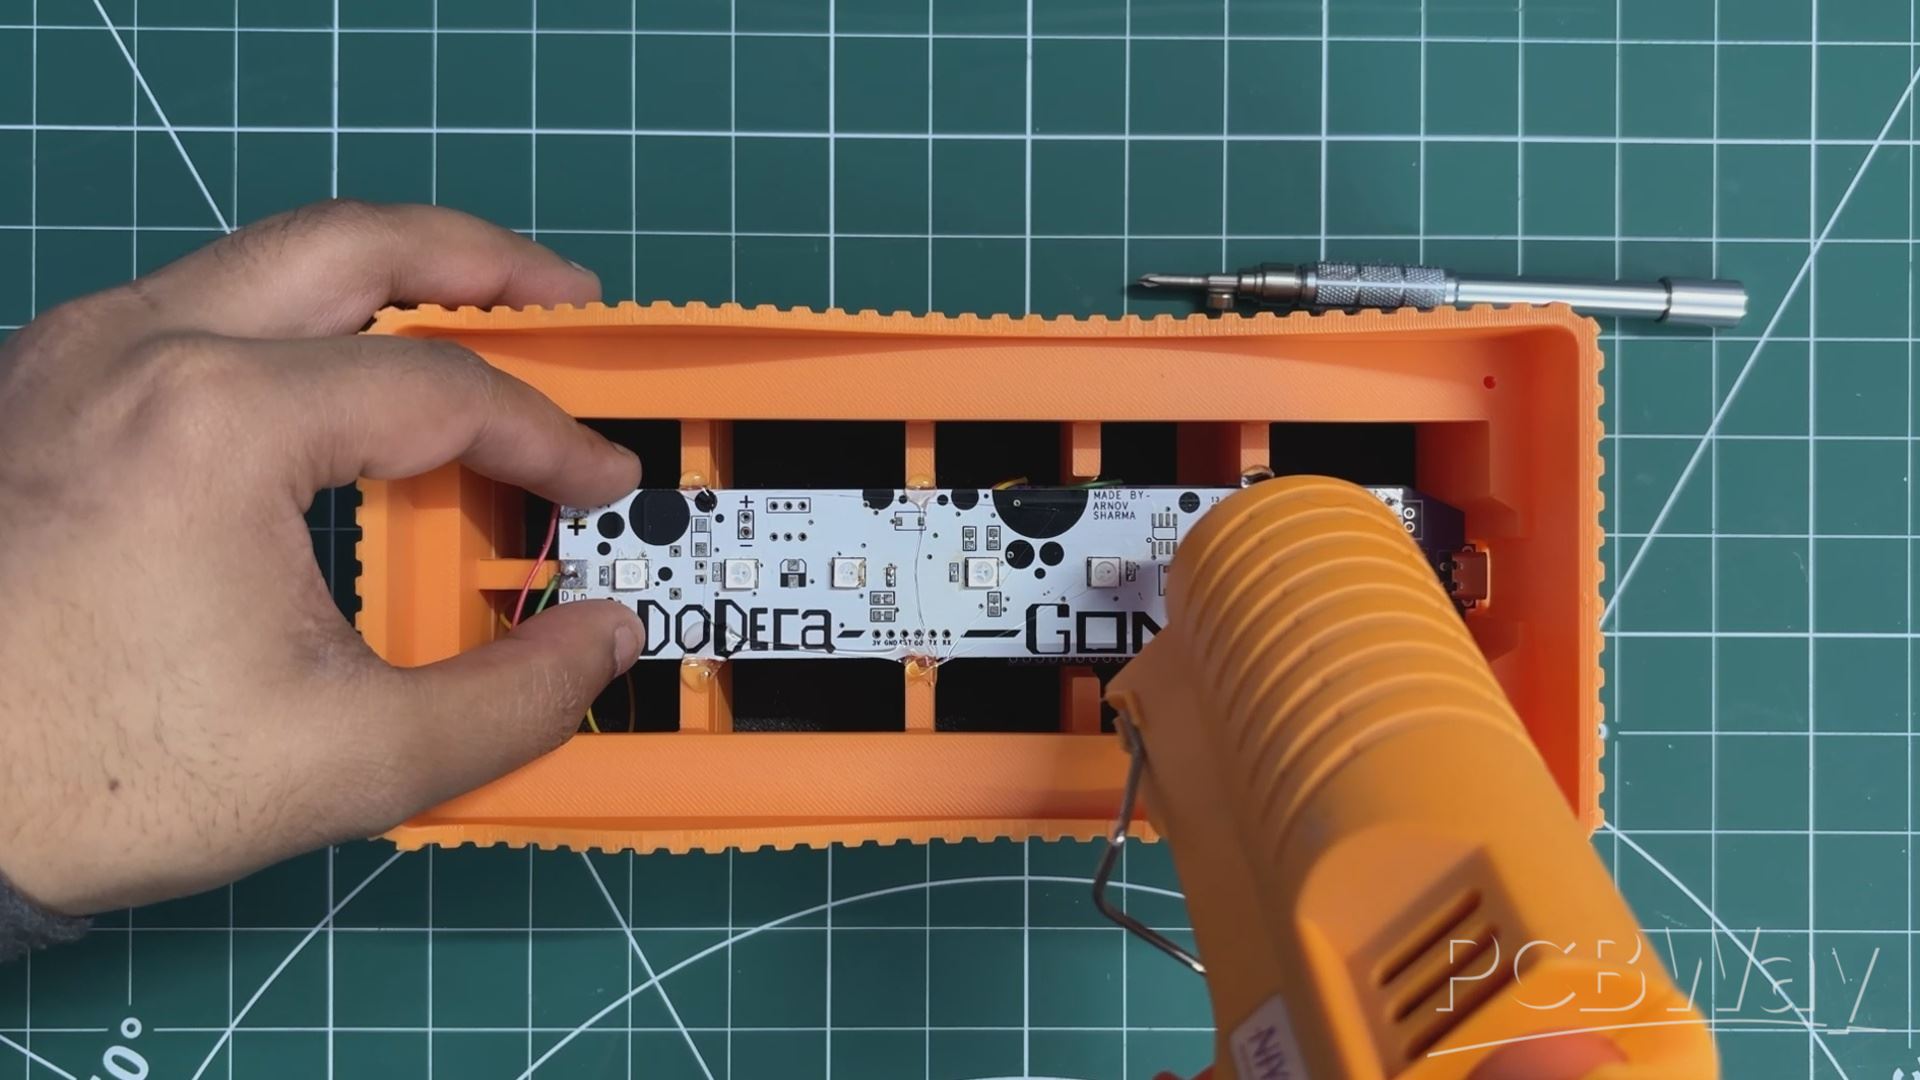
- First, we place the lithium cell in its place inside the main body, followed by positioning the Medic Mini PCB by aligning it over the two mounting holes provided inside the main body.
- Using two M2 screws, the Medic Mini PCB is secured in place.
- At last, we position the LED PCB in its place, and it is secured using some hot glue. After letting it cool, the whole assembly process has been completed.
MAIN CODE
This was the main code, and let's have a quick breakdown.
#include <WiFi.h> #include <WebServer.h> #include <FastLED.h> /* ================= LED CONFIG ================= */ #define LED_PIN 5 #define LED_COUNT 7 #define LED_TYPE WS2812B #define COLOR_ORDER GRB CRGB leds[LED_COUNT]; /* ================= WIFI ================= */ const char* ssid = "SSID"; const char* password = "PASS"; /* ================= WEB ================= */ WebServer server(80); /* ================= MODES ================= */ enum Mode { MODE_STATIC, MODE_OCEAN, MODE_FIRE, MODE_OFF }; Mode currentMode = MODE_STATIC; /* ================= UI ================= */ const char PAGE_HTML[] PROGMEM = R"rawliteral( <!DOCTYPE html> <html> <head> <meta name="width=device-width, initial-scale=1"> <title>Brick of Light</title> <style> html, body { margin: 0; padding: 0; height: 100%; background: #0f0f14; display: flex; justify-content: center; align-items: center; font-family: system-ui, -apple-system, BlinkMacSystemFont, sans-serif; color: white; } .container { text-align: center; } h1 { font-weight: 500; letter-spacing: 0.05em; margin-bottom: 20px; opacity: 0.9; } canvas { touch-action: none; } .modes { margin-top: 22px; display: flex; justify-content: center; gap: 18px; } .mode-btn { width: 52px; height: 52px; border-radius: 50%; border: none; cursor: pointer; } .ocean { background: radial-gradient(circle at 30% 30%, #4fd1c5, #1e4fd8); } .fire { background: radial-gradient(circle at 30% 30%, #ffd166, #ff6b00); } .off { background: radial-gradient(circle at 30% 30%, #444, #111); } .mode-btn:active { transform: scale(0.95); } </style> </head> <body> <div class="container"> <h1>Brick of Light</h1> <canvas id="wheel" width="300" height="300"></canvas> <div class="modes"> <button class="fetch('/mode?m=ocean')"></button> <button class="fetch('/mode?m=fire')"></button> <button class="fetch('/mode?m=off')"></button> </div> </div> <script> const canvas = document.getElementById("wheel"); const ctx = canvas.getContext("2d"); const r = canvas.width / 2; function drawWheel() { for (let a = 0; a < 360; a++) { const s = (a - 1) * Math.PI / 180; const e = a * Math.PI / 180; ctx.beginPath(); ctx.moveTo(r, r); ctx.arc(r, r, r, s, e); ctx.closePath(); ctx.fillStyle = `hsl(${a},100%,50%)`; ctx.fill(); } } function hslToRgb(h, s, l) { let r, g, b; if (s === 0) r = g = b = l; else { const f = (p, q, t) => { if (t < 0) t += 1; if (t > 1) t -= 1; if (t < 1/6) return p + (q - p) * 6 * t; if (t < 1/2) return q; if (t < 2/3) return p + (q - p) * (2/3 - t) * 6; return p; }; const q = l < 0.5 ? l * (1 + s) : l + s - l * s; const p = 2 * l - q; r = f(p, q, h + 1/3); g = f(p, q, h); b = f(p, q, h - 1/3); } return [Math.round(r*255), Math.round(g*255), Math.round(b*255)]; } function sendColor(x, y) { const dx = x - r; const dy = y - r; if (Math.sqrt(dx*dx + dy*dy) > r) return; let angle = Math.atan2(dy, dx) * 180 / Math.PI; if (angle < 0) angle += 360; const rgb = hslToRgb(angle/360, 1, 0.5); const hex = rgb.map(v => v.toString(16).padStart(2,"0")).join(""); fetch(`/set?color=${hex}`); } canvas.addEventListener("pointerdown", e => handle(e)); canvas.addEventListener("pointermove", e => { if (e.buttons) handle(e); }); function handle(e) { const rect = canvas.getBoundingClientRect(); sendColor(e.clientX - rect.left, e.clientY - rect.top); } drawWheel(); </script> </body> </html> )rawliteral"; /* ================= HANDLERS ================= */ void handleRoot() { server.send(200, "text/html", PAGE_HTML); } void handleSetColor() { currentMode = MODE_STATIC; String hex = server.arg("color"); long v = strtol(hex.c_str(), NULL, 16); fill_solid(leds, LED_COUNT, CRGB(v >> 16, (v >> 8) & 0xFF, v & 0xFF)); FastLED.show(); server.send(200, "text/plain", "OK"); } void handleMode() { String m = server.arg("m"); if (m == "ocean") currentMode = MODE_OCEAN; else if (m == "fire") currentMode = MODE_FIRE; else if (m == "off") { currentMode = MODE_OFF; FastLED.clear(); FastLED.show(); } server.send(200, "text/plain", "OK"); } /* ================= ANIMATIONS ================= */ void oceanAnimation() { static uint8_t hue = 130; static int8_t dir = 1; fill_solid(leds, LED_COUNT, CHSV(hue, 180, 220)); FastLED.show(); hue += dir; if (hue > 160 || hue < 120) dir = -dir; delay(30); } void fireAnimation() { for (int i = 0; i < LED_COUNT; i++) { uint8_t flicker = random(150, 255); leds[i] = CRGB(flicker, random(60, 100), 0); } FastLED.show(); delay(50); } /* ================= SETUP ================= */ void setup() { Serial.begin(115200); delay(1500); FastLED.addLeds<LED_TYPE, LED_PIN, COLOR_ORDER>(leds, LED_COUNT); FastLED.setBrightness(255); FastLED.clear(); FastLED.show(); WiFi.begin(ssid, password); while (WiFi.status() != WL_CONNECTED) delay(300); Serial.print("Brick of Light → http://"); Serial.println(WiFi.localIP()); server.on("/", handleRoot); server.on("/set", handleSetColor); server.on("/mode", handleMode); server.begin(); } /* ================= LOOP ================= */ void loop() { server.handleClient(); if (currentMode == MODE_OCEAN) oceanAnimation(); else if (currentMode == MODE_FIRE) fireAnimation(); }
In this code, we use three main libraries. The WiFi.h library connects our ESP32 to Wi-Fi and allows us to use functions like WiFi.begin, WiFi.status, and WiFi.localIP.
Next is WebServer.h, which lets us create a simple HTTP web server on the ESP32 for hosting our LED-controller webpage.
And finally, we use the FastLED library, which handles all the control for the WS2812B RGB LEDs.
RESULT
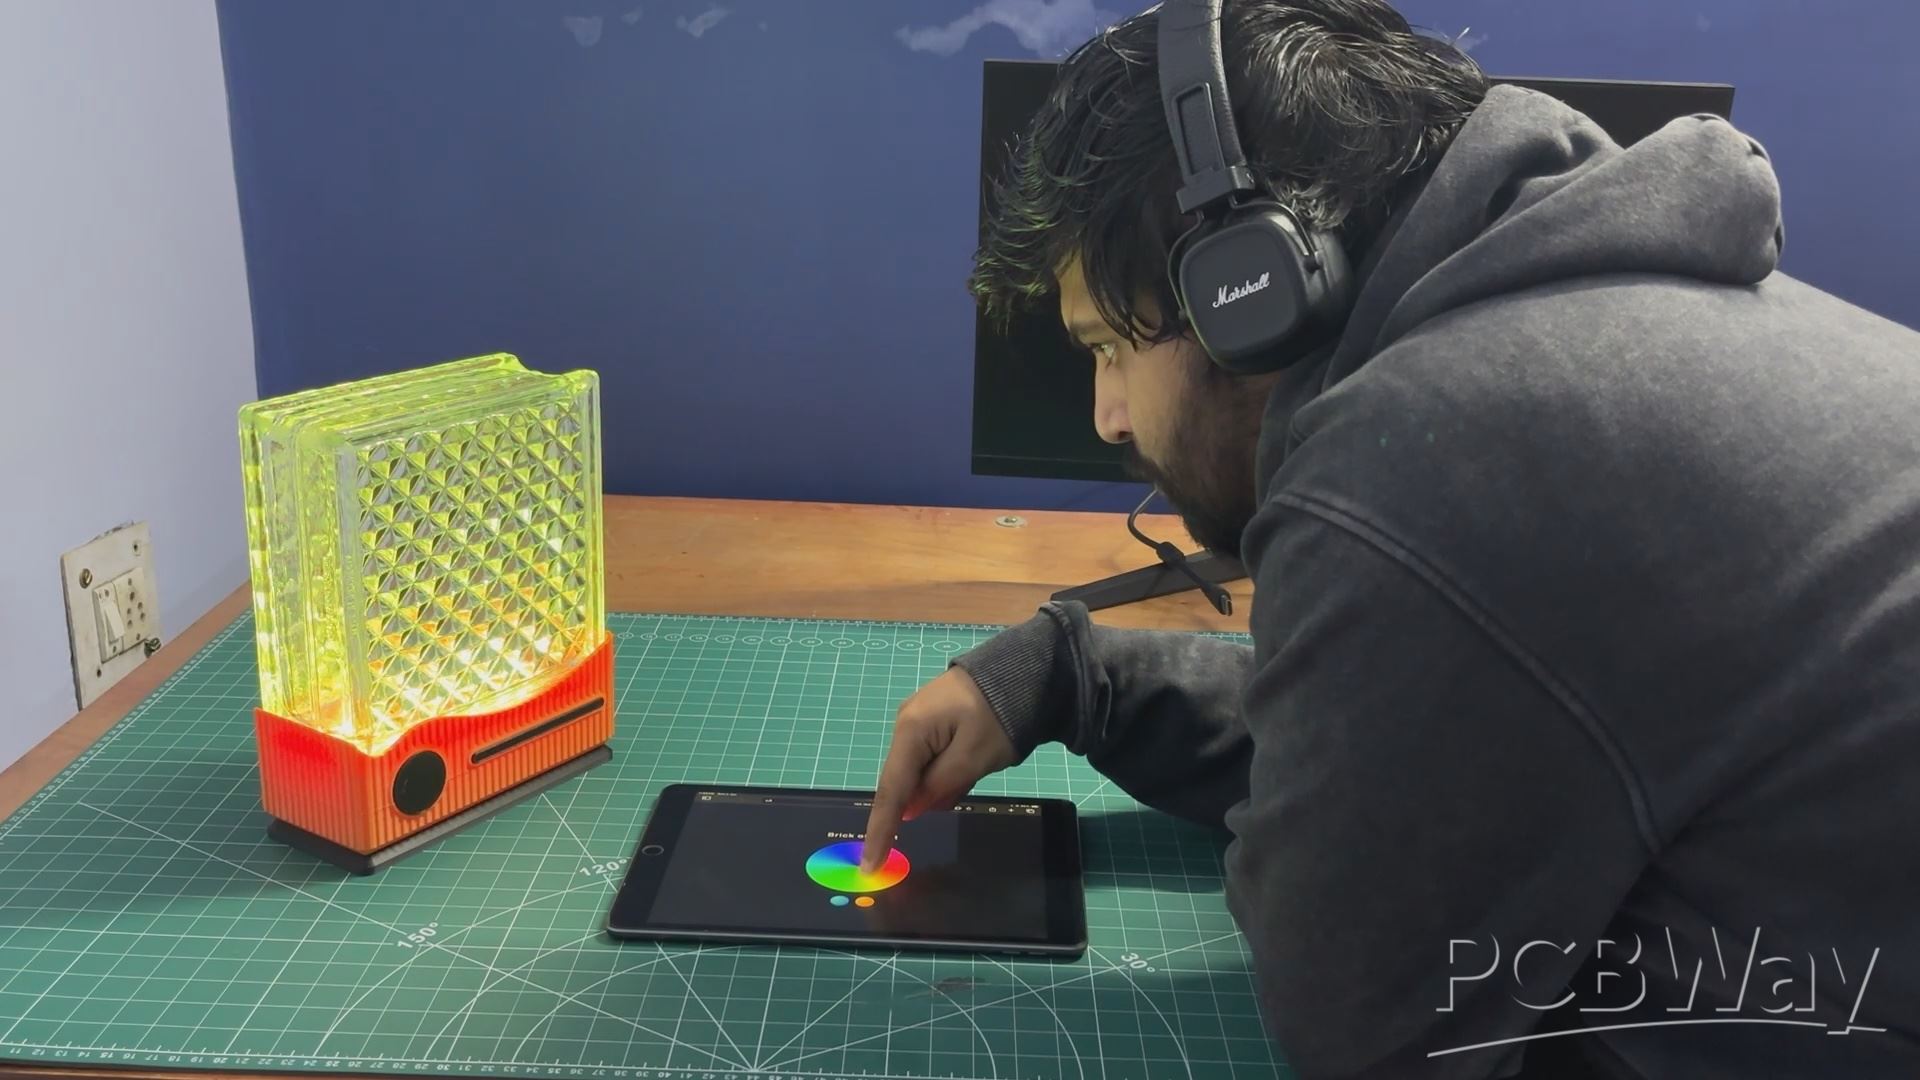
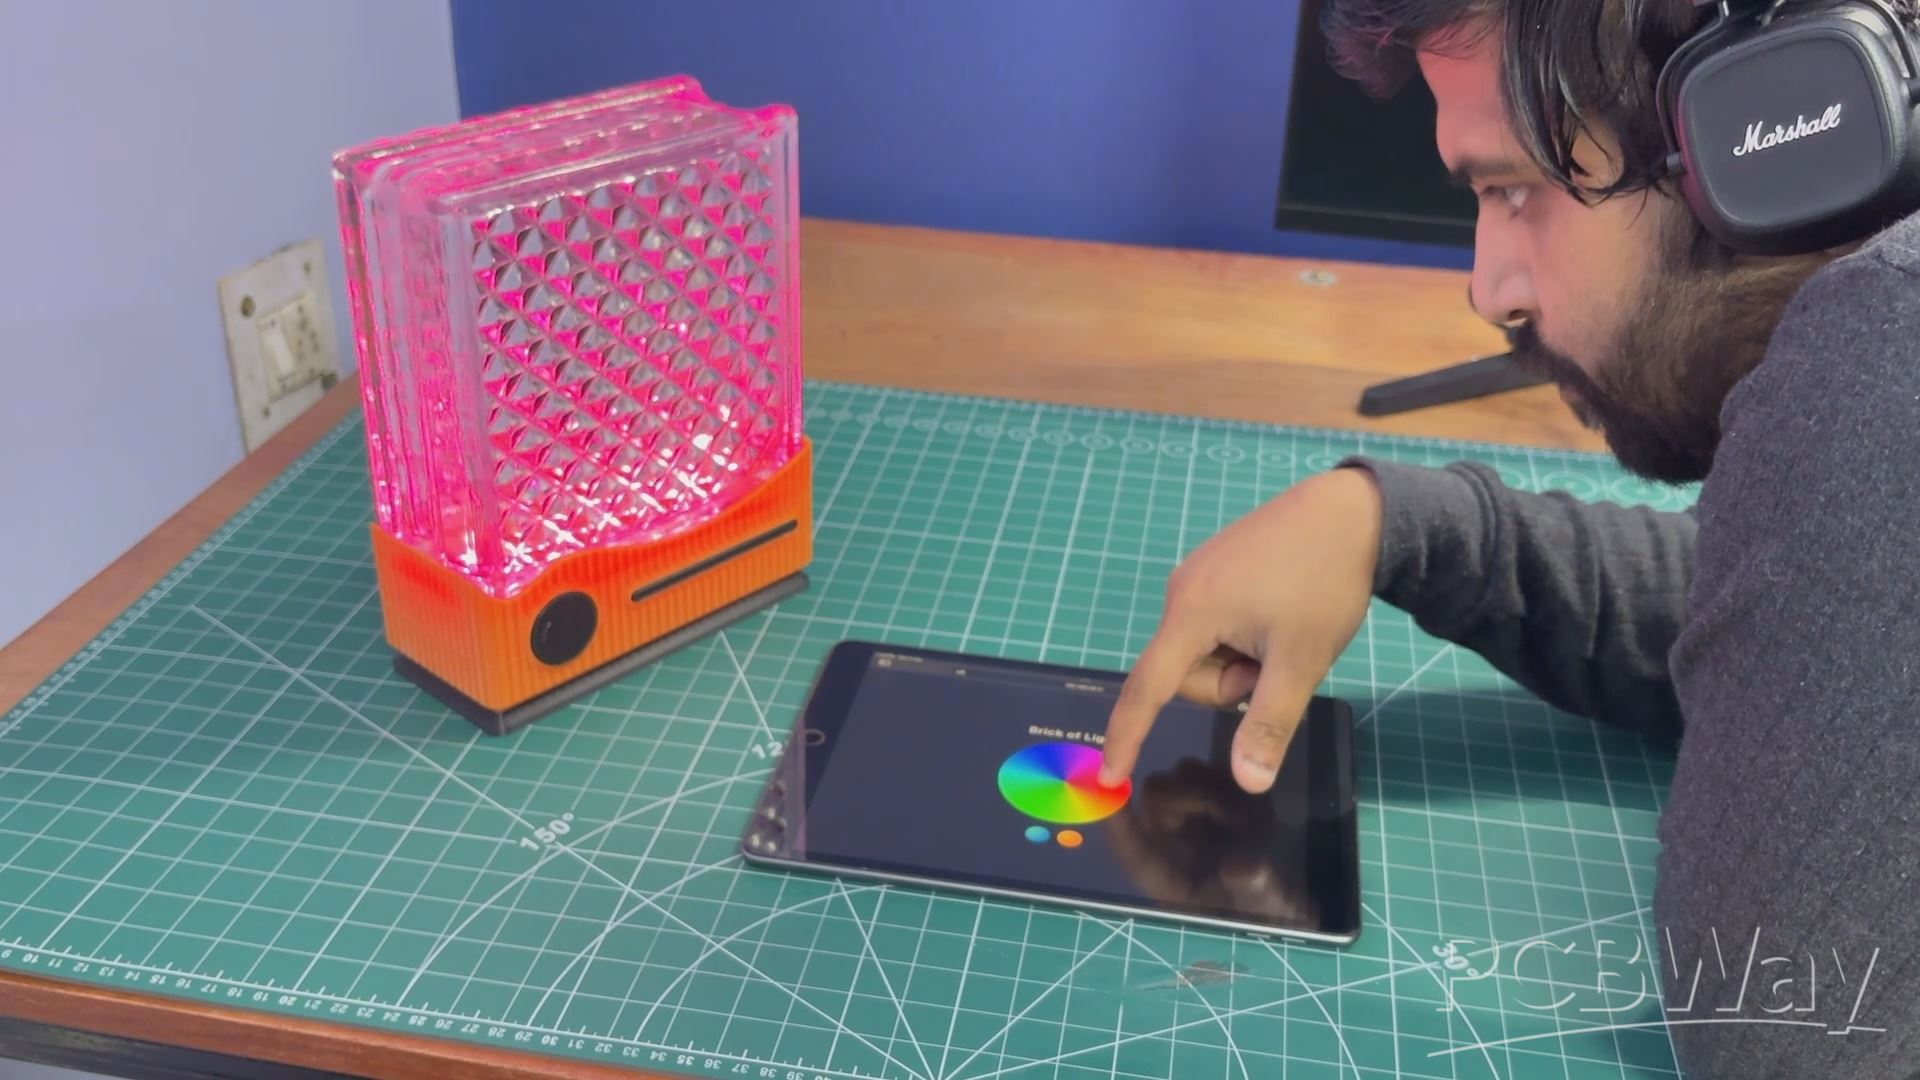
And here it is—the final result of this simple yet surprisingly bright build! A repurposed glass brick transformed into a glowing, modern RGB lamp that you can control from your phone, tablet, or practically any device on your Wi-Fi network. It looks absolutely stunning in person and instantly upgrades the aesthetic of a living room, bedroom, or wherever you decide to place it.
Through a bit of creativity, some custom 3D design, and a handful of electronics, we took an ordinary leftover glass brick and turned it into a stylish, app-controlled décor piece.
Overall, the project was a success, and all design files, code, and resources related to this build are attached on the project page.
In addition, we appreciate PCBWAY's support of this project. Visit them for a variety of PCB-related services, such as stencil and PCB assembly services, as well as 3D printing services.
Thanks for reaching this far, and I will be back with a new project pretty soon.
Peace.
#include <WiFi.h>
#include <WebServer.h>
#include <FastLED.h>
/* ================= LED CONFIG ================= */
#define LED_PIN     5
#define LED_COUNT   7
#define LED_TYPE    WS2812B
#define COLOR_ORDER GRB
CRGB leds[LED_COUNT];
/* ================= WIFI ================= */
const char* ssid     = "SSID";
const char* password = "PASS";
/* ================= WEB ================= */
WebServer server(80);
/* ================= MODES ================= */
enum Mode {
MODE_STATIC,
MODE_OCEAN,
MODE_FIRE,
MODE_OFF
};
Mode currentMode = MODE_STATIC;
/* ================= UI ================= */
const char PAGE_HTML[] PROGMEM = R"rawliteral(
<!DOCTYPE html>
<html>
<head>
<meta name="viewport" content="width=device-width, initial-scale=1">
<title>Brick of Light</title>
<style>
html, body {
margin: 0;
padding: 0;
height: 100%;
background: #0f0f14;
display: flex;
justify-content: center;
align-items: center;
font-family: system-ui, -apple-system, BlinkMacSystemFont, sans-serif;
color: white;
}
.container {
text-align: center;
}
h1 {
font-weight: 500;
letter-spacing: 0.05em;
margin-bottom: 20px;
opacity: 0.9;
}
canvas {
touch-action: none;
}
.modes {
margin-top: 22px;
display: flex;
justify-content: center;
gap: 18px;
}
.mode-btn {
width: 52px;
height: 52px;
border-radius: 50%;
border: none;
cursor: pointer;
}
.ocean {
background: radial-gradient(circle at 30% 30%, #4fd1c5, #1e4fd8);
}
.fire {
background: radial-gradient(circle at 30% 30%, #ffd166, #ff6b00);
}
.off {
background: radial-gradient(circle at 30% 30%, #444, #111);
}
.mode-btn:active {
transform: scale(0.95);
}
</style>
</head>
<body>
<div class="container">
<h1>Brick of Light</h1>
<canvas id="wheel" width="300" height="300"></canvas>
<div class="modes">
<button class="mode-btn ocean" onclick="fetch('/mode?m=ocean')"></button>
<button class="mode-btn fire" onclick="fetch('/mode?m=fire')"></button>
<button class="mode-btn off" onclick="fetch('/mode?m=off')"></button>
</div>
</div>
<script>
const canvas = document.getElementById("wheel");
const ctx = canvas.getContext("2d");
const r = canvas.width / 2;
function drawWheel() {
for (let a = 0; a < 360; a++) {
const s = (a - 1) * Math.PI / 180;
const e = a * Math.PI / 180;
ctx.beginPath();
ctx.moveTo(r, r);
ctx.arc(r, r, r, s, e);
ctx.closePath();
ctx.fillStyle = `hsl(${a},100%,50%)`;
ctx.fill();
}
}
function hslToRgb(h, s, l) {
let r, g, b;
if (s === 0) r = g = b = l;
else {
const f = (p, q, t) => {
if (t < 0) t += 1;
if (t > 1) t -= 1;
if (t < 1/6) return p + (q - p) * 6 * t;
if (t < 1/2) return q;
if (t < 2/3) return p + (q - p) * (2/3 - t) * 6;
return p;
};
const q = l < 0.5 ? l * (1 + s) : l + s - l * s;
const p = 2 * l - q;
r = f(p, q, h + 1/3);
g = f(p, q, h);
b = f(p, q, h - 1/3);
}
return [Math.round(r*255), Math.round(g*255), Math.round(b*255)];
}
function sendColor(x, y) {
const dx = x - r;
const dy = y - r;
if (Math.sqrt(dx*dx + dy*dy) > r) return;
let angle = Math.atan2(dy, dx) * 180 / Math.PI;
if (angle < 0) angle += 360;
const rgb = hslToRgb(angle/360, 1, 0.5);
const hex = rgb.map(v => v.toString(16).padStart(2,"0")).join("");
fetch(`/set?color=${hex}`);
}
canvas.addEventListener("pointerdown", e => handle(e));
canvas.addEventListener("pointermove", e => { if (e.buttons) handle(e); });
function handle(e) {
const rect = canvas.getBoundingClientRect();
sendColor(e.clientX - rect.left, e.clientY - rect.top);
}
drawWheel();
</script>
</body>
</html>
)rawliteral";
/* ================= HANDLERS ================= */
void handleRoot() {
server.send(200, "text/html", PAGE_HTML);
}
void handleSetColor() {
currentMode = MODE_STATIC;
String hex = server.arg("color");
long v = strtol(hex.c_str(), NULL, 16);
fill_solid(leds, LED_COUNT, CRGB(v >> 16, (v >> 8) & 0xFF, v & 0xFF));
FastLED.show();
server.send(200, "text/plain", "OK");
}
void handleMode() {
String m = server.arg("m");
if (m == "ocean") currentMode = MODE_OCEAN;
else if (m == "fire") currentMode = MODE_FIRE;
else if (m == "off") {
currentMode = MODE_OFF;
FastLED.clear();
FastLED.show();
}
server.send(200, "text/plain", "OK");
}
/* ================= ANIMATIONS ================= */
void oceanAnimation() {
static uint8_t hue = 130;
static int8_t dir = 1;
fill_solid(leds, LED_COUNT, CHSV(hue, 180, 220));
FastLED.show();
hue += dir;
if (hue > 160 || hue < 120) dir = -dir;
delay(30);
}
void fireAnimation() {
for (int i = 0; i < LED_COUNT; i++) {
uint8_t flicker = random(150, 255);
leds[i] = CRGB(flicker, random(60, 100), 0);
}
FastLED.show();
delay(50);
}
/* ================= SETUP ================= */
void setup() {
Serial.begin(115200);
delay(1500);
FastLED.addLeds<LED_TYPE, LED_PIN, COLOR_ORDER>(leds, LED_COUNT);
FastLED.setBrightness(255);
FastLED.clear();
FastLED.show();
WiFi.begin(ssid, password);
while (WiFi.status() != WL_CONNECTED) delay(300);
Serial.print("Brick of Light → http://");
Serial.println(WiFi.localIP());
server.on("/", handleRoot);
server.on("/set", handleSetColor);
server.on("/mode", handleMode);
server.begin();
}
/* ================= LOOP ================= */
void loop() {
server.handleClient();
if (currentMode == MODE_OCEAN) oceanAnimation();
else if (currentMode == MODE_FIRE) fireAnimation();
}
LIGHT BLOCK- Smart Lamp
*PCBWay community is a sharing platform. We are not responsible for any design issues and parameter issues (board thickness, surface finish, etc.) you choose.


Raspberry Pi 5 7 Inch Touch Screen IPS 1024x600 HD LCD HDMI-compatible Display for RPI 4B 3B+ OPI 5 AIDA64 PC Secondary Screen(Without Speaker)
BUY NOW


- Comments(1)
- Likes(0)
More by Arnov Arnov sharma
-
 DIY XBOX Controller
Greetings everyone, and welcome back. Here's something fun and custom.This is my version of an Xbox ...
DIY XBOX Controller
Greetings everyone, and welcome back. Here's something fun and custom.This is my version of an Xbox ...
-
 Pocket SNES
Greetings everyone, and welcome back! Today, I’ve got something fun and tiny to share—the Pocket SNE...
Pocket SNES
Greetings everyone, and welcome back! Today, I’ve got something fun and tiny to share—the Pocket SNE...
-
 Batocera Arcade Box
Greetings everyone and welcome back, Here's something. Fun and nostalgic. Right now, we are using ou...
Batocera Arcade Box
Greetings everyone and welcome back, Here's something. Fun and nostalgic. Right now, we are using ou...
-
 64x32 Matrix Panel Setup with PICO 2
Greetings everyone and welcome back.So here's something fun and useful: a Raspberry Pi Pico 2-powere...
64x32 Matrix Panel Setup with PICO 2
Greetings everyone and welcome back.So here's something fun and useful: a Raspberry Pi Pico 2-powere...
-
 Portable Air Quality Meter
Hello everyone, and welcome back! Today, I have something incredibly useful for you—a Portable Air Q...
Portable Air Quality Meter
Hello everyone, and welcome back! Today, I have something incredibly useful for you—a Portable Air Q...
-
 WALKPi PCB Version
Greetings everyone and welcome back, This is the WalkPi, a homebrew audio player that plays music fr...
WALKPi PCB Version
Greetings everyone and welcome back, This is the WalkPi, a homebrew audio player that plays music fr...
-
 Delete Button XL
Greetings everyone and welcome back, and here's something fun and useful.In essence, the Delete Butt...
Delete Button XL
Greetings everyone and welcome back, and here's something fun and useful.In essence, the Delete Butt...
-
 Arduino Retro Game Controller
Greetings everyone and welcome back. Here's something fun.The Arduino Retro Game Controller was buil...
Arduino Retro Game Controller
Greetings everyone and welcome back. Here's something fun.The Arduino Retro Game Controller was buil...
-
 Super Power Buck Converter
Greetings everyone and welcome back!Here's something powerful, The SUPER POWER BUCK CONVERTER BOARD ...
Super Power Buck Converter
Greetings everyone and welcome back!Here's something powerful, The SUPER POWER BUCK CONVERTER BOARD ...
-
 Pocket Temp Meter
Greetings and welcome back.So here's something portable and useful: the Pocket TEMP Meter project.As...
Pocket Temp Meter
Greetings and welcome back.So here's something portable and useful: the Pocket TEMP Meter project.As...
-
 Pico Powered DC Fan Driver
Hello everyone and welcome back.So here's something cool: a 5V to 12V DC motor driver based around a...
Pico Powered DC Fan Driver
Hello everyone and welcome back.So here's something cool: a 5V to 12V DC motor driver based around a...
-
 Mini Solar Light Project with a Twist
Greetings.This is the Cube Light, a Small and compact cube-shaped emergency solar light that boasts ...
Mini Solar Light Project with a Twist
Greetings.This is the Cube Light, a Small and compact cube-shaped emergency solar light that boasts ...
-
 PALPi V5 Handheld Retro Game Console
Hey, Guys what's up?So this is PALPi which is a Raspberry Pi Zero W Based Handheld Retro Game Consol...
PALPi V5 Handheld Retro Game Console
Hey, Guys what's up?So this is PALPi which is a Raspberry Pi Zero W Based Handheld Retro Game Consol...
-
 DIY Thermometer with TTGO T Display and DS18B20
Greetings.So this is the DIY Thermometer made entirely from scratch using a TTGO T display board and...
DIY Thermometer with TTGO T Display and DS18B20
Greetings.So this is the DIY Thermometer made entirely from scratch using a TTGO T display board and...
-
 Motion Trigger Circuit with and without Microcontroller
GreetingsHere's a tutorial on how to use an HC-SR505 PIR Module with and without a microcontroller t...
Motion Trigger Circuit with and without Microcontroller
GreetingsHere's a tutorial on how to use an HC-SR505 PIR Module with and without a microcontroller t...
-
 Motor Driver Board Atmega328PU and HC01
Hey, what's up folks here's something super cool and useful if you're making a basic Robot Setup, A ...
Motor Driver Board Atmega328PU and HC01
Hey, what's up folks here's something super cool and useful if you're making a basic Robot Setup, A ...
-
 Power Block
Hey Everyone what's up!So this is Power block, a DIY UPS that can be used to power a bunch of 5V Ope...
Power Block
Hey Everyone what's up!So this is Power block, a DIY UPS that can be used to power a bunch of 5V Ope...
-
 Goku PCB Badge V2
Hey everyone what's up!So here's something SUPER cool, A PCB Board themed after Goku from Dragon Bal...
Goku PCB Badge V2
Hey everyone what's up!So here's something SUPER cool, A PCB Board themed after Goku from Dragon Bal...
-
Programmable Mist Maker - XIAO / QT PY Extension
940 1 0 -
RadioHAT - Raspberry Pi radio development platform
765 0 2 -
-
-
-
-
ARPS-2 – Arduino-Compatible Robot Project Shield for Arduino UNO
3224 0 6 -
A Compact Charging Breakout Board For Waveshare ESP32-C3
3845 3 8 -
AI-driven LoRa & LLM-enabled Kiosk & Food Delivery System
4202 2 2


