


|
|
GB300 |
x 1 | |
|
|
WT0132P4-A1-N16R32 |
x 1 | |
|
|
2.8 |
x 1 | |
|
|
Volume Wheel (14x1mm 10k) |
x 1 |
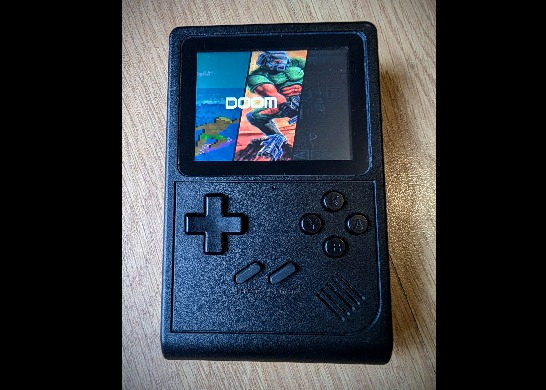
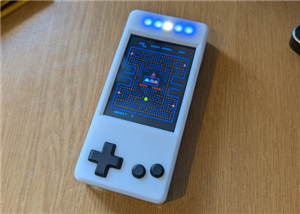
GB300-P4 - An ESP32-P4 based Retro Handheld
The ESP32-P4 is fairly new, it boasts a dual core 360-400Mhz CPU, this is quite a jump over the previous ESP32/ESP32-S3 range, which are just not powerful enough to properly play MegaDrive and SNES, although there is some work in-progress to improve this.
Luckily, my go to software for ESP32 handhelds, RetroGo, already mostly supported the ESP32-P4, although still fairly new, not fully tested and optimised.
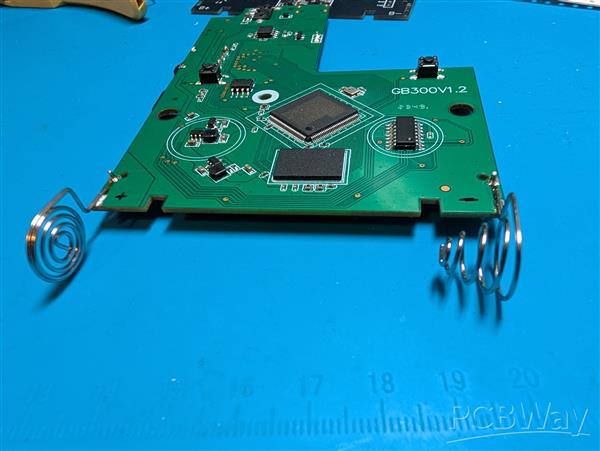
So anyway, I had a GB300 sitting on the shelf and took a look inside to see what the PCB layout looked like. it wasnt too bad, no weird curves/angles etc so fairly easy to replicate. I already knew I had a LCD that fitted perfectly from my previous FunkyFrog project (the SF2000 and GB300 use very similar screens) and it turned out a lot of the other components were also the same, MicroSD slot, power switch, USBC port to name a few, so saved a lot of additional work. I didnt need a lot of persuasion but that helped :)
I copied the PCB layout, measured all the main stuff like mounting holes, button contacts, port placements etc then just plonked on some components. There was some confusion over the schematic I based my design on (around powering the ESP32-P4 module) and I did go my own way slightly on somethings, so its not a total copy/paste job. I also replaced the AV jack on the GB300 with a 2.5mm audio jack and kept the volume wheel (although the volume wheel currently doesnt do anything as needs RetroGo to add support, which maybe coming) Funnily enough I have probably spent the most time on the headphone jack even though I'll never personally use it and no-one else will probably ever build one, let alone use headphones :) but I wanted it to cut the speaker when headphones were plugged in, there wasnt a large selection of ports for 2.5mm audio jacks to start with, which also had the required shunts to make it work as well as reduce the volume so it doesnt blow out the headphones.
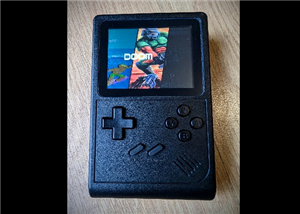
Anyway, afterwards you'll end up with a ESP32-P4 handheld running RetroGo in a proper injection moulded shell. This isnt really an upgrade over the GB300 in terms of performance, maybe with optimisation it can match the GB300 in performance, who knows, but the project was mostly about trying to create 'the best' RetroGo ESP32-P4 (at least that I could) so we can enjoy RetroGo on the most powerful hardware it currently supports.
Parts Required
You will need to order the PCB, it needs to be ordered with a PCB thickness of 1.2mm, all other settings can remain stock.
Some links will be from AliExpress but also some will be from LCSC, however its not a super complicated design so I'd imagine you can find most of it on AliExpress however you'll want to double check its the correct items, I'll only be posting links to items I've personally bought and can verify.
GB300: https://www.aliexpress.com/item/1005006698538931.html - hunt around, sometimes a Bundle deal is cheaper.
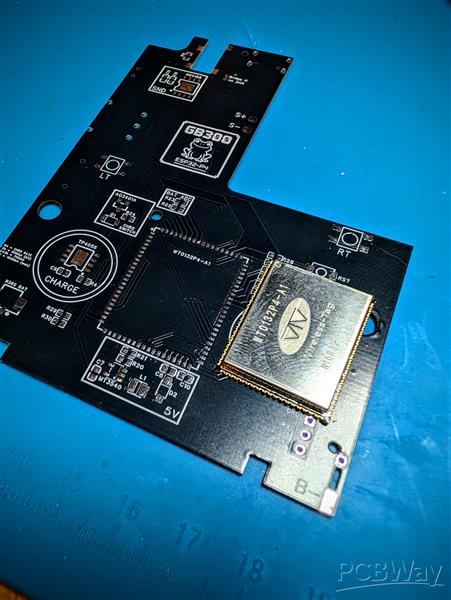
ESP32-P4 (WT0132P4A1N16R32) module: https://www.aliexpress.com/item/1005009232174249.html or https://www.aliexpress.com/item/1005009221458389.html
Screen (ST7789V Type A): https://www.aliexpress.com/item/1005007691230304.html
Volume Wheel (14x1mm 10k): https://www.aliexpress.com/item/1005009637434299.html
Other parts I have purchased from AliExpress but also have LCSC part numbers below are:
PJ-242 2.5mm Jack: https://www.aliexpress.com/item/1005006722998381.html
0603 LED Kit: https://www.aliexpress.com/item/1005006417226949.html
LCSC parts. I will just list the item name and part no. You can to go to www.lcsc.com and copy/paste in the numbers, add to basket.
However you can also upload the BOM to their website. Highlight your profile and choose 'BOM Lists (Projects)' then upload the excel file. It will automatically add everything and you can order from there.
Just note that you cannot buy every part from LCSC so the AliExpress links above will still be needed. I'll also include any AliExpress parts I've personally bought and can verify too
You can download the BOM HERE - Extract the zip, its the excel file you need.
C843669 - GT-TC029B-H025-L1N x2
C19702 - 10uF x7
C14663 - 100nF x5
C2939578 - PJ-242 x1
C41409894 - D125F2W1-2W2P43 x1
C963381 - 1N5819W x1
C908229 - DSK24 x1
C29780738 - 4.7uH x1
C965799 - XL-1608SURC-06 x1
C965804 - XL-1608UGC-04 x1
C181158 - S8050 x1
C15127 - AO3401A x1
C25804 - 10kΩ x9
C25803 - 100kΩ x3
C22975 - 2kΩ x1
C23186 - 5.1kΩ x3
C21190 - 1kΩ x3
C23350 - 240Ω x1
C22859 - 10Ω x4
C4216 - 33kΩ x1
C91145 - TF-01A x1
C5149818 - HX MSK12CO2-BBTM x1
C725790 - TP4056 x1
C910588 - NS4168 x1
C181744 - MT3540 x1
C23380830 - AP2112K-3.3TRG1 x1
C3001428 - YTS1H0152ABG00 x2
C2765186 - TYPE-C 16PIN 2MD(073) x1
Building the GB300-P4
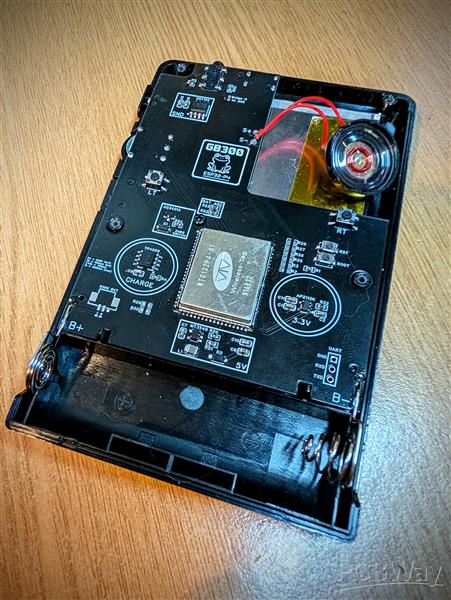
This comes in two parts, first you will need to disassemble the GB300 since we'll need the shell, buttons, membranes but also the speaker & battery. We do also need some items from the PCB, lucky not a huge amount and nothing totally destructive.
The battery is just an 18650 so you can upgrade this for better battery life if wanted, the GB300 one is pretty poor with only 800mAh, compared to the 2000+mAh of most 18650's, just note the device itself doesnt have any undervoltage protection so ideally you want an 18650 with this built in. They are generally referred to as 'Protected'. The software does have a low battery indicator at 3.3v but still requires the user to actually turn it off.
We need the battery connectors. As for removing these, I found it easier to add some leaded solder and heat to remove, add solder to the anchor point and also the through hole, just keep wiping back and forth and the anchor point should lift away cleanly the you can concentrate on the through hole to pull it through. Obviously you can use wick if you prefer.
Once thats done, we can start building the PCB. You can use the BOM or Interactive BOM for information about which components go where. Download HERE
As for building the new PCB, I'd highly recommend starting with the ESP32-P4 since you'll want to make sure its well lined up, tack in one corner and check for alignment on all sides before tacking in another few corners to ensure its secure, then go around properly soldering each point. Check for bridges, use plenty of flux and it should be good.
After that its up to you, theres no real space constraints as such. I did all one side of the PCB then started working on the other side.
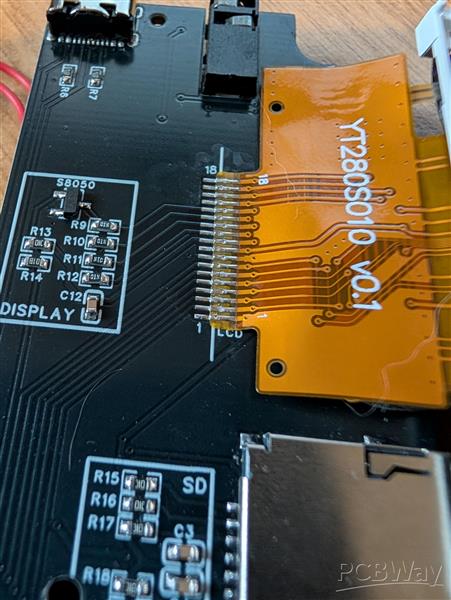
The audio jack is snug, thats normal as the pins are fairly small so needed to be snug to ensure they could be soldered. Be a little careful about applying too much heat as melting the plastic may cause the port not to function properly.
The kit charge resistor will charge at 500mA, but this can be changed to a maximum of 1amp via resistor R3. I would recommend sticking with stock but the option is there.
Last two things I'd recommend soldering is the battery connectors as they dont really allow the board to lay flat then the LCD, theres some lines on the silkscreen, use those as the edge of the connector. Check pics for correct orientation. Also note that I have moved the silkscreen lines in the final PCB so they will be roughly where I have soldered.
Theres a R36S BAT connector, this isnt needed and not used on this build. It was added as a 'rainy day' addition which could then allow a battery commonly used in the R36S handhelds to power the device rather than the 18650.
Rebuilding the device is very much the same as disassembly. A few things to note, the power slider goes in before the PCB and make sure its in the correct position so it slots in correctly. I havent personally bothered with the 3mm foam since the LCD seems to be staying in the correct position but your results may vary.
I did also add some kapton tape to the back of the LCD where the speaker would sit incase it caused an issue, you cant use the original foam backing sheet from the GB300 as the LCD is about 0.5mm thicker than original GB300 LCD which then causes additional pressure on the display.
Flashing the firmware
Once the system is built, its time to flash the firmware. This part is fairly easy since it can be flashed directly from the USBC port. A brand new device with no firmware flashed will give a white screen so dont worry if you get this when its turned on first time.
When you plug it into a PC, it should recognise the device and pickup a COM Port. I recommend using ESP Flasher it supports Windows, Mac and Linux and in my opinion makes flashing any ESP32 device as easy as it could be.
Download the firmware, its the .img file, HERE
Load ESP-Flasher, select the correct COM port, choose the firmware file (may need to change from .bin to All Files before the .img will appear) and then click Flash ESP.
It should find the device and flash. If you get an issue with the ESP not being found/recognised you may need to use the 'Boot' button on the back of the device, hold this down when turning it on. I didnt personally have to do this and you certainly dont when reflashing but I have had ESP32-S3 devices that required this on first flash.
Worst case, I have left the UART port to external flashing but as long as the USBC port is correctly soldered and the pins on the ESP are not bridged, it should just work.
Using the device
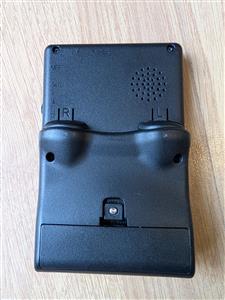
As for the physical device, it has the same ports as the GB300. Up top you have: USBC for charging and firmware updates, the AV port is now a 2.5mm audio jack then right hand side, theres the power toggle switch, volume wheel and MicroSD slot, on the back theres the L/R triggers and battery compartment.
Charging wise, the LED will be red when charging and green when fully charged. There is a onscreen low battery indicator at 3.3v as well.
You will need a MicroSD card, it doesnt need to be a large card since the system only supports rom style systems, not CD based ones. Something like a 32GB will be way more than needed. Format the SD Card to FAT32 and copy the SD contents (GB300-P4 SD.zip) from HERE
Note theres no USB host so plugging in the device will not mount the SD card, you will need a separate SD card reader to copy the files.
The SD contents dont include any games/roms/bios files, however it does have the shareware version of Doom. You will need to add your own games, just copy them to the roms directory. You can use zipped roms for most systems however that will mean you wont be able to use the boxart (since it uses the CRC of the rom file to work out the boxart needed), so just an FYI. Unzipped does use a little more space obviously but I dont think we're gonna be struggling for space!
Using RetroGo is very easy, just scroll left/right for the various the systems, then up/down to scroll the rom list. A & B to go in and out of systems, and A to select the game you want. Theres further info on RetroGo HERE
START & SELECT is the button combination to bring up the menu, press both together and you will get the RetroGo menu, both in game and in the main menu.
As for headphones, since the GB300 actually had a 2.5mm AV port originally and I have changed this to a 2.5mm headphone jack, this does mean you will either need 2.5mm headphones or just use a simple 2.5mm>3.5mm adaptor. The one I have been using is similar to THIS
GB300-P4 - An ESP32-P4 based Retro Handheld
*PCBWay community is a sharing platform. We are not responsible for any design issues and parameter issues (board thickness, surface finish, etc.) you choose.


Raspberry Pi 5 7 Inch Touch Screen IPS 1024x600 HD LCD HDMI-compatible Display for RPI 4B 3B+ OPI 5 AIDA64 PC Secondary Screen(Without Speaker)
BUY NOW


- Comments(0)
- Likes(1)
More by Gavin Knight
-
 PicoNES - RaspberryPi Pico Based NES Emulation Console
PicoNES is a NES emulator running on the Raspberry Pi Pico and also Pico 2 (RP2040 and RP2350), the ...
PicoNES - RaspberryPi Pico Based NES Emulation Console
PicoNES is a NES emulator running on the Raspberry Pi Pico and also Pico 2 (RP2040 and RP2350), the ...
-
 GB300-P4 - An ESP32-P4 based Retro Handheld
The ESP32-P4 is fairly new, it boasts a dual core 360-400Mhz CPU, this is quite a jump over the prev...
GB300-P4 - An ESP32-P4 based Retro Handheld
The ESP32-P4 is fairly new, it boasts a dual core 360-400Mhz CPU, this is quite a jump over the prev...
-
 CYD Galagino Handheld
I had just created the PCB for my CYD arcade cabinet (Here), sent it off, then thought "What about a...
CYD Galagino Handheld
I had just created the PCB for my CYD arcade cabinet (Here), sent it off, then thought "What about a...
-
Programmable Mist Maker - XIAO / QT PY Extension
940 1 0 -
RadioHAT - Raspberry Pi radio development platform
765 0 2 -
-
-
-
-
ARPS-2 – Arduino-Compatible Robot Project Shield for Arduino UNO
3224 0 6 -
A Compact Charging Breakout Board For Waveshare ESP32-C3
3844 3 8 -
AI-driven LoRa & LLM-enabled Kiosk & Food Delivery System
4201 2 2


