


|
teensy 4.0pjrc
|
x 1 |

|
arduino IDEArduino
|
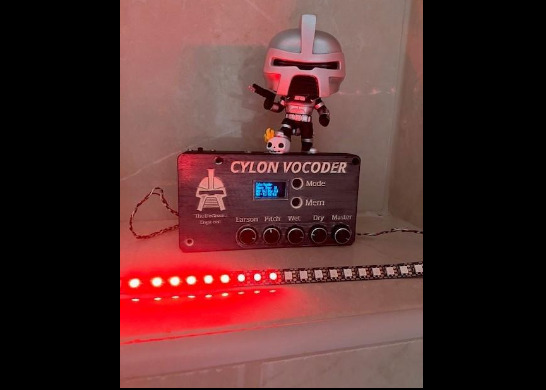
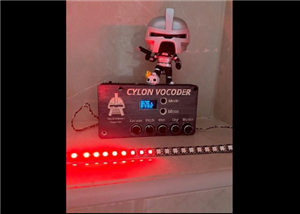
Cylon Vocoder wit Larson Scanner ( moving eye)
I'm a big fan of the TV series Battlestar Galactica ( BSG) and I love the robots called Cylons. The original design ( and also in the remake) included a moving red eye that later became the soul of KITT from the Knight Rider Series.
The Cylons talked with a very unique sound that was produces using Vocoder technology. Maybe today, vocoders are not that special anymore because you can emulate those by using software plugin. Back in the day however, a vocoder was something special and mysterious
A vocoder was build using transistors, opamp and filters as digital advancement was not yet achieved. Although today vocoders can be build using digital technology, the principle of how they work remains the same.
Vocoders and how they work
Welcome in the world of vocoding. With vocoding we take peak data from each sample and transform it back into an audio signal.
You can device a vocoder into two main sections. The first one is nothing more than an audio spectrum analyzer. It is used to determine the strength of each frequency band, present in the input signal. The peak data of each frequency band ( the strength signal) is used as an amount of amplification for band filters that are working on the same frequencies as the analyzer.
These band filters are fed by a signal source. This signal can be a tone from a generator, noise or it can be a signal from a complicated source like a synthesiser.. The stronger a analyzer signal from the first section is present, the higher the amplitude will be coming from the bandfilters in the second section. All the signals coming from the second section will be mixed together as the output of the vocoder.
This is however, a brief explanation of how vocoders work, for more info and details, you can look at Wikipedia and other sources.
Modern Digital Vocoder
The vocoder I build uses a Teensy Microcontroller and a external audio chip. Using some very well crafted coding ( the Teensy Audi library) I was able to emulate a vocoder that delivers. Not only can it make your voice sound like a Cylon, it als included the larson scanner ( the moving eye) it even emulates the mechanical sound of the moving eye,,,,WHOOS...WHOOS...
Time to get started with this awesome build!
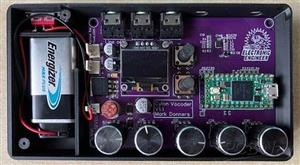
LETS BUILD OUR OWN CYCLON VOCODER, PERFECT FOR COSPLAY
Supplies
Although all information to build the project and pcb from scratch, I highly suggest you use the service from PCBway. This project includes all the files for PCBway to make a turnkey assembly of just an assembly of the pcb.
Assuming that's the way to go, you only need to add a few more components to complete the project. If you decide to assembly the pcb yourself, you will need to purchase the individual components from the bom list as well.
So, beside an assembled pcb you'll need: ( check your order, some of the components below might already be included )
- Teensy microcontroller board 4.0
- Display I2S SSD1306
- Potentiometers, I used ALPS RV09 10K to 100K will work
- Fuse 1A
- Molex headers of simular (optional)
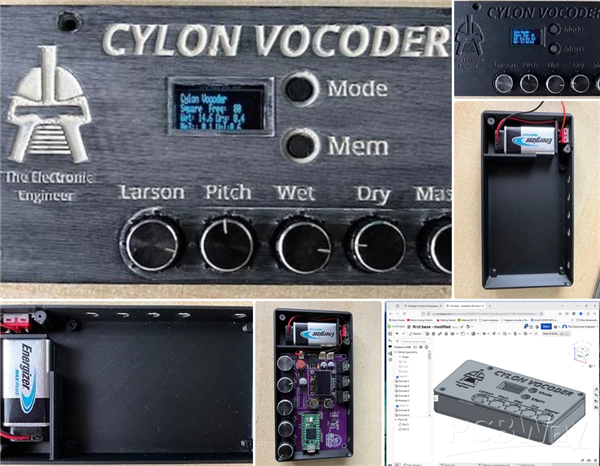
- Battery clip for 9V Battery
- 9V battery
- Housing (optional) files are provided and yes PCBway can also produce those.
- Wires
- Jackplugs to connect the audio.
- Wires
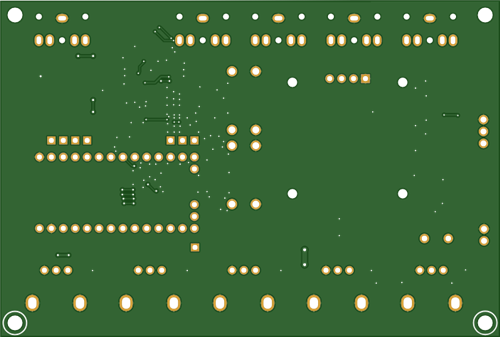
Schematic explained.
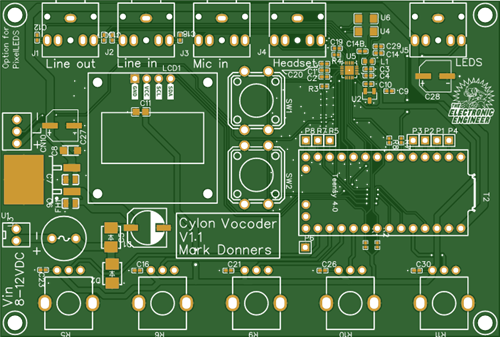
This part of the text refers to the provided pcb schematic.
On the left side of the schematic you'll see user interface inputs: Potmeters, pushbuttons. Also the power in connector (Top) and the connectors for two optional pixelleds strips ( WS2812) ( bottom) are on the left.
In the middle there is the power supply. D1 will protect the circuit against reversed polarity, in case you mix up the + and - of the battery. In that Case, D2 will draw so much current that the fuse FH1 will blow out. There is an onboard regulator the make 5V. At the bottom in the middle you'll find the I2S display. In that regards, R1 and R2 ( near the audio chip) are very important. The I2s bus will not function without those pull-up resistors.
That brings us the the top right where you can find the audio chip. The audio circuit is a stripped copy of the original Teensy Audio board. I removed all I don't need and I made a few changes. In this version, the line in, line out and the mic in can be connected using a stereo jackplug. In the next update, The headset out will be included as well and I will add a jackplug for one pixelledstrip.
If you want to solder the audio chip on a pcb you created yourself let me give you a fair warning, the audio chip is extremely hard to solder as it is very small. You will need tools for SMD soldering and a microscope to work with. This is the reason why i sell pre-soldered versions.
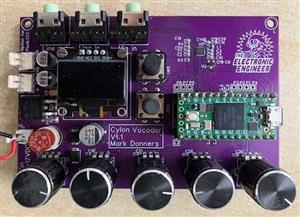
The PCB
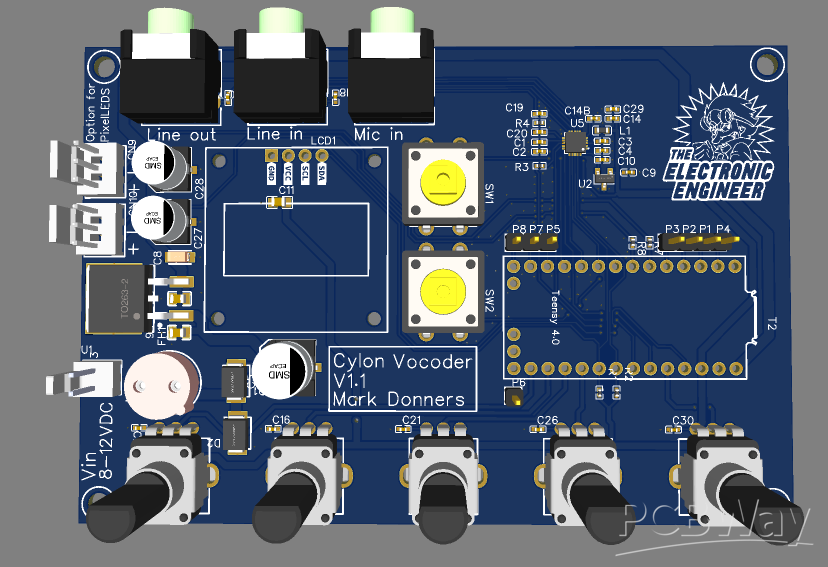
Here is a nice impression of the pcb. When you order, check with pcb which components they need to include.
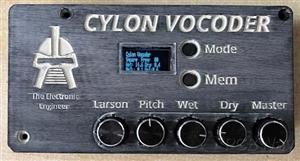
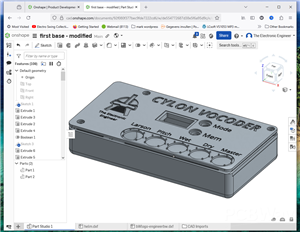
3D Printed Housing
I did design a portable housing that you can print on your 3d printer, or have PCBway print it for you!
All the files you need are included in the project.
Note: this printed version and pcb version has had an update. Now pcb and housing are adjusted because 2 jack connectors are added.
The included files are of the new version
A vocoder emulator
The actual vocoder was created using the Teensy Audio Tool
It's a graphic enviroment, a playground, that you can use to create various audio things. You can then export the code and paste it into your Arduino Sketch.
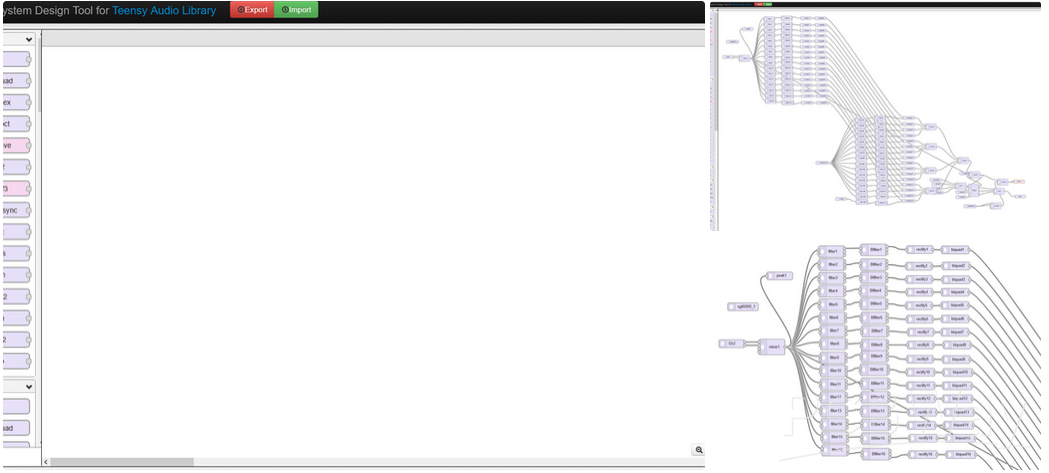
Teensy Audio System Design Tool
You can click import and import the content of the Vocoder.h file to recreate the graphic layout of the vocoder
The Arduino Sketch and Setup
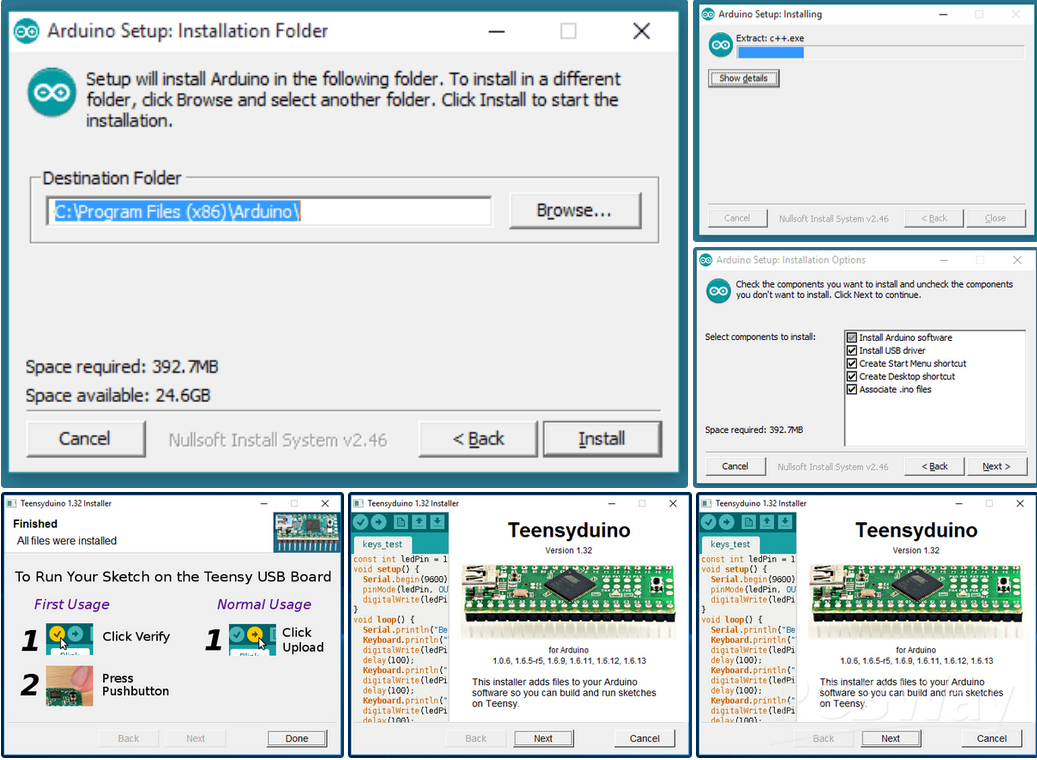
Installing the Teensy Framework
Before you can compile the sketch successfully, you will need to install the Teensy plugin and some libraries
I used Arduino IDE with Teesyduino:
Arduino IDE 2.3.4
Teensyduino, Version 1.59.0
You can download ARduino here: Arduino Ide Download
Click here for a tutorial about installing Arduino
Make sure you use the Arduino IDE and not the windows app ( incompatible with the Teensyduino )
You can download Teensyduino here: Download TeensyDuino
Click here for a tutorial about installing TeensyDuino
Installing the Libraries
The following libraries are included in the Teensy Framework and don't need installing
Using library Audio at version 1.3
Using library SPI at version 1.0
Using library SD at version 2.0.0
Using library SdFat at version 2.1.2
Using library SerialFlash at version 0.5
Using library Wire at version 1.0
The following libraries need to be installed
Using library EasyButton at version 2.0.1
Using library Adafruit GFX Library at version 1.10.4
Using library Adafruit SSD1306 at version 2.5.7
Using library FastLED at version 3.9.2
Using library Adafruit BusIO at version 1.7.1
Opening the sketch
Using the Sketch
The actual Sketch for the vocoder is divided into 3 files. Make sure all 3 files are in a folder named CylonVocoder2
If you open the sketch from within a different folder, Arduino IDE will move the file to a new folder with that name, however, the 2 extra files will not be included and you will have to copy those manually!!
CylonVocoder2.ino
Soundfile.h
Vocoder.h
The main program is in the CylonVocoder2.ino
Soundfile.h contains the binairy data for the Cylon sound.
Vocoder.h contains the code for the actual vocoder,
Although, the latest release is at time of publication is included, please check out my github to see if there is an update available:
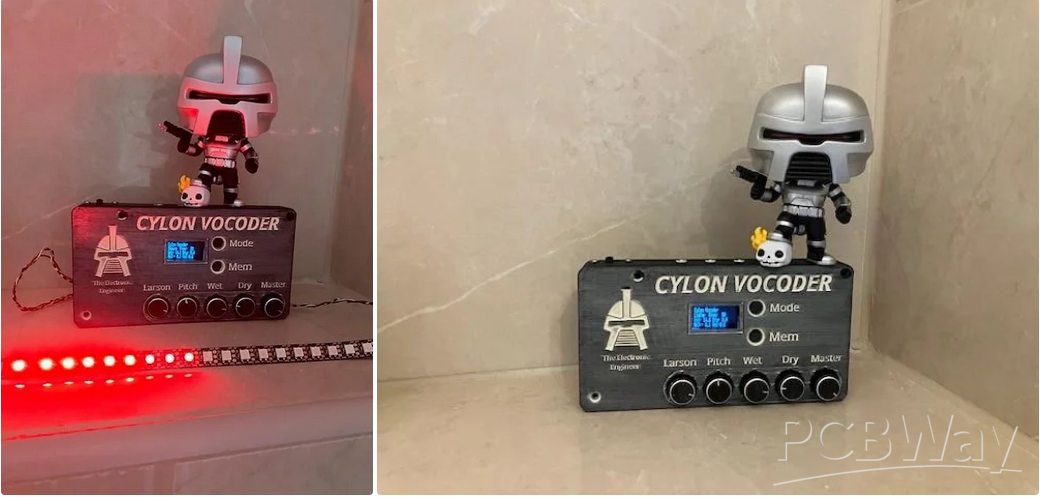
Demo
I made a small video of what this vocoder can do. In this demo, I tuned it to sound like a Cylon. It's easy to change Pitch of the mix of Wet and Dry sound as well as volume. The volume of the Larson Scanner ( the red moving light) can be changed also.
Cylon Vocoder wit Larson Scanner ( moving eye)
Project images are for reference only. Actual production is based on the manufacturing files on the project page.
Please review the designer's notes (e.g., PCB thickness) and select the appropriate options.
PCBWay is not responsible
for issues caused by unsuitable parameter selections.
For more important ordering information, please refer to
Read More


Raspberry Pi 5 7 Inch Touch Screen IPS 1024x600 HD LCD HDMI-compatible Display for RPI 4B 3B+ OPI 5 AIDA64 PC Secondary Screen(Without Speaker)
BUY NOW


- Comments(0)
- Likes(2)
More by Mark Donners
-
 Fast Audio Spectrum Analyzer
This design is nothing if not amazing! Imagine 3500 Colored LEDS dancing around to the music at a ve...
Fast Audio Spectrum Analyzer
This design is nothing if not amazing! Imagine 3500 Colored LEDS dancing around to the music at a ve...
-
 Classic Analog Spectrum Analyzer for Your Desktop
This is a spectrum analyzer that visualizes 10 audio frequency bands. Although it might look like ju...
Classic Analog Spectrum Analyzer for Your Desktop
This is a spectrum analyzer that visualizes 10 audio frequency bands. Although it might look like ju...
-
 Cylon Vocoder wit Larson Scanner ( moving eye)
I'm a big fan of the TV series Battlestar Galactica ( BSG) and I love the robots called Cylons. The ...
Cylon Vocoder wit Larson Scanner ( moving eye)
I'm a big fan of the TV series Battlestar Galactica ( BSG) and I love the robots called Cylons. The ...
-
 Pico-Voice_PCB_Pico-Voice_2024-11-14
This is my pcb design for the Pico Voice changer. Software was written by Mike Cook and is open sour...
Pico-Voice_PCB_Pico-Voice_2024-11-14
This is my pcb design for the Pico Voice changer. Software was written by Mike Cook and is open sour...
-
 Gerber_Logo_PCB_Logo_2024-05-15
This is a youtube subscriber counter with audio playback and it has a dot matric spectrum analyzer w...
Gerber_Logo_PCB_Logo_2024-05-15
This is a youtube subscriber counter with audio playback and it has a dot matric spectrum analyzer w...
-
 Twin display pixelled Audio Analyzer
IntroductionThis Spectrum Analyzer project is nothing other than amazing. It includes a Teensy micro...
Twin display pixelled Audio Analyzer
IntroductionThis Spectrum Analyzer project is nothing other than amazing. It includes a Teensy micro...
-
 SPECTRUM ANALYZER WITH STEAMPUNK NIXIE LOOK
This is my version of a NIXIE tube lookalike Spectrum AnalyzerI created my own tubes using testtubes...
SPECTRUM ANALYZER WITH STEAMPUNK NIXIE LOOK
This is my version of a NIXIE tube lookalike Spectrum AnalyzerI created my own tubes using testtubes...
-
 Gerber_PCB_BatDetector
This is the PCB that goes with a video that will be published on the element 14 presents community
Gerber_PCB_BatDetector
This is the PCB that goes with a video that will be published on the element 14 presents community
-
 Talking CR Timer
The StoryImagine working at the office from nine to five punching numbers in a computer the whole da...
Talking CR Timer
The StoryImagine working at the office from nine to five punching numbers in a computer the whole da...
-
 Stereo Flyback Driver
This is my design of a stereo flyback driver. (ZVS) You can drive 2 flyback transformers to create a...
Stereo Flyback Driver
This is my design of a stereo flyback driver. (ZVS) You can drive 2 flyback transformers to create a...
-
 Russian Slayer Exciter PCB
This is my take on the Russian Slayer Exciter. The slayer exciter is an easy to build Tesla coil. A ...
Russian Slayer Exciter PCB
This is my take on the Russian Slayer Exciter. The slayer exciter is an easy to build Tesla coil. A ...
-
Programmable Mist Maker - XIAO / QT PY Extension
1061 2 1 -
RadioHAT - Raspberry Pi radio development platform
861 0 2 -
-
-
-
-
ARPS-2 – Arduino-Compatible Robot Project Shield for Arduino UNO
3322 0 6 -
A Compact Charging Breakout Board For Waveshare ESP32-C3
3930 3 8 -
AI-driven LoRa & LLM-enabled Kiosk & Food Delivery System
4316 2 2


