


|
arduino IDEArduino
|
Arduino Stepper Motor Control Using 28BYJ-48 and ULN2003 Driver
This project demonstrates how to control the popular 28BYJ-48 5V stepper motor using an Arduino Uno and a ULN2003 driver board. Stepper motors are widely used in robotics, positioning systems, camera sliders, and automation projects where precise rotational control is required. Unlike ordinary DC motors, a stepper motor rotates in small angular increments, allowing accurate speed and position control.
Components Required
- Arduino Uno
- 28BYJ-48 Stepper Motor
- ULN2003 Driver Module
- Jumper Wires
- External 5V Power Supply
About the 28BYJ-48 Stepper Motor
The 28BYJ-48 is a low-cost 5V unipolar stepper motor equipped with an internal reduction gearbox, providing higher torque and improved positioning accuracy.
Specifications
- Operating Voltage: 5V
- Type: Unipolar Permanent Magnet Stepper Motor
- Number of Phases: 4
- Stride Angle: 5.625°
- Gear Reduction Ratio: Approximately 64:1
- Steps per Revolution (Full Step): 2048
- Steps per Revolution (Half Step): 4096
- Coil Resistance: 50 Ω ±7%
Operating Modes
1. Full-Step Mode (Single Coil Energized)
Only one winding is activated at a time.
Advantages
Lower power consumption
Reduced heat generation
Disadvantage
Lower torque
2. Full-Step Mode (Two Coils Energized)
Two phases are energized simultaneously.
Advantages
Maximum torque
Disadvantages
Higher current consumption
Increased vibration
3. Half-Step Mode
Alternates between one-phase and two-phase excitation.
Benefits
Smoother motion
Better resolution
Reduced vibration
The 28BYJ-48 commonly operates in half-step mode, providing 4096 steps per revolution.
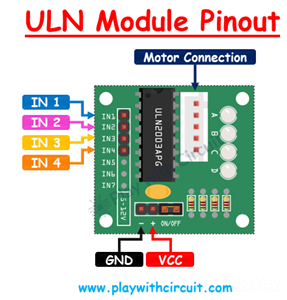
Why Use the ULN2003 Driver?
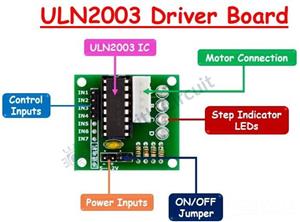
The stepper motor requires significantly more current than an Arduino output pin can provide. The ULN2003 driver board acts as a current amplifier and allows the Arduino to safely energize the motor windings.
The module contains Darlington transistor arrays capable of driving loads up to 500 mA.
Working Principle
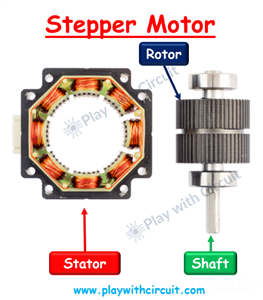
The motor contains four coils. By energizing these coils in sequence, the rotor aligns with the changing magnetic field and rotates step by step.
Changing the order of coil excitation determines the direction of rotation:
Clockwise rotation:
IN1 → IN2 → IN3 → IN4
Counter-clockwise rotation:
Reverse sequence
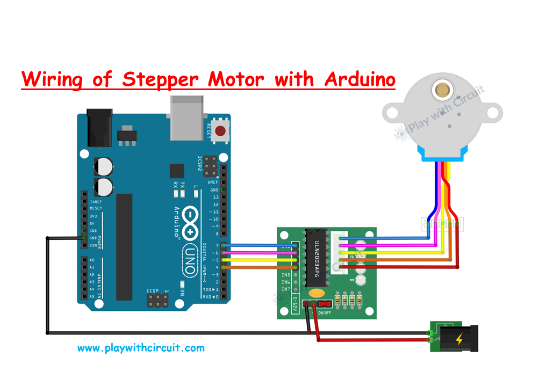
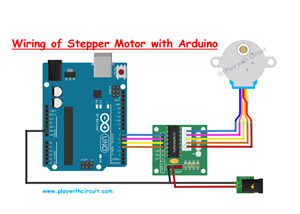
Circuit Diagram and Connections
The circuit consists of an Arduino Uno, a ULN2003 stepper motor driver module, and a 28BYJ-48 5V stepper motor. An external 5V power supply is connected to the VCC and GND pins of the ULN2003 module to provide sufficient current for the motor. The Arduino communicates with the driver through four digital pins, with D7, D6, D5, and D4 connected to IN1, IN2, IN3, and IN4, respectively. The GND pin of the Arduino is connected to the GND pin of the ULN2003 driver, and the ground of the external power supply is also connected to the same ground line to establish a common reference. The 28BYJ-48 stepper motor plugs directly into the connector provided on the ULN2003 board. During operation, the Arduino sends control signals to the ULN2003 driver, which amplifies these signals and energizes the motor coils in sequence, enabling precise control of the motor's speed and direction. Ensure that the power jumper on the ULN2003 module is installed for proper operation.
Step Calculation
The internal rotor requires 32 steps for one revolution.
Because the motor includes a gearbox with a reduction ratio close to 64:1:
32 × 64 = 2048 full steps
Therefore:
Full-step mode = 2048 steps/revolution
Half-step mode = 4096 steps/revolution
Features
- Accurate rotational control
- High torque because of gear reduction
- Low-cost solution
- Suitable for robotics and automation projects
- Simple interfacing with Arduino
- Supports forward and reverse rotation
Applications
Robotic arms
Camera pan and tilt systems
CNC and positioning systems
Automatic curtains
Small conveyor mechanisms
Educational projects
Home automation systems
Conclusion
The combination of the 28BYJ-48 stepper motor and ULN2003 driver provides an inexpensive and reliable solution for applications requiring controlled rotational movement. Using Arduino, both speed and direction can be easily controlled, making this setup ideal for beginners and makers.
For detailed explanation and code checkout tutorial published on Play with Circuit:
https://playwithcircuit.com/28byj48-stepper-motor-arduino-tutorial/
Play with Circuit publishes practical tutorials and projects related to Arduino, ESP32, embedded systems, and electronics.
Arduino Stepper Motor Control Using 28BYJ-48 and ULN2003 Driver


Raspberry Pi 5 7 Inch Touch Screen IPS 1024x600 HD LCD HDMI-compatible Display for RPI 4B 3B+ OPI 5 AIDA64 PC Secondary Screen(Without Speaker)
BUY NOW


- Comments(0)
- Likes(0)
More by Rachana Jain
-
 Arduino Stepper Motor Control Using 28BYJ-48 and ULN2003 Driver
This project demonstrates how to control the popular 28BYJ-48 5V stepper motor using an Arduino Uno ...
Arduino Stepper Motor Control Using 28BYJ-48 and ULN2003 Driver
This project demonstrates how to control the popular 28BYJ-48 5V stepper motor using an Arduino Uno ...
-
 Arduino Water Level Indicator Using Water Level Sensor
Monitoring water levels in tanks is important for preventing overflow and reducing water wastage. In...
Arduino Water Level Indicator Using Water Level Sensor
Monitoring water levels in tanks is important for preventing overflow and reducing water wastage. In...
-
 Arduino Servo Motor Control
Precise motion control is at the heart of many modern electronics projects—from robotic arms to came...
Arduino Servo Motor Control
Precise motion control is at the heart of many modern electronics projects—from robotic arms to came...
-
 Build a Long-Range Wireless Appliance Control System
Controlling electrical devices over long distances is often challenging, especially when internet co...
Build a Long-Range Wireless Appliance Control System
Controlling electrical devices over long distances is often challenging, especially when internet co...
-
 DHT11 and DHT22 Sensors with Arduino Uno
Temperature and humidity monitoring plays a crucial role in various applications, from smart home cl...
DHT11 and DHT22 Sensors with Arduino Uno
Temperature and humidity monitoring plays a crucial role in various applications, from smart home cl...
-
 Line Follower Robot using Arduino
A Line Follower Robot (LFR) is an autonomous robot that follows a predefined path, typically a black...
Line Follower Robot using Arduino
A Line Follower Robot (LFR) is an autonomous robot that follows a predefined path, typically a black...
-
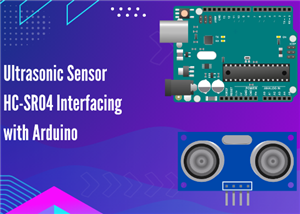 Ultrasonic Sensor HC-SR04 Interfacing with Arduino
The HC-SR04 Ultrasonic Sensor is a widely used and easy-to-implement sensor for distance measurement...
Ultrasonic Sensor HC-SR04 Interfacing with Arduino
The HC-SR04 Ultrasonic Sensor is a widely used and easy-to-implement sensor for distance measurement...
-
 Interfacing IR Sensor Module with Arduino Nano
In this project, we will learn how to interface an Infrared (IR) sensor module with an Arduino Nano....
Interfacing IR Sensor Module with Arduino Nano
In this project, we will learn how to interface an Infrared (IR) sensor module with an Arduino Nano....
-
Programmable Mist Maker - XIAO / QT PY Extension
235 0 0 -
RadioHAT - Raspberry Pi radio development platform
257 0 1 -
-
-
-
-
ARPS-2 – Arduino-Compatible Robot Project Shield for Arduino UNO
2815 0 6 -
A Compact Charging Breakout Board For Waveshare ESP32-C3
3317 3 8 -
AI-driven LoRa & LLM-enabled Kiosk & Food Delivery System
3606 2 2


