


uTerm2-S: a multi-emulation color RS232 terminal
* * HARDWARE OVERVIEW * *
The uTerm2-S (micro Term2 stand-alone) is an easy to build multi-emulation RS232 terminal using an ESP32-Wroom-32 module and the great FabGL library (http://www.fabglib.org). More, using an ESP32 gives the opportunity to use the uTerm2-S in a lot of different ways easily using the Arduino IDE with the ESP32 core.
These the main specs of uTerm2-S:
- RS232 serial port;
- VGA output;
- "transparent" port for a serial-USB adapter (as in the uTerm-S);
- secondary serial port for ESP32 programming using a serial-USB adapter;
- RTS/CTS support between the RS232 and the "transparent" port (as in the uTerm-S);
- on board power supply;
- colors, graphics and sounds capabilities (FabGL library);
- multi language keyboard support (FabGL library);
- various terminal emulations (FabGL library);
- PS/2 connectors for keyboard and mouse;
- on board amplifier for an external speaker.
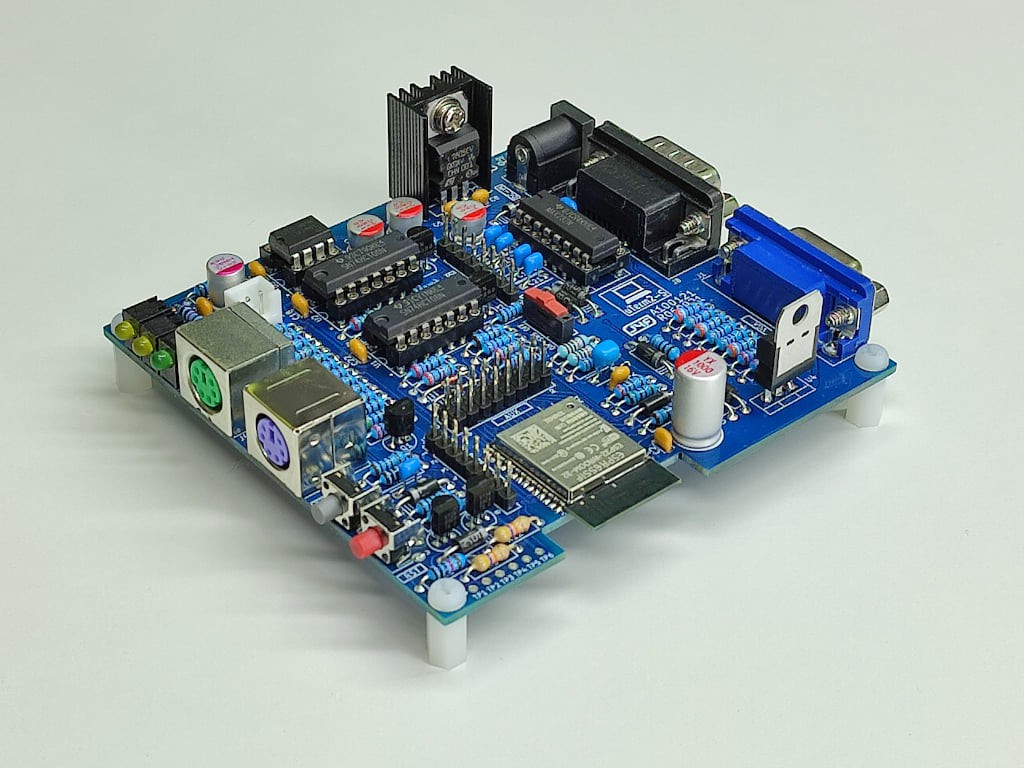
In the following image a uTerm2-S (previous PCB revision) connected to a common PC speaker:

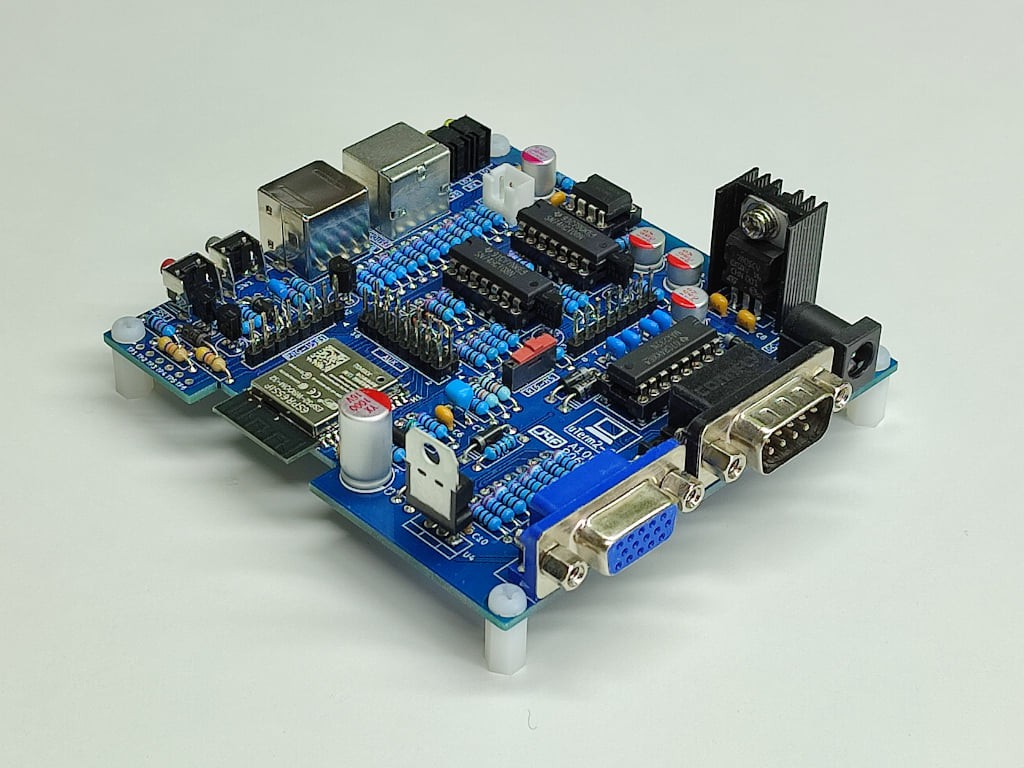
This one is the final board:
THE COM-USB2 (J3) CONNECTOR (TRANSPARENT PORT)
The uTerm2-S has a "transparent" port for an USB-serial adapter (as in the uTerm-S), so you can e.g. use XMODEM to exchange files with a PC (running a terminal emulator that supports XMODEM file transfer) while the uTerm2-S is in use.
Both the "mixed" power supply scenarios (USB-serial adapter not powered from USB but uTerm2-S powered and vice-versa) are managed by the HW, so you don't need to worry about it.
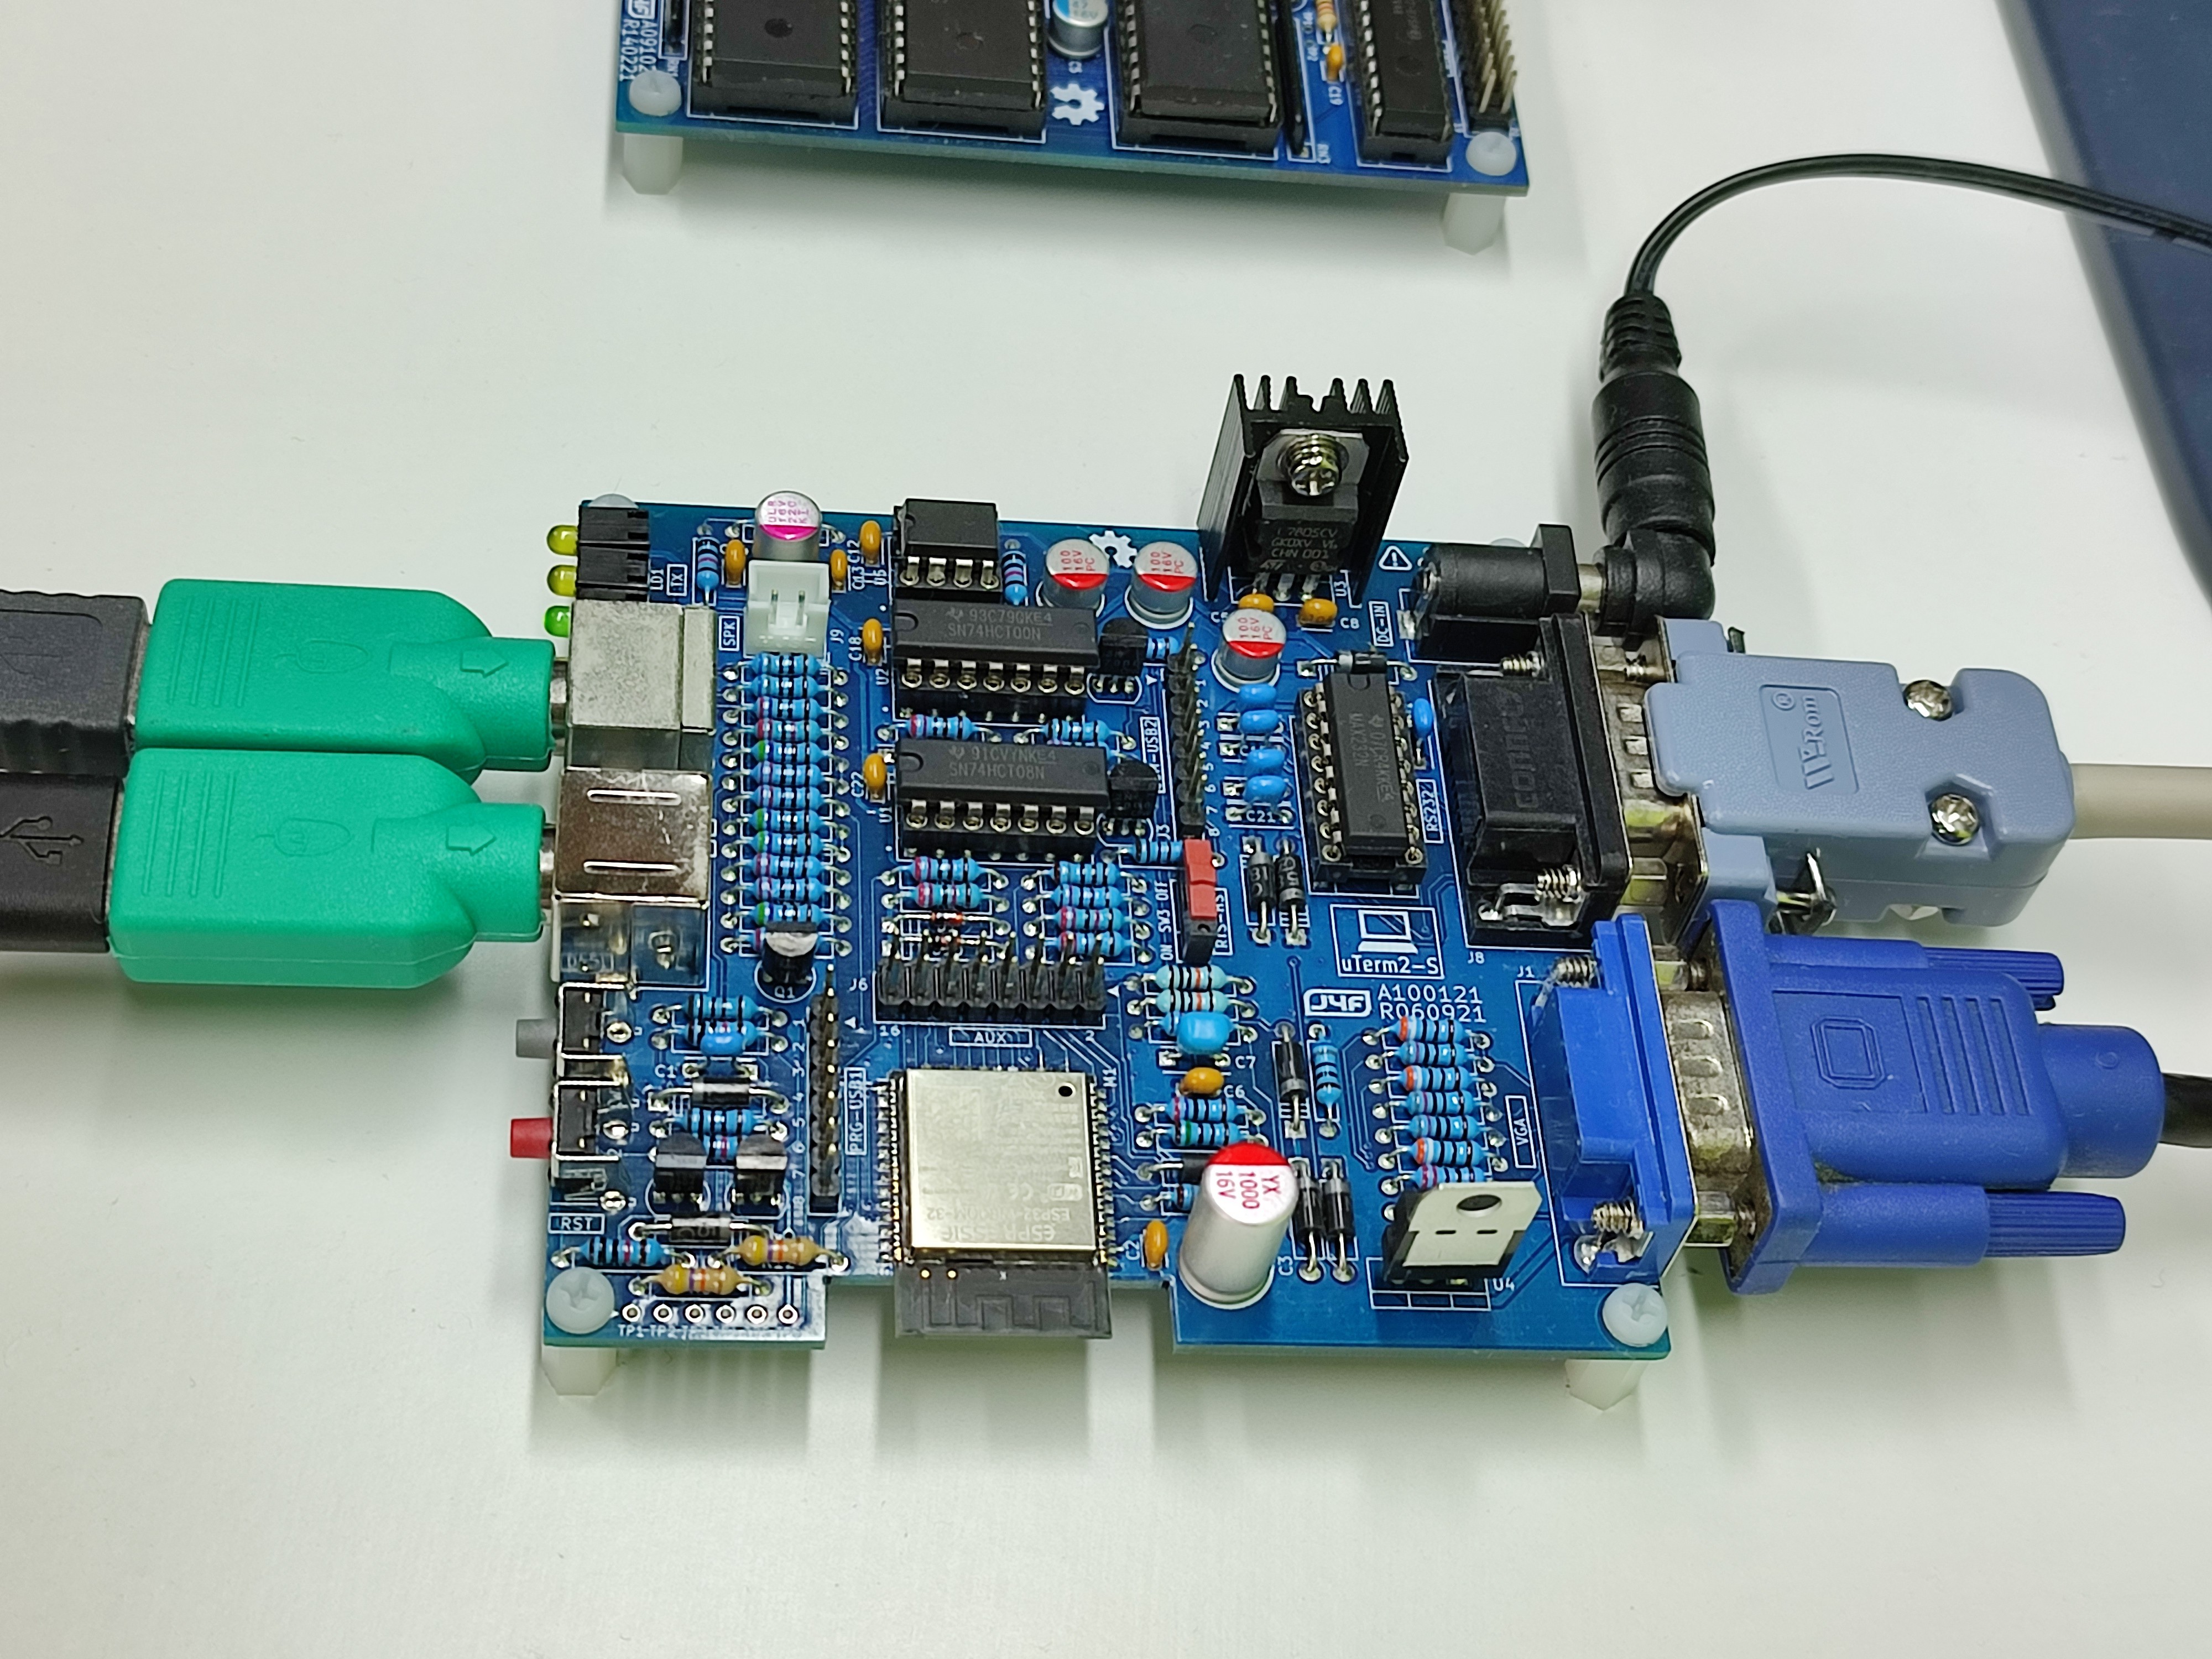
In the following photo a serial-USB adapter is connected with a cable to the transparent COM-USB2 (J3) port:
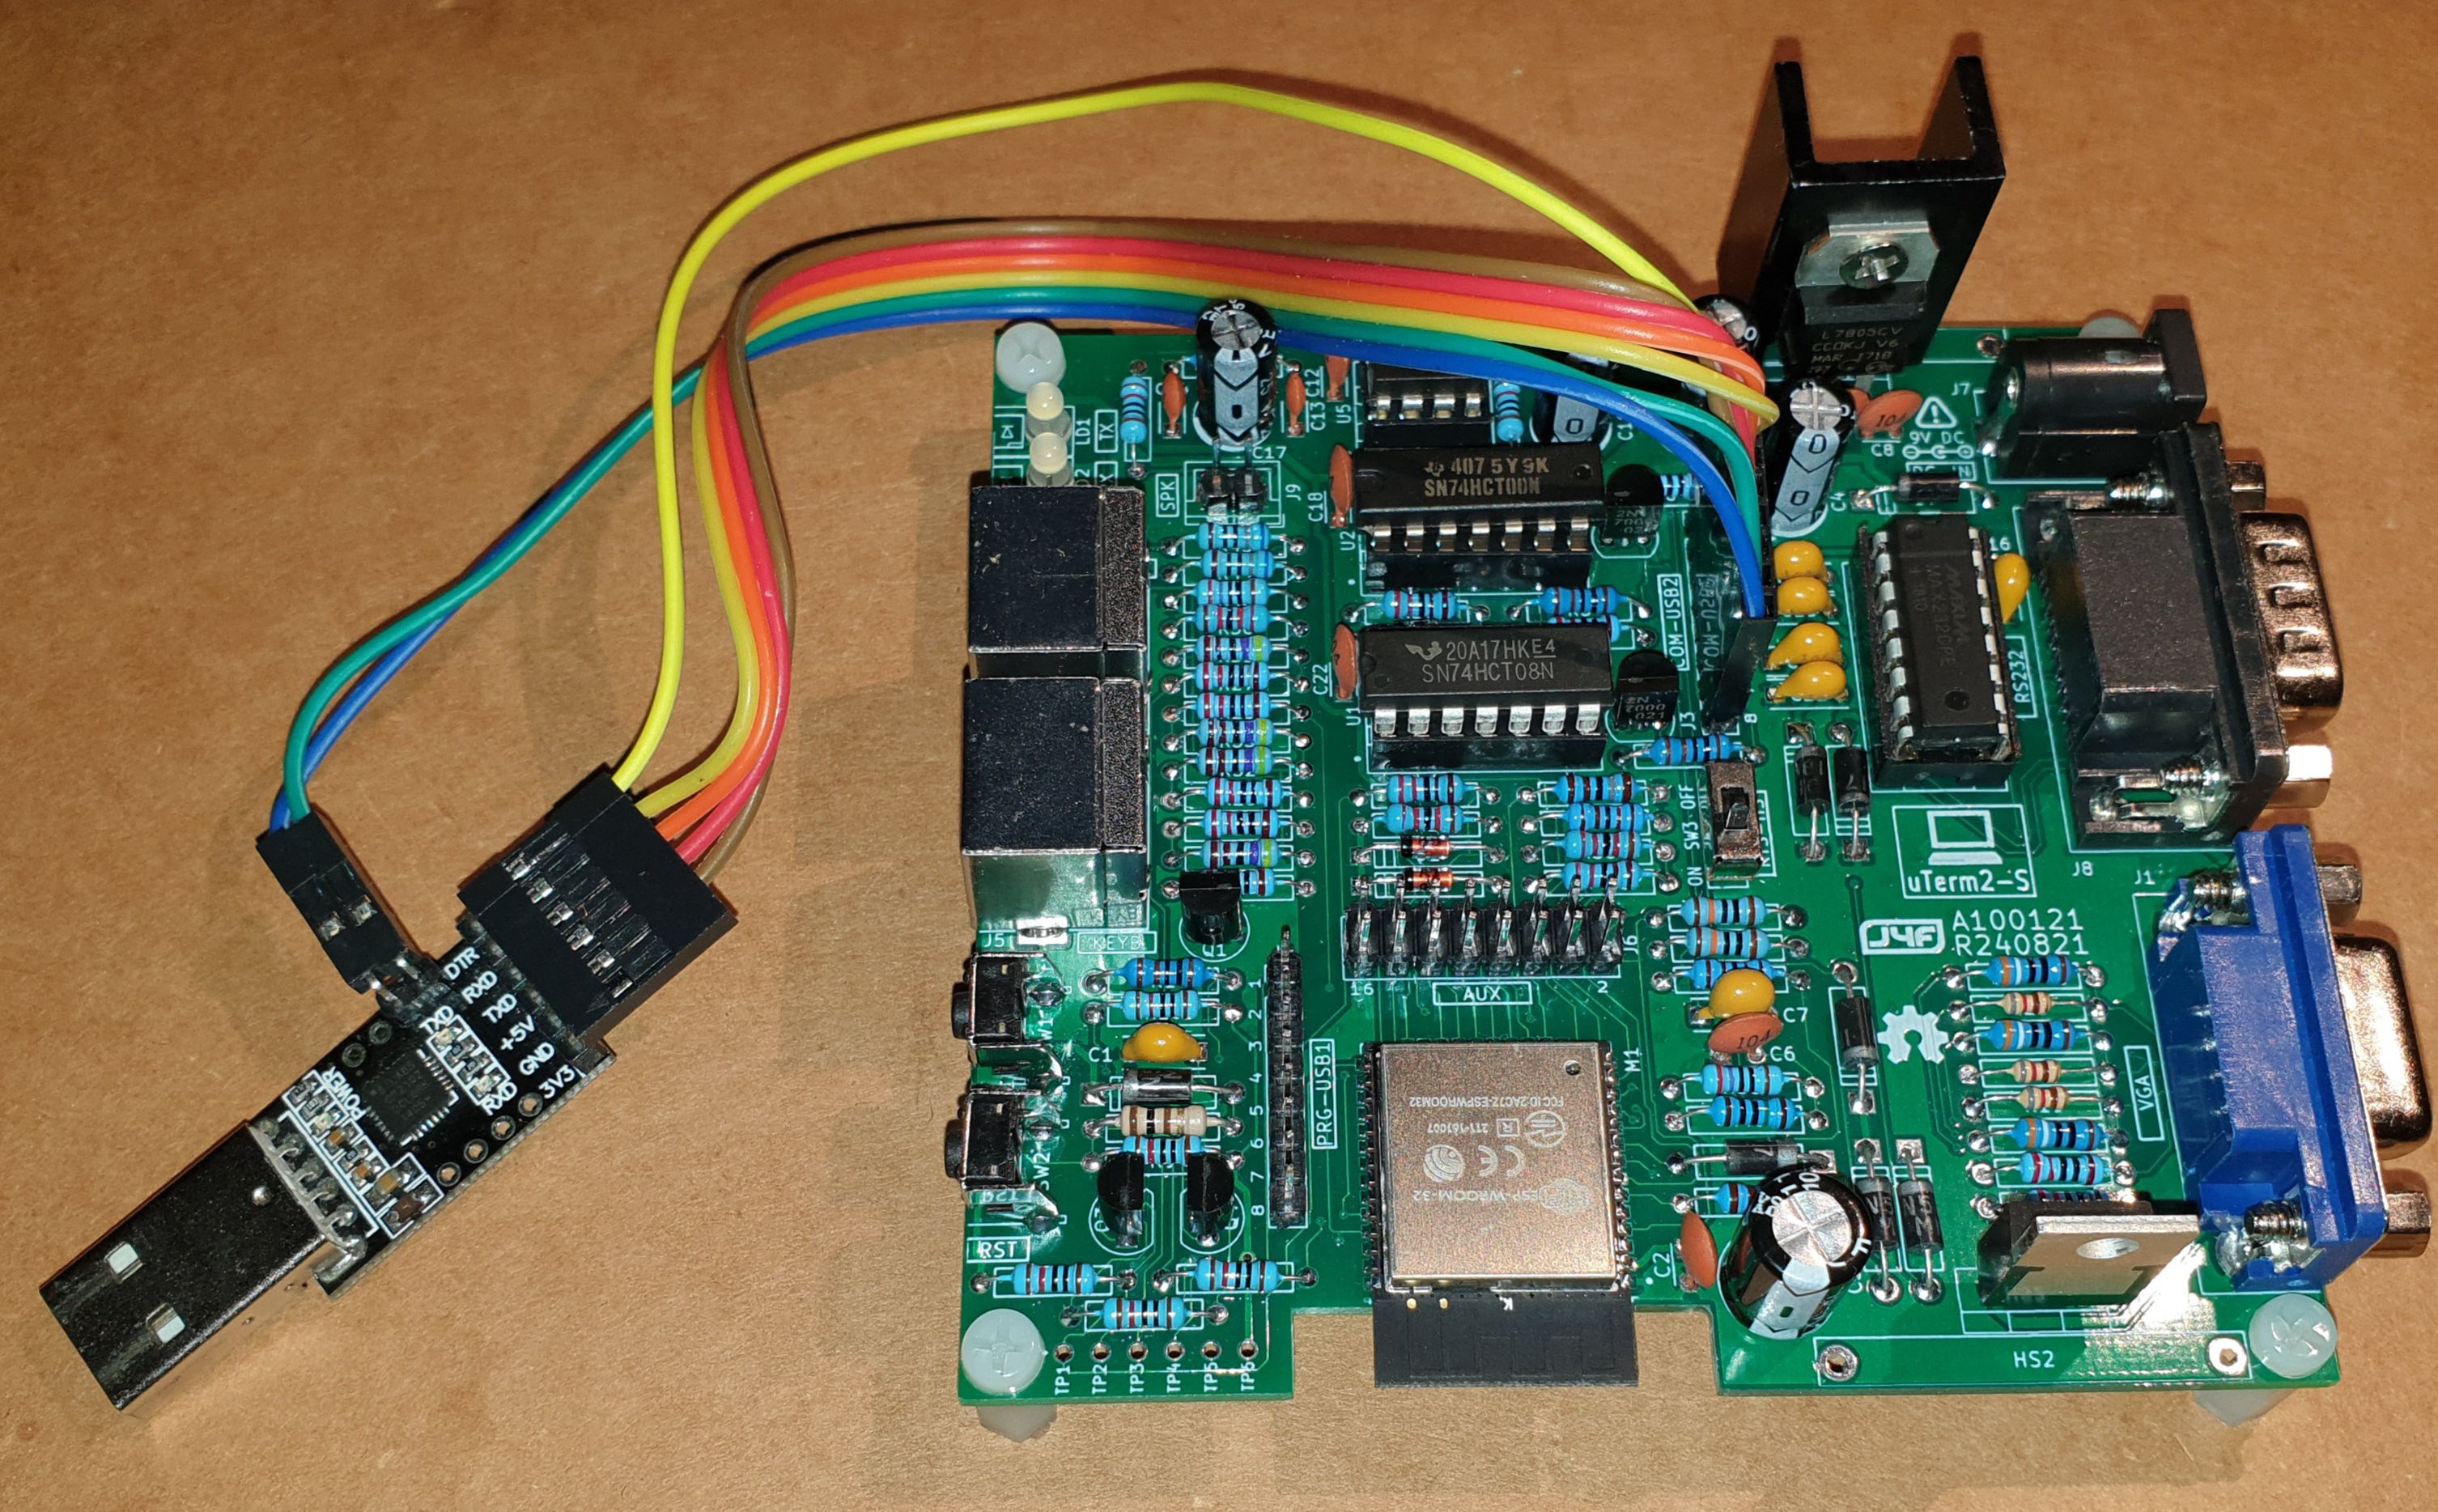
This allows to use two keyboards and two monitors in the "same" time (one keyboard and monitor attached directly to the uTerm2-S, and another keyboard and monitor of the terminal emulator on a PC connected with the serial-USB).
Please note that the COM-USB2 (J3) port supports the RTS/CTS HW handshaking, so both RTS/CTS signals are needed on the serial-USB adapter.
In the following image a common CP2102 based serial-USB adapter with the RTS/CTS signals connected:
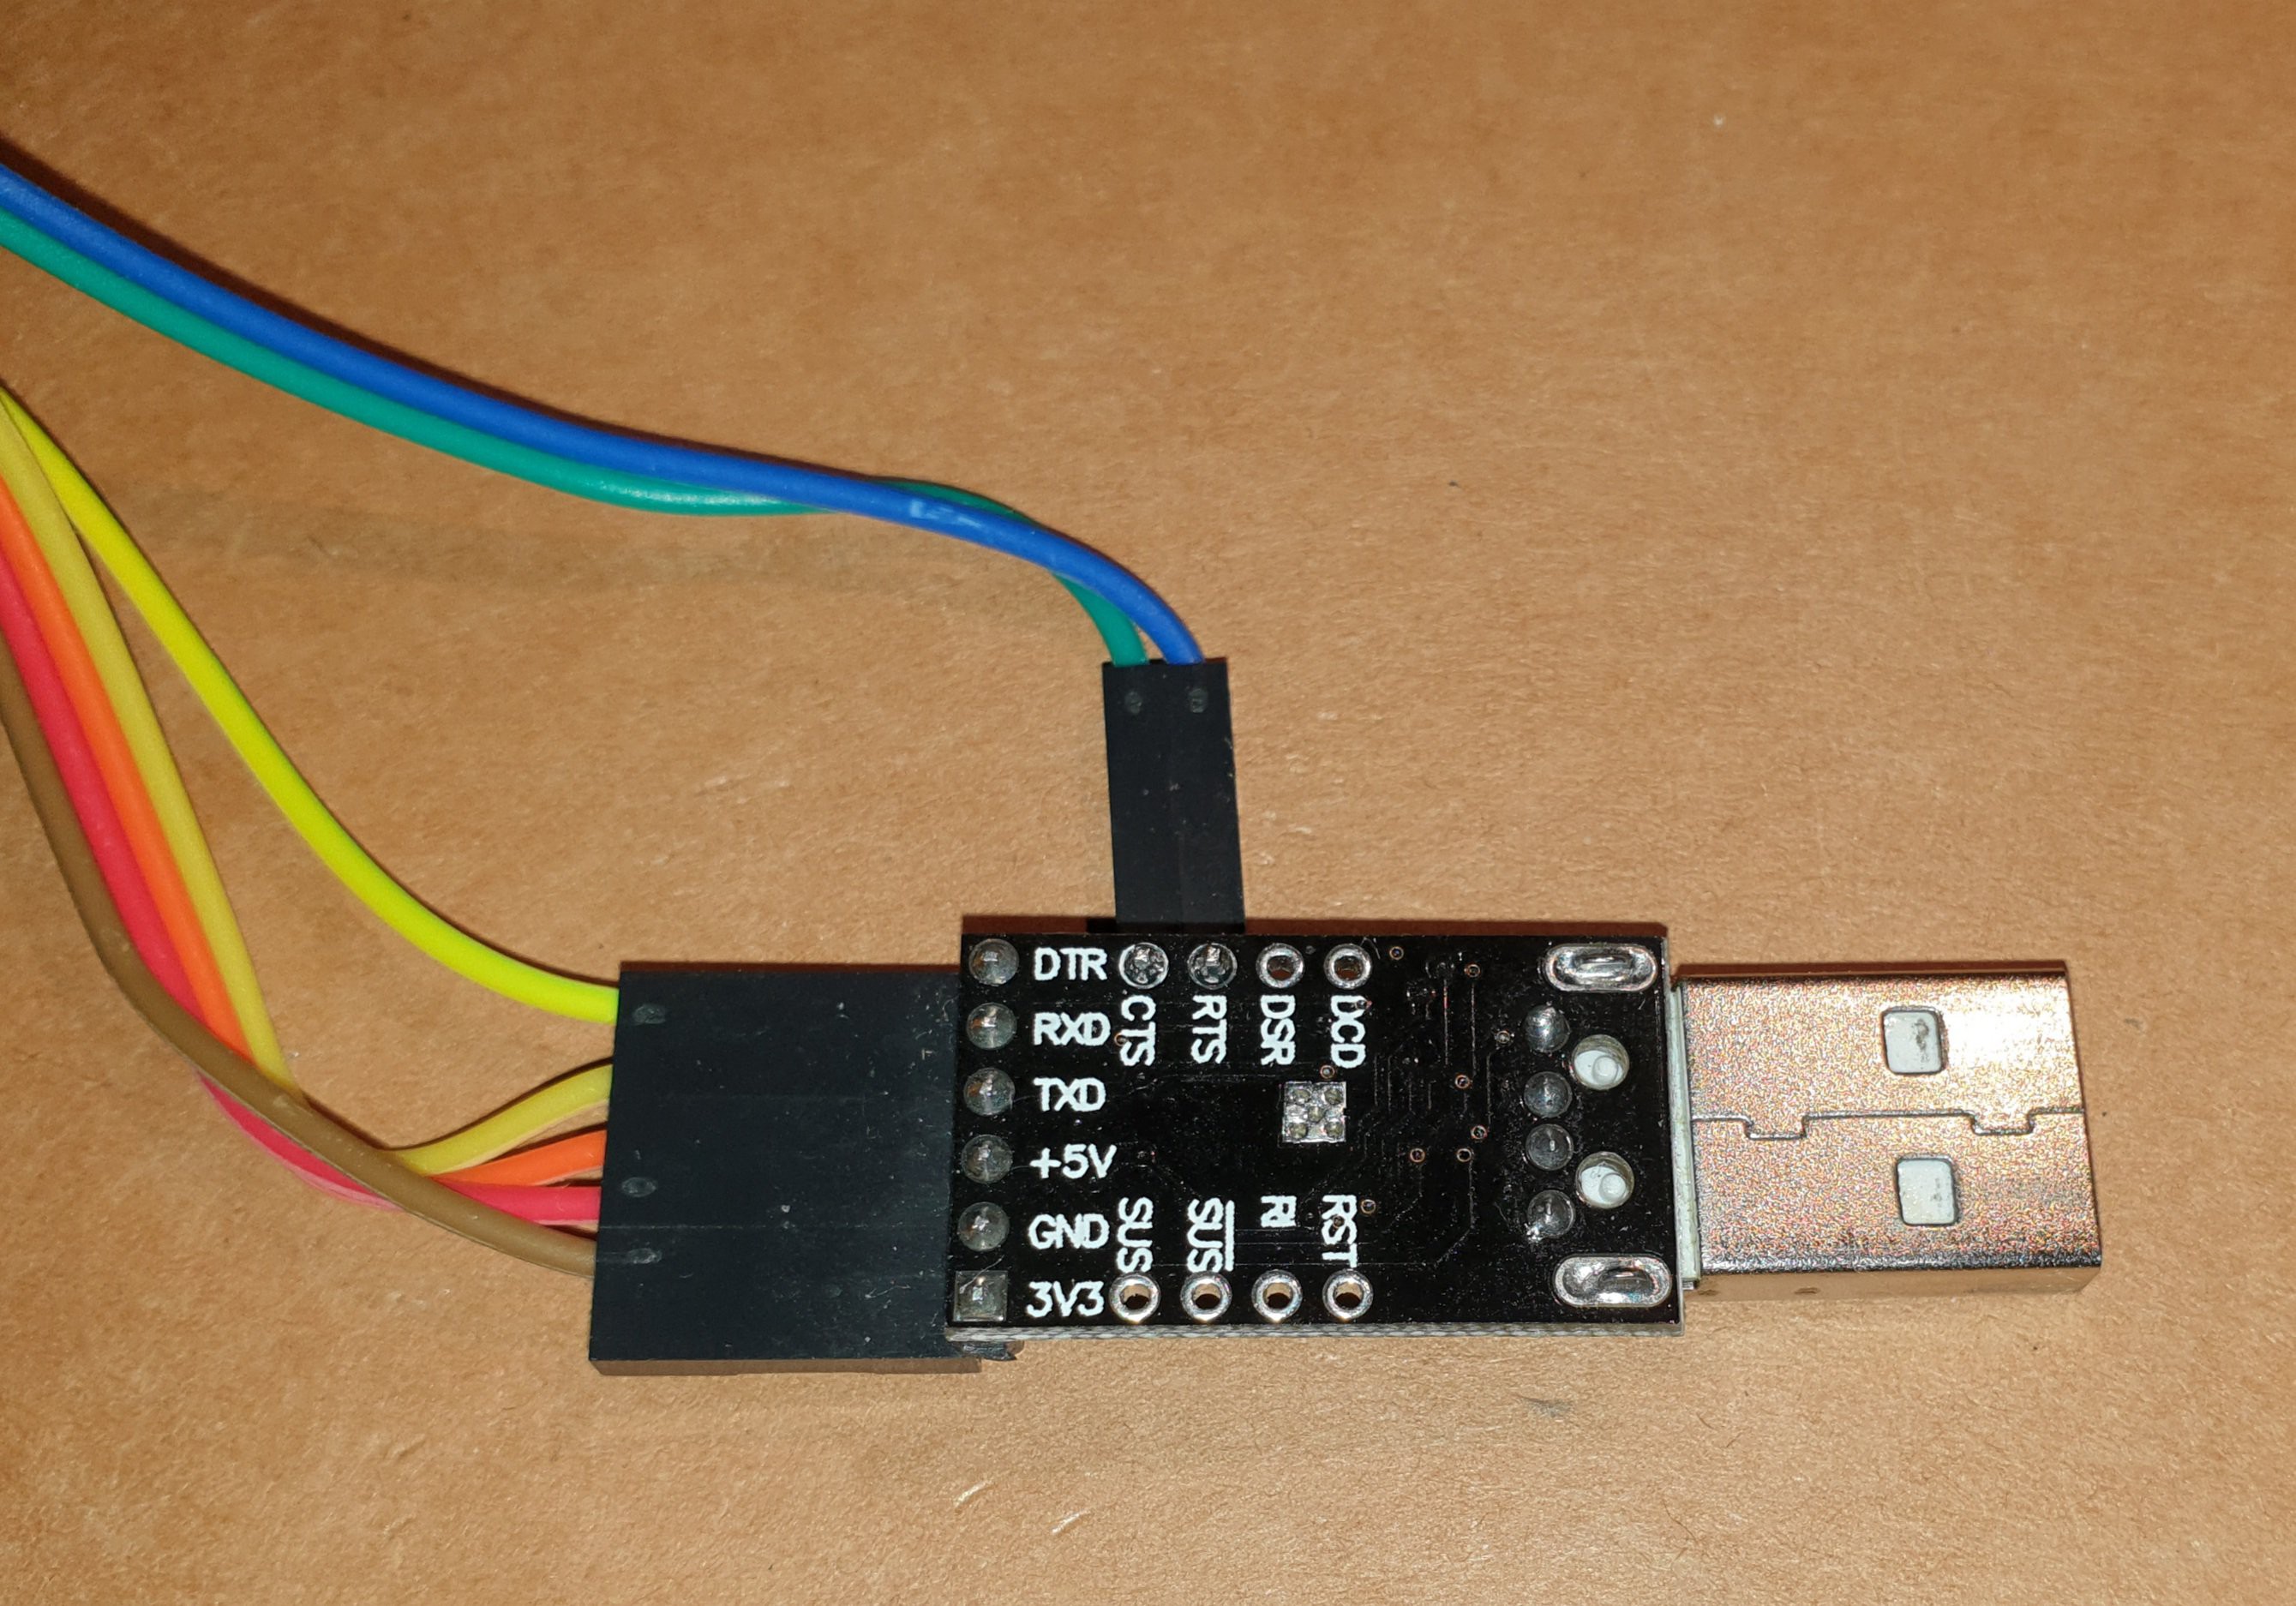
The following table shows how to connect the serial-USB adapter to J3:
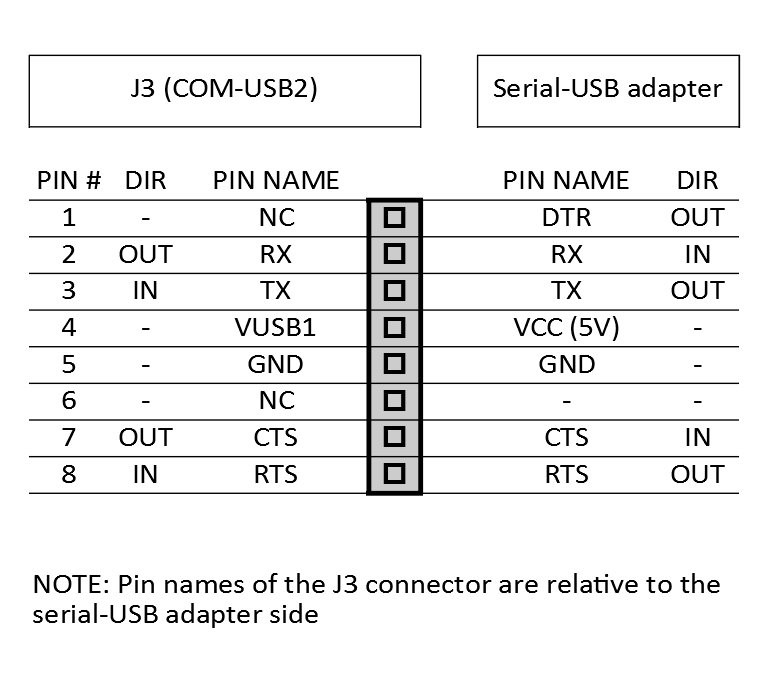
NOTE: The signals assignment is the same of the SER-USB (J3) connector of the uTerm-S.
THE PRG-USB1 (J2) CONNECTOR (PROGRAMMING PORT)
The PRG-USB1 (J2) connector is use to program the ESP32 using a serial-USB adapter (it is recommended to use a model that supports the default 921600 bit/s upload speed, like the CP2102 based adapters).
Both the "mixed" power supply scenarios (USB-serial adapter not powered from USB but uTerm2-S powered and vice-versa) are managed by the HW, so you don't need to worry about it.
For more information about the programming procedure see the "HOW TO PROGRAM THE ESP32" paragraph.
THE SPK (J9) CONNECTOR
The SPK (J9) connector is used to attach an optional speaker (4/16 Ohm). I've used a salvaged PC speaker.
OTHER CONNECTORS
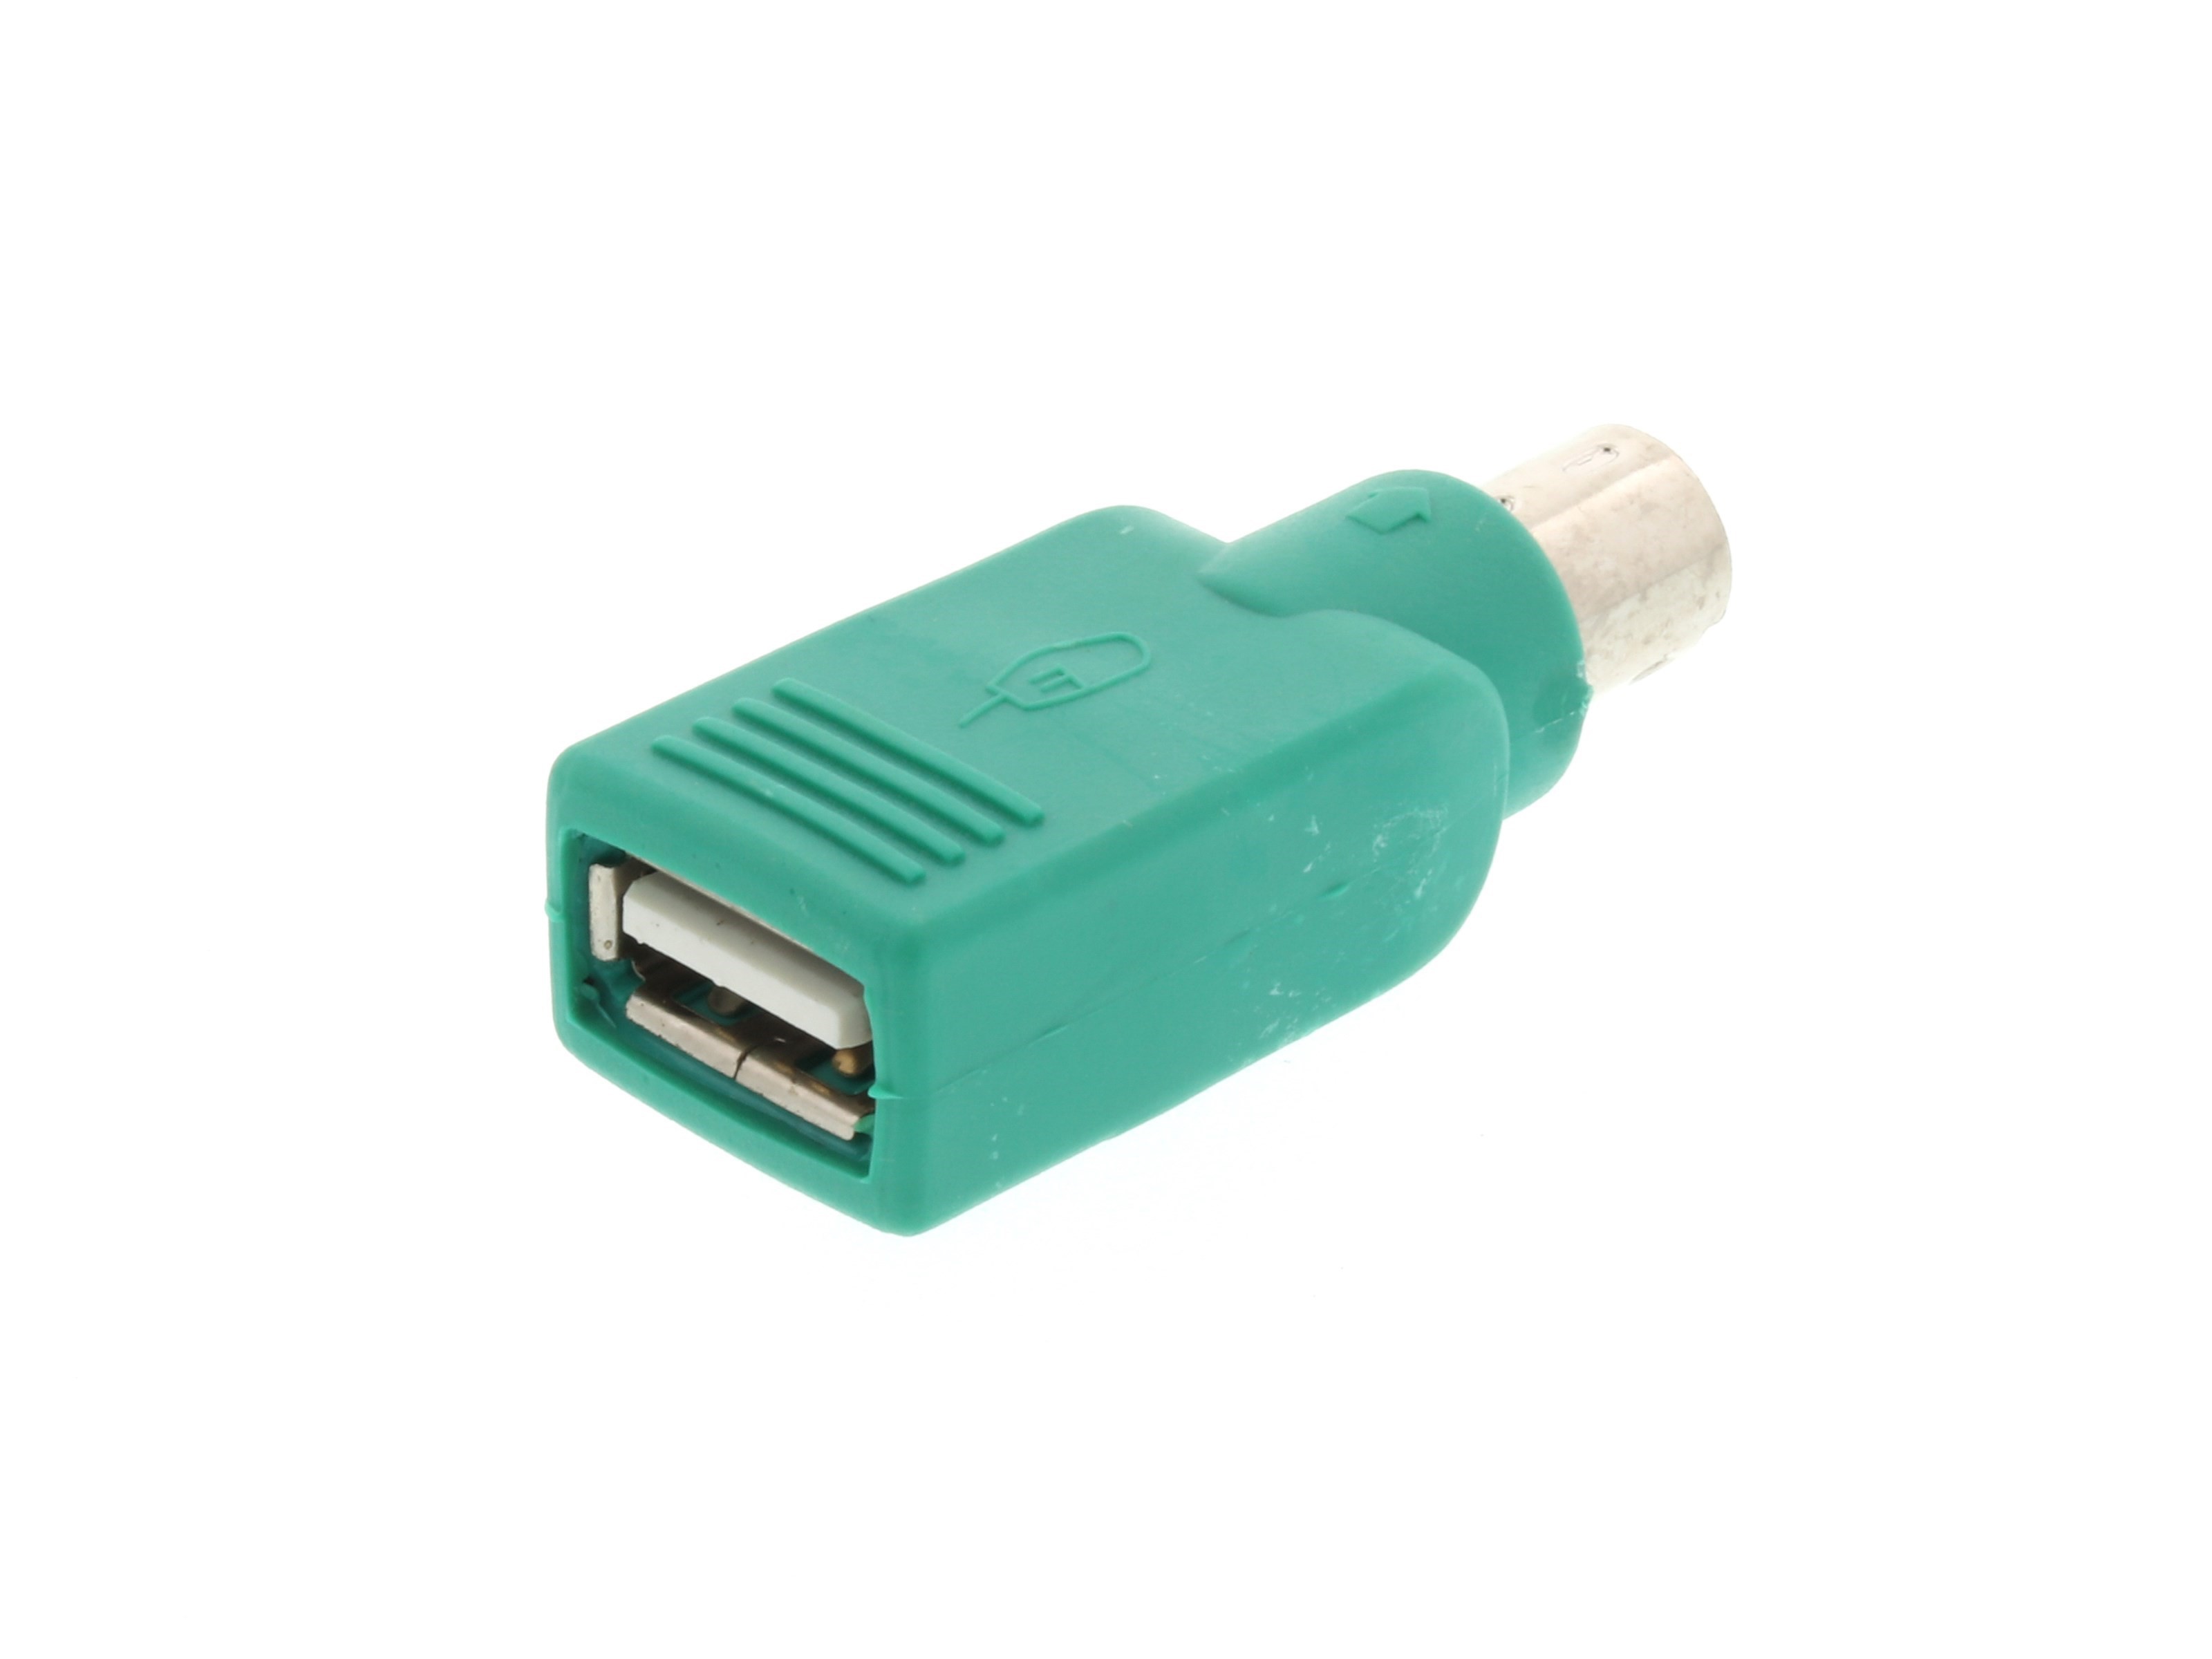
The remaining connectors are obvious. PS/2 KB (J5) and PS/2 MOUSE (J4) are for a PS/2 keyboard and an optional PS/2 mouse. Please note that many USB keyboards (and USB mouses too) have a PS/2 compatible chip inside so can be used with the well known "green adapter":
The VGA (J1) connector is for a VGA monitor, and the RS232 (J8) connector is the RS232 serial port for the Host. The maximum speed is 115200 bps (it is the maximum speed of the MAX232 RS232 driver).
The DC-IN (J2) is the power in connector. It is recommended to use a 9V 1A DC power supply.
THE RTS-HS (SW3) SWITCH
The uTerm2-S has both the RTS/CTS signals for HW handshaking between the RS232 serial port (J8) connector (for the Host) and the COM-USB2 (J3) connector (the "transparent port" for the terminal emulation SW on a PC), so it can be used for file exchange.
To clarify the following image shows a block diagram of the serial ports of the uTerm2-S:
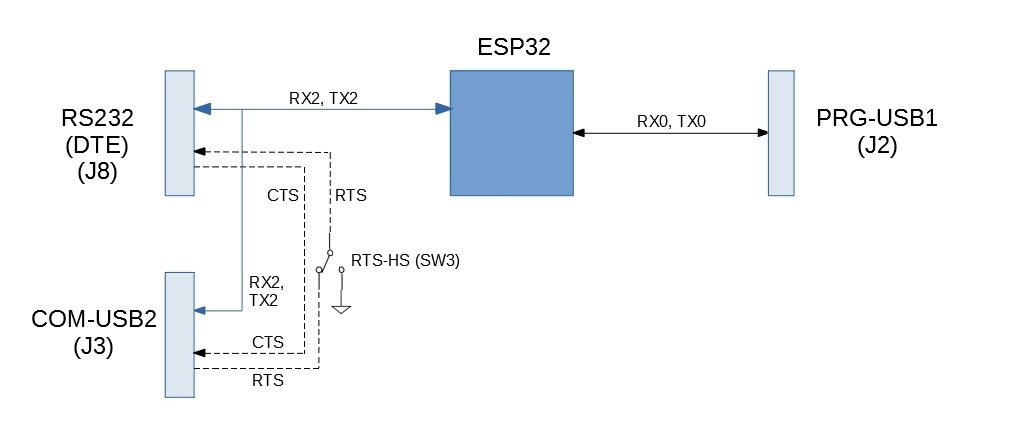
On the COM-USB2 (J3) side the RTS signal is used by the terminal emulation SW on a PC to put in a wait state the communication if the RX buffer on the PC side is full. The CTS signal is an input that allows the Host to do the same if the input buffer on the Host side is full. Because a PC is typically a lot more fast than a retro-system it can be handy set the RTS signal to an "always ready to accept" state (on the PC side). In this case the RTS-HS switch (SW3) is used to turn on or off the RTS handshaking.
When turned off, the Host connected to the serial port will see the RST line always active (RTS and CTS are active "Low" signals). This can be handy in some situations.
The RTS-HS switch has no influence on the CTS signal.
THE RST KEY (SW2)
The RST key (SW2) is used to reset the ESP32 module.
THE DFLT KEY (SW1)
The DFLT key (SW1) is used to reset all the terminal parameters to default values. To activate this function you have to press down the DFLT key and, while holding it down until the reset is complete, press and release the RST key (SW2) to reset the uTerm2-S.
NOTE: the DFLT key must be enabled inside the AnsiTerminal sketch (see the "HOW TO PROGRAM THE ESP32 (J2/PROG-USB1 CONNECTOR)" paragraph) to make it work.
* * SOFTWARE OVERVIEW * *
The uTerm2-S is designed to use the FabGL library, so you need to install Arduino IDE and the ESP32 core at first.
Then you have to install the FabGL library. Because there are a lot of tutorials around I'll not give more details here (i.e. see the Demos and Tutorials section on the FabGL site) about how set up the "toolchain".
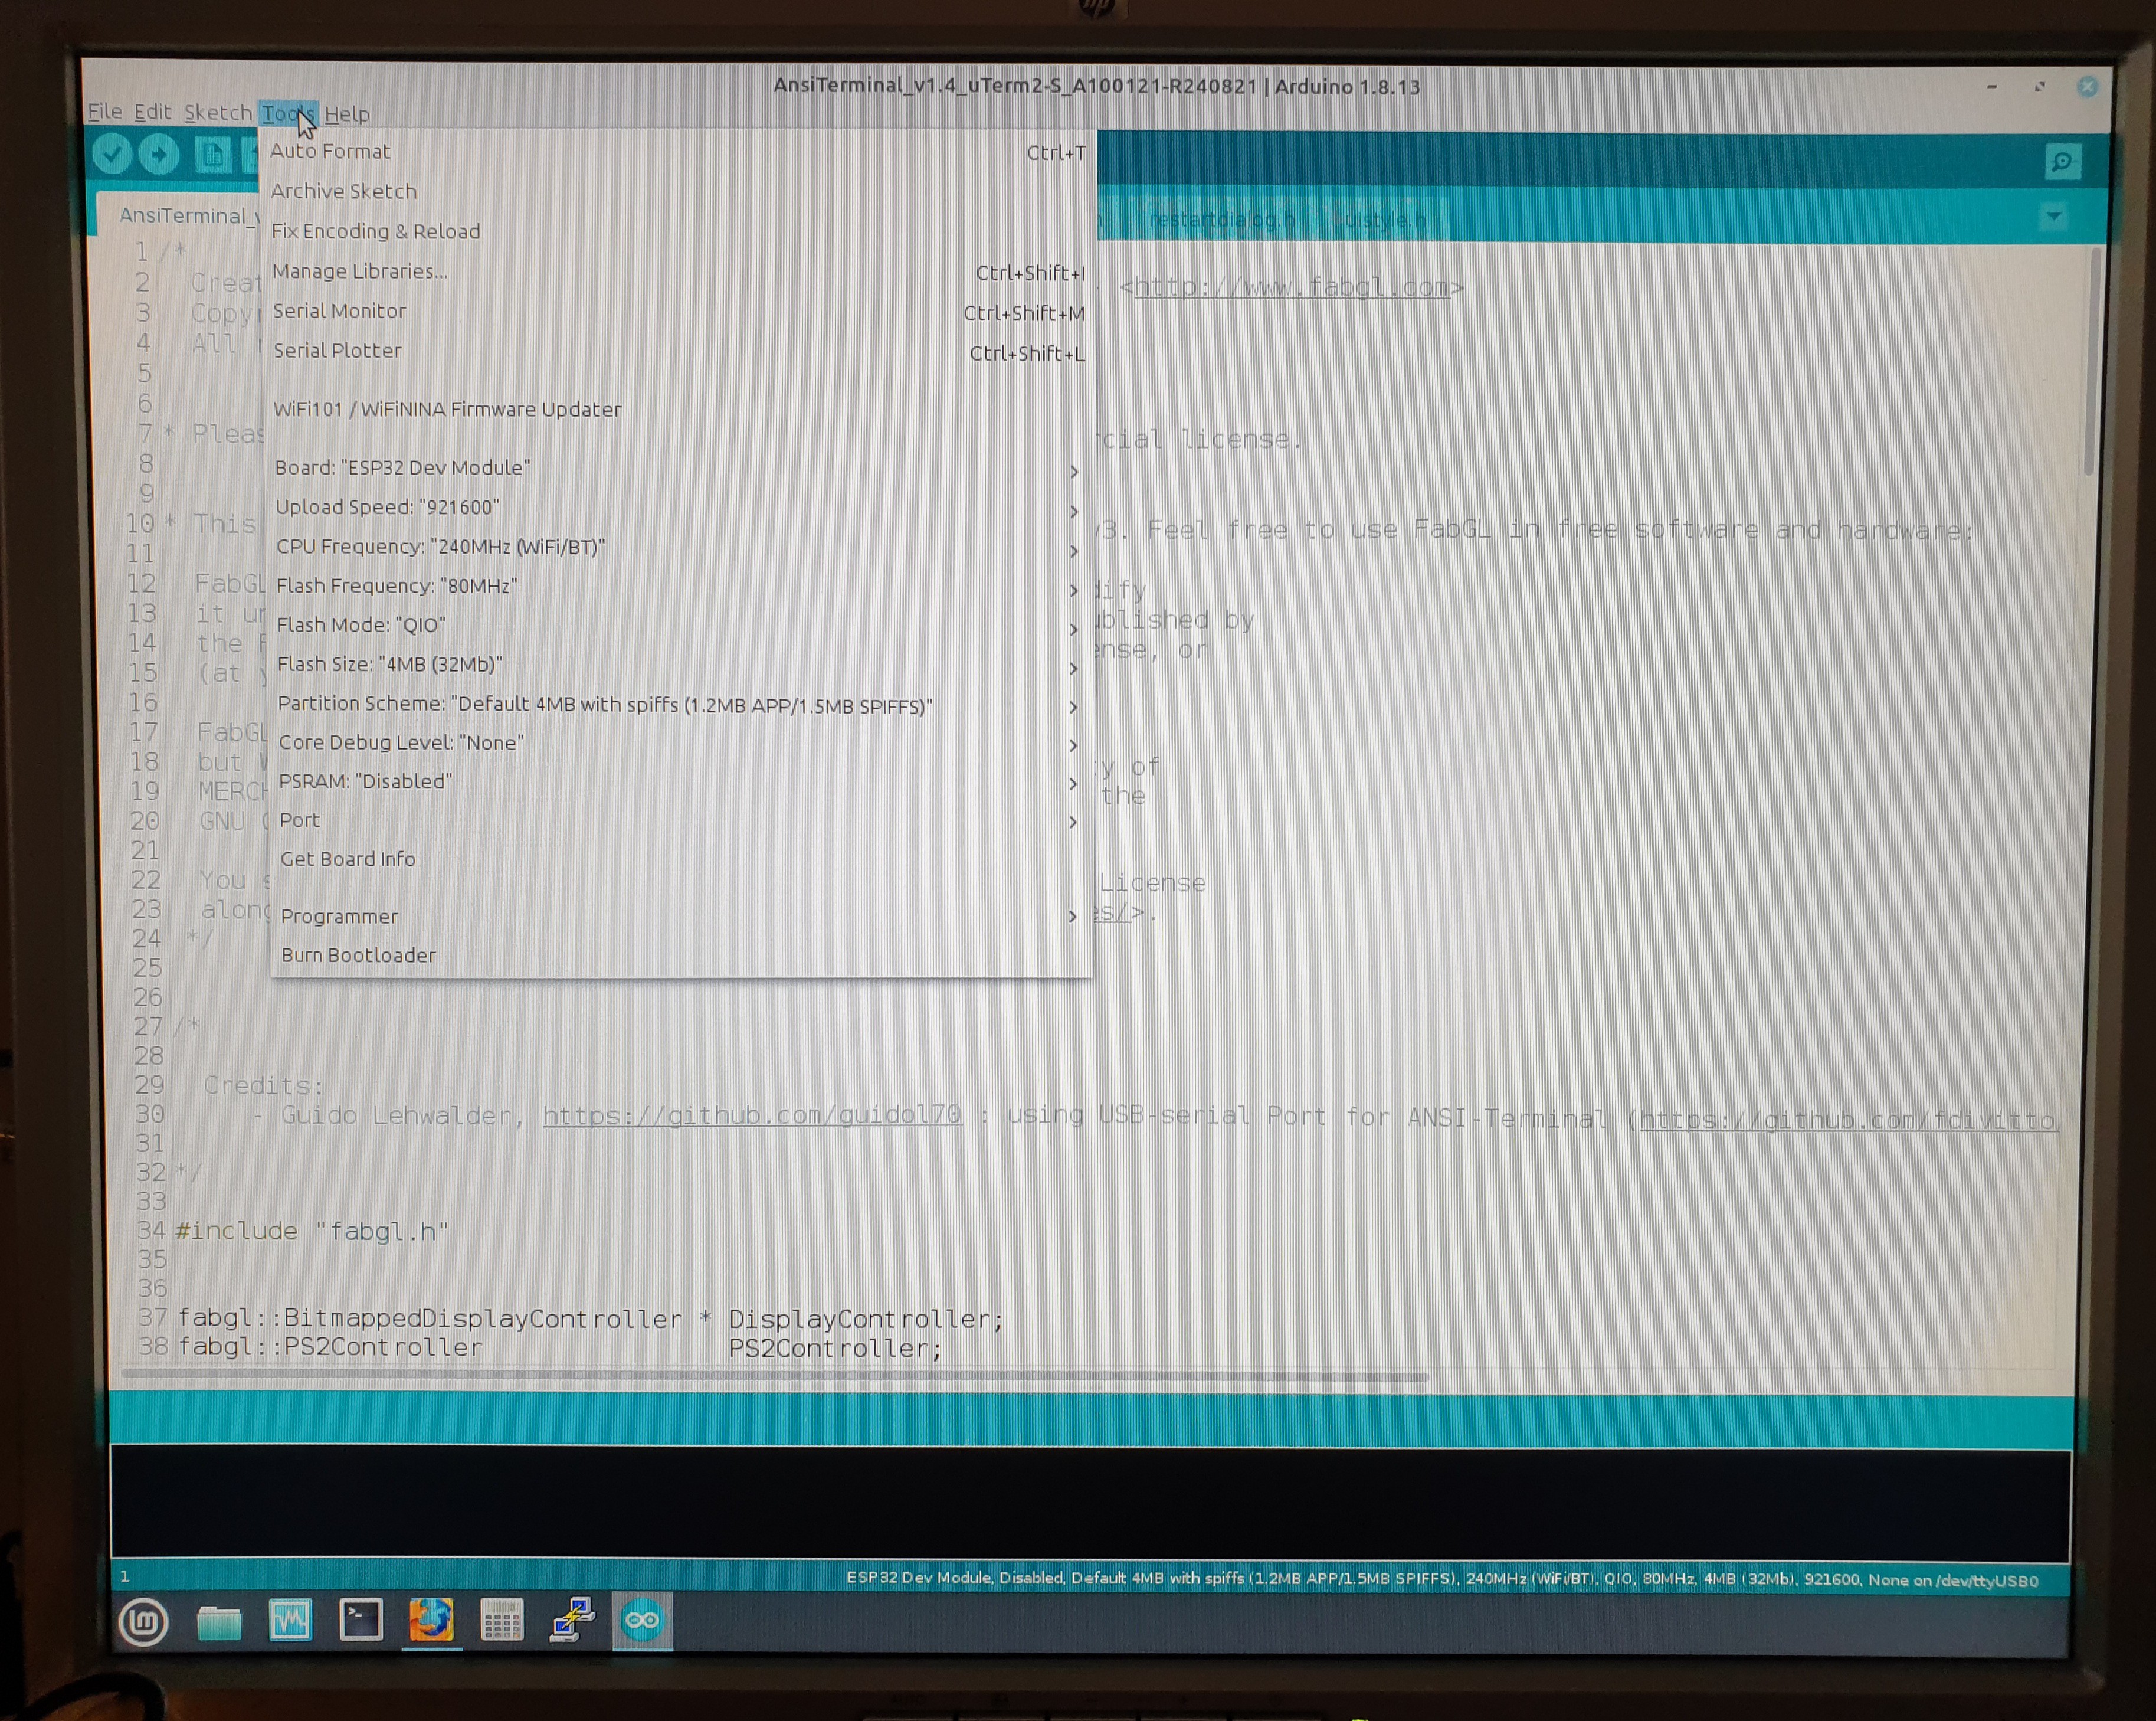
HOW TO PROGRAM THE ESP32
The uTerm2-S can be programmed using the Arduino IDE as a common ESP32 board (having the needed circuitry for auto uploading):
You just need to use the PRG-USB1 (J2) connector with a serial-USB adapter:

The following table shows how to connect the serial-USB adapter to PRG-USB1 (J2):

NOTE: You can use the same adapter/cable for both programming (thru J2) and communicating with the transparent port (thru J3) as the J2 and J3 connection tables have a compatible signals assignment.
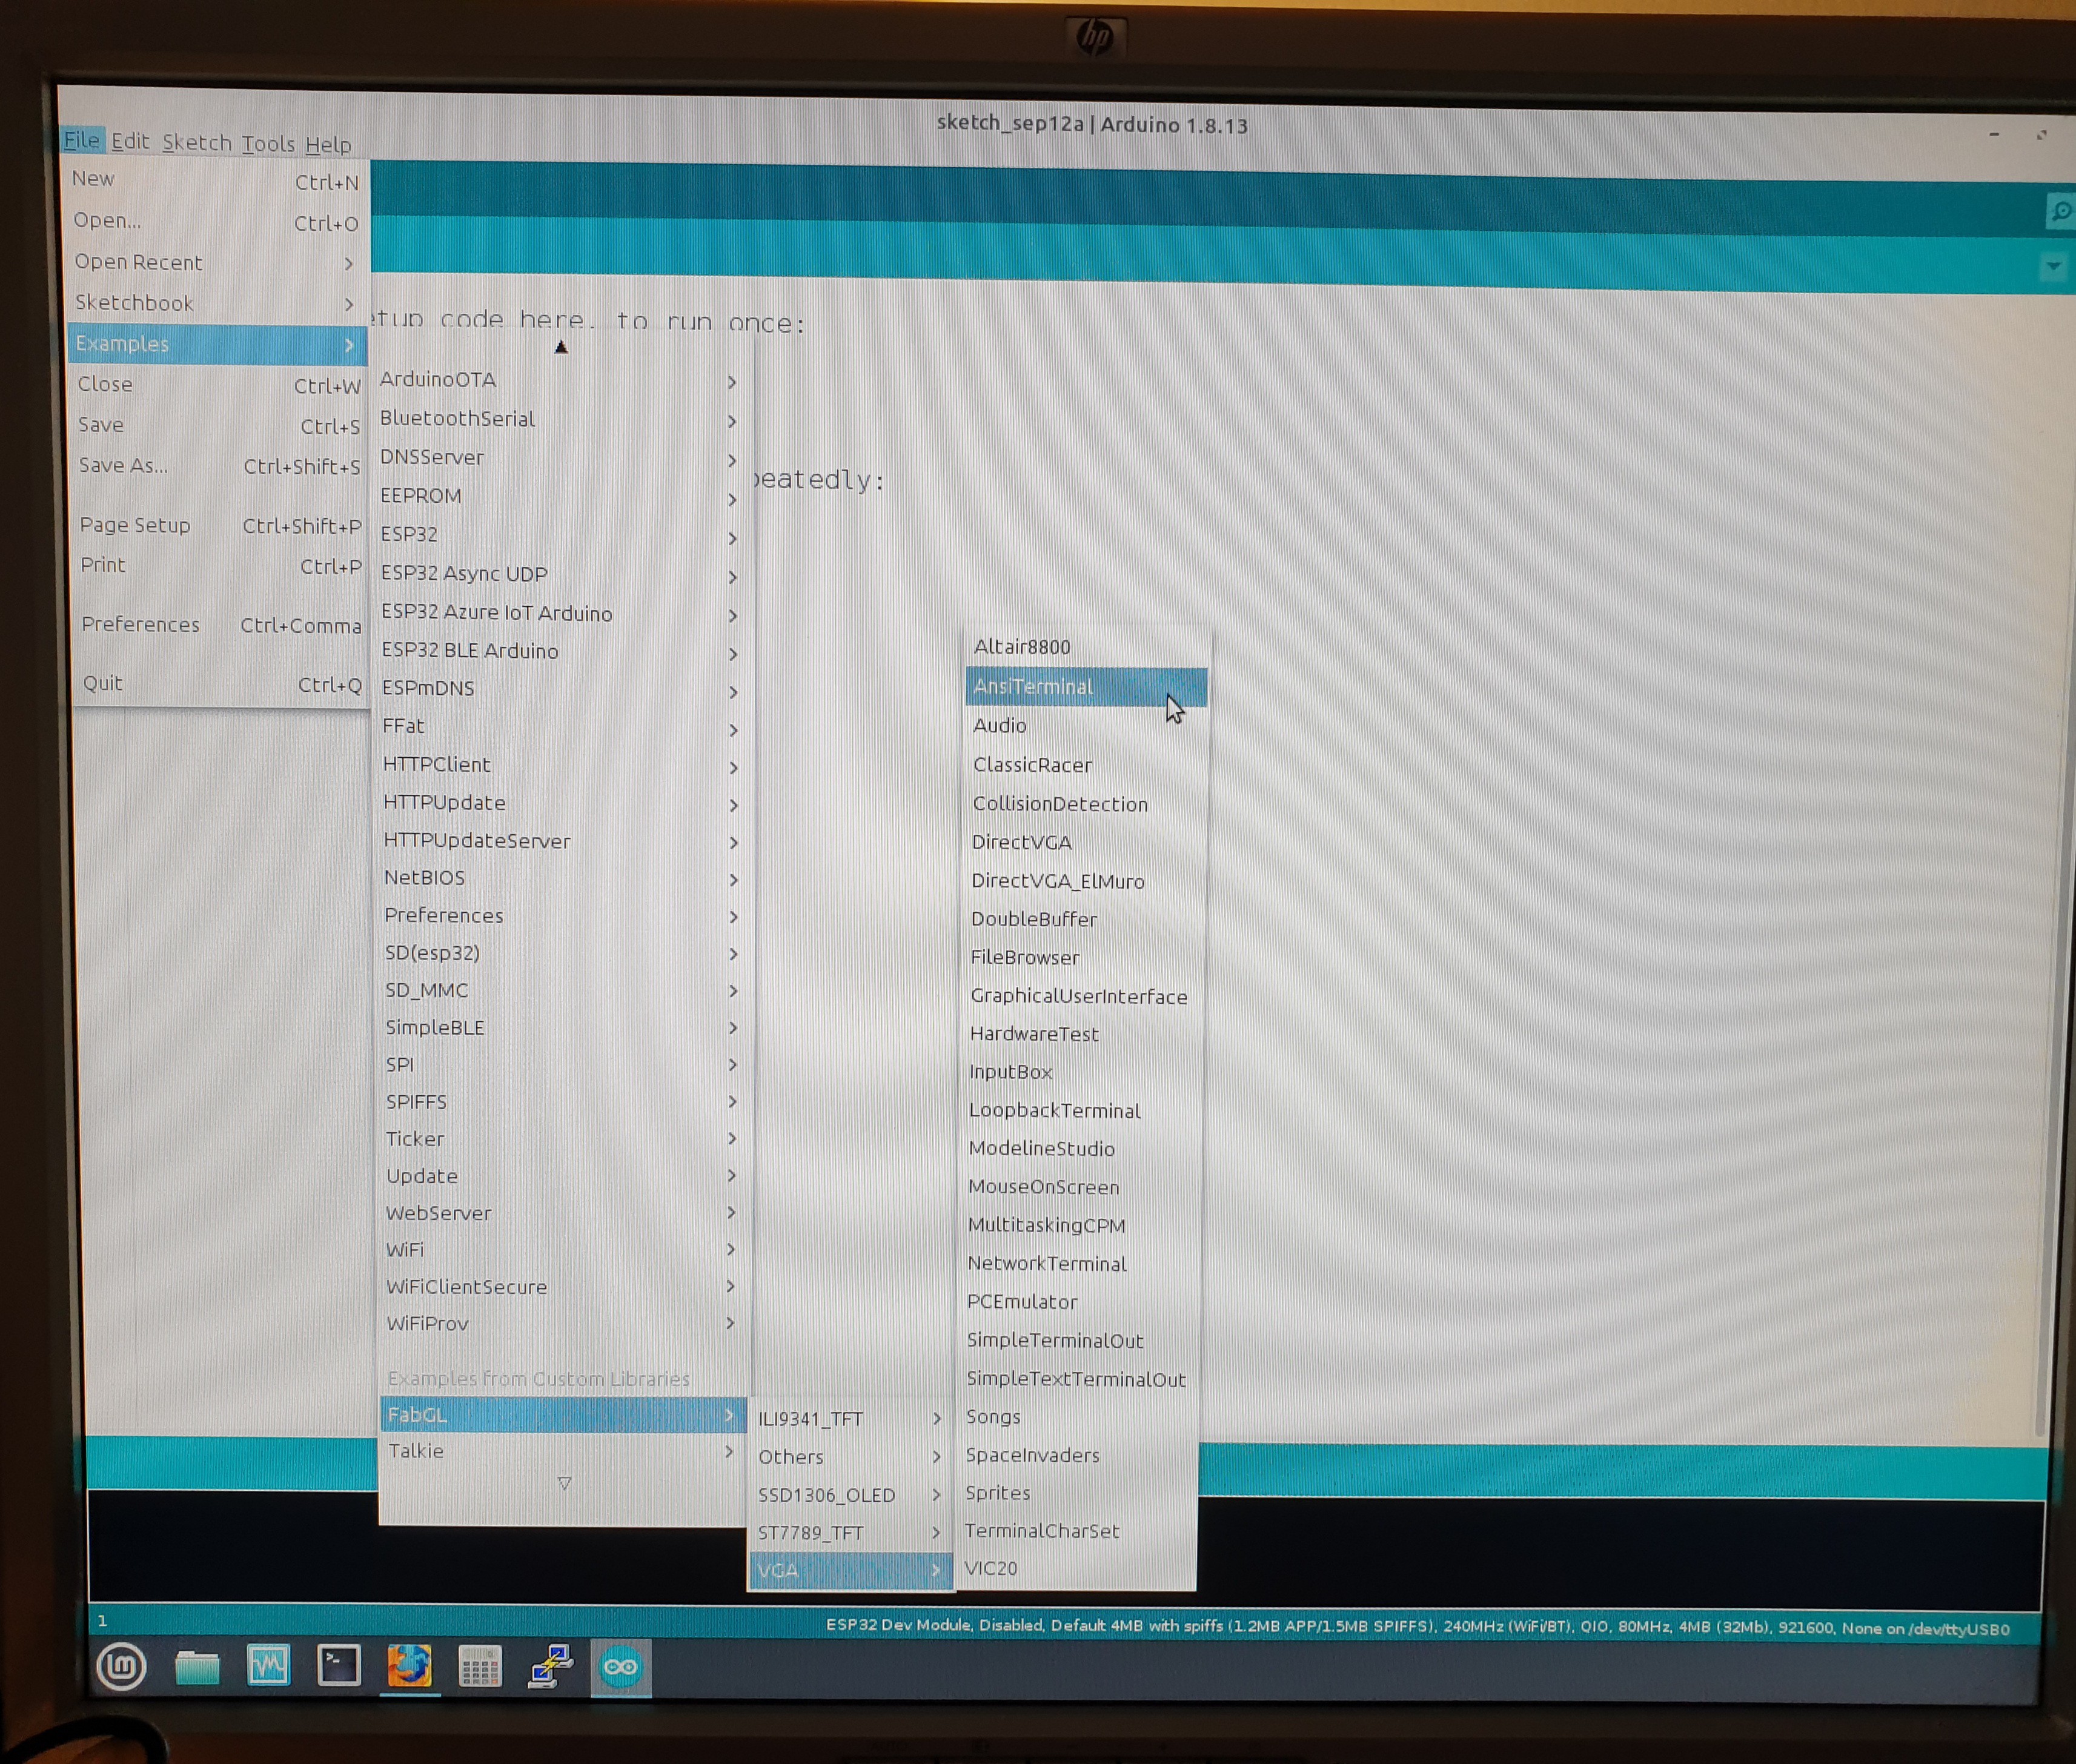
To flash the terminal FW you have to open the AnsiTerminal "sketch" from the Examples of the FabGL library:
Remember to change at first the line containing:
#define USERESETPIN 0
to:
#define USERESETPIN 1
to enable the DFLT key:
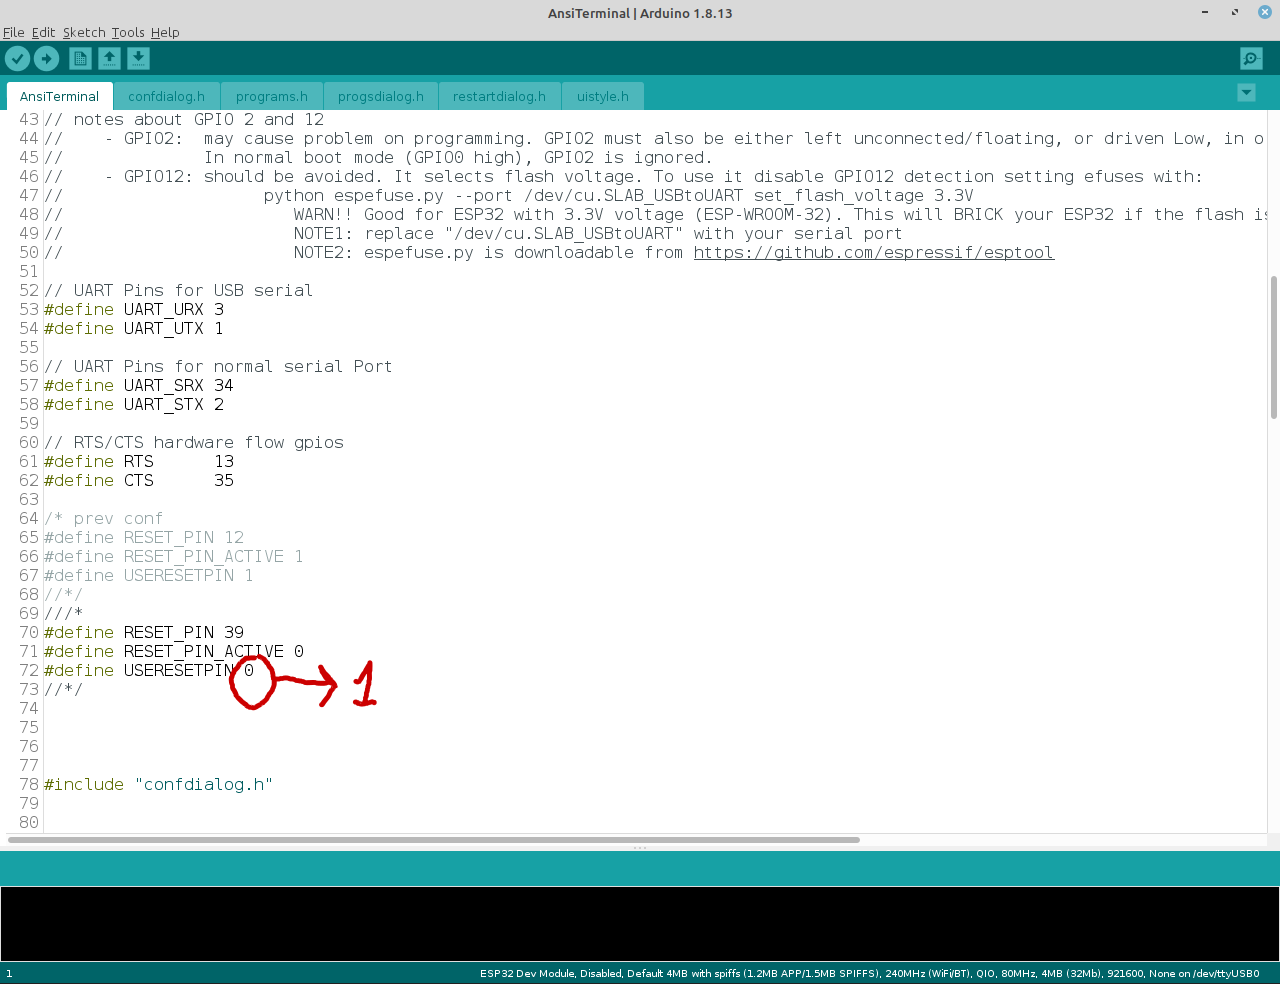
Now you can compile and flash the AnsiTerminal sketch.
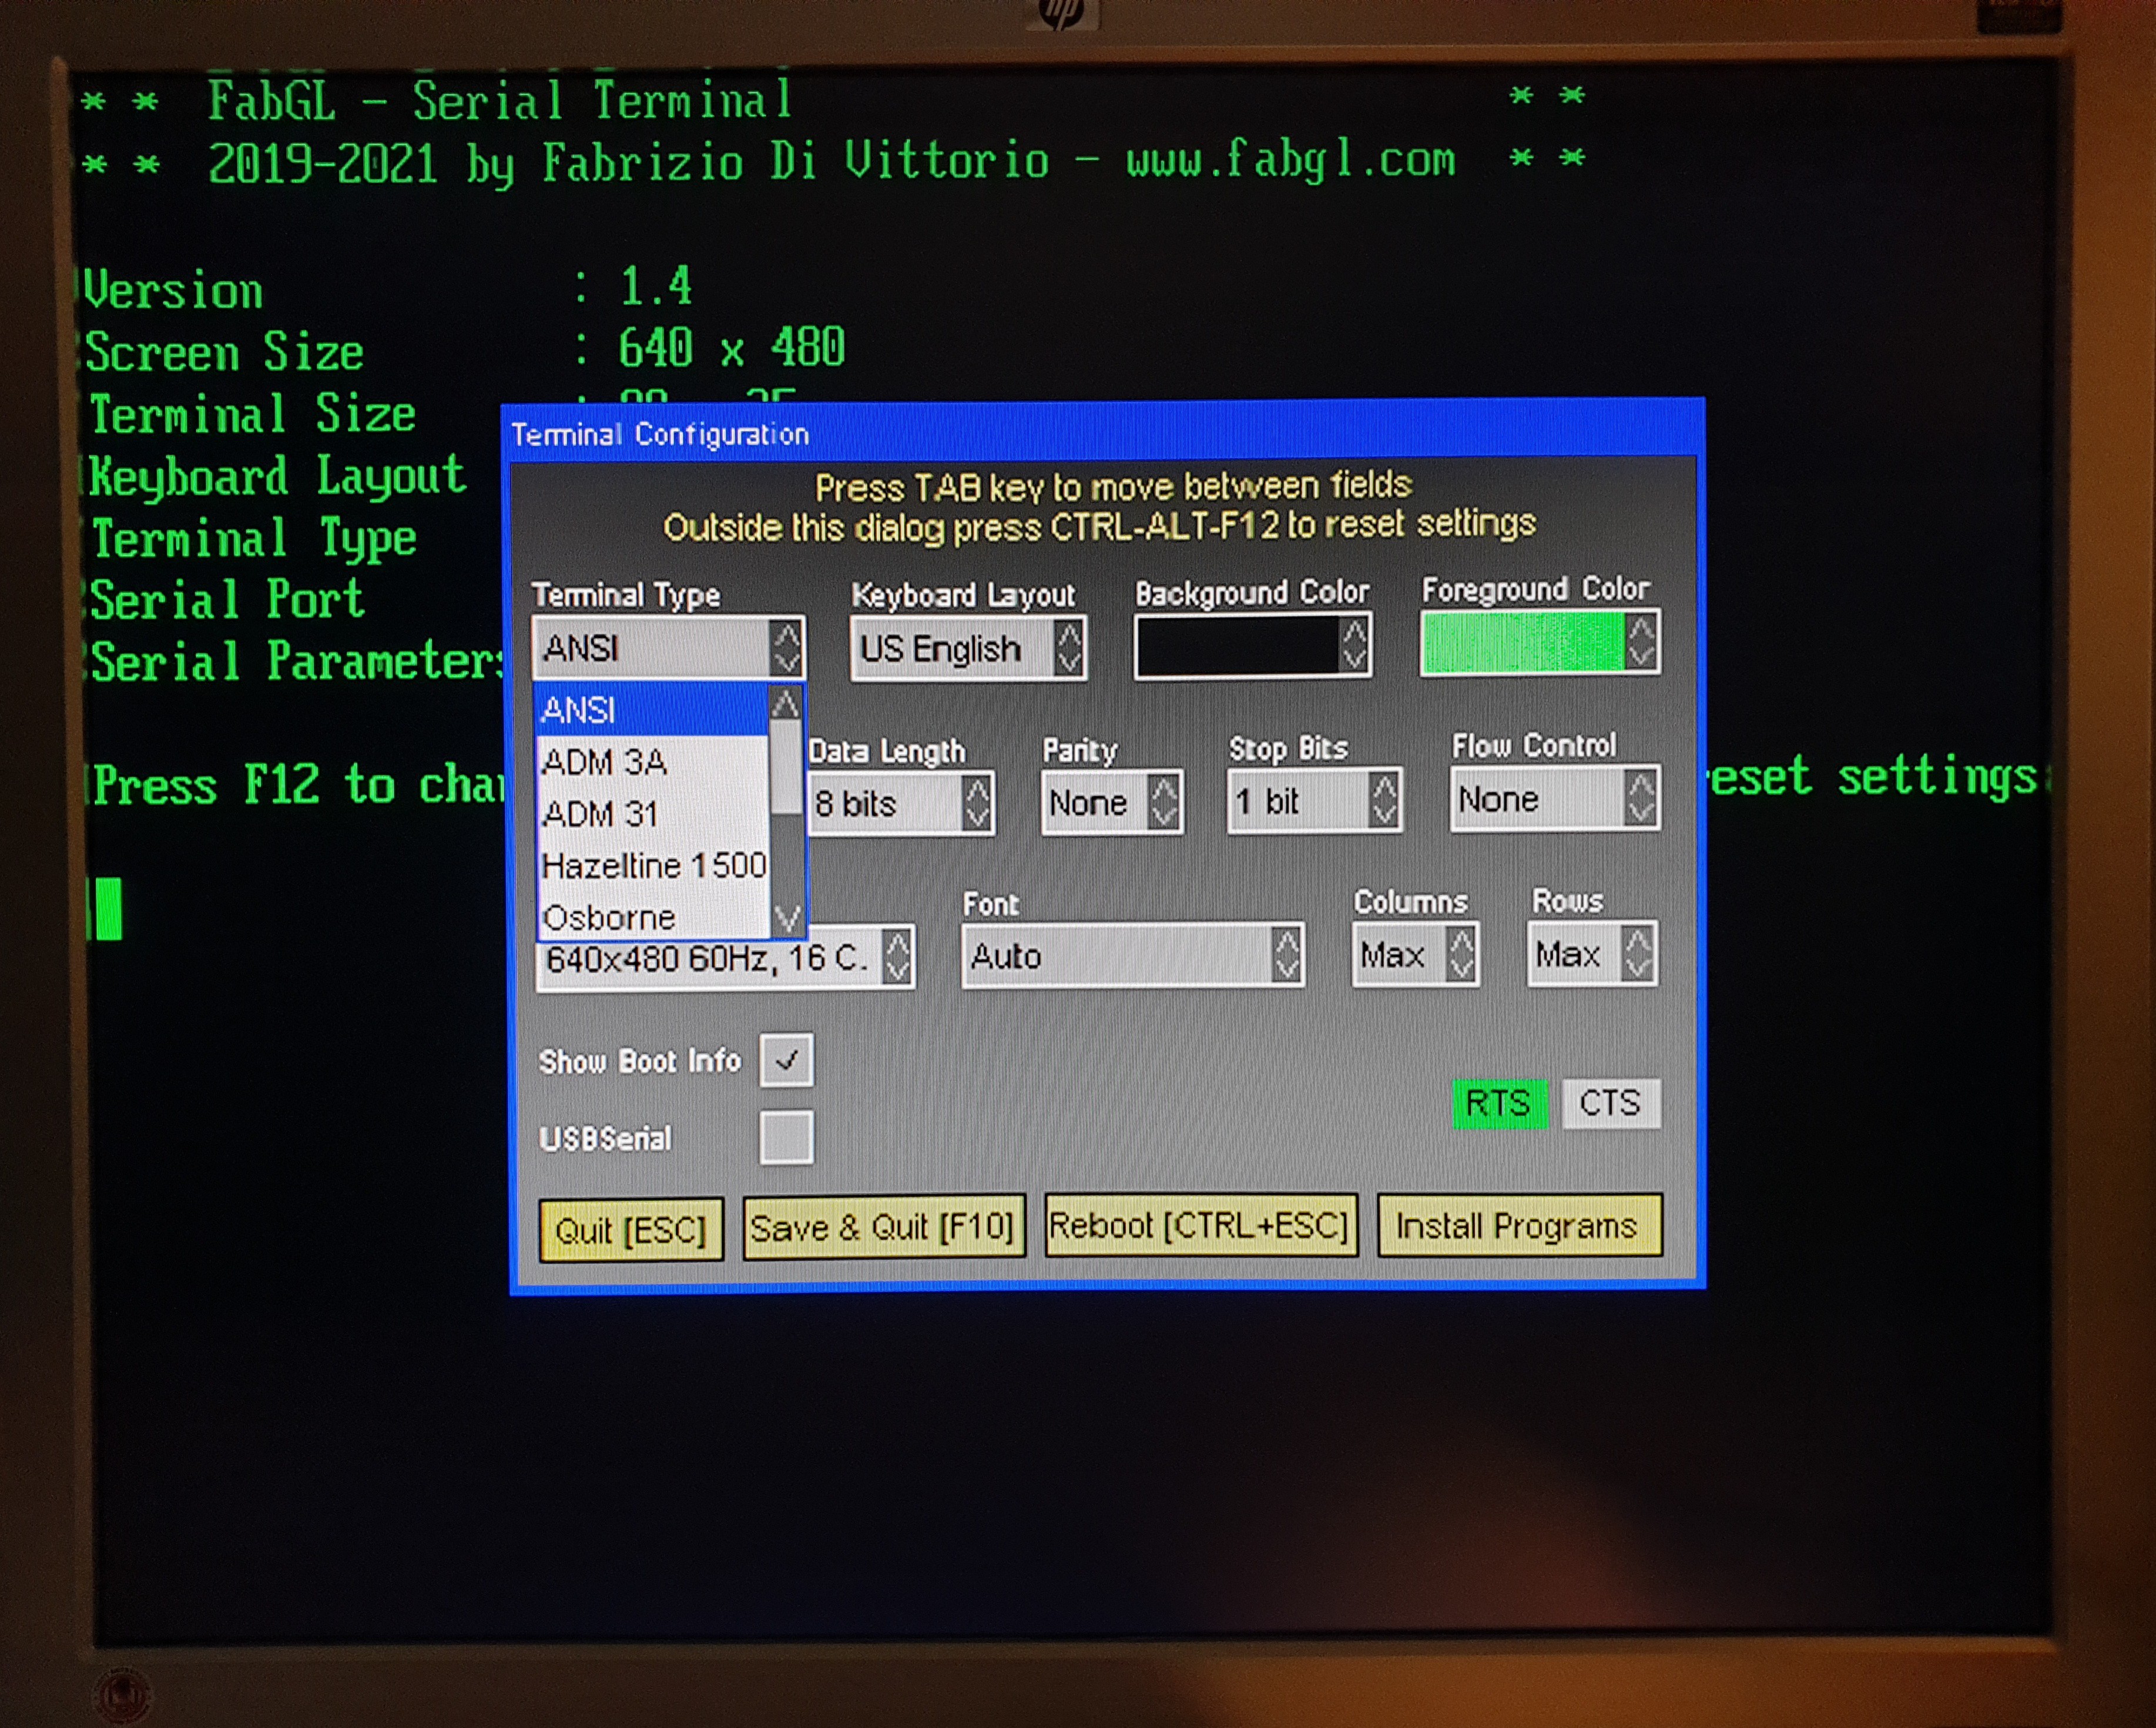
NOTE 1: Don't enable the HW RTS/CTS handshaking on the "Flow Control" terminal setting panel as the HW handshaking is reserved for the COM-USB2 (J3) "transparent" connector (see the "THE RTS-HS SWITCH" paragraph), and the relative GPIOs are not used for that.
NOTE 2: The maximum terminal serial speed cannot exceed 115200 bps.
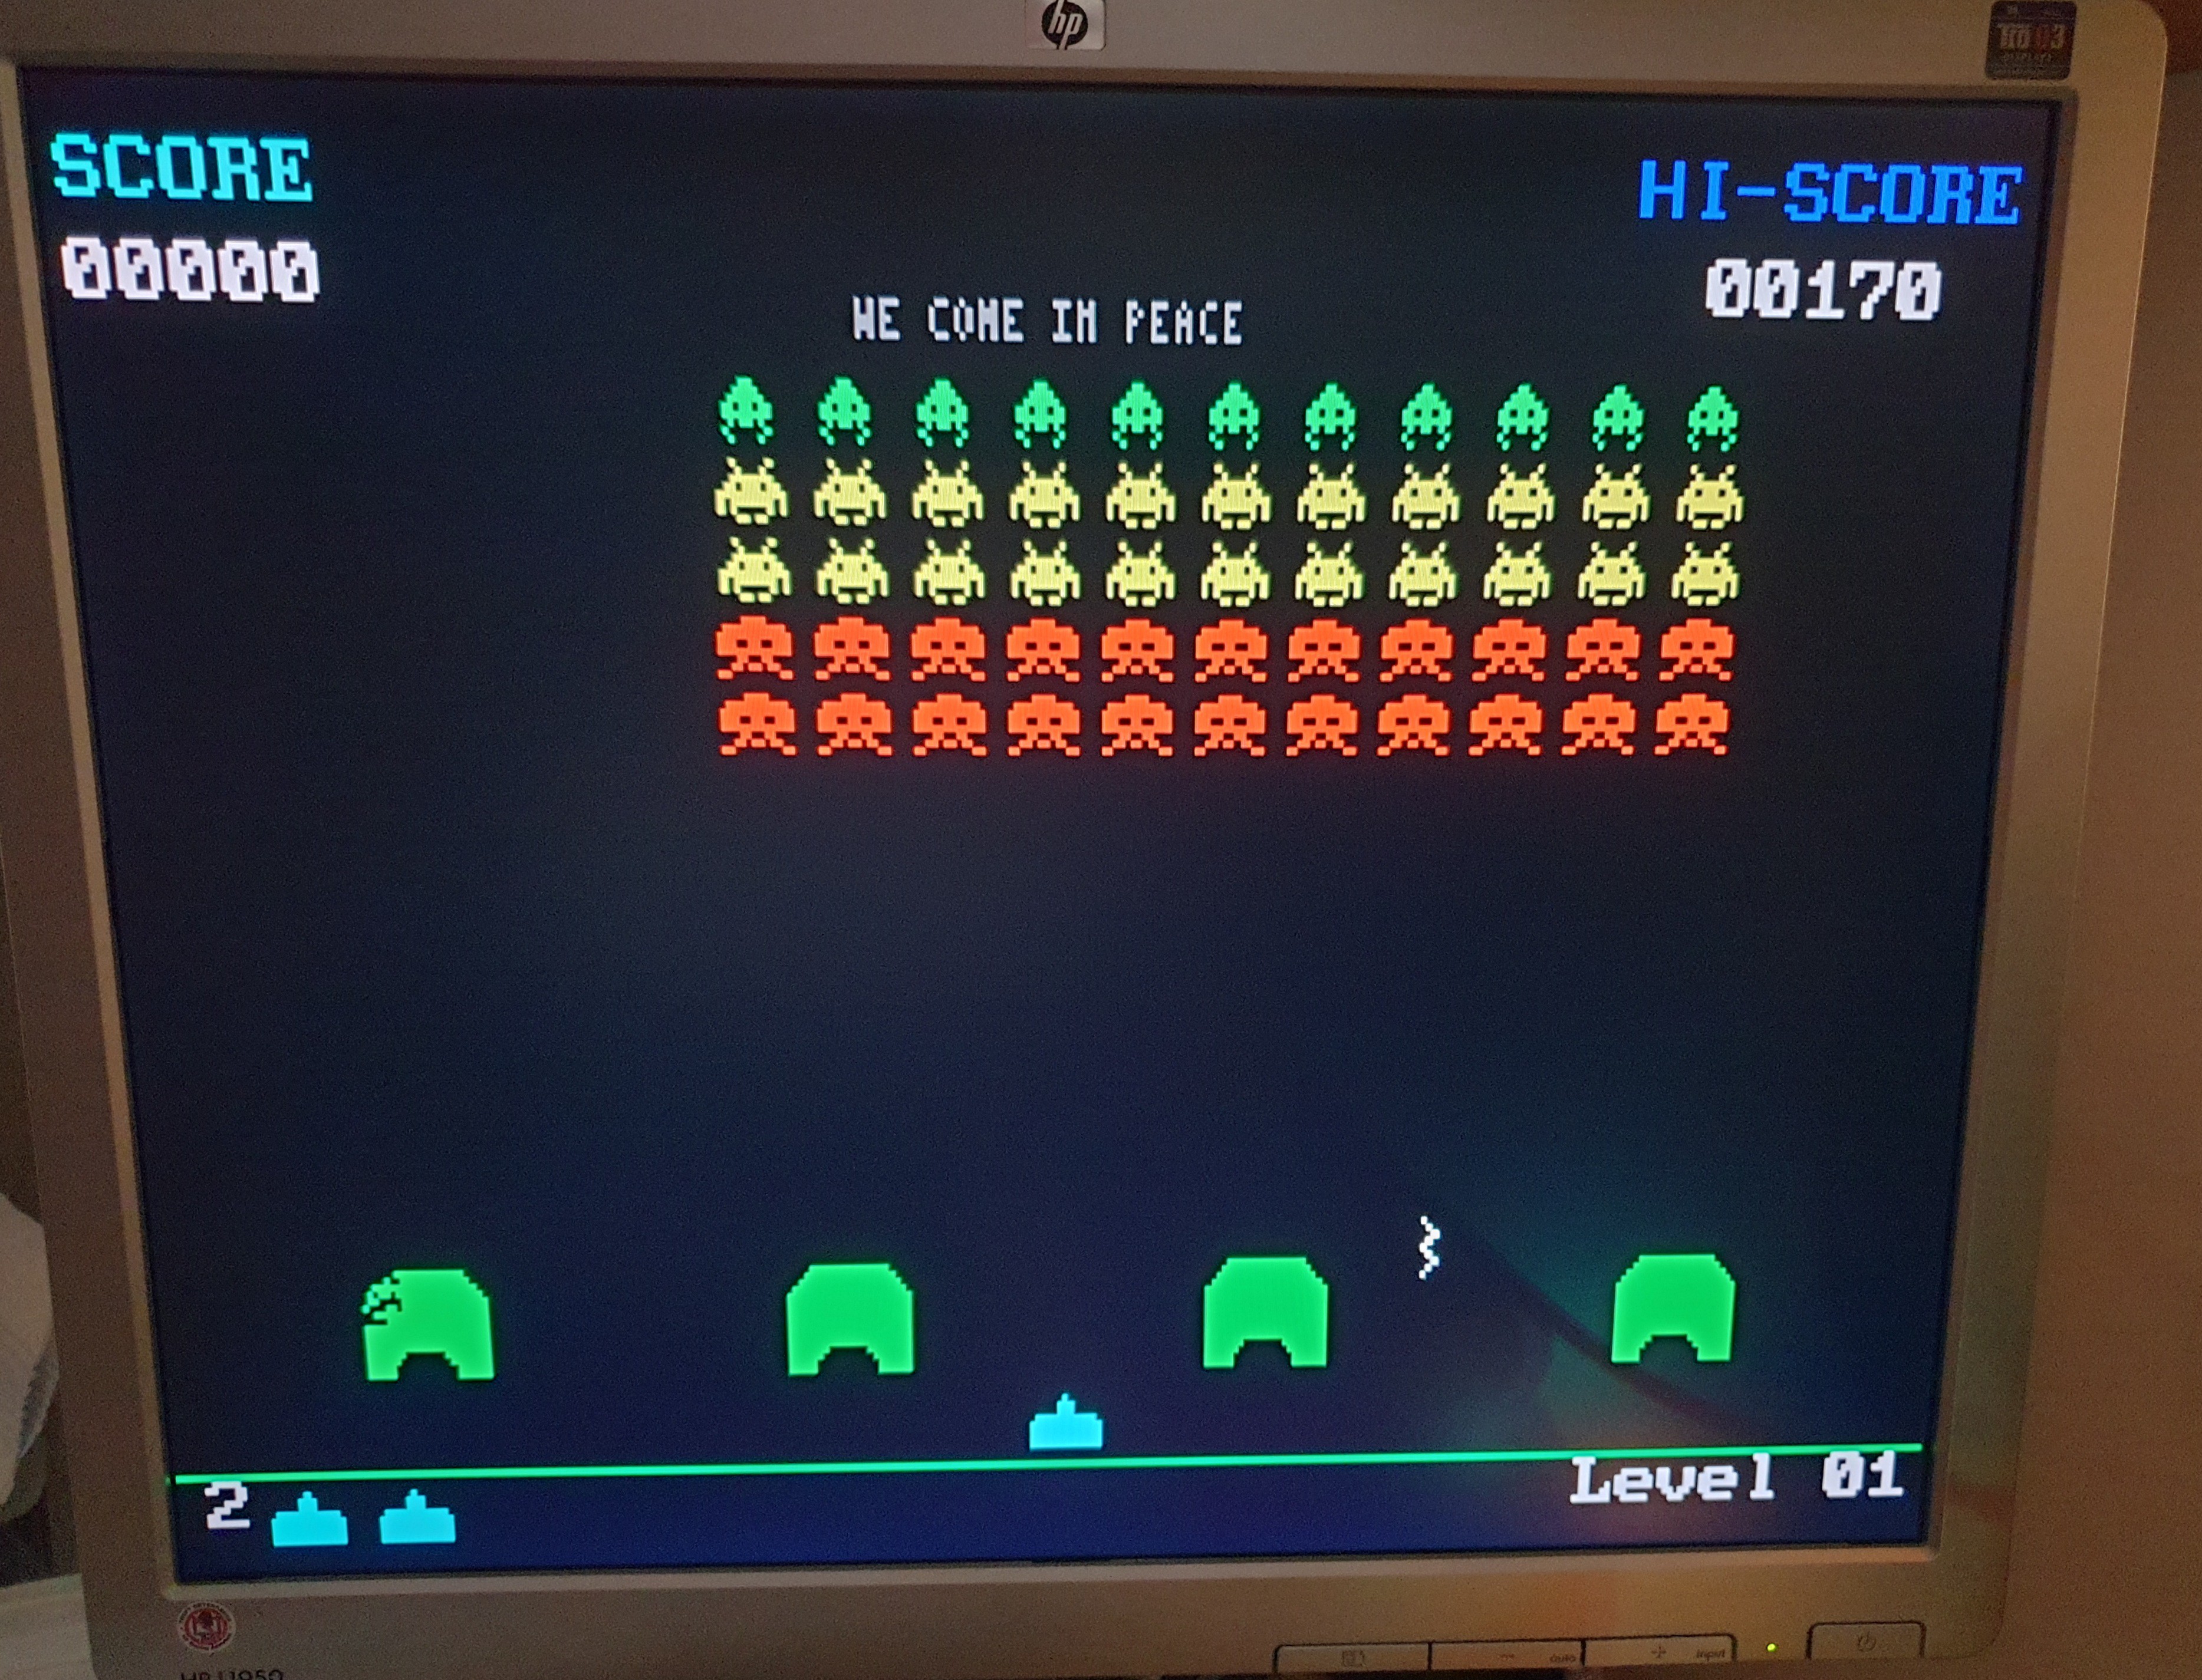
GAMES
In the Examples directory of the FabGL library there are some games that can be run with the uTerm2-S too.
Here Space Invaders:
and Classic Racer:

and don't forget to connect the speaker!
* * CREDITS * *
The FabGL library was developed by Fabrizio Di Vittorio (http://www.fabglib.org).
NOTE: All the updates and the details to build it are in the uTerm2-S main page here:
https://hackaday.io/project/181583
uTerm2-S: a multi-emulation color RS232 terminal
*PCBWay community is a sharing platform. We are not responsible for any design issues and parameter issues (board thickness, surface finish, etc.) you choose.


- Comments(0)
- Likes(12)
- 2 USER VOTES
- YOUR VOTE 0.00 0.00

-
9design
-
8usability
-
9creativity
-
8content

-
10design
-
9usability
-
10creativity
-
10content
 More by Just4Fun
-
 SPP (Standard Parallel Port) Adapter for the 68k-MBC
The Standard Parallel Port (SPP) Adapter board allows to use the GPIO port of the "retro-board" 68k-...
SPP (Standard Parallel Port) Adapter for the 68k-MBC
The Standard Parallel Port (SPP) Adapter board allows to use the GPIO port of the "retro-board" 68k-...
-
 uTerm2-S: a multi-emulation color RS232 terminal
* * HARDWARE OVERVIEW * *The uTerm2-S (micro Term2 stand-alone) is an easy to build multi-emulation ...
uTerm2-S: a multi-emulation color RS232 terminal
* * HARDWARE OVERVIEW * *The uTerm2-S (micro Term2 stand-alone) is an easy to build multi-emulation ...
-
 68k-MBC: a 3 ICs 68008 homebrew computer
* * DESCRIPTION * *The 68k-MBC is an easy to build 68008 CPU SBC (Single Board Computer), using only...
68k-MBC: a 3 ICs 68008 homebrew computer
* * DESCRIPTION * *The 68k-MBC is an easy to build 68008 CPU SBC (Single Board Computer), using only...
-
 Parallel Printer (SPP) Emulator Shield
* * HARDWARE OVERVIEW * *Playing with retro-computers or messing with dated instruments a simple SPP...
Parallel Printer (SPP) Emulator Shield
* * HARDWARE OVERVIEW * *Playing with retro-computers or messing with dated instruments a simple SPP...
-
 Azz!Duino: A W806 (Winner Micro) MCU on a Arduino Mega shaped board
* * OVERVIEW * *The W806 is an interesting low cost MCU made by Winner Micro. There is a page about ...
Azz!Duino: A W806 (Winner Micro) MCU on a Arduino Mega shaped board
* * OVERVIEW * *The W806 is an interesting low cost MCU made by Winner Micro. There is a page about ...
-
 uHat add-on board for uTerm2-S
It is a little add-on board with a PSRAM (specific for the ESP32) and a microSD socket. I've called ...
uHat add-on board for uTerm2-S
It is a little add-on board with a PSRAM (specific for the ESP32) and a microSD socket. I've called ...
-
 PicOne (PIC18F47Q10)
I was searching a DIL MCU for another "project" and found this one that seems interesting. It is che...
PicOne (PIC18F47Q10)
I was searching a DIL MCU for another "project" and found this one that seems interesting. It is che...
-
 V20-MBC: an easy to build 8088 + 8080 computer
DescriptionThe V20-MBC2 is an easy to build V20HL CPU SBC (Single Board Computer). It follows the sa...
V20-MBC: an easy to build 8088 + 8080 computer
DescriptionThe V20-MBC2 is an easy to build V20HL CPU SBC (Single Board Computer). It follows the sa...
-
 CH552 Dragon
* * HARDWARE OVERVIEW * *The CH552 is a little MCU with a 8051 core and a USB interface, and is damn...
CH552 Dragon
* * HARDWARE OVERVIEW * *The CH552 is a little MCU with a 8051 core and a USB interface, and is damn...
-
 ARMando (STM32F030R8 board)
I wanted a board with a "standard" form factor as the common dev boards, but that could be easily in...
ARMando (STM32F030R8 board)
I wanted a board with a "standard" form factor as the common dev boards, but that could be easily in...
-
 RC-Z8BASIC
Never used a Z8 MCU before, but when I found that chip "forgotten" for decades and started to read t...
RC-Z8BASIC
Never used a Z8 MCU before, but when I found that chip "forgotten" for decades and started to read t...
-
 uTerm-S: stand-alone RS232 VT100 terminal with VGA/PS2
* * HARDWARE OVERVIEW * *uTerm-S (micro-Term Stand-alone) is a legacy RS232 VT100-like terminal. It ...
uTerm-S: stand-alone RS232 VT100 terminal with VGA/PS2
* * HARDWARE OVERVIEW * *uTerm-S (micro-Term Stand-alone) is a legacy RS232 VT100-like terminal. It ...
-
 Dual channel RS232 adapter
This is a simple board I made to play with my FPGA board "The Thing". This board has two RS-232 chan...
Dual channel RS232 adapter
This is a simple board I made to play with my FPGA board "The Thing". This board has two RS-232 chan...
-
 uCom (a RS232 adapter for the Z80-MBC2)
uCom (micro-Com) is a RS232 adapter for the Z80-MBC2 (https://hackaday.io/project/159973). It has a ...
uCom (a RS232 adapter for the Z80-MBC2)
uCom (micro-Com) is a RS232 adapter for the Z80-MBC2 (https://hackaday.io/project/159973). It has a ...
-
 uTerm (a VT100-like terminal for the Z80-MBC2)
uTerm (micro-Term) is a VT100-like terminal for the Z80-MBC2 (https://hackaday.io/project/159973). I...
uTerm (a VT100-like terminal for the Z80-MBC2)
uTerm (micro-Term) is a VT100-like terminal for the Z80-MBC2 (https://hackaday.io/project/159973). I...
-
 "The Thing": FPGA + STM32, Multicomp compatible
### DESCRIPTIONTwo dev boards into one: a STM32 based Arduino ("Maple Mini" compatible) and a Cyclon...
"The Thing": FPGA + STM32, Multicomp compatible
### DESCRIPTIONTwo dev boards into one: a STM32 based Arduino ("Maple Mini" compatible) and a Cyclon...
-
 ESP-01 NanoBoard (ESP8266)
### DESCRIPTIONThe ESP-01 NanoBoard is a little "motherboard" for the well known ESP-01 ...
ESP-01 NanoBoard (ESP8266)
### DESCRIPTIONThe ESP-01 NanoBoard is a little "motherboard" for the well known ESP-01 ...
-
 Z80-MBC2: 4ICs homemade Z80 computer
### DESCRIPTIONThe Z80-MBC2 is an easy to build Z80 SBC (Single Board Computer with 8MHz Z80, 128kB ...
Z80-MBC2: 4ICs homemade Z80 computer
### DESCRIPTIONThe Z80-MBC2 is an easy to build Z80 SBC (Single Board Computer with 8MHz Z80, 128kB ...
-
-
-
-
Tester for Touch Screen Digitizer without using microcontroller
337 2 2 -
Audio reactive glow LED wristband/bracelet with NFC / RFID-Tags
317 0 1 -
-
-


