


|
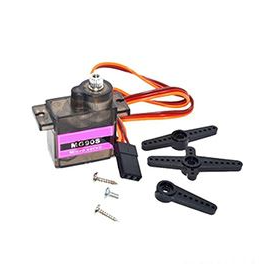
MG90S Metal Gear RC Micro Servo |
x 8 | |
|
|
Lolin S2 miniWemos
|
x 1 | |
|
|
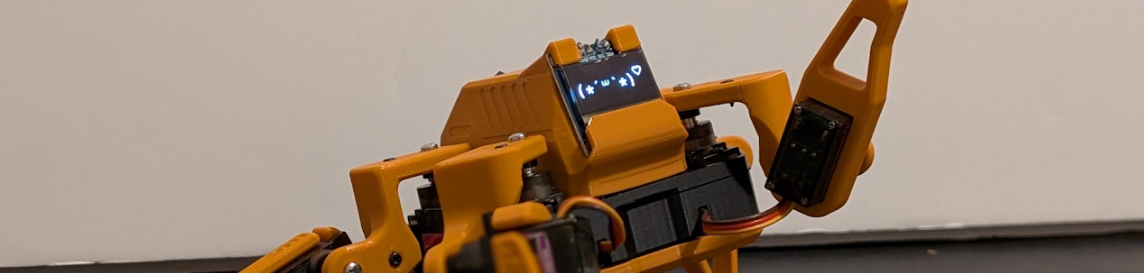
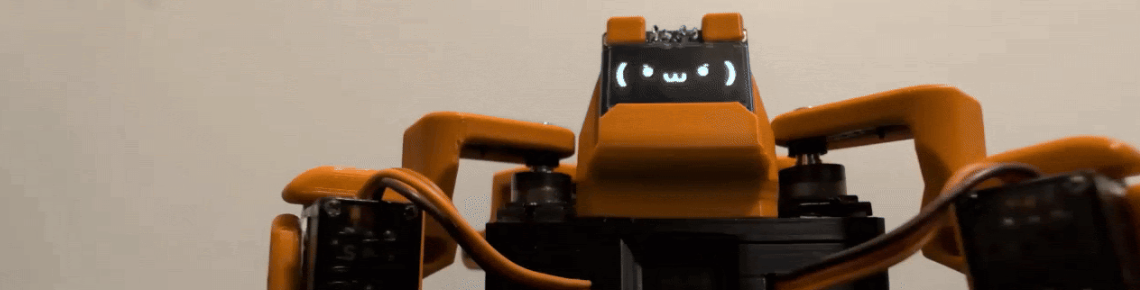
OLED Display 0.96 I2C 128x64 |
x 1 |

|
Autodesk Fusion 360Autodesk
|
|

|
Visual Studio CodeMicrosofe
|
|

|
Python 3.9Python Community
|
|

|
arduino IDEArduino
|
|

|
Bambu Lab A1 mini 3D printerBambu Lab
|
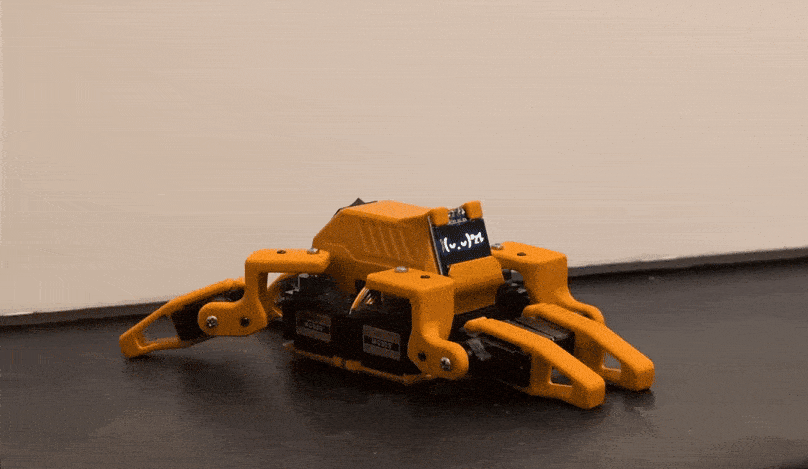
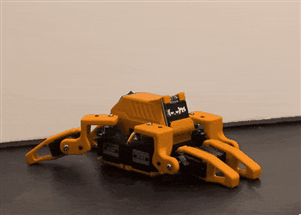
The Sesame Robot Project
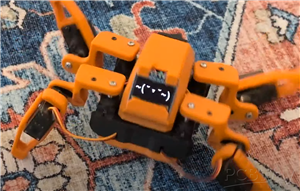
What is Sesame?
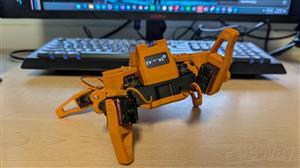
Sesame is a 3D-printable quadruped robot powered by an ESP32. It runs on 8 MG90S metal-gear servos (two per leg) and features a 128x64 OLED display for a face. It walks, dances, waves, and judges you silently with pixelated eyes. The best part? It’s completely modular. Whether you want to hand-wire a prototype or order a professional PCB, the barrier to entry is super low.
Building a Sesame Robot costs $50-60 in parts. I went into detail on how I came up with and built Sesame on my YouTube Channel:
-------------------------------------------------
Designing the Hardware (and failing a few times)
Designing a robot that walks is tricky. Designing one that is small, cheap, and easy to print is a whole different headache.
I did all the design work in Fusion 360. My first concept actually had three servos per leg. While that offers more freedom of movement, it made the robot look like a spindly spider and blew the budget. I scrapped it and simplified the design to two servos per leg—one for the hip, one for the knee.
Optimizing for Printability
One of my biggest pet peeves with 3D printed projects is wrestling with support material. I spent a lot of time optimizing the Sesame parts (links, body, covers) to print without supports wherever possible.
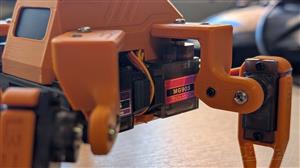
For example, the femur links have specific geometry changes (squared-off sections vs. rounded ones) solely to ensure they lay flat on the print bed. The internal frame is packed tight; I had to figure out how to cram a battery, a microcontroller, and a nest of wires into a box the size of a bar of soap.
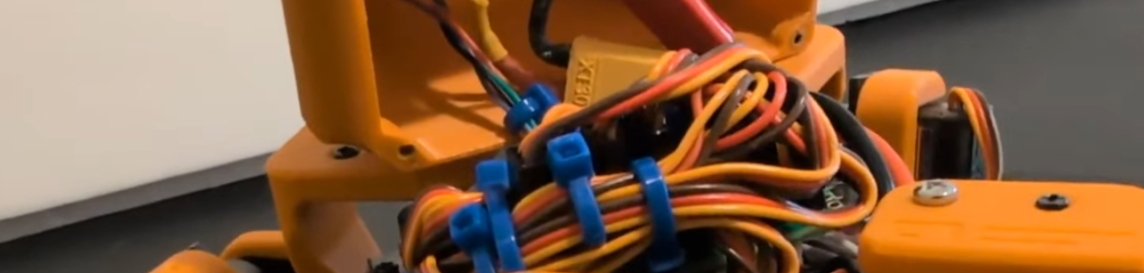
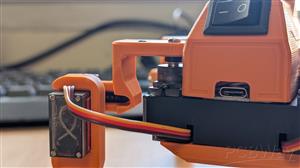
The Electronics & The "Spaghetti" Problem
Let’s talk about wiring.
The working prototype of Sesame is... functional. It uses an ESP32-S2 Mini and a perfboard. But if you look inside, its sort-of a terrifying bird's nest of silicone wire and solder. It worked, but asking other people to replicate that mess does seem cruel
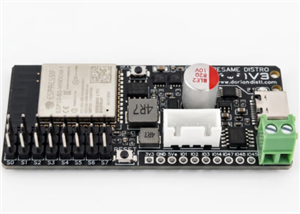
I wanted a cleaner solution. That’s where the Sesame Distro Board comes in.
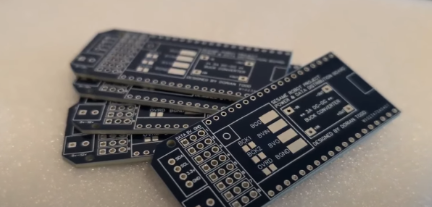
Going Custom with PCBWay
I designed a custom PCB that acts as a "hat" for an ESP32-DevKitC-32E. It breaks out all 8 servo channels, handles the I2C connection for the OLED screen, and manages power distribution.
A huge shoutout to PCBWay for supporting this part of the project. I sent them my Gerber files, and a few days later, I had these beautiful blue-and-silver PCBs in hand. They are genuinely some of the nicest boards I've handled. Using a dedicated PCB turns a 4-hour frustration-filled wiring session into a 20-minute soldering job.
Note: The Sesame distro board V1 will work, but it has a few issues that make it a little harder to assemble and will not run on teathered power (eg. USB C). Until V2 is released, I recommend using the S2 Mini / Hand Wiring approach.
The Brains: Firmware & Sesame Studio
A robot is just a plastic brick until you give it code. For Sesame, I wanted the user experience to be seamless. No app stores, no Bluetooth pairing headaches.
The Captive Portal
The firmware creates its own WiFi Access Point called "Sesame-Controller." When you connect to it with your phone, it acts like a hotel WiFi login page, and it automatically pops up a web-based controller.
This interface is stored directly on the ESP32 using PROGMEM. It allows you to:
- Drive the robot (Walk, Turn).
- Trigger emotes (Wave, Dance, Point).
- Adjust settings (Calibration, Speed).
Sesame Studio:
Writing robot animations by hand is painful. You have to guess angles: "Set servo 3 to 45 degrees... no, wait, 60 degrees."
I got tired of guessing, so I wrote a Python desktop app called Sesame Studio. It gives you a visual schematic of the robot. You can input numbers to set the legs exactly where you want them, capture a "frame," and then sequence those frames into an animation.
Once you’re done, the app generates the exact C++ code needed for the Arduino IDE. You just copy, paste, and upload. It turns it into a stop-motion animation workflow, which is way easier to use.
You can download Sesame Studio in the software folder of the repository.
Build Your Own Sesame
After four months of prototyping, coding, and melting plastic, Sesame is finally finished. But really, this is just the start.
I’ve uploaded everything you need to build this bot to GitHub. I mean everything:
- The STLs: Optimized for PLA.
- The Source Code: Firmware and the Python Studio app.
- The Documentation: A full Bill of Materials (BOM), a wiring guide, and a step-by-step assembly manual.
Want to Learn More?
Check out my full blog on the project on my website!
Also, check out the Open-Source Repository!
The Sesame Robot Project
Project images are for reference only. Actual production is based on the manufacturing files on the project page.
Please review the designer's notes (e.g., PCB thickness) and select the appropriate options.
PCBWay is not responsible
for issues caused by unsuitable parameter selections.
For more important ordering information, please refer to
Read More


Raspberry Pi 5 7 Inch Touch Screen IPS 1024x600 HD LCD HDMI-compatible Display for RPI 4B 3B+ OPI 5 AIDA64 PC Secondary Screen(Without Speaker)
BUY NOW

- Comments(4)
- Likes(9)
- 2 USER VOTES
- YOUR VOTE 0.00 0.00

-
10design
-
10usability
-
10creativity
-
10content

-
10design
-
10usability
-
10creativity
-
10content
 More by Dorian Todd
-
Programmable Mist Maker - XIAO / QT PY Extension
1066 2 1 -
RadioHAT - Raspberry Pi radio development platform
877 0 2 -
-
-
-
-
ARPS-2 – Arduino-Compatible Robot Project Shield for Arduino UNO
3330 0 6 -
A Compact Charging Breakout Board For Waveshare ESP32-C3
3938 3 8 -
AI-driven LoRa & LLM-enabled Kiosk & Food Delivery System
4326 2 2


