


Components
|
|
M2.5 screws and nuts |
x 3 | |
|
|
623-2z bearing |
x 1 | |
|
|
Arc magnet |
x 1 |
Tools, APP Software Used etc.

|
STM32CubeProgrammerSTMicroelectronics
|
Description
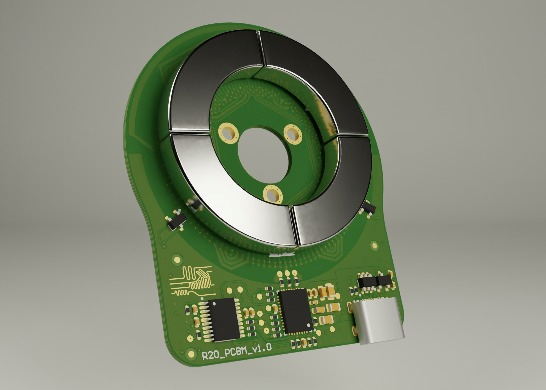
R20 PCBM v1.1
The project
The Comb PCB motor redefines what’s possible in accessible, efficient, and versatile motor solutions.
- USB-C Powered: Powered through a standard USB-C connection, making it incredibly user-friendly and compatible with modern power sources.
- Cost-Effective Manufacturing: Designed with simplicity and scalability in mind, it is extremely affordable to produce. Perfect for hobbyists and large-scale applications alike.
- Efficient: The comb-shaped stator maximizes efficiency by eliminating torque loss, ensuring optimal performance even under demanding conditions.
- Seamless Integration: Fully customizable, the motor can be easily modified or directly integrated into any project requiring a compact, inexpensive motor solution.
- Advanced Control Capabilities: Built-in position, velocity, and torque control offer a level of precision and flexibility typically reserved for far more expensive systems.
In short, this PCB motor combines cutting-edge design with practicality, making it an ideal choice for engineers, makers, and innovators everywhere.
These early tests confirmed the basic viability of the motor while pointing out mechanical details to refine in future versions.
Tests
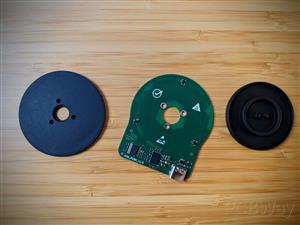
Assembly Instructions
Follow these steps to assemble the Comb PCB Motor:
- Order PCBs: Purchase the motor PCBs from PCBWay using the provided manufacturing files.
- Prepare Mechanical Parts: 3D print the rotor and bearing holder using standard FDM or resin printers. Alternatively, you can order high-quality 3D prints directly through PCBWay’s 3D printing service.
- Attach Magnets to Rotor: Carefully glue the magnets onto the rotor.
- Mount the Bearing: Glue the bearing into the bearing holder. Make sure it sits flat and is fully secured.
- Secure Bearing Holder to PCB: Use non-ferrous screws and nuts (e.g., stainless steel or nylon) to attach the bearing holder to the PCB. Avoid magnetic materials to prevent cogging or interference with motor function.
- Assemble the Rotor: Press-fit the rotor (with magnets) into the bearing. Ensure smooth rotation.
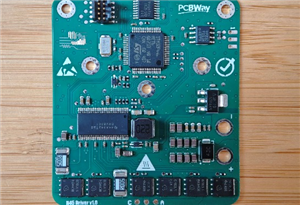
- Program the Firmware: Connect the PCB to your computer via USB-C. Use STM32CubeProgrammer to flash the latest firmware onto the microcontroller. Firmware is available from the github repository.
Code
Github repository of the R20_PCBM
https://github.com/guimpt/R20_PCBM
Schematic and Layout
Github repository of the R20_PCBM
https://github.com/guimpt/R20_PCBM
CAD-Custom parts and enclosures
Rotor
Rotor_pl.STEP
Bearing holder
Stator.STEP
May 02,2025
1,085 views
R20 PCBM v1.1
4 Layers PCB 61 x 52 mm FR-4, 1.6 mm, 1, HASL lead free, Green Solder Mask, White silkscreen
The goal of this project is to create a small, highly efficient and very cheap to manufacture PCB Motor.
1085
2
1
Published: May 02,2025
Standard PCB
Download Gerber file 16
BOM(Bill of materials)
Centroid file
PCBWay Donate 10% cost To Author
Only PCB
PCB+Assembly
*PCBWay community is a sharing platform. We are not responsible for any design issues and parameter issues (board thickness, surface finish, etc.) you choose.


Under the
Attribution-ShareAlike (CC BY-SA)
License.


Raspberry Pi 5 7 Inch Touch Screen IPS 1024x600 HD LCD HDMI-compatible Display for RPI 4B 3B+ OPI 5 AIDA64 PC Secondary Screen(Without Speaker)
BUY NOW


Topic

- Comments(1)
- Likes(2)
Upload photo
You can only upload 5 files in total. Each file cannot exceed 2MB. Supports JPG, JPEG, GIF, PNG, BMP
0 / 10000
 More by Guim P.
You may also like
-
Programmable Mist Maker - XIAO / QT PY Extension
80 0 0 -
RadioHAT - Raspberry Pi radio development platform
100 0 0 -
-
-
-
-
ARPS-2 – Arduino-Compatible Robot Project Shield for Arduino UNO
2722 0 5 -
A Compact Charging Breakout Board For Waveshare ESP32-C3
3218 3 8 -
AI-driven LoRa & LLM-enabled Kiosk & Food Delivery System
3476 2 2


