


Project Scribe
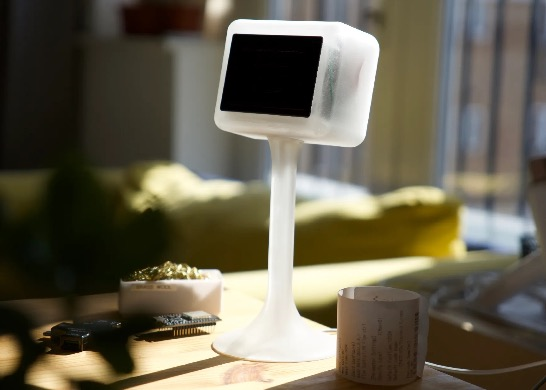
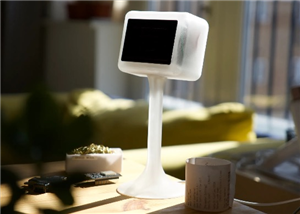
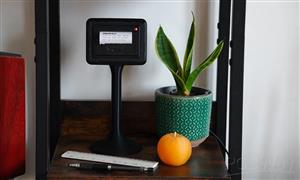
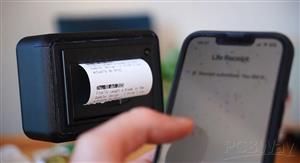
Base Scribe: a simple, reliable, open-source system that helps you capture the meaningful moments of your life. It leverages thermal printing to write a tangible log of your life's story, daily achievements, thoughts, or memories on a continuous roll of paper. It's designed to be a quiet companion that nudges you to live more intentionally.
This project is born from the idea of "bringing receipts" for the life you lead/ towards the life you want to lead. It's about creating a physical artefact of your journey. It is highly hackable, adaptable and scalable to fit your needs and wants.
Features of the "out-of-the-box" configuration (v1)
- Thermal Printing: Clean, permanent-enough tactile records - no mess, no dried ink
- Standard Rolls: Very cheap and available paper - e.g. couple of bucks for 6 rolls
- Minimalist Web Interface: Sleek, distraction-free input with just a text box and submit button (and some confetti for that extra delight)
- API Integration: Integrate Project Scribe with your favourite tools like Apple Shortcuts, IFTTT, or your own custom scripts.
- Offline Operation: No cloud services required (but cloud capable) - everything works locally
- Organic Design: Loosely Inspired by Dalí and Gaudí, with flowing curves that hint at life's organic nature
- Low Power: Runs on a single USB port, no separate power supply needed (about 0.5W at idle)
- Open Source: Completely free, hackable, and customisable
BOM
- D1 mini board (any Arduino board will do, but you will have to adjust the sketch)
- CSN-A4L thermal printer (any serial thermal printer might do, although I haven't tested for that - you may need to adjust power and pinout)
- Paper rolls (printer comes preloaded with one, and it'll last ages - here, you're looking for 57.5±0.5mm width and 30mm max diameter)
- 3D printer for the body (you may need some glue to fix the parts together - no screws required)
- Wires (for soldering and connecting components + USB wire to power the whole thing)
- 5V/ USB power supply capable of higher currents (only used during thermal printing)
Links to grab the components (if you want to use them):
Microcontroller (USB-C D1 Mini):
- Amazon US: https://amzn.to/4h2zQYO
- Amazon UK: https://amzn.to/4gRFgFe
Thermal Printer (CSN-A4L):
- AliExpress: https://s.click.aliexpress.com/e/_opjoNrw
- Amazon US: https://amzn.to/4kr5ksq
Paper Rolls (57.5x30mm):
- Amazon US: https://amzn.to/4kpOREP
- Amazon UK: https://amzn.to/44nqGCg
Important Note: Do your own due diligence regarding thermal paper types - the thermal paper we handle everyday (e.g. through receipts from the grocery store, restaurants, takeaway, taxis, etc.) will contain BPA. When choosing your rolls for this, you should definitely go for BPA-free paper just to be on the safer side - the links provided are for BPA-free paper. If you can, go a step further and look for “phenol-free” paper. Three types that do not contain BPA or BPS and are competitively priced contain either ascorbic acid (vitamin C), urea-based Pergafast 201, or a technology without developers, Blue4est. (Thanks to everyone who commented and informed this!)
Note2: The components might be slightly different as listings always change silently - always check. If you notice any issues, please ping me to update the readme.
Note3: If you don't have a 3D printer but would like to build this, consider using the PCBWay affiliate link: https://pcbway.com/g/86cN6v (discount to you + some small help for the project).
Note4: Some thermal paper is treated against fading - can last e.g. 35+ years. If you're planning on using Scribe for archival purposes, consider ink fading when picking up the right rolls.
Pin-out/ wiring during operation
Data Connections (D1 Mini ↔ Printer)
- Printer TTL RX → D1 Mini D3
- D1 Mini Transmit (TX → RX)
- Printer TTL TX → D1 Mini D4
- D1 Mini Receive (RX ← TX)
Power Connections
- Printer Power VH → 5V from Power Supply
- Printer VIN (requires external 5V power source, relatively high current)
- Printer GND → GND (shared between D1 Mini and Power Supply)
- Printer TTL GND → GND (shared between D1 Mini and Power Supply)
- Ensures common ground for serial communication
Note: Never power the printer directly from/ through the D1 Mini! You'll burn your microcontroller.
Note2: Only power the D1 Mini via one source (either via USB during firmware flashing, or via the 5V pin during normal operation from the shared power supply)
Note3: You can remove the other wires (e.g. TTL NC/ DTR) - you'll deal with less clutter since these will not be used.
Microcontroller firmware
One sketch file, using the IDE of your choice (e.g. the main Arduino IDE works well with the added modules for D1 mini + libraries - that's what I use).
You can grab the latest version from the GitHub repository: https://github.com/UrbanCircles/scribe/tree/main
Please check everything is working before soldering and squeezing everything into the 3D printed shell.
Note: As mentioned above - do not power the printer through the D1 Mini and do not power the D1 mini via both the USB and its pins at the same time.
Assembly
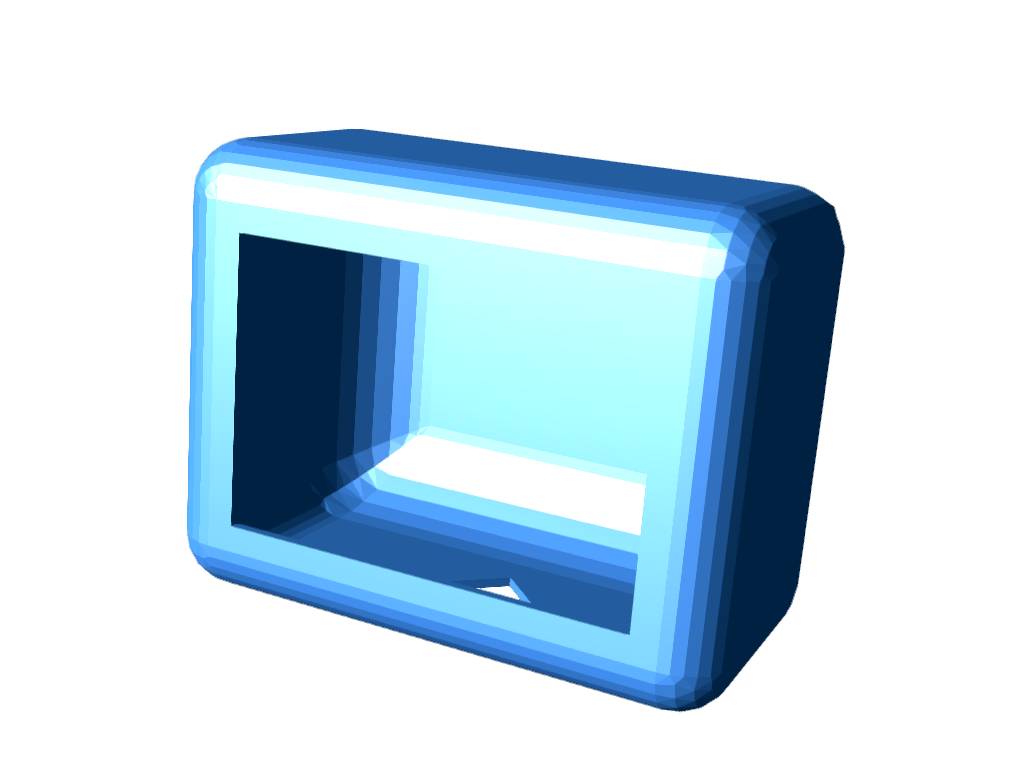
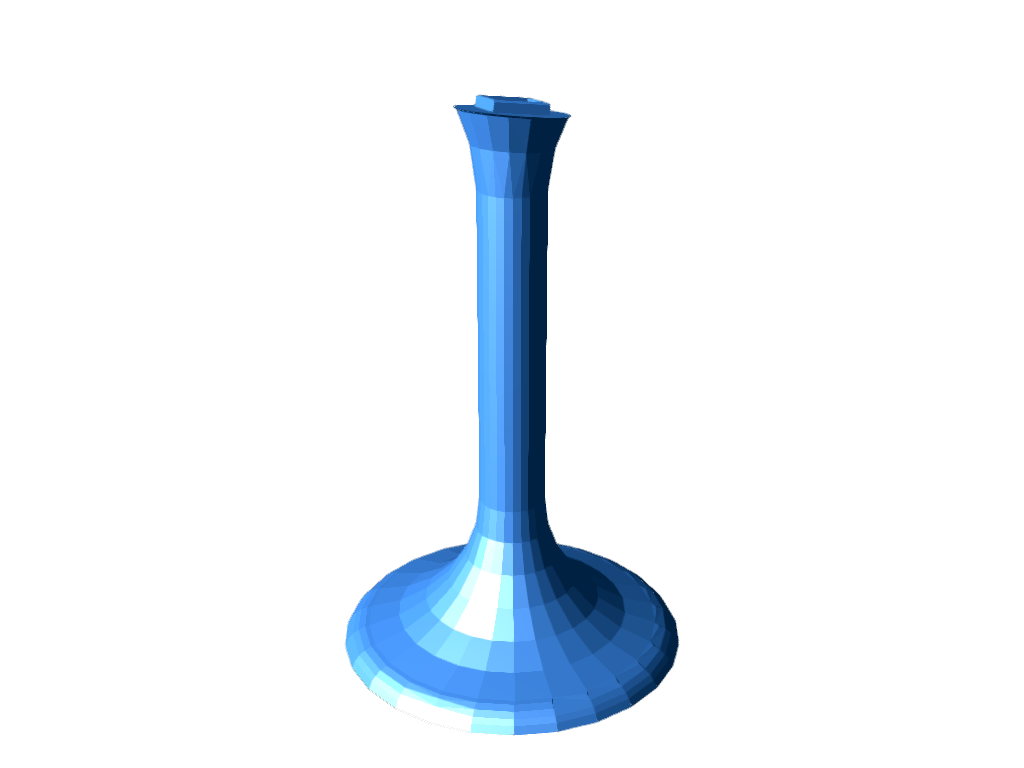
There are 2x 3D Printed components:
- The head unit (in which your MCU + Thermal Printer + wiring slot it)
- The neck/ leg (connects with the head and has a channel to elegantly route/ feed your power cable through)
Printing considerations
- The head has fillets, so you will most likely require supports
- Smaller line heights will produce better results
- The neck/ leg can be printed without any supports upright
- The components may vary in size slightly, so will the tolerances/ clearances - you may need to us glue to put the pieces together in case they're lose, or sandpaper in case they're too tight
Assembly considerations
- Make sure you route the wire through the neck/ leg of Scribe before you crimp the connectors
- Important: make sure each connection and wire is well isolated before you cram all the wiring into the head unit! You really don't want a short circuit
- Always to a test run before final assembly
- Do not glue the electrical components together, in case you need to service this later (you shouldn't need to glue them together)
User guide for standard configuration (v1)
- Power On: Connect the device to a beefy 5V USB power source. Wait a few moments for it to boot, connect to WiFi, and print its startup receipt.
- Get the IP Address: The local IP address will be printed on the startup receipt.
- Start Scribing!
- Look back at your story
- Improve and scribe some more
Message format
The as-is firmware prints messages in the right orientation for the roll of paper to naturally wind downwards, with word wrap. The first line is the header, reminiscent of a calendar - date on black background. The following lines are the message itself.
Scribing through a web browser
- The D1 Mini creates a local web server and the as-is configuration includes a minimalist, light web app
- Open a web browser on any device on the same network and navigate to http://<IP_ADDRESS>. Type your entry (up to 200 characters) and press Enter or click the "Send" button
- This limitation is not the limitation of the printer/ hardware/ system, I just like it to keep the messages concise - you can change it in firmware (just like everything else around here)
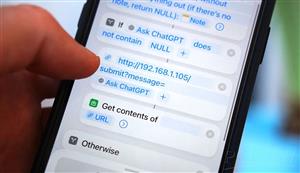
Scribing through the API
- You can also send entries directly from a browser or script. For example: http://<IP_ADDRESS>/submit?message=Went%20for%20a%20hike
- This is particularly useful when running automations - it works straight out of the box
- Different to the web app, when using the API there is no character limit out of the box. In addition, you can also backdate your entries, by adding the date parameter: http://<IP_ADDRESS>/submit?message=Finished%20the%20book&date=2025-07-04
Troubleshooting
In my testing and usage, I found this setup to be extremely reliable (after all, these printers are used in commercial settings). If the device is not printing as expected, this may be because of several reasons, e.g.:
- incorrect wiring/ a short
- paper not inserted correctly
- current on offer is not high enough
Thermal Printer Manual, in case you need to look into things further: https://www.manualslib.com/manual/3035820/Cashino-Csn-A4l.html
Disclaimer
I've done my best to document everything accurately - however, there might be mistakes. If you see them, or opportunities to improve, please open an issue. This is an open-source project given for free, with no warranties or guarantees. It assumes a level of proficiency with electronics, assemblies, engineering, etc. Stay safe. Stay productive. Work with what you have. Make the world a better place.
Project Scribe
Project images are for reference only. Actual production is based on the manufacturing files on the project page.
Please review the designer's notes (e.g., PCB thickness) and select the appropriate options.
PCBWay is not responsible
for issues caused by unsuitable parameter selections.
For more important ordering information, please refer to
Read More


Raspberry Pi 5 7 Inch Touch Screen IPS 1024x600 HD LCD HDMI-compatible Display for RPI 4B 3B+ OPI 5 AIDA64 PC Secondary Screen(Without Speaker)
BUY NOW


- Comments(0)
- Likes(3)
More by Urban Circles / Peter
-
Programmable Mist Maker - XIAO / QT PY Extension
1084 2 1 -
RadioHAT - Raspberry Pi radio development platform
902 0 2 -
-
-
-
-
ARPS-2 – Arduino-Compatible Robot Project Shield for Arduino UNO
3340 0 6 -
A Compact Charging Breakout Board For Waveshare ESP32-C3
3954 3 8 -
AI-driven LoRa & LLM-enabled Kiosk & Food Delivery System
4341 2 2


