|
ESP32-BlueJammerFlasherEmensta
|
ESP32-Based Smart Sensor Node with Custom PCB Design
The original idea was to create a compact and reliable sensor platform that can be used for environmental monitoring, home automation, and remote data collection.
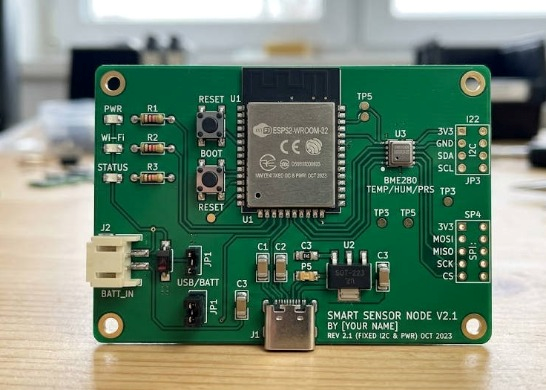
Instead of using multiple development modules connected with jumper wires, I designed a custom PCB to integrate the controller, power supply, communication interface, and sensor connectors into one compact board.
The goal of this project was not only to build a working device but also to practice the complete hardware development process, from schematic design to PCB layout and prototype testing.
Hardware Components
Main components used in this project:
Microcontroller
- ESP32-WROOM module
Sensors
- BME280 temperature/humidity/pressure sensor
- Optional I2C sensor expansion interface
Power Section
- USB-C 5V input
- 3.3V low-noise voltage regulator
- Battery connector
- Protection circuit
Communication
- Wi-Fi
- Bluetooth Low Energy
The ESP32 was selected because it provides enough processing capability while keeping the hardware design simple and affordable.
PCB Design
The PCB was designed using KiCad.
Some design considerations:
Power Supply Design
ESP32 can create short current peaks during Wi-Fi transmission, so stable power delivery was an important part of the design.
I added:
- Decoupling capacitors close to IC power pins
- Separate power traces for digital and sensor sections
- Proper grounding strategy
Sensor Placement
The temperature sensor was placed away from the ESP32 module and voltage regulator.
During testing, I noticed that heat generated by the MCU and power circuit could influence temperature readings.
Moving the sensor closer to the PCB edge improved measurement accuracy.
PCB Layout
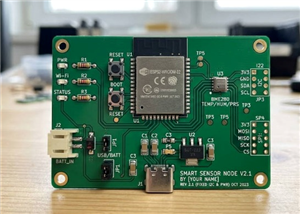
The final PCB includes:
- 2-layer board structure
- Clearly labeled connectors
- Test points for debugging
- Expansion headers for future sensors
Assembly and Testing
After receiving the PCB prototype, I assembled the components and tested each section separately.
Testing steps:
- Check power rail voltage
- Program ESP32 firmware
- Verify sensor communication
- Test Wi-Fi connection
- Run long-term stability tests
The first prototype worked, but I found some small issues:
- One sensor address conflict on the I2C bus
- Slight voltage drop during Wi-Fi transmission
- Incorrect silkscreen marking on one connector
These problems were fixed in the second revision.
Lessons Learned
This project reminded me that PCB design is very different from breadboard prototyping.
A circuit that works perfectly on a breadboard may still have problems on a real PCB.
The most important lessons:
- Always consider power stability
- Leave enough test points
- Keep sensitive sensors away from heat sources
- Read component datasheets carefully before layout
Future Improvements
For the next version, I plan to add:
- Lower power sleep mode
- Solar charging support
- LoRa communication option
- More sensor interfaces
- Smaller PCB size
Conclusion
This ESP32 sensor node was a great learning project because it covered the complete hardware development process.
From selecting components, designing the schematic, creating PCB layout, assembling prototypes, and debugging hardware issues, every step helped improve my understanding of embedded electronics.
I hope this project can provide some ideas for other makers working on IoT and sensor-based devices.
Feel free to share your suggestions or improvements!
If you are deciding between ESP32 and ESP8266, this comparison may help explain where ESP32 fits and why it is usually the better choice for robotics and sensor projects:
https://www.bettlink.com/blog/esp32-vs-esp8266-which-choose-in-2026
ESP32-Based Smart Sensor Node with Custom PCB Design









Raspberry Pi 5 7 Inch Touch Screen IPS 1024x600 HD LCD HDMI-compatible Display for RPI 4B 3B+ OPI 5 AIDA64 PC Secondary Screen(Without Speaker)
BUY NOW


- Comments(1)
- Likes(2)
 More by sky Lin
-
 ESP32-Based Smart Sensor Node with Custom PCB Design
The original idea was to create a compact and reliable sensor platform that can be used for environm...
ESP32-Based Smart Sensor Node with Custom PCB Design
The original idea was to create a compact and reliable sensor platform that can be used for environm...
-
 From VHDL Code to Real Hardware: Designing a Finite-State Machine
This project is the second installment of my “From VHDL Code to Real Hardware” series, in which we d...
From VHDL Code to Real Hardware: Designing a Finite-State Machine
This project is the second installment of my “From VHDL Code to Real Hardware” series, in which we d...
-
Émetteur Récepteur Optique Expérimental (communication UART ATtiny + fibre optique)
138 0 1 -
SmallOLED - Live PC Stats, Animated Clocks & Audio Visualizer
986 0 3 -
"Talking Multimeter": Arduino-Based Speech Add-on for Multimeters with SCPI Protocol
563 0 1 -
Programmable Mist Maker - XIAO / QT PY Extension
3033 2 3 -
RadioHAT - Raspberry Pi radio development platform
2582 0 4 -
-
-