


DIY SMD ARDUINO UNO
This is a regular arduino board which contains extra features such as an extra VCC/GND rail and it uses an ATmega 328p SMD which has 2 extra analog pins (A6 - A7) . All you need to do is solder the components and use a (FT232RL) USB to TTL converter to upload a code. If you don't have this converter , you can simply follow the procedures below.
you will need: ATmega328p(SMD) ,220ohm resistor(SMD) ,SMD LED (4),16MHz crystal, pushbutton switch, (FT232RL) USB to TTL conveter, LM7805 (SMD) ,AMS 1117 (3.3V), female pin headers, a lot of lead.
In case u don't have a (FT232RL) USB to TTL conveter simply follow these steps,
first take a regular arduino UNO board and REMOVE it's micro controller(ATmega328p).
Then make these connections,
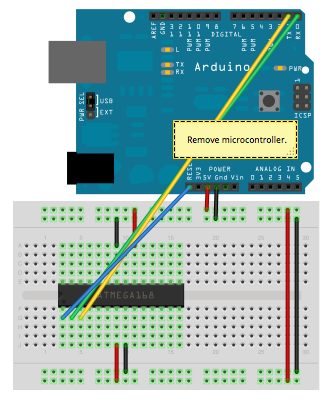
CONSIDER THE BREADBOARD AS THIS PCB.↑
| ARDUINO UNO R3 (regular arduino) | DIY SMD ARDUINO UNO R3 (THIS PCB) |
RST | RST |
| GND | GND |
| VCC | VCC |
| RX | RX |
| TX | TX |
after making the connections, simply go to the arduino IDE and upload a sketch.
for more info about the connections click the link below.
arduino upload code using another arduino
If u have any questions, pls leave them in the 'comment section'. I will give the answer ASAP.
And pls like my project :)
DIY SMD ARDUINO UNO
Project images are for reference only. Actual production is based on the manufacturing files on the project page.
Please review the designer's notes (e.g., PCB thickness) and select the appropriate options.
PCBWay is not responsible
for issues caused by unsuitable parameter selections.
For more important ordering information, please refer to
Read More









Raspberry Pi 5 7 Inch Touch Screen IPS 1024x600 HD LCD HDMI-compatible Display for RPI 4B 3B+ OPI 5 AIDA64 PC Secondary Screen(Without Speaker)
BUY NOW


- Comments(2)
- Likes(7)
- 2 USER VOTES
- YOUR VOTE 0.00 0.00

-
10design
-
10usability
-
10creativity
-
10content
-
10design
-
10usability
-
10creativity
-
10content
More by umar_khalid
-
 DIY ARDUINO UNO BOARD
this is a regular arduino board which all u need to do is solder the components and use a (FT232RL) ...
DIY ARDUINO UNO BOARD
this is a regular arduino board which all u need to do is solder the components and use a (FT232RL) ...
-
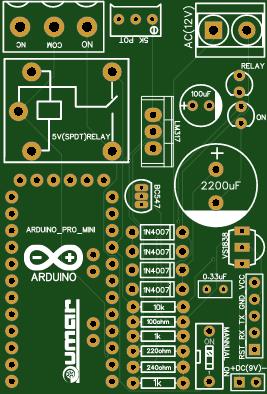 ARDUINO IR CONTROLLED RELAY (AC/DC)
This circuit needs maximum 5v - 7v if powered directly through DC power supply only. If ur supplyi...
ARDUINO IR CONTROLLED RELAY (AC/DC)
This circuit needs maximum 5v - 7v if powered directly through DC power supply only. If ur supplyi...
-
 LIGHT AND MOTION SENSITIVE LAMP CIRCUIT
This is a circuit which activates a RELAY when the envoiroment is dark and when there is a movement ...
LIGHT AND MOTION SENSITIVE LAMP CIRCUIT
This is a circuit which activates a RELAY when the envoiroment is dark and when there is a movement ...
-
 DIY ARDUINO PRO MINI 2.0 (upgraded version)
This is a DIY arduino PRO mini which is like a regular arduino pro minni but it has less components ...
DIY ARDUINO PRO MINI 2.0 (upgraded version)
This is a DIY arduino PRO mini which is like a regular arduino pro minni but it has less components ...
-
 DIY SMD ARDUINO UNO
This is a regular arduino board which contains extra features such as an extra VCC/GND rail and it u...
DIY SMD ARDUINO UNO
This is a regular arduino board which contains extra features such as an extra VCC/GND rail and it u...
-
 DIY SMD ARDUINO UNO R3
This is a regular arduino board which contains extra features such as an extra VCC/GND rail and it u...
DIY SMD ARDUINO UNO R3
This is a regular arduino board which contains extra features such as an extra VCC/GND rail and it u...
-
 LDR CONTROLLED RELAY MODULE SMD
This is a simple LDR dark sensor project which is designed to turn ON a relay (when there is light) ...
LDR CONTROLLED RELAY MODULE SMD
This is a simple LDR dark sensor project which is designed to turn ON a relay (when there is light) ...
-
 DIY ARDUINO UNO SHEILD SMD
This is a simple arduino sheild that can run on it's own as an arduino uno once it's powered...
DIY ARDUINO UNO SHEILD SMD
This is a simple arduino sheild that can run on it's own as an arduino uno once it's powered...
-
 DIY arduino UNO sheild
This is a simple arduino sheild that can run on it's own as an arduino uno once it's powered...
DIY arduino UNO sheild
This is a simple arduino sheild that can run on it's own as an arduino uno once it's powered...
-
 DIY 4017 CLAP SWITCH CIRCUIT.
THIS IS A SIMPLE CLAP SWITCH CCIRCUIT THAT USES A 4017ic DECODER. WHEN U CLAP ONCE, IT TURNS THE R...
DIY 4017 CLAP SWITCH CIRCUIT.
THIS IS A SIMPLE CLAP SWITCH CCIRCUIT THAT USES A 4017ic DECODER. WHEN U CLAP ONCE, IT TURNS THE R...
-
 DIY DIGITAL CLOCK
THIS IS A SIMPLE DIGITAL CLOCK THAT WORKS WITH A 9V BATTERY AND CAN BE SET JUST THREE BUTTONS.IF U L...
DIY DIGITAL CLOCK
THIS IS A SIMPLE DIGITAL CLOCK THAT WORKS WITH A 9V BATTERY AND CAN BE SET JUST THREE BUTTONS.IF U L...
-
 DIY ARDUINO UNO R3 SMD
THIS WORKS AS A REGULAR ARDUINO UNO WITH AN SMD ATMEGA 328P.U JUST NEED TO SOLDER THE COMPONENTS AND...
DIY ARDUINO UNO R3 SMD
THIS WORKS AS A REGULAR ARDUINO UNO WITH AN SMD ATMEGA 328P.U JUST NEED TO SOLDER THE COMPONENTS AND...
-
 arduino mega password security system shield
this is a sheild for an arduino mega. this security system can be accesed using RFID and IR and a ke...
arduino mega password security system shield
this is a sheild for an arduino mega. this security system can be accesed using RFID and IR and a ke...
-
 LED CHASER
this is a simple circuit using an ic 4017 and an ic 555 timer . u can adjust the frequency using the...
LED CHASER
this is a simple circuit using an ic 4017 and an ic 555 timer . u can adjust the frequency using the...
-
 LED CHASER
this is a simple circuit using an ic 4017 and an ic 555 timer . u can adjust the frequency using the...
LED CHASER
this is a simple circuit using an ic 4017 and an ic 555 timer . u can adjust the frequency using the...
-
 DIY arduino uno r3
DIY arduino uno circuit.its used just like a regular arduino uno all u gotta do is get the component...
DIY arduino uno r3
DIY arduino uno circuit.its used just like a regular arduino uno all u gotta do is get the component...
-
 ARDUINO UNO R3
AN ARDUINO UNO R3 DIY PROJECTU WILL NEED: ATmega 328P, 22PF ceramic capacitors(3), a few female pin ...
ARDUINO UNO R3
AN ARDUINO UNO R3 DIY PROJECTU WILL NEED: ATmega 328P, 22PF ceramic capacitors(3), a few female pin ...
-
 2 WAY INTERCOM CIRCUIT_20181119155207
THIS IS A 2 WAY INTERCOM CIRCUIT, IT WORKS LIKE A WALKIE TALKIE BUTWITH WIRES
2 WAY INTERCOM CIRCUIT_20181119155207
THIS IS A 2 WAY INTERCOM CIRCUIT, IT WORKS LIKE A WALKIE TALKIE BUTWITH WIRES
-
Programmable Mist Maker - XIAO / QT PY Extension
2233 2 2 -
RadioHAT - Raspberry Pi radio development platform
1926 0 4 -
-
-
-
ARPS-2 – Arduino-Compatible Robot Project Shield for Arduino UNO
4102 0 6 -
A Compact Charging Breakout Board For Waveshare ESP32-C3
4867 3 8 -
AI-driven LoRa & LLM-enabled Kiosk & Food Delivery System
5655 2 2 -





















