


Get Started with Capacitive Touch Kit
In between a new project I decided to make a small tutorial on capacitive touch pad for your next project.
For my next project I'm going to use some capacitive touchpad, and before releasing it, I decided to make a small tutorial about the kit that I received for DFRobot.
The kit brings 3 touchpads:
- Numeric keypad
- Wheel pad
- Touch pad
Connector board and rainbow cable. The kit only allow the use of one pad at a time connected to the Arduino. To start you will need the touch kit library, available here. Download and install it on your Arduino Library folder.
Schematic
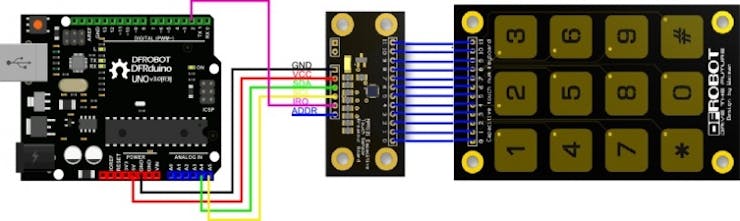
Keypad Schematic
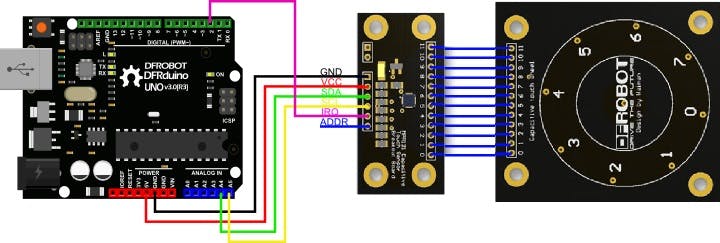
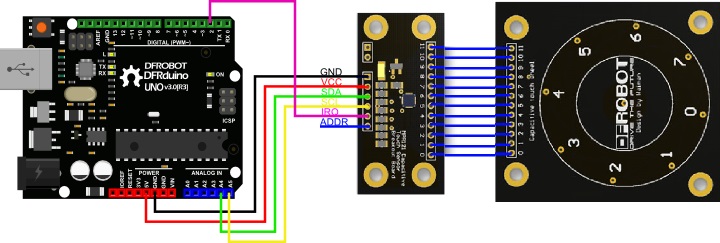
Wheel Schematic
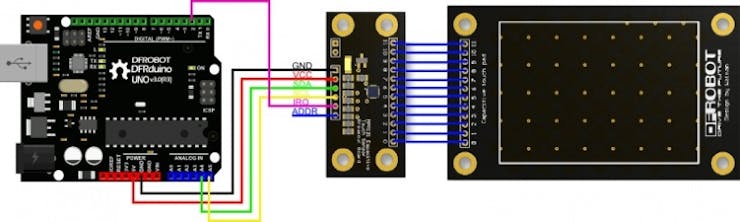
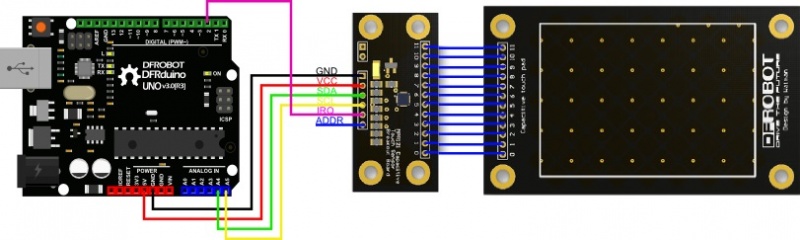
Touchpad Schematic
Just follow one of the schematic, to connect them in your arduino board.
The communication is done trough I2C (A4 and A5 for arduino UNO) and an adicional pin D2 (I did not confirm this but I think that this library need an interruption pin, so I do not know about compatibility with other boards)
Code
Just do to the example folder of your Arduino IDE locate the MPR121 folder and load the example code according to the keypad that you have connected.
Or upload the ones in the attachment files.
Test it.
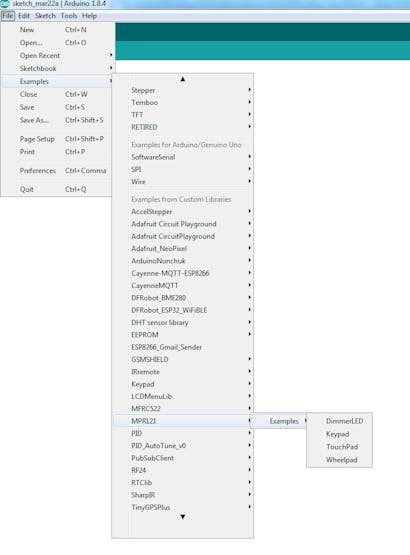
Example Folder
Conclusion
I've you like this project, do not forget to click it as Favorite
Schematics
Keypad

Wheel Pad
Touchpad
Code
Code
- TouchWheel.pde
- Keypad.pde
- Capacitive touch pad
TouchWheel.pdeArduino
TouchWheel.pde
MPR121 WhellPad Example Code
/*
 TouchWheel.pde
 MPR121 WhellPad Example Code


 Hardware: 3.3V Arduino Pro Mini
           SDA -> A4
           SCL -> A5
           IRQ -> D2
*/


#include <Wire.h>
#include <mpr121.h>

int key = 0;


// =========  setup  =========
void setup()
{
	//  initialize function
  Serial.begin(19200);
  Wire.begin();
  CapaTouch.begin();

  delay(500);
  Serial.println("START");
}


// =========  loop  =========
void loop()
{
   key=CapaTouch.keyPad();

  if (key==1)
  { Serial.print("wheel:");
  Serial.println("0");
  }
   if (key==4)
  { Serial.print("wheel:");
  Serial.println("1");
  }
   if (key==7)
  { Serial.print("wheel:");
  Serial.println("2");
  }
   if (key==11)
  { Serial.print("wheel:");
  Serial.println("3");
  }
   if (key==2)
  { Serial.print("wheel:");
  Serial.println("4");
  }
   if (key==5)
  { Serial.print("wheel:");
  Serial.println("5");
  }

   if (key==8)
  { Serial.print("wheel:");
  Serial.println("6");
  }
   if (key==0)
  { Serial.print("wheel:");
  Serial.println("7");
  }
   if (key==3)
  { Serial.print("wheel:");
  Serial.println("8");
  }
	delay(200);
- Comments(0)
- Likes(2)
 More by Engineer
-
 Make Your own Smart Watch
This document is also translated in Polish(by Sebastian), Korean language.Various user made their ow...
Make Your own Smart Watch
This document is also translated in Polish(by Sebastian), Korean language.Various user made their ow...
-
 Vintage Flash Clock
Step 1: Parts & ToolsParts:1. Vintage Flash – check junk stores or if you have to, buy one from ...
Vintage Flash Clock
Step 1: Parts & ToolsParts:1. Vintage Flash – check junk stores or if you have to, buy one from ...
-
 Mini Weather Station Using Arduino Nano
This is a simple and fun project with pocket friendly budget....
Mini Weather Station Using Arduino Nano
Mini Weather Station Using Arduino NanoThis is a simple and fun project with pocket friendly budget....
-
 DIY IR Control Otto Bot
Thanks Pcbway For Your SupportCOMPONENTSIR transmitter (generic)×1ABOUT THIS PROJECTIntroductionIn t...
DIY IR Control Otto Bot
Thanks Pcbway For Your SupportCOMPONENTSIR transmitter (generic)×1ABOUT THIS PROJECTIntroductionIn t...
-
 Make Your OWN Solenoid Driver
Learn how to mill a solenoid driver PCB using your Bantam Tools Desktop PCB Milling Machine! This dr...
Make Your OWN Solenoid Driver
Learn how to mill a solenoid driver PCB using your Bantam Tools Desktop PCB Milling Machine! This dr...


