


Jan Postma
NETHERLANDS, THE • + Follow


Tools, APP Software Used etc.

|
TinkerCad |
Description
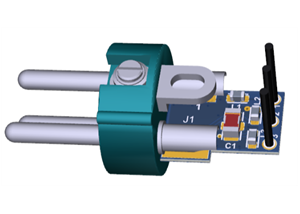
Takstar CM-60 and CM-63 nose cone
For this nose cone design, you will need to acquire the following parts:
- This Nose Cone.
- 4 mm outside, 3 mm inside diameter PTFE tube, e.g. from this Aliexpress shop: https://www.aliexpress.us/item/3256804984585970.html?spm=a2g0o.order_list.order_list_main.19.6d2b1802E5MT71&gatewayAdapt=glo2usa4itemAdapt
- Pogo pin, 3 mm diameter, model H617 from this Aliexpress shop: https://www.aliexpress.us/item/3256805807561623.html?spm=a2g0o.order_list.order_list_main.70.6d2b1802E5MT71&gatewayAdapt=glo2usa4itemAdapt .
- EDIT: The pogo pin above might be out of stock. Another similar pogo pin with a 3 mm diameter and at least a length of 20 mm can be found here: https://www.aliexpress.us/item/3256806135284404.html?spm=a2g0o.store_pc_allItems_or_groupList.0.0.14b345deMnNzd8&pdp_npi=4%40dis%21EUR%21%E2%82%AC%203%2C32%21%E2%82%AC%203%2C32%21%21%213.81%213.81%21%400b51895617716798536798388e42b3%2112000042080950532%21sh%21NL%21708845403%21X&gatewayAdapt=glo2usa4itemAdapt. Choose model GB30-16040-2040 1A.
- Two M2 x 5 mm hex socket screws, e.g. from this Aliexpress shop: https://www.aliexpress.us/item/2251832624557792.html?gps-id=pcStoreLeaderboard&scm=1007.22922.271278.0&scm_id=1007.22922.271278.0&scm-url=1007.22922.271278.0&pvid=9af7fd69-73b0-4d74-95d6-4d8fd8f55143&_t=gps-id%3ApcStoreLeaderboard%2Cscm-url%3A1007.22922.271278.0%2Cpvid%3A9af7fd69-73b0-4d74-95d6-4d8fd8f55143%2Ctpp_buckets%3A668%232846%238108%231977&pdp_npi=4%40dis%21USD%210.85%210.85%21%21%210.85%210.85%21%400b51895617344469263334525e407b%2112000037536050511%21rec%21US%21708845403%21X&spm=a2g0o.store_pc_home.smartLeaderboard_2009432985108.32810872544&gatewayAdapt=glo2usa
Notes:
- I do not earn a commission when you order from the Aliexpress shops listed above.
- I'm not familiar with the print quality of PCBWay 3D prints, but you may have to remove the support material, burrs, and rims that are inherent to the 3D printing process. This is quite common, and this is not a reason for rejection!
Mounting Instructions:
- Insert the PCBA into the slots. Preferably, only mount the XLR insert on the PCBA and no other components. Other parts may get in the way when soldering the pogo pin or get damaged during handling.
- Tighten the two bolts. Do not over-tighten!
- Insert the PTFE tube until it hits the PCB edge. Place the protruding roll of PTFE tube on a block of wood and cut it to length with a sharp knife.
- Insert the pogo pin. Leave the short, spring-loaded pin sticking out about 10 mm. Do not solder yet!
- Remove the capsule and the original PCBA from the microphone body. Transplant the metal tailpiece of the PCBA from the original PCBA to your DIY PCBA.
- Insert the PCBA into the microphone body and tighten one screw of the tailpiece to hold the PCBA in place. Pull or insert the pogo pin until the tip is level with the top edge of the microphone body.
- Remove the PCBA from the microphone body. The pogo pin will probably extend past the edge of the solder pad. Mark the edge of the solder pad on the pogo pin with a marker. Remove the pogo pin and cut it to length.
- Repeat step 6, now with the shortened pogo pin. Remove the PCBA and solder the pogo pin to the PCBA. Be careful not to melt the nose cone plastic.
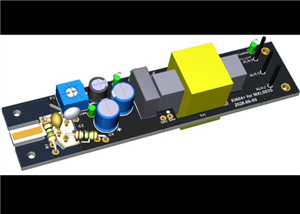
- Your PCBA is now ready to solder the other parts.
CAD-Custom parts and enclosures
Takstar CM-60 and CM-63 nose cone for DIY microphone PCBAs
CM-6X Nose Cone 4mm with screw holes.stl
Dec 17,2024
1,932 views
Takstar CM-60 and CM-63 nose cone
Use this 3D-printed nose cone for my DIY microphone head amp PCBs that I designed for the Takstar CM-60 and CM-63 condenser microphones.
1932
4
0
10.00 (1)
Published: Dec 17,2024
PCBWay Donate 10% cost To Author
*PCBWay community is a sharing platform. We are not responsible for any design issues and parameter issues (board thickness, surface finish, etc.) you choose.


Under the
Attribution-NonCommercial (CC BY-NC)
License.


Raspberry Pi 5 7 Inch Touch Screen IPS 1024x600 HD LCD HDMI-compatible Display for RPI 4B 3B+ OPI 5 AIDA64 PC Secondary Screen(Without Speaker)
BUY NOW


Topic

- Comments(0)
- Likes(4)
Upload photo
You can only upload 5 files in total. Each file cannot exceed 2MB. Supports JPG, JPEG, GIF, PNG, BMP
0 / 10000
VOTING
1 votes
- 1 USER VOTES
10.00
- YOUR VOTE 0.00 0.00
-
10design
-
10usability
-
10creativity
-
10content
10.00
More by Jan Postma
-
 Condenser Microphone RFI Filter
This little PCB contains an RF Interference filter that has been optimised to suppress cell phone in...
Condenser Microphone RFI Filter
This little PCB contains an RF Interference filter that has been optimised to suppress cell phone in...
-
 Takstar CM-60 and CM-63 nose cone
For this nose cone design, you will need to acquire the following parts:This Nose Cone.4 mm outside,...
Takstar CM-60 and CM-63 nose cone
For this nose cone design, you will need to acquire the following parts:This Nose Cone.4 mm outside,...
-
 KM84+ for MXL603 SDC Microphone
EDIT 2026-06-08: I have updated C5 and C8 in the BOM. They have changed to 47uF/35V E-Caps. The diam...
KM84+ for MXL603 SDC Microphone
EDIT 2026-06-08: I have updated C5 and C8 in the BOM. They have changed to 47uF/35V E-Caps. The diam...
-
 KM84++ for Takstar CM-63 Microphone
Before going into the project details, an important note: when you order the PCB, choose a thickness...
KM84++ for Takstar CM-63 Microphone
Before going into the project details, an important note: when you order the PCB, choose a thickness...
-
 Slide switch knob for Takstar CM-60 compatible DIY PCBA builds
This slide switch knob can be used for DIY PCBAs that fit the Takstar CM-60 condenser microphone. If...
Slide switch knob for Takstar CM-60 compatible DIY PCBA builds
This slide switch knob can be used for DIY PCBAs that fit the Takstar CM-60 condenser microphone. If...
-
 KM84+ for Takstar CM-60
Before going into the project details, an important note: when you order the PCB, choose a thickness...
KM84+ for Takstar CM-60
Before going into the project details, an important note: when you order the PCB, choose a thickness...
You may also like
-
Programmable Mist Maker - XIAO / QT PY Extension
419 0 0 -
RadioHAT - Raspberry Pi radio development platform
324 0 1 -
-
-
-
-
ARPS-2 – Arduino-Compatible Robot Project Shield for Arduino UNO
2879 0 6 -
A Compact Charging Breakout Board For Waveshare ESP32-C3
3381 3 8 -
AI-driven LoRa & LLM-enabled Kiosk & Food Delivery System
3700 2 2


